

Check out our latest Carrying & Outdoors collection!
Packing light for a day hike doesn’t mean you have to skip a hot meal or your morning coffee. Build a minimalist outdoor cooking kit, and you’ll get tasty food on the trail without hauling a bunch of stuff you’ll never use. The trick? Just bring what you need. Your back will thank you, and honestly, it makes the whole process less of a headache.
There aren’t many things that matter when you’re eating outside. If you stick to the right tools and plan ahead, your kit stays small and tidy. There’s something satisfying about knowing every piece of gear has a reason to be there, and nothing’s slowing you down.
Key Takeaways
- Minimalist kits keep outdoor cooking light and simple.
- Picking only essential gear saves space and effort.
- Good planning and quick cleanup make hiking more fun.
Why Go Minimalist With Outdoor Cooking Kits
Going minimalist with your outdoor cooking setup makes your pack lighter, keeps meal prep fast, and lets you actually enjoy your hike. By sticking to the basics, you’ll spend less time fumbling with gear and more time soaking in the scenery.
Benefits For Day Hikers
A minimalist kit drops the extra weight, so your back and knees don’t scream at you later. Trails feel easier when you’re not lugging around pots you never use.
Setup and cleanup get way faster too. You won’t waste time digging through a pile of gear or scrubbing a stack of pans—just grab the essentials and go. That’s a lifesaver if the weather turns or daylight’s fading.
Plus, with fewer things to buy, you can afford to invest in a couple of solid pieces that’ll last, instead of filling your closet with stuff that collects dust.
Quick look: Key benefits
| Benefit | How it Helps |
|---|---|
| Lighter pack | More comfort hiking |
| Simple cleanup | Less time & effort |
| Cost-effective | Buy what we’ll use |
| Faster setup | More time on the trail |
Core Principles Of Minimalist Packing
Every item has to earn its spot. Go for multipurpose tools—a single pot that boils water, cooks dinner, and doubles as your bowl is perfect.
Lightweight materials like titanium or aluminum keep things manageable without sacrificing durability. Bring only what you’ll use: stove, fuel, one utensil, a container. That’s usually enough.
If your multitool already has a knife, leave the kitchen knife at home. Fewer items mean fewer decisions and less to keep track of. That way, you can just focus on the hike and the food.
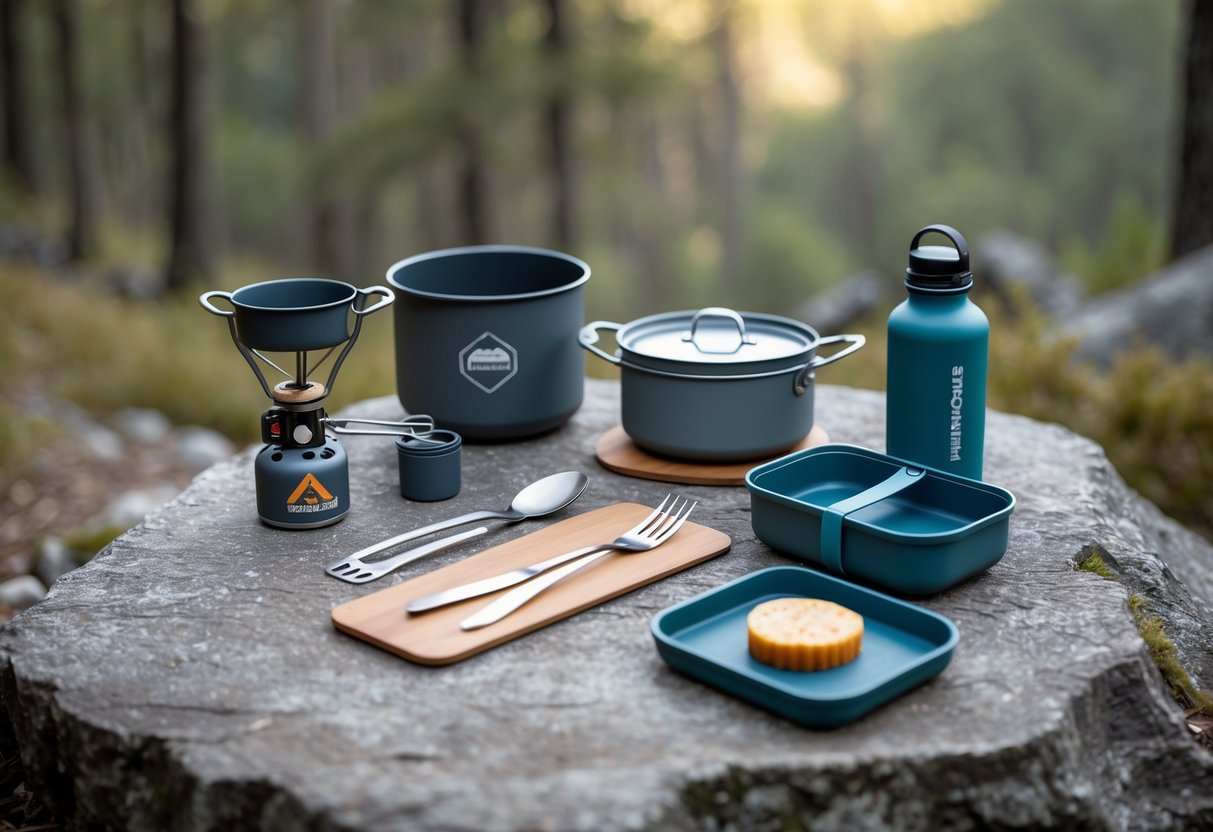
Essential Components Of A Minimalist Cooking Kit
If you pack smart, your day hike feels lighter and a lot more fun. You want gear that’s easy to carry, quick to use, and makes trail cooking a breeze.
Lightweight Cookware Choices
Pick cookware that balances weight, toughness, and function. Titanium pots are a go-to for a lot of folks—they’re super light, won’t rust, and can take a beating over a flame. Aluminum is cheaper and still pretty light, so it’s a solid choice if you’re watching your spending. Stainless steel lasts forever but adds weight, so it’s not everyone’s favorite for day hikes.
Usually, one 750-ml to 1-liter pot covers you for boiling water or whipping up a meal for one or two people. If the lid doubles as a frying pan or mug, even better—no extra bulk. Nesting sets save space, and pots with markings help measure right on the trail.
Honestly, one multi-use pot and maybe a compact mug are all most people need for a simple day out.
Compact Stoves And Fuel Options
For stoves, you want something light, reliable, and easy to fuel up. Canister stoves like the MSR PocketRocket or Jetboil are tiny, quick, and dead simple—just twist on the canister, spark it up, and you’re cooking. Make sure your pot actually fits on the stove, though.
Alcohol stoves weigh even less and work great for short hikes. Bring a little denatured alcohol, and you can boil water for coffee or a freeze-dried meal. They struggle in wind or rain, though. Solid fuel tabs are lighter still, but boiling water with them takes patience.
Quick comparison:
| Stove Type | Weight (avg.) | Fuel Type | Boil Speed | Best For |
|---|---|---|---|---|
| Canister | 2.6 oz+ | Isobutane/Propane | Fast | Versatility, reliability |
| Alcohol | 1 oz+ | Alcohol | Moderate | Simplicity, lightest |
| Solid Fuel | 0.5 oz+ | Esbit/Tabs | Slow | Ultra-minimal, backup |
A folding windscreen helps a lot if the wind picks up—it’s a tiny addition that can save you fuel.
Space-Saving Utensil Selection
Utensils get the minimalist treatment too. Instead of a full cutlery set, grab a sturdy spork or long-handled spoon—titanium or BPA-free plastic both work. They’re light and handle everything from stirring to eating.
A folding knife with a locking blade is handy for prepping food or camp chores. Unless you’re making something fancy, you can skip extra forks and spatulas—a good spork does most jobs. Some folks like utensils that stack together or fit inside their pot, which keeps things neat.
Mini spatulas or collapsible bowls are nice if you really need them, but on a quick day hike, you probably won’t.
Multi-Purpose Tools
Gear that does more than one thing is gold. A classic Swiss Army knife or compact multi-tool covers most small jobs—open packets, slice cheese, tighten a screw.
A bandana? That’s your pot holder, cleaning rag, sun shield, or napkin. Mini lighters and waterproof matches double as firestarters and backups. If your cooking might get messy, a tiny silicone scrubber or micro towel helps with cleanup, but you can skip them if you’re just boiling water.
Multi-use items keep your kit light, flexible, and ready for whatever comes up.
Selecting The Right Materials For Weight And Durability
Weight adds up fast, and picking the right materials saves your back (and your wallet) in the long run. Let’s look at the pros and cons of the most common metals, and settle the nonstick debate once and for all.
Aluminum Vs Titanium
Most hiking cookware comes in aluminum or titanium. Aluminum pots are everywhere, affordable, and heat up fast and evenly. You get a good meal without waiting forever. But they can dent or warp if you drop them a few times.
Titanium is the “go anywhere, do anything” option. It’s lighter for the same size, tough as nails, and shrugs off rust. The downside? It costs more, and it doesn’t spread heat as well—so keep an eye on your dinner or you’ll end up with a burnt spot. If you want the lightest, most durable setup, titanium’s hard to beat, but aluminum works just fine for most people and doesn’t break the bank.
| Material | Weight | Durability | Cost | Heat Conductivity |
|---|---|---|---|---|
| Aluminum | Moderate | Moderate | Low | High |
| Titanium | Very Low | High | High | Low |
Nonstick Versus Uncoated Surfaces
Nonstick pots make cleanup easy—super helpful when water’s scarce. You’ll use less oil, too, which is good news for your pack and your heart. Most nonstick coatings are PTFE or ceramic, but they’ll scratch if you use metal utensils, so stick to wood or plastic.
Uncoated pots—plain titanium or hard-anodized aluminum—are nearly indestructible. Scrub them with a stick or sand if you have to; they won’t flake. The catch? Food sticks more, so you’ll need to stir and maybe soak the pot after eating.
In the end, it’s about what you value: easy cleanup and less sticking, or gear that’s bombproof and coating-free.
Smart Food Planning For Minimalist Kits
When you want to keep your pack light and your hike fun, food choices matter. The right foods save space, cut down on prep, and give you the energy you need without bogging you down.
Quick And Nutritious Meal Ideas
Simple, high-energy meals work best. Single-serve nut butter packs, hard cheese, and trail mix are classics—they don’t spoil quickly and pack a punch. For lunch, flour tortillas with tuna or hummus make a no-cook wrap you can eat on the go.
Instant oatmeal or muesli with powdered milk is a solid breakfast. Add some bars for snacking—aim for at least 200 calories, with both carbs and protein. Skip anything messy or smelly to keep cleanup easy.
Sample Quick Meal List:
| Meal | Options |
|---|---|
| Breakfast | Instant oatmeal, muesli, breakfast bars |
| Lunch | Tuna wraps, nut butters, cheese, tortillas |
| Snack | Trail mix, protein bars, jerky |
Dehydrated Vs Ready-To-Eat Foods
You’ve got two main routes: bring food you just open and eat, or pack dehydrated meals that need hot water. Ready-to-eat stuff is super convenient but can be bulky and heavy. Dehydrated meals are lighter and save space, but you’ll need water and a way to heat it.
For short hikes, ready-to-eat usually wins—zero fuss, no extra gear. If you’re counting every ounce, though, a single dehydrated pouch can replace a big meal and free up space. Just make sure you have enough water and a stove if you go that route.
Here’s a quick rundown:
- Dehydrated Pros: Lightweight, compact, long shelf life
- Dehydrated Cons: Needs water and heat
- Ready-To-Eat Pros: Convenient, no cooking
- Ready-To-Eat Cons: Heavier, bulkier
Packing Efficiently For Weight And Volume
Every gram matters out there, so efficient packing pays off. Repack bulky foods into zip bags, ditch the extra wrappers, and never bring cans or glass—soft pouches and vacuum packs are way better.
Go for calorie-dense foods, aiming for about 100–120 calories per ounce. Stack or roll items to make a tight food bag that fits easily in your pack. Keep snacks handy on top or in side pockets. A packing list helps you avoid overpacking and keeps the extras at home.
Tips for Efficient Packing:
- Use resealable bags for everything
- Keep snacks within reach
- Double-bag powders or liquids to avoid leaks
- Choose foods that fit small spaces easily
Tips To Keep Your Kit Clean And Simple
Bringing only what you need means less to wash and less to haul. Make cleanup easy, respect the outdoors, and the whole hiking-and-cooking thing stays fun for you and everyone else.
Low Fuss Cleaning Methods
When you're out there keeping things minimal, quick cleaning's a real lifesaver. Grab a small sponge, a sturdy paper towel, or one of those camp towels to wipe down gear right after you use it. If you don't let food dry on your pots, scrubbing later is way less of a hassle.
Just a few drops of biodegradable soap and a splash of water usually do the trick. For really stubborn bits, try a little sand or a handful of leaves (definitely not poison ivy!) to scrub things clean—no need to lug around extra gear. Here’s a routine that works for most of us:
- Eat all your food so you’re not stuck with leftovers.
- Swish a little water in your pot, wipe it out with a towel.
- Rinse your towel at least 200 feet from streams or lakes.
- Let everything dry in the sun before you pack up.
Honestly, the simpler the process, the more likely we are to clean up and avoid that nasty grime build-up between hikes.
Leave No Trace Cooking
We want to leave wild places looking untouched, right? Cooking with less packaging and keeping waste under control goes a long way. Pack out all trash and food scraps, even the biodegradable stuff.
Sealed containers for food and reusable utensils help cut down on single-use plastics and wrappers. Since burn scars stick around for ages, using a small stove instead of a fire is better for the landscape.
Dig a little “sump” hole with a stick to pour out strained dishwater, but keep it 200 feet from any water source. Before you go, sweep your spot for trash or crumbs—we don’t want to feed wildlife or mess with their habits.
Safety And Storage While On The Trail
Safety and storage can make or break your day on the trail. Staying alert for wildlife and keeping your kit organized keeps meals safe and the hike a whole lot easier.
Food Storage To Deter Wildlife
No one wants to attract curious critters while they’re eating outdoors. The trick is to stash all your food in sturdy, airtight containers—hard plastic or metal beats flimsy bags every time. Smells travel, so double-bagging or using odor-proof bags helps a lot.
In places with active wildlife—especially bears—use a bear canister or hang your food from a tree, about 12 feet up and 6 feet out from the trunk. For smaller animals, pack out every crumb, wrapper, and bit of cooking waste.
Here’s a quick checklist:
- Airtight containers or odor-proof bags
- Bear canister or food-hanging gear (if needed)
- Trash bag for waste
- Keep food and trash at least 200 feet from camp
Let’s try to make sure every snack stays ours—not the local raccoon’s.
Proper Kit Organization
When your cooking kit’s organized, everything gets easier. Keep fuel, cookware, utensils, and cleaning stuff in separate pouches or mesh bags. Rubber bands work, too if you’re in a pinch.
A simple checklist helps keep things on track—something like this:
| Item | Where Packed | Notes |
|---|---|---|
| Stove | Mesh outer pouch | Cool before packing |
| Lighter | Small side pocket | Carry backup |
| Spork | Main pouch | Clean/dry only |
| Soap/cloth | Zip bag | Leak-proof |
Nobody likes the dreaded pack explosion. If we organize now, we can cook, eat, and get back on the trail without any drama.
Creative Upgrades To Personalize Your Kit
Tweaking your outdoor cooking kit can make every hike feel more personal and dialed-in. Functional tweaks and a few practical extras help us stay light and efficient, but don’t skimp on comfort or fun.
DIY Modifications
You can trim weight and boost utility with some easy DIY fixes. Swap out bulky pot handles for paracord wraps—they save space and double as emergency cordage. Marking your pots with a metal file or heat-resistant marker means no more guessing measurements.
Slap a silicone band on lids or mugs for better grip and heat protection. Multi-use items like a cut-off bandana work as a pot holder, strainer, or cleaning cloth. For stoves, a trimmed aluminum pie tin makes a quick windscreen when the breeze kicks up.
Stick a tiny magnet or Velcro square inside your kit to keep your ferro rod from vanishing. A shallow, snap-lid container keeps spices, oil, or fuel tabs sorted—label each section and you’re set for trail-side flavor.
Favorite Minimalist Extras
A few little extras can make a big difference without weighing you down. Mini folding spice containers or tiny squeeze tubes of olive oil add fresh options—no need to bring the whole pantry.
A mini sponge or a bit of steel wool in a zip bag lets you clean up fast. Nobody wants to hike back with a greasy pan. Some of us toss in a reusable cloth napkin instead of paper towels, which keeps things sustainable and tidier.
Here’s a quick comparison of popular minimalist extras:
| Extra | Weight | Why We Like It |
|---|---|---|
| Folding spork | 15g | Simple, space-saving utensil |
| Collapsible cup | 30g | Drinks without bulk |
| Tiny salt shaker | 10g | Seasons foods easily |
| Ultralight towel | 20g | Doubles as a drying or cleaning cloth |
Stick to the essentials, sneak in a couple of handy extras, and your kit stays light but plenty functional—and still feels like yours.
Frequently Asked Questions
Packing light for day hikes is all about picking the must-haves and using gear that pulls double duty. Cutting bulk and weight just makes meals and the trail more enjoyable.
What are the essential items for a minimalist outdoor cooking kit on day hikes?
You really just need a stove, a lightweight pot or cup, fuel, a spork, and maybe a small windscreen. That’s enough to heat water and cook simple meals without carrying extras.
A lighter or waterproof matches make good backups. And if your meals don’t need boiling water, you can even leave the stove home sometimes.
How can I keep my cooking gear lightweight yet functional for backpacking?
Look for titanium or aluminum pots—they’re light and still get the job done. Folding utensils and collapsible cups save space, too.
A compact canister stove fits inside most pots. If you leave out extras like mugs or big fry pans, your pack stays streamlined and practical.
What cooking gear do seasoned hikers recommend for minimalist day trips?
Most folks go for an ultralight stove like the MSR PocketRocket or BRS-3000T with a small 750ml pot. Add a spork and a mini fuel canister and you’re set.
If you’re just heating water, some hikers even use instant food and skip cookware, mixing and eating right out of the food pouch.
Are there any multi-use cooking tools to save space and weight in my pack?
You can use a pot lid as a plate or a titanium spork for both cooking and eating. Many stoves nest inside pots, and a bandana can work as a pot holder or towel.
A silicone bowl collapses flat but still works as a mug, bowl, or even a measuring cup.
Can you suggest a simple and quick meal plan for a day hike that requires minimal cooking gear?
Try instant oatmeal for breakfast, tortillas with nut butter or tuna for lunch, and ramen or couscous with a protein pouch for dinner. All you need is hot water.
Packets of instant soup or tea bags add variety without much weight. Protein bars and dried fruit make great snacks between meals.
What's the trade-off between cooking gear weight and convenience for trail meals?
When you carry less gear, your pack feels lighter and you can set up camp in no time. But honestly, you might have to give up on meal variety or settle for simpler food. Boil-only setups? They're fast, but don't expect anything fancy.
On the flip side, hauling heavier gear lets you get creative—maybe you want to fry up something or even try baking. Still, your back (and knees) might not thank you later. Finding that balance is a bit of a guessing game, and it really comes down to what works for you on each trip.
Share:
How to Incorporate a Japanese Bowl Set Into Your Everyday Meals
Archival-Safe Storage Boxes: Protecting Documents for Decades