
Check out our latest Home & Kitchen collection!
Gathering together for a baking session brings people closer and creates lasting memories. We can create a fun baking station by setting up an organized, well-stocked area with tools, ingredients, and a personalized touch to make everyone feel welcome. Having everything easily accessible encourages group participation and makes the experience enjoyable for all.
A successful baking station starts with choosing the right location and making sure there’s enough space for everyone to join in. Keeping essentials visible and organized lets us focus on creativity and connection, not dealing with clutter.
Key Takeaways
- Pick a spot and fill it with the basics
- Organize for easy access and group fun
- Add personal flair to make baking sessions stand out
Choosing the Best Location for Your Baking Station
A baking station should be functional, convenient, and safe for everyone. By thinking through the layout, safety, and atmosphere, we can make the space work for shared baking.
Assessing Kitchen Layout and Space
Start by measuring how much countertop space you’ve got. Pick an area near power outlets for mixers and with enough room for kneading, rolling, and decorating.
Islands or dedicated counters are great since they keep tools and supplies close by. Open shelves and deep drawers nearby make it easy to stash flour, sugar, and utensils.
Try not to set up right next to the stove or sink—extra heat and moisture can mess with your baked goods. If you can, set up near a window for some natural light. It just makes prep nicer.
Factors for Accessibility and Safety
Safety’s a must, especially if kids or guests are joining. Set up away from heat sources, sharp corners, and busy walkways.
A clear path helps avoid accidents. Baking mats or anti-slip rugs help, too, especially with little helpers.
Lower shelves make it easier to grab bowls and tools. For families, it’s worth using child-safe latches on drawers holding sharp or heavy stuff.
Here’s a checklist for quick reference:
| Safety Check | Notes |
|---|---|
| Away from the heat | At least 2 ft from the stove |
| Clear work zones | No clutter or obstructions |
| Non-slip surfaces | Mats or textured flooring |
| Tool access | Low shelves, no stacking |
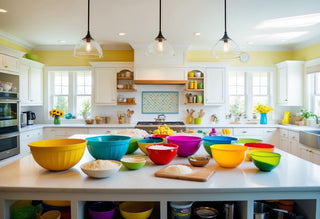
Creating Open and Inviting Environments
A welcoming space draws people in. Line up some stools or chairs along the station so everyone can gather around.
Good lighting matters—overhead LEDs or under-cabinet lights cut shadows and let you see what you’re doing. Open layouts or peninsulas make it easier for everyone to join the action.
Add some personal touches, like a display of cookie cutters or a chalkboard for recipe notes. Keeping things tidy with baskets or containers helps guests feel at ease and ready to bake.
Essential Tools and Bakeware
Setting up a baking station means starting with durable appliances, reliable measuring tools, and solid bakeware. The right mix keeps things running smoothly and makes baking less of a hassle.
Must-Have Baking Appliances
A stand mixer or a good hand mixer is a game changer—whipping egg whites, mixing doughs, you name it. Look for one with multiple speeds and attachments.
An oven thermometer does help—most ovens aren’t as precise as we’d like. Digital kitchen scales are awesome for getting measurements right, especially for finicky recipes.
A food processor is handy for pastry dough, grating chocolate, or chopping nuts. And don’t forget a timer—no one wants burnt cookies.
Selecting Measuring Tools and Mixing Bowls
Measuring cups and spoons should be sturdy and easy to read. Stainless steel sets last and don’t hang onto stains or smells. Keep a set of dry measuring cups, wet measuring cups (with clear markings), and a few sizes of spoons handy.
Mixing bowls should be non-reactive—glass, stainless, or heavy-duty plastic. Nesting sets save space and give you options for batters, doughs, and icings.
Color-coded or labeled tools help avoid confusion, especially with a group. Non-slip bases keep bowls from sliding off the counter.
Bakeware Sets and Specialty Items
For bakeware, heavy-gauge aluminum or aluminized steel pans heat evenly and don’t warp. Here are the basics:
| Item | Recommended Type |
|---|---|
| Baking sheets | Rimmed, nonstick |
| Cake pans | 8” or 9” round/square |
| Muffin pans | 12-cup, nonstick |
| Loaf pans | 9” x 5” |
| Cooling racks | Stainless steel, grid |
Specialty items like silicone baking mats (easy cleanup), tart pans with removable bottoms, and rolling pins are all good to have. Cookie cutters, pastry brushes, and piping bags add some fun for decorating. It’s smart to keep these in labeled bins or drawers so you’re not hunting for them mid-bake.
Stocking Your Baking Ingredients
A well-stocked baking station saves time and makes it easier to bake with others. Keeping staple ingredients organized and fresh means you can focus on the fun (and maybe sneak a taste of dough).
Organizing Flours, Sugars, and Leaveners
Clear, airtight containers are your friends for flours, sugars, and leaveners. Label each container with the ingredient and expiration date—no more mystery powders.
Store flours (all-purpose, bread, whole wheat) away from heat and light. Leaveners like baking powder, baking soda, and yeast do best in small, moisture-proof jars. Sugars—white, brown, powdered—go in sealed bins to keep them from clumping.
Arrange by what you use most. Our tip: keep essentials in front and rotate older stuff up top. That way, you won’t run out in the middle of a recipe.
| Staple Ingredient | Recommended Storage |
|---|---|
| All-Purpose Flour | Airtight plastic canister |
| Brown Sugar | Sealed glass jar with a clip |
| Baking Powder | Small airtight tub |
Storing Mix-Ins and Toppings
Mix-ins—chocolate chips, dried fruit, nuts—go in stackable containers or glass jars with scoops. Clear jars make it easy to see what’s left.
Group toppings by type and label them so kids and guests can help themselves. Popular add-ins like sprinkles and mini candies work well in divided trays for decorating.
If you’ve got a lot of bakers, a dedicated toppings organizer is great for a “help-yourself” area. It keeps things moving and cuts down on messes.
| Topping Type | Storage Solution |
|---|---|
| Sprinkles | Divided plastic tray |
| Nuts | Resealable glass jar |
| Chocolate Chips | Stackable lidded container |
Keeping Ingredients Fresh
Airtight containers keep moisture and pests out. Refrigerate nuts and some whole-grain flours for longer shelf life. Sugars and chocolates are fine at room temp if sealed tightly.
Check expiration dates and use up older stuff first. A magnetic dry-erase board or inventory sheet helps track what needs restocking.
Toss a food-safe desiccant pack in with marshmallows or brown sugar to keep them from getting weird. If you bake a lot, buying smaller amounts more often keeps everything fresh.
Organizing and Displaying Your Station
A good-looking baking station keeps everything in reach and makes you want to dive in. With smart organization, labeled storage, and a bit of style, baking gets a whole lot easier (and more fun).
Space-Saving Storage Solutions
Making the most of your space is key. Sturdy stackable bins and drawer organizers are great for grouping pans, bowls, and utensils. Wall-mounted racks or floating shelves free up counter space and keep things handy. Pegboards are surprisingly handy for hanging rolling pins, measuring spoons, and whisks.
For smaller stuff like cookie cutters and piping tips, clear divided trays or tiered lazy Susans work wonders. Here’s a quick storage cheat sheet:
| Item | Best Storage Solution |
|---|---|
| Spices | Vertical wall rack |
| Baking sheets | Upright file organizer |
| Utensils | Pegboard hooks |
| Mixing bowls | Nested stacking in the cabinet |
| Cutters/tips | Clear divided tray |
Easy-Access Containers and Jars
Easy access to ingredients makes baking smoother. Airtight glass jars and clear canisters are perfect for flour, sugar, oats, and chocolate chips. Labels with names and expiration dates save time and keep things fresh.
Stick with one style of container for a clean look. Keep the most-used items front and center—on shelves or in cabinets. For small add-ins like sprinkles or baking powder, use compact spice jars. Keep measuring cups and spoons close, maybe hanging from the jars or in a caddy.
Displaying Tools for Inspiration
Why not make your tools part of the décor? Countertop crocks are perfect for rolling pins, spatulas, and wooden spoons. Decorative trays or cake stands can show off cookie cutters or even a vintage whisk.
Hang tools on a stainless-steel rail or hooks to keep favorites in sight. Colorful mixing bowls or themed aprons add a little personality, too. Mixing practicality with a bit of flair makes the baking zone more inviting.
Personalizing the Baking Experience
Making your baking space unique sets the stage for memorable moments. A few distinctive touches and a nod to tradition can turn a regular kitchen corner into something special.
Decor and Theming Ideas
A theme can change the vibe and make guests feel at home. Seasonal banners, colorful bunting, or wall decals (cupcakes, rolling pins, whatever you like) add personality without crowding things. Clear containers for flour, sugar, and toppings double as décor and keep everything visible.
Themed utensil holders or matching bowls help tie it all together. For quick updates, try removable tablecloths or placemats in fun patterns. Some theme ideas:
- Classic Bakery: Neutral tones, chalkboard labels, glass jars
- Holiday Themes: Reds and greens for Christmas, soft pastels for spring
- Kids’ Corner: Cartoon aprons, animal-shaped spatulas, bright colors
Personal bits—like framed family recipes or a shelf for favorite cookbooks—make the space feel like yours.
Customizing Aprons and Accessories
Personalized aprons get everyone involved and make things feel a bit more special. We offer aprons you can customize with names or quirky sayings—pick colors or patterns that fit each person’s vibe so it’s easy to spot whose is whose.
Adding flair is simple: iron-on patches, embroidery, or even a quick splash of fabric paint. If you’re into matching sets, you can pair aprons with oven mitts, embroidered towels, or those bright silicone utensils. It’s handy to keep accessories in labeled bins or hanging on hooks nearby so you’re not rummaging around.
Here’s a quick summary:
| Accessory | Personalization Ideas |
|---|---|
| Aprons | Names, quotes, favorite colors |
| Oven Mitts | Monograms, seasonal prints |
| Towels | Embroidered initials, patterns |
| Utensils | Silicone handles in theme colors |
Incorporating Family Traditions
Bringing in family traditions makes baking feel more meaningful. If you’ve got handwritten recipes from grandparents, why not display them? Or maybe use those old, well-loved baking tools you’ve inherited. If your family has a signature treat, put it front and center on a “Recipe of the Day” board.
Encourage everyone to share a memory or a story tied to a favorite recipe. For birthdays or holidays, baking together and snapping a group photo in the same spot can become a ritual.
Some ideas for honoring traditions:
- Recipe Journals: Jot down new favorites alongside the classics
- Memory Jars: Drop in notes about each baking day
- Heritage Ingredients: Try spices or flavors that connect to your roots
It’s about keeping the good stuff from the past while making new memories with the people you love.
Encouraging Group Baking and Participation
A well-set-up baking station just invites people to jump in and get their hands messy. If you break up the space and tasks a bit, everyone, no matter their age, can pitch in and enjoy it.
Dividing Tasks for All Ages
Splitting up baking tasks helps everyone feel like they’re part of the action. We like to divvy up recipes into roles: measuring, mixing, decorating, and cleaning up. Grown-ups can handle things like ovens and knives, while kids stir, pour, or sprinkle on toppings.
A simple task chart (whiteboard or even a printout) keeps things moving. Color-coded utensils or aprons make it easy to remember who’s doing what. And if you rotate jobs after each batch, everyone gets to try something new.
This way, you don’t end up elbowing each other at the counter, and things just run smoother.
Setting Up Kid-Friendly Stations
A kid-friendly station helps. Lower counters, non-slip stools, and tools made for smaller hands—think silicone spatulas and plastic measuring cups—make a difference. Keep anything sharp or hot in a separate grown-up spot.
To keep kids interested, set out pre-measured ingredients in labeled containers. Toss in decorating options like sprinkles, edible markers, and fun-colored frosting. A picture guide with steps helps kids follow along without needing help every two seconds.
With everything at their level, kids can join in safely and feel proud of what they make.
Hosting Baking Challenges
Baking challenges add a spark to any get-together. Try timed cookie decorating, cupcake contests, or team pastry creations. Just lay out the ground rules, set up the tools, and maybe jot down a judging rubric—what counts for appearance, creativity, teamwork, and so on.
Prizes don’t have to be fancy. Stickers, ribbons, or letting the winners pick the next recipe keep it lighthearted. The main thing is to get everyone involved, whether they’re pros or total newbies.
It’s a fun way to learn new tricks and make the day memorable, especially when you snap a group photo or have a tasting session at the end.
Maintaining Cleanliness and Safety
A clean, safe baking station keeps everyone healthy and happy. Paying attention to hygiene, allergies, and cleanup makes the whole process smoother.
Hygiene Essentials for Shared Spaces
Always wash your hands with soap and water before you start—especially if you’re handling raw stuff. Disposable gloves or aprons can help keep things cleaner when you’re working with a group.
Sanitize surfaces before and after baking. Separate utensils for wet and dry ingredients help avoid cross-contamination.
Tie back long hair, skip the dangly jewelry, and keep paper towels and wipes close for quick cleanups.
A small trash bin nearby makes it easy to toss scraps as you go. Labeling bins and containers cuts down on people grabbing the wrong thing.
Allergy-Friendly Practices
Check for food allergies before you dive in. A simple checklist or chart helps keep restrictions front and center:
| Allergen | Safe Ingredients | Substitute Needed |
|---|---|---|
| Gluten | Almond flour, Oats* | Yes/No |
| Nuts | Sunflower seeds, Oats | Yes/No |
| Dairy | Oat milk, Margarine | Yes/No |
Wash all equipment thoroughly between uses, especially if you’re doing both regular and allergy-friendly batches. Color-coded bowls and utensils make it easier to keep things separate.
Label containers clearly so everyone knows what’s safe. Keep allergy-friendly ingredients stored apart to avoid mix-ups.
Proper Cleanup Tips
Scrape leftover batter into the trash before rinsing anything. Wash utensils, bowls, and pans right away with hot, soapy water—it’s just less of a hassle that way.
For counters and work surfaces, a quick spray and wipe gets rid of flour, sugar, and sticky bits. Keep dish soap, brushes, and towels within easy reach.
Kids can help put away ingredients and sweep up, but a little supervision goes a long way to make sure it’s done right. Keeping things organized after each session makes the next one easier (and maybe encourages a bit more help from everyone).
Maximizing Fun With Seasonal and Themed Stations
Changing up your baking station for the season or a holiday just makes things more fun. A few simple swaps and themed ideas can turn an ordinary afternoon into something a bit more festive.
Seasonal Swaps for Tools and Decor
We like to switch out tools and decor as the seasons roll by. Spring gets pastel bowls and floral aprons, while autumn brings out pumpkin-shaped cutters and leaf-patterned napkins.
Here’s a peek at some seasonal ideas:
| Season | Featured Tool | Decor Accent |
|---|---|---|
| Spring | Flower piping tips | Fresh-cut flowers |
| Summer | Ice cream sandwich molds | Citrus tablecloths |
| Fall | Pumpkin cookie cutters | Mini gourds or leaves |
| Winter | Snowflake stencils | Pine cone centerpieces |
Keep off-season stuff in labeled bins so it’s easy to swap things out when the mood (or weather) changes.
Holiday-Inspired Baking Activities
Holidays are perfect for themed baking. Halloween? Set up a cupcake decorating bar with edible eyes and orange sprinkles. Christmas? Gingerbread cookie contest with piping bags and colored sugars.
Valentine’s Day cookie swaps or heart-shaped cakes are always a hit. For birthdays, reusable silicone molds and easy-fill decorating bags make things festive without a ton of fuss.
Stock up on themed toppers, stencils, and edible glitter for those extra touches. A dedicated basket for holiday supplies keeps it all organized and ready to go when inspiration strikes.
Frequently Asked Questions
Setting up a baking station is exciting, but it can definitely feel a bit overwhelming. Here are answers to some of the most common questions we get about layout, storage, surfaces, and creative organization.
What essential items should I include in my baking station setup?
Start with mixing bowls, measuring cups, spatulas, a rolling pin, and sturdy baking sheets. Add a stand or hand mixer, cooling racks, and a few pans for cakes, muffins, and bread.
Keep your go-to ingredients—flour, sugar, baking powder—in clear, airtight canisters within arm’s reach.
How can I design a baking station that fits into a small kitchen space?
Portable carts or compact kitchen islands with shelves work wonders. Wall racks can hold utensils and spices and free up counter space.
Stackable containers and sticking to your most-used tools help keep clutter under control.
Can you recommend some versatile storage solutions for a home baking station?
Modular drawer organizers keep tools tidy. Clear pantry bins or labeled jars are great for ingredients.
Tiered shelves or pull-out drawers make the most of cabinets or under-counter space.
What are the best surfaces to use for a durable and functional baker's counter?
Quartz and granite are tough and easy to clean—great for frequent bakers. A big wooden butcher block is forgiving for dough work.
If you want something heat-resistant and low-maintenance, stainless steel is a solid choice.
How can I incorporate a baker's rack into my kitchen for both storage and style?
Go for a metal rack with shelves for bowls, gadgets, and recipe books. Hooks or rails on the side are handy for utensils and aprons.
A wooden rack adds a cozy touch and still gives you plenty of space to stash your baking gear.
What are some creative ways to repurpose a Hoosier cabinet for modern-day baking needs?
Try giving an old Hoosier cabinet a fresh twist—maybe pop in some custom shelves for your stand mixer or food processor. Pull-out bins or wire baskets can work wonders for stashing flour, sugar, or all those random baking tools that never seem to have a home.
Honestly, tossing in a strip of LED lighting under the upper cabinets? Total game changer. It just makes the whole workspace feel brighter and more inviting when you’re elbow-deep in dough.