

Check out our latest Home & Kitchen collection!
A well-designed kitchen island is more than just extra counter space—it’s the hub for cooking, entertaining, and family gatherings. Building a multi-purpose island that fits your kitchen and your life? That’s where things get interesting. Whether you’re craving more prep areas, smarter storage, or just a spot where friends can hang out, the right island design can shift the vibe.
With smart choices in materials, appliances, and features, your kitchen island can juggle cooking and hosting with style. Don’t forget about seating, lighting, and maybe some clever tech—those touches make daily routines and parties way more fun.
Key Takeaways
- Start with a plan that matches how you cook and host.
- Add appliances, storage, and seating for more versatility.
- Choose materials and features that fit your style and kitchen space.
Planning Your Multi-Functional Kitchen Island
Getting a multi-functional island right means thinking through your goals, the design, and how people move through the kitchen. If you match features to how you cook and host, you’ll enjoy the space a lot more.
Identifying Your Needs for Cooking and Entertaining
First things first: What do you want from this island? Extra prep area? Casual dining space? More storage for all that cookware?
If you love having people over, built-in seating or a wine fridge can change how you connect with guests. If you’re more about the cooking, try adding a prep sink or a cooktop to keep things efficient and avoid the endless back-and-forth.
It helps to jot down your priorities and rank them—seating, storage, appliances, whatever matters most. Here’s a quick way to break it down:
| Priority | Cooking | Entertaining |
|---|---|---|
| Countertop Space | Prep and chop space | Buffet and serving |
| Seating | Not essential | Must-have for guests |
| Storage | Pots/pans below | Servingware, linens |
| Appliances | Cooktop, sink | Beverage fridge, ice |
Getting specific about your needs leads to an island that’s helpful, not just pretty.
Selecting the Ideal Island Size and Layout
Your kitchen’s size and shape will set some limits on how big your island can be. Most standard islands run 36-48 inches deep, but if you want more seating or storage, you might need a bit more space.
Try for at least 36-42 inches of walkway all around so the kitchen doesn’t get jammed up, even when a few people are in there. For seating, a 12-inch countertop overhang gives folks enough legroom.
When it comes to layout, think in zones:
- Working Zone: Sinks, cooktops, prep surfaces.
- Entertaining Zone: Bar seating, buffet space.
- Storage Zone: Drawers, shelves, cabinets.
Keep it simple—don’t cram in every feature. It’s tempting, but too much can make the island feel crowded and less usable.
Maximizing Kitchen Workflow and Traffic Flow
Smooth traffic flow is key, especially if your island has to do double-duty. You’ll want clear paths between the island, sink, fridge, and stove—think classic work triangle.
Don’t place the island so close to walls or cabinets that you can’t open drawers or appliances all the way. Each activity—chopping, seating, serving—should have its own little space.
If your kitchen opens up to a living or dining area, a two-level island can help separate food prep from the social side. Also, remember to plan for outlets where you’ll use them—nobody wants cords running across the floor.
Choosing Materials and Finishes
Picking the right materials and finishes is where your island goes from “just okay” to “wow, I actually like being in here.” Durability, style, and easy cleanup are all worth considering.
Durable Countertop Options
For a hard-working island, you need countertops that can take a beating. Quartz is a favorite—low maintenance, doesn’t stain easily, and stands up to scratches. Granite is another classic; it looks great and holds up well, though it does need sealing now and then.
Butcher block brings warmth and a cozy vibe, perfect for prep work, but expect to oil it regularly and see a few knife marks. Stainless steel is super practical and has that pro-kitchen look, but it’ll show fingerprints and scratches. Here’s a quick rundown:
| Material | Maintenance | Heat Resistance | Stain Resistance | Style |
|---|---|---|---|---|
| Quartz | Low | Good | Excellent | Modern |
| Granite | Moderate | Excellent | Good | Traditional |
| Butcher Block | High | Moderate | Moderate | Warm/Classic |
| Stainless Steel | Low | Excellent | Excellent | Industrial |
Cabinetry Materials for Longevity
Cabinet quality really matters. Solid wood like maple or oak is tough and timeless. Plywood is a solid pick too—less expensive, resists warping, and still sturdy.
If you’re on a tighter budget, MDF works for painted finishes and won’t crack easily, but it doesn’t love moisture. Hardware matters more than you’d think—soft-close hinges and heavy-duty drawer slides make a difference in daily use.
Go for interiors that resist spills, like melamine or laminated shelves. Cleaning is easier, and your cabinets will last longer.
Selecting Finish Colors to Complement Your Kitchen
Color makes a big impact. White or off-white finishes are classic, bright, and work with almost any style. If you want a bold look, try navy, black, or deep green—they’re dramatic and can make your island the star.
You can match the island to your cabinets for a seamless look, or pick a contrasting color to make it pop. Wood stains show off the grain and add warmth, while painted finishes let you customize.
Durability counts, especially in busy kitchens. Look for paints or stains with tough topcoats to fight off scratches and stains. And always check colors in your actual kitchen light—they can look way different than you’d expect.
Incorporating Appliances and Accessories
The right appliances and accessories take your island from “just a counter” to the heart of the kitchen. Built-ins make daily tasks easier, and a few thoughtful extras can make hosting a breeze.
Built-In Cooktops and Ovens
A built-in cooktop puts you right in the action. Induction cooktops are great for safety and energy savings, while gas is still the go-to for those who love a flame.
If you want an oven in the island, space gets tight—look at slim or under-counter models. Controls that face outward are easier to use, especially when more than one person is in the kitchen.
Don’t forget about venting and wiring—talk to an installer early on. Features like bridge burners, touch controls, and child locks are worth considering. Downdraft vents keep things tidy and smoke-free.
Integrated Sinks and Faucets
A sink in the island is a game-changer for prep and cleanup. Most folks go for a single-bowl, deep enough to hide dishes and avoid splashing. Undermount styles look clean and make wiping down the counter easier.
For faucets, high-arc pull-downs are super handy for big pots. Touch or motion-activated options are nice if your hands are messy (which, let’s be honest, happens a lot).
Add a garbage disposal if you can—it’s just practical. Little extras like soap dispensers, filtered water taps, and fitted cutting boards make the whole setup feel more polished.
- Soap dispensers
- Filtered water taps
- Colanders and drying racks
Wine Coolers, Beverage Centers, and Mini Fridges
A wine cooler or mini fridge in the island means drinks are always nearby when you’re hosting. Wine coolers keep bottles at the right temp, and dual-zone models are awesome if you’re picky about your whites vs reds.
Beverage centers are great for sodas, beer, or mixers, and adjustable shelves make them flexible. Mini fridges are perfect for snacks or kids’ drinks. Look for models with reversible doors—they’re easier to fit wherever you want.
Here’s a quick comparison:
| Feature | Wine Cooler | Beverage Center | Mini Fridge |
|---|---|---|---|
| Temperature Zones | 1-2 | 1 | 1 |
| Storage Flexibility | Bottles | Bottles/Cans | Food/Drinks |
| Door Style | Glass | Glass/Solid | Solid |
| Noise Level | Low | Low | Moderate |
Optimizing Storage Features
If your island’s going to serve as both a workspace and a hangout spot, you’ve got to make the most of every inch. Integrated shelves, clever drawers, and hidden bins all help keep things running smoothly.
Pull-Out Shelves and Deep Drawers
Pull-out shelves and deep drawers are a lifesaver for accessing heavy appliances or big pots—no more crouching and digging. Smooth slides (soft-close if you can swing it) are worth the investment.
Mix up shallow and deep drawers to keep utensils up top and bulkier stuff below. Built-in dividers or organizers help keep everything in its place, so you’re not hunting for a spatula mid-recipe.
Hidden Trash and Recycling Bins
Hidden trash and recycling bins keep your island looking clean and uncluttered. Pull-out tracks are the way to go—easy to access, out of sight when you don’t need them.
Pick bin sizes that fit your family’s needs and try to place them close to the prep zone. Built-in handles or foot pedals are a nice touch for hands-free use.
Double-bin setups (one for trash, one for recycling) are super common. Here’s a quick comparison:
| Feature | Pull-Out Trash Bin | Freestanding Trash Can |
|---|---|---|
| Odor Control | Better | Lower |
| Appearance | Fully Hidden | Visible |
| Space-Saving | Yes | No |
Specialized Storage for Cookware and Utensils
Smart storage keeps cookware and utensils organized and easy to grab. Vertical slots or pegs for lids and cutting boards stop the clatter and chaos. Custom inserts for spatulas, whisks, and spoons make drawers less of a mess.
Built-in knife blocks or magnetic strips in a drawer keep blades safe and handy. Hanging rails or dowels inside cabinet doors are great for small pots or go-to tools.
Put specialized storage close to the cooking zone—it saves steps and makes prep way smoother. And if you’re into wine, a few cubbies for bottles and glasses can be a fun, functional touch.
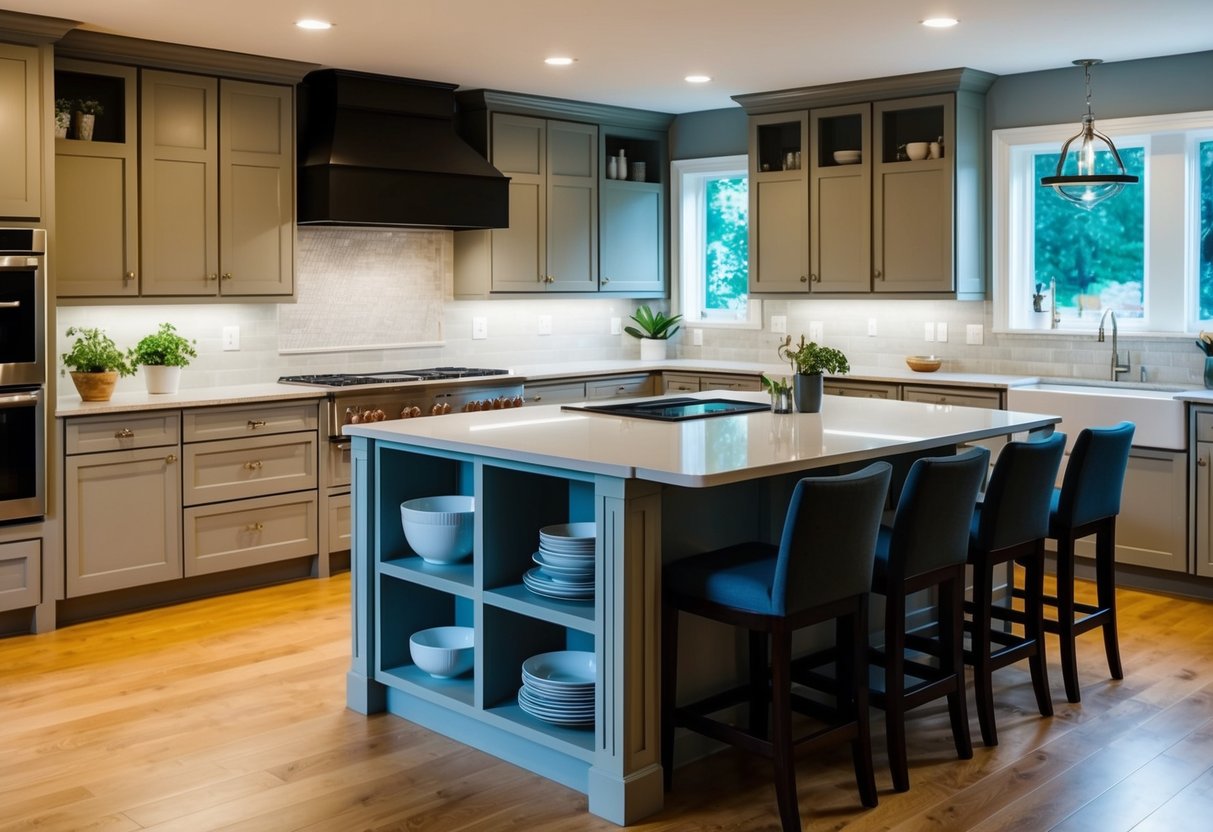
Designing for Seating and Socializing
A truly multi-functional kitchen island needs to hit the mark for both eating and hanging out. The way we handle seating, stool selection, and countertop overhang can really shape how comfortable the space feels for everyday use and how welcoming it is when friends drop by.
Bar-Height vs. Counter-Height Seating
Bar-height or counter-height seating? It depends on your kitchen’s vibe and how you want to use the space. Counter-height islands (about 36 inches high) blend right in with most kitchen counters, making them practical for casual meals or even homework sessions. Bar-height (closer to 42 inches) carves out a dedicated spot for entertaining, plus it gives a bit of privacy between the cook and the crowd.
Counter-height is usually better for families with younger kids or anyone who prefers a single, unified prep and dining surface. Bar-height is nice if you want a clear split between cooking and socializing zones.
Bar stools are taller and can be a climb, while counter stools are easier to hop onto. So think about who’ll be using them and how often—quick breakfasts, long dinners, or just standing around with drinks.
Selecting Comfortable and Stylish Stools
The right stools make a world of difference. Padded seats, backrests, and footrests? Yes, please—your guests will stick around longer. For high-traffic kitchens, easy-clean materials like metal, wood, or faux leather just make sense.
Features we love:
- Swivel seats—no more awkward shuffling to join the conversation
- Adjustable heights—everyone can get comfy
- Wide bases—for peace of mind (no wobbly disasters)
Looks matter, too. Sleek and modern stools can give a fresh edge to a classic kitchen, while rustic or upholstered ones cozy things up. Always check the seat width—16–18 inches per stool is a good rule of thumb so folks aren’t elbow-to-elbow.
Incorporating Overhangs for Legroom
Don’t skimp on the countertop overhang. If it’s too shallow, knees bang into cabinets, and nobody wants to linger. Shoot for at least 12–15 inches of overhang at counter height, and up to 18 inches if you’re going for deeper bar seating.
Remember, a bigger overhang needs solid support—brackets or corbels are your friends once you go past 12 inches.
Here’s a quick reference:
| Seating Type | Recommended Overhang |
|---|---|
| Counter-height | 12–15 inches |
| Bar-height | 12–18 inches |
Get the legroom right, and your island goes from “looks nice” to “let’s hang out here all the time.”
Integrating Smart Technology
Smart features can amp up the convenience of your kitchen island, whether you’re prepping dinner or hosting friends. A few well-chosen tech upgrades make daily routines smoother and the island way more versatile.
Smart Power Outlets and Charging Stations
Smart outlets let you control appliances from your phone or with a simple voice command. No more crawling under the counter to unplug the mixer.
Pop-up USB and standard outlets right on the island surface keep cords under control and devices charged while you’re using them. Look for models with surge protection—no one wants fried gadgets during a party.
Scheduling features are handy, too. Set the blender to run only in the morning, or make sure everything powers down at night. It’s a little thing, but it adds up to less hassle and a safer kitchen.
Voice-Controlled Lighting and Appliances
Smart lighting is a game-changer for hosting. Voice-controlled bulbs (Alexa, Google Assistant, you name it) let you tweak brightness or color with your hands full of dough. Great for setting the mood or just finding your way during a late-night snack run.
Connect compatible appliances—coffee makers, mixers, even under-cabinet lights—to your voice assistant. A quick command can get things going while you’re busy elsewhere.
Most smart plugs and lights are plug-and-play, so you don’t need to be an electrician. A quick app setup and you’re in business. It’s a nice way to tie everything together without a tech headache.
Lighting Your Kitchen Island
Lighting can make or break how your kitchen island feels and functions. The right setup means you can see what you’re doing, but also set the mood for everything from meal prep to late-night chats.
Pendant Lighting for Ambiance
Pendant lights are a favorite for adding both style and a bit of drama over the island. Pick fixtures that fit your kitchen’s personality—modern, farmhouse, classic, whatever works. Hang them 30–36 inches above the countertop, and space them 24–30 inches apart for even light.
Dimmable bulbs are a must if you want to shift between bright mornings and cozy evenings. Glass, metal, or fabric shades all have their own vibe—clear glass keeps things bright, colored or matte options give a softer glow. Pendants do more than light up the space—they help make the island the heart of the room.
Task Lighting for Food Prep
You need good, focused light for chopping, mixing, and all the other kitchen tasks. Undercabinet lights, recessed downlights, or LED strips get the job done. Aim them right at your main prep zone to cut down on shadows and eye strain.
LEDs are a solid bet for energy savings and longevity. For showing off food colors, look for bulbs in the 3000K–4000K range—bright but not harsh. Easy-to-reach controls mean you can keep your hands on the task, not fumbling for a switch.
Personalizing Style and Décor
Your kitchen island is the perfect place to show off your taste and pull together the whole space. A few thoughtful details and the right materials can boost both the look and the function, without making it feel overdone.
Adding Decorative Elements
Mixing practical and fun details makes the island feel lived-in and welcoming. Pendant lights above the island double as a centerpiece and task lighting.
Open shelves or glass-front cabinets are great for showing off cookbooks, favorite dishes, or even a few potted herbs. A fruit bowl, a couple of trays, or a quirky art piece can give the space a finished, personal touch.
Stools add texture and color—upholstered or wooden options keep things comfy and warm. Swap out a table runner or centerpiece now and then for a quick refresh. Some favorite decorative picks:
- Pendant lights
- Decorative bowls & trays
- Cookbook stands
- Seasonal centerpieces
- Greenery or herbs in planters
It’s easy to update the look without a full-on makeover.
Mixing Materials for Visual Interest
Combining materials keeps the island from looking flat or predictable. Maybe a butcher block top on a painted base, or mixing metal hardware with wood finishes—whatever feels right for your space.
We’re seeing more islands with stone and tile accents, or bold cabinet colors with contrasting handles. It’s a way to make the island stand out without clashing with the rest of the kitchen.
Stick with materials that play well with your overall design, but don’t be afraid to mix things up for a little visual interest. Here’s a quick cheat sheet:
| Surface | Base/Accent |
|---|---|
| Quartz | Warm oak |
| Marble | Matte black |
| Butcher block | Painted navy |
| Concrete | Stainless steel |
A little contrast goes a long way in making the island feel custom and inviting.
Tips for Installation and Assembly
How you install your kitchen island makes a big difference in how long it lasts and how safe it is. Taking a bit of time to prep and use the right tools can save you a lot of headaches down the road.
DIY vs. Professional Installation
Should you tackle the island assembly yourself or call in a pro? For ready-to-assemble or modular islands, plenty of folks manage just fine with some patience and the right instructions. It’s budget-friendly and satisfying if you’re handy with basic tools.
But if you’re dealing with built-in plumbing or electrical, or the island is part of a bigger remodel, hiring a pro is almost always the smarter move. Messing up here can get expensive fast, or even void warranties. For heavy pieces or anything that needs to be anchored to the floor, professional help just makes sense.
Here’s a quick comparison:
| Feature | DIY | Professional |
|---|---|---|
| Cost | Lower (except special needs) | Higher upfront |
| Complexity | Low to medium | Handles all complexities |
| Time | Longer for beginners | Usually faster |
| Safety & Code | Must research local requirements | Licensed for code compliance |
Essential Tools and Safety Precautions
A little prep goes a long way. Most installations need:
- Phillips and flathead screwdrivers
- Cordless drill with bits
- Level
- Stud finder
- Tape measure
- Wrench or socket set
- Gloves and safety glasses
Before you start, read the whole assembly guide and lay everything out. Double-check for missing parts. Clear out enough room to work—tripping over tools isn’t fun. If you’re hooking up water or electricity, turn off the right circuits and valves.
When lifting heavy pieces, don’t go solo if you don’t have to. Good lifting technique (or a helper) can save your back. And yeah, keep the workspace tidy—no one wants to step on a rogue screw.
Frequently Asked Questions
We design our multi-functional kitchen islands to maximize both cooking efficiency and social engagement. By focusing on specific configurations, materials, and smart features, we offer solutions that balance utility with style.
What design features should I consider for a kitchen island that accommodates both cooking and entertaining?
A split-level countertop separates prep from dining or serving. Overhangs with bar stools invite guests to hang out without getting in the cook’s way.
Add built-in outlets and a sink for easier prep and cleanup. Open shelves or display cabinets keep glassware and serving dishes handy when company’s over.
Can you suggest some storage solutions for a multi-functional kitchen island?
Look for islands with deep drawers for pots and pans, pull-out spice racks, and hidden trash or recycling bins. Adjustable shelves behind cabinet doors are great for small appliances or serving platters.
Wine racks and open cubbies work for bottles and cookbooks. Roll-out trays or tiered organizers make it easier to see and grab what you need.
What types of materials are recommended for a durable and stylish kitchen island surface?
Quartz countertops are tough, resist scratches and stains, and are easy to keep clean. Granite and solid surface materials are also durable and look polished.
Butcher block gives a warm, practical surface. Stainless steel is perfect for serious cooks who want a sleek, hygienic workspace.
How can lighting be effectively incorporated into a kitchen island geared towards food prep and hosting?
Pendant lights over seating areas give focused light for meals and conversation. Under-cabinet or recessed lighting brightens up prep zones.
Dimmable controls let you switch between bright task lighting and a relaxed mood. LED strips under the counter edge add a subtle glow and highlight the island’s shape.
What are the ideal dimensions for a kitchen island used for meal prep and as a gathering spot?
Aim for a minimum width of 36–42 inches and at least 6 feet long for enough seating and workspace. Countertop height should be 36 inches for prep, with a raised 42-inch section for bar seating if you like.
Keep 42–48 inches of clearance around the island so people can move and appliances open easily. Adjust as needed for your kitchen’s size and how you like to entertain.
Are there innovative appliance integrations that can enhance the functionality of a kitchen island?
We often add drawer-style microwaves, beverage coolers, or even a sneaky induction cooktop—just for that extra bit of convenience. Pop-up power outlets and charging stations? Those are lifesavers if you’re tired of cords snaking across the counter.
Some folks go for built-in downdraft vents or a compact dishwasher, which honestly keeps things neat and efficient. Modular components, like portable induction burners, add a bit of freedom—cook here, serve there, move stuff around as you please.
Share:
When to Swap Out Your Kitchen Towels for Better Hygiene
When to Swap Out Your Kitchen Towels for Better Hygiene