
Check out our latest home & kitchen collection!
Decluttering your whole house? Yeah, that can feel like a mountain, especially when every room seems to sprout new piles overnight. But you really can tackle a room in just 30 minutes, if you’ve got the right bins and a plan that breaks things down into bite-sized pieces.
It’s not about finding more hours in your day. It’s about having a system and the right tools so you don’t get stuck.
We’ve all started decluttering only to end up stuck paging through old photos or wrestling with guilt over a broken blender. A 30-minute routine keeps you out of those rabbit holes.
When every item has a bin and you know what goes where, you can move fast and avoid decision gridlock.
Once you pair a time limit with a simple sorting system, the process really speeds up. Instead of bouncing around the room, you work through categories; trash, donations, stuff that belongs somewhere else, and things to keep.
This method works for loads of families, and honestly, it might surprise you how much you can get done in half an hour.
Key Takeaways
- A 30-minute timer and sorting bins keep you moving and help you avoid burning out on decisions
- Working by category—not just grabbing random stuff—makes decluttering faster and less stressful
- Short, regular sessions beat those once-in-a-blue-moon cleaning marathons for keeping your space under control
Getting Ready for Your 30-Minute Declutter
A little prep makes all the difference. If you just jump in, you’ll probably end up frustrated (or stuck halfway through a closet). So, let’s get your head in the game, gather your bins, and set yourself up for a quick win.
Setting Your Intention and Timer
Before you touch anything, get clear on your mission. Pick one small area—like a single drawer, one shelf, or a corner of your bedroom. Don’t try to overhaul the whole house in 30 minutes. That’s just asking for trouble.
Jot your goal on a sticky note and slap it somewhere you’ll see it: “clear kitchen counter” or “sort out desk drawer.” It’s a little cheesy, but it works.
Now, set your timer for 30 minutes. No cheating. The clock keeps you moving and makes it easier to let go of stuff. When time’s up, you’re done—even if you’re not “finished.” That’s the point.
Gathering Essential Bins and Supplies
Get your bins together before you start. If you’re running around looking for a trash bag halfway through, you’ll lose momentum.
You’ll need four containers:
- Keep bin – for stuff that stays in the room
- Relocate bin – for things that go somewhere else
- Donate bag – for good-condition items you don’t need
- Trash bag – for broken or useless stuff
Label them. Masking tape and a marker work fine.
Other handy supplies:
- Cleaning wipes
- Small storage boxes for keepers
- A notepad (for random reminders or follow-ups)
Keep everything close so you’re not trekking across the house mid-session.
Creating the Perfect Decluttering Atmosphere
Your environment matters. You want energy, not distractions.
Crank up some music or a podcast—nothing too distracting, just something to keep you moving.
Open the windows or at least turn on some lights. Natural light helps you see what you’re actually dealing with. Dim corners make it way too easy to ignore stuff.
Put your phone in another room or on airplane mode. Seriously, Instagram can wait.
Clear a bit of workspace for your bins. Give yourself room to sort without making a bigger mess.
Choosing the Right Bins and Tools
The right bins make a world of difference. If you’re fumbling with flimsy bags or hauling around a giant storage tote, you’ll waste time and energy.
The Four-Bin Method Explained
You need four containers: trash, recycling, donations, and relocations. This way, every item has a home—no more “I’ll just put this here for now.”
Trash: Go with sturdy garbage bags. Flimsy ones rip, and you don’t need that hassle.
Recycling: Paper bags or small bins work. Old grocery bags are perfect for paper and little recyclables.
Donations: Tote bags are easiest. Use ones you don’t mind giving up, so you can just drop them off later.
Relocations: Open baskets with handles are best. You’ll want to carry these from room to room after you’re done.
What to Look For in Storage Bins
Don’t stress about fancy bins. You want ones that fit your space and aren’t too big to carry when full.
Medium bins (10-15 quarts) are the sweet spot for most rooms.
Stackable bins are great when you’re not using them—saves space.
Clear or semi-clear bins let you see what’s inside, so you don’t mix things up.
Strong handles are a must. Flimsy handles will drive you nuts.
Labeling and Organizing Bins for Efficiency
Labels save you from sorting mistakes. Use bold, easy-to-read text.
Masking tape and a fat marker: “TRASH,” “RECYCLE,” “DONATE,” “RELOCATE.”
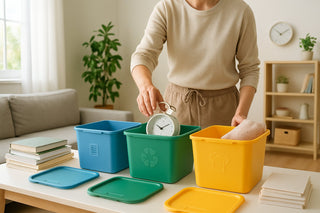
Color-coding helps, too. Pick a color for each bin—red for trash, blue for recycling, green for donations, yellow for relocations.
Keep your bins somewhere handy between sessions. Closet, garage, whatever works.
Set up all four bins before you start. Scrambling for containers halfway through kills your flow.
Step-By-Step Declutter Routine in 30 Minutes
Here’s how to break things down: scan the room, clear visible surfaces, and make fast decisions. This way, you’ll actually see progress—and maybe even enjoy it a little.
Quick Room Scan for Clutter Hotspots
Spend the first 2 minutes scanning the room. Where’s the worst of the mess? Mentally note the biggest trouble spots.
Hotspots usually include:
- Kitchen counters, dining tables
- Bedroom floors, nightstands
- Bathroom counters, shower ledges
- Living room tables
Tackle flat surfaces first—they make the biggest difference. Don’t get sucked into drawers or closets yet. Just look for what’s out in the open.
Set a timer for this scan. Otherwise, you’ll wander. Pick your priorities: start with the messiest, most obvious spots.
Tackling Surfaces and Floors First
The next 15 minutes are for clearing visible surfaces and floors. This is where you get the biggest payoff.
Start with the floor. Grab clothes, shoes, toys, books—anything that’s not supposed to be down there.
Work your way up: floor, then tables, then counters.
Order of attack:
- Floors and walkways
- Coffee and side tables
- Kitchen counters, dining tables
- Dressers, nightstands
Don’t organize yet. Just make quick piles by category. You’ll sort them in a minute.
Use a laundry basket or big bag for stuff that belongs elsewhere. Don’t leave the room to put things away—that’s a time trap.
Making Swift Keep, Donate, Sell, or Trash Decisions
Last 13 minutes: make decisions, fast. Don’t overthink it.
How to decide:
- Keep: Used in the last year and has a home
- Donate: Good shape but unused for a year
- Sell: Worth something, but you don’t need it
- Trash: Broken, expired, or just junk
Use the “one-touch rule.” Handle each item once, then decide. If you hesitate, you probably don’t need it.
Drop each item straight into the right bin. No extra piles.
Put keepers away in their spots. If something doesn’t have a home, ask yourself if it’s worth keeping.
For sentimental stuff, give yourself 30 seconds. If you can’t remember the last time you used it or why it matters, maybe it’s time to let go.
Focused Decluttering Tips for Maximum Impact
Making quick choices and keeping your energy up can turn a messy room into a calm space. Sometimes you need to move fast, sometimes you need to pause—knowing when is the trick.
Speedy Wins Versus Sentimental Decisions
Go for the easy stuff first. Broken, expired, or obvious junk? Toss it, no debate.
Quick wins:
- Empty packaging
- Duplicate tools
- Worn-out clothes
- Expired meds or makeup
Sentimental things are harder. Toss those in a “maybe” bin for now—don’t let them slow you down.
If you haven’t used something in a year, it’s probably safe to let it go.
For family photos or keepsakes, make a “decide later” box. You can come back to those when you’re not on the clock.
Staying Motivated Under Pressure
Music helps a lot. Make a 30-minute playlist that gets you moving.
Stay motivated by:
- Setting tiny goals every 10 minutes
- Snapping before-and-after pics
- Treating yourself when you finish
- Asking a friend to help (if you’re feeling stuck)
If you’re overwhelmed, shrink your focus. One drawer or one shelf is still progress.
The timer adds urgency, but don’t rush so much you get sloppy or hurt yourself. If you start to feel frazzled, pause for half a minute and regroup.
Maintaining a Clutter-Free Environment After Decluttering
Finishing a 30-minute session feels awesome, but staying organized takes a bit of daily effort. The trick is to build easy habits and systems so clutter doesn’t sneak back in.
Daily and Weekly Mini-Declutter Habits
Keep your space tidy by tacking on 5-10 minutes of decluttering to things you already do. Make it automatic, so you don’t even have to think about it.
Daily habits:
- Put stuff back in its bin right after using it
- Do a 5-minute tidy-up before bed
- Sort mail as soon as it comes in
- Wipe kitchen counters after meals
Weekly habits: These catch messes before they pile up:
| Day | Focus Area | Time |
|---|---|---|
| Monday | Kitchen drawers/counters | 10 minutes |
| Wednesday | Bedroom surfaces | 10 minutes |
| Friday | Entryway/mudroom | 10 minutes |
| Sunday | Living room | 15 minutes |
You don’t have to tackle every room every day. Rotating your focus keeps things manageable and nothing gets overlooked.
Systems for Handling Incoming Clutter
Keeping clutter out starts with what we let through the front door. If we set up a few boundaries, we can stop messes before they take over.
The one-in, one-out rule is simple but surprisingly effective. Every time you bring home something new, pick one thing to send out the door. It works for clothes, books, kitchen gadgets—honestly, almost anything.
Landing zones with bins can keep chaos from spreading. I like to stash a few containers near the entrance:
- Donation bin for stuff we’re done with
- Return bin for things that belong somewhere else
- Action bin for things you need to deal with soon
Monthly declutter sessions—just 30 minutes—help keep things from piling up. You can rotate through rooms or focus on the usual trouble spots.
Smart Storage Solutions to Prevent Future Clutter
Good storage does half the work for you. If your bins and furniture actually fit your space and lifestyle, clutter has nowhere to hide.
Choosing Storage That Works for Your Space
Measure first, always. I’ve bought cute bins that didn’t fit my shelves more times than I care to admit.
Start with your messiest spots. Check the size of your shelves, under-bed areas, and cabinets before you buy anything.
Clear containers beat opaque ones. If you can see what’s inside, you’ll use what you have and stop buying duplicates.
Stackable bins make the most of vertical space. Square or rectangular ones, not round—those just waste corners.
Think about your habits. If lids never make it back on, skip them. Sometimes, a simple open bin is all you need.
Labels help, even if you think you’ll remember. Trust me, after a few months, you won’t.
Reusing and Repurposing Bins
Shop your own house first. Old shoeboxes are drawer organizers waiting to happen.
Big yogurt tubs? They’re perfect for toys or craft stuff. Peel off the label and slap on your own.
Amazon boxes make great donation bins. Fill one up, tape it shut, and toss it in your car.
Ice cream tubs are awesome for art supplies or playdough. The wide opening means even kids can clean up.
Mason jars are just right for buttons, screws, or spices. You can see what’s inside and they stack well.
Broken suitcases work as under-bed storage. Even if the zipper’s busted, they’ll hold off-season clothes or bedding.
Furniture With Built-In Storage
Storage ottomans double as seats and hiding spots. Go for the kind with removable tops for easy access.
Bed frames with drawers mean you don’t need extra bins. Suddenly, that wasted under-bed space gets put to use.
Coffee tables with shelves or drawers finally give remotes and magazines a home.
Benches with storage are perfect in entryways for shoes and bags. Kids can sit to put on shoes, and everything stays tucked away.
Kitchen islands with shelves give you more prep space and a spot for appliances or dishes.
Bookcases with both open and closed sections let you show off some stuff and hide the rest. Keeps things looking neater without sacrificing storage.
Frequently Asked Questions
A 30-minute declutter routine raises a lot of questions about bins, timing, and what actually works. Here’s what I’ve learned, sometimes the hard way.
What's the secret to kicking off a decluttering routine without feeling overwhelmed?
Start tiny—just one drawer or shelf. Five or ten minutes is enough. Trying to tackle a whole room at once? That’s a recipe for giving up.
Set up your bins before you start. If you know where keep, donate, trash, and relocate items go, you won’t freeze halfway through.
Try to do it at the same time every day. Mornings usually work best, when your brain’s fresh and you haven’t lost steam yet.
Got a mountain of stuff? What are the first steps to take when organizing a room full of clutter?
Divide the room into small zones—no more than what you can handle in 30 minutes. One corner, one bookcase, one side of the bed.
Toss obvious trash first. You’ll see progress right away, which makes the rest easier.
Set up five bins or bags: keep, donate, sell, relocate, trash. That way, you won’t just create new piles.
Stick to one category at a time. Do all the books, then all the clothes, then papers. Jumping around just makes things messier.
Can you share a straightforward checklist to navigate the chaos during a house organization spree?
Set a timer for 30 minutes. Pull everything out of your chosen spot.
Sort items into five bins—don’t overthink it. If you haven’t used it in a year, it’s probably time to let it go.
Wipe down the empty space. Only put back what you’re keeping, and group similar things together.
Deal with one bin at the end of each session. Take out the trash, put away relocated items, or load donations into your car.
Is there a way to transform my room from messy to tidy without spending a dime?
Use what you’ve got. Shoeboxes, jars, little containers—they all work as drawer dividers.
Declutter before you organize. You can’t organize clutter, and getting rid of extras might mean you don’t need to buy anything.
Live with your new setup for a week before buying organizers. You’ll figure out what you actually need (and what just looks good in ads).
Steal organizers from other rooms. That basket in the closet might be perfect for your desk.
Can you break down the room-by-room decluttering strategy into easy, actionable steps?
Start with the easy rooms—bathrooms or closets—before you tackle sentimental spaces.
Spend a week per room, 30 minutes a day in different zones. Monday: nightstand. Tuesday: dresser top. Wednesday: one drawer.
Sketch a quick map of the room, divided into 5-7 zones for the week. It helps you know where to start when the timer goes off.
Finish one room before starting another. It’s a lot more satisfying than having half-done projects everywhere.
On a quest to declutter – what are the top things to consider for maintaining a minimalist vibe at home?
Try the one-in-one-out rule when you buy something new. If you bring home a new item, let go of something else—maybe donate it, maybe toss it. It keeps things in check without much fuss.
Set aside about 15 minutes every month for a quick clutter check. Honestly, these little bursts of tidying beat a big, overwhelming clean-up any day.
Keep your sorting bins out in the open, somewhere you actually use them. If they're right there, it's way less tempting to toss stuff in a random pile for “later.”
And hey, clear surfaces do wonders. If your counters, tables, or dresser tops are mostly empty, the whole place just feels calmer and more put-together—even if there’s a little chaos hiding in the drawers.


