

Check out our latest collection of compact vacuum sealer for food!
Farmers market hauls bring home the freshest produce, but anyone who's watched expensive berries turn moldy or leafy greens wilt after just a few days knows the frustration of food waste. Vacuum sealing can extend the life of your farmers market finds by 2-5 times, keeping produce fresh for weeks instead of days. This simple technique removes the oxygen that causes spoilage—perfect for storing those beautiful vegetables and fruits you picked up on Saturday morning.
We've all been there—loading up on gorgeous seasonal produce, then scrambling to use everything before it goes bad. Vacuum sealing is a practical fix that doesn’t require fancy equipment or complicated steps. With the right approach, you can keep everything from delicate herbs to sturdy root veggies fresher, longer.
This guide covers what to seal, how to handle different types of produce, and the best portable vacuum sealing options for busy folks. Plus, a few thoughts on sustainable practices—because most of us shop farmers markets with the planet in mind, right?
Key Takeaways
- Vacuum sealing extends farmers market produce life by removing oxygen that leads to spoilage
- Different fruits and veggies need specific techniques for best results
- Portable vacuum sealers and sustainable habits make preservation easier and greener
Why Fresh Farmers‑Market Produce Deserves Extra Care
Farmers-market produce needs a little more TLC than grocery store stuff. Without preservatives or extended storage, it’s more vulnerable to spoilage. Knowing how and why food waste happens—and how to store things properly—helps you get the most from your market haul.
Understanding Food Waste From Fresh Fruits and Vegetables
In the U.S., we toss out 30-40% of our food supply, with fresh produce topping the waste list. Fruits and veggies just don’t last—they keep ripening and breaking down after harvest.
Market produce is usually picked within a day of sale, so you’re not getting waxed or treated items. That’s great for taste and nutrition, but shelf life? Not so much.
Typical spoilage patterns:
- Leafy greens wilt fast—2-3 days, tops
- Berries mold in 3-5 days
- Stone fruits over-ripen quickly
- Root veggies lose crunch
Even the trip home can speed up spoilage, especially on hot days. That crisp kale? It can turn limp before you know it.
How Proper Storage Extends Shelf Life
Produce needs different storage conditions to stay fresh. How you handle it right after purchase makes a big difference.
Temperature-sensitive items like berries and greens go straight in the fridge. Vacuum sealing keeps air and bacteria out, holding in moisture.
Ethylene producers—apples, bananas—shouldn’t hang out with ethylene-sensitive veggies (lettuce, broccoli). Otherwise, things ripen and rot too soon.
| Produce Type | Storage Method | Shelf Life Extension |
|---|---|---|
| Leafy Greens | Vacuum sealed, refrigerated | 7-10 days vs 2-3 days |
| Berries | Vacuum sealed portions | 10-14 days vs 3-5 days |
| Herbs | Vacuum sealed with paper towel | 2-3 weeks vs 5-7 days |
Vacuum sealing is great for prepping meal-sized portions. It saves you from playing “what’s about to go bad?” roulette every night.
Benefits of Reducing Food Waste at Home
Wasting less food saves money and makes your market splurge worth it. Nobody likes tossing pricey tomatoes or wilted greens.
Financially, it adds up. The average family throws out $1,500 a year in food. Better storage can cut that down.
Environmentally, less waste means less methane from landfills—methane’s even worse than CO2 for the climate. Preserving your market finds shrinks your footprint.
Plus, when food lasts, meal planning is easier. Stock up in season, stretch your haul, and skip a few grocery trips.
Vacuum sealing lets you buy in bulk from your favorite farmer when the harvest is on. You can stash away the extras for later.
The On‑the‑Go Vacuum Sealing Advantage
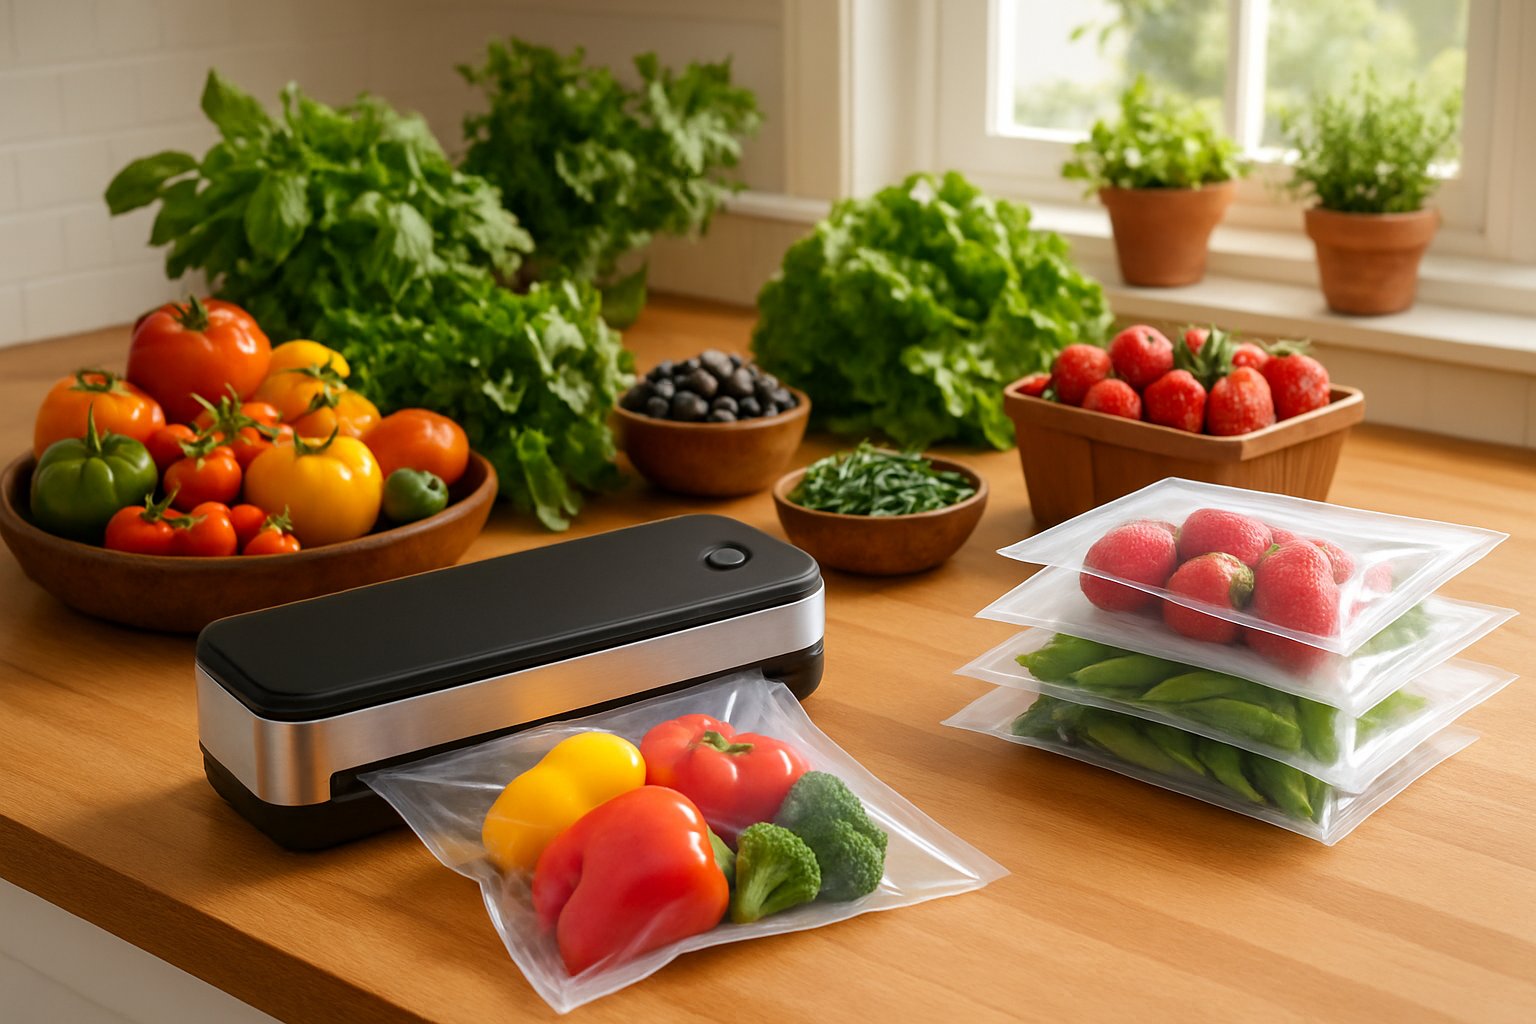
Portable vacuum sealers change the game for keeping market produce fresh. These little gadgets pull out the air that causes food to spoil, so you get more time to enjoy your haul.
Basics of Portable Vacuum Sealers
Portable vacuum sealers suck the air out of special bags, then heat-seal them shut. This keeps out bacteria, mold, and oxidation.
Most handheld models run on rechargeable batteries or can plug into a car. Just pop your veggies or fruit in a bag, stick the opening in the sealer, and hit the button.
You’ll hear the motor pull the air out—usually takes 10-30 seconds per bag. The machine seals it up tight when it’s done.
Parts you’ll find:
- Vacuum pump motor
- Heat-sealing strip
- Battery or adapter
- Compatible bags
They’re lighter than countertop models and fit in a tote or even your glove box.
How Vacuum Sealing Keeps Food Fresher Longer
Vacuum sealing keeps produce fresh by removing oxygen, which is what bacteria and mold need to grow. Produce can last 3-5 times longer with this method.
No air means less browning in apples and avocados, and less wilting in greens and herbs.
Vacuum-sealed berries stay firm for weeks (not days). Herbs keep their color and smell much longer than in a regular bag.
Shelf life boosts:
- Berries: 2-3 weeks vs 3-5 days
- Leafy greens: 2-3 weeks vs 5-7 days
- Fresh herbs: 3-4 weeks vs 7-10 days
- Root veggies: 2-3 months vs 3-4 weeks
Airtight bags also keep strong smells (like onions) from spreading to other foods.
Types of Vacuum Sealers for Market Trips
Handheld vacuum sealers are the easiest to bring along. They’re light (1-2 lbs), battery-powered, and fit in most bags. You can seal your purchases right at the car.
Chamber vacuum sealers are heavier and need a car adapter, but they’re faster and can handle big hauls—good if you’re buying in bulk.
| Type | Weight | Power Source | Best For |
|---|---|---|---|
| Handheld | 1-2 lbs | Battery/USB | Individual items |
| 12V Chamber | 3-5 lbs | Car adapter | Bulk purchases |
| Pump-style | 0.5-1 lb | Manual/Battery | Light use |
Pump-style sealers are manual and super light—handy for herbs or delicate produce that might get squished by an electric sealer.
Think about how much you usually buy. Heavy shoppers might want a chamber model; casual shoppers will be fine with a handheld.
Step-by-Step: Vacuum Sealing Farmers-Market Finds
A little prep goes a long way to keep your fresh market produce in top shape. Knowing what needs blanching, how to avoid crushing soft stuff, and how to pack for the ride home makes a big difference.
Preparing Produce for Sealing
How you prep depends on the produce. Leafy greens like spinach or kale should be washed and dried thoroughly—use a salad spinner or pat dry with towels. Any leftover water can mess up the seal and speed up spoilage.
Blanch these veggies first:
- Broccoli, green beans, asparagus
- Cauliflower, Brussels sprouts
- Carrots, snap peas
Blanch for 2-3 minutes, then dunk in ice water. This keeps colors bright and texture firm.
No need to blanch:
- Bell peppers, zucchini
- Corn cut off the cob
- Berries, stone fruits
Some foods just don’t vacuum seal well—mushrooms, soft cheeses, and whole apples get mushy. Maybe skip sealing those.
Chop bigger veggies into meal-sized pieces before sealing. It makes storage and later use simpler.
Optimal Vacuum Sealing Techniques
Leave a few inches at the top of the bag before sealing—about 3-4 inches. This keeps food from getting sucked into the machine.
If your sealer has a gentle mode, use it for soft stuff like berries. Too much pressure can crush them.
Managing liquids:
- Freeze wet items for an hour or two first
- Add paper towels to soak up extra moisture
- Tilt the bag a bit during sealing
With sharp-edged veggies, put a paper towel over the cut ends to prevent poking holes in the bag.
Test your seal by pressing on the bag. It should feel airtight—no give.
For stuff you’ll use soon, zipper bags with a handheld sealer are super convenient.
Label bags with what’s inside and the date. Trust me, you’ll thank yourself later.
Packing for Travel and Storage
Pack sealed bags in a cooler with ice packs for the trip home. Put heavier items on the bottom so delicate produce doesn’t get squished.
Layer frozen stuff at the bottom, then fridge items, then pantry items on top to keep temperatures right.
| Produce Type | Refrigerated | Frozen |
|---|---|---|
| Berries | 1-2 weeks | 8-12 months |
| Leafy greens | 2-3 weeks | 6-8 months |
| Cut veggies | 2-4 weeks | 10-12 months |
Keep a small cooler in your car just for market trips—it really helps.
Store sealed bags flat in your fridge or freezer. It saves space and keeps bags from getting punctured.
Think about portion sizes before sealing. Individual servings are handy for lunches, while bigger bags are great for family meals.
Best Practices for Different Kinds of Fresh Produce
Every fruit and veggie has its quirks. Knowing how to handle each type means less waste and more delicious meals from your farmers market finds.
Tips for Fruits: Berries, Apples, and Stone Fruit
Berries are high-maintenance. Sort through them as soon as you get home—toss any that look iffy.
Store berries unwashed in the fridge, in their original or a breathable container. Washing first just invites mold and shortens their life.
Apples are easier but still need care. They give off ethylene gas, which speeds up ripening in other produce. Keep them in the fridge crisper, away from other fruits and veggies.
Stone fruits like peaches and plums can finish ripening on the counter. Once they’re just right, stash them in the fridge to slow things down.
Quick tip: Check berries daily and pull out any that start to go bad. One moldy berry can ruin the whole bunch.
Storing Leafy Greens and Salad Fixings
Leafy greens want a little moisture—not too much, though. Wash and dry them, then wrap in a damp paper towel.
Pop the wrapped greens in a breathable container or perforated bag. This keeps humidity up but lets air circulate.
Hardy greens like kale can handle more moisture than soft lettuce or spinach. For herbs like basil, treat them like flowers—put stems in water, cover loosely with a bag, and refrigerate.
Salad fixings like cukes and bell peppers do best in the fridge crisper. Tomatoes? Leave them on the counter—fridge temps zap their flavor and texture.
Trim off any yellow or wilted leaves as soon as you see them.
Keeping Root Vegetables and Herbs at Their Best
Root veggies are built to last. Store potatoes, carrots, and beets in a cool, dark spot with good airflow.
Cut off the green tops from carrots, radishes, and beets before storing. The tops suck out moisture, making the roots limp.
Most roots like it a bit humid. Perforated bags in the fridge crisper work, or stash them in a cool pantry.
Onions and garlic want dry, airy storage far from potatoes—otherwise, they all spoil faster.
For herbs, trim the stems and set them in jars of water. Loosely cover with a plastic bag and refrigerate. Treat them like a little bouquet—because why not?
Creative Ways to Use Vacuum-Sealed Produce
Once you’ve sealed your farmers market haul, that’s when the real fun starts—turning those preserved veggies and fruits into easy meals and snacks. Vacuum sealing really does open up new ways to marinate and store food, keeping things fresher for longer than you might expect.
Meal Prep and Recipe Ideas
Vacuum-sealed vegetables make meal prep a breeze. You can portion out servings for stir-fries, soups, and casseroles well ahead of time.
Marinades get a serious boost in flavor here. With no air in the bag, veggies soak up sauces way faster than they would in a bowl. Try sealing bell peppers with balsamic and herbs, or carrots with ginger and soy sauce—honestly, it’s hard to go wrong.
Quick meal combos that just work:
- Sealed broccoli tossed with garlic butter for quick sides
- Pre-cut onions and peppers ready for fajita night
- Herb-marinated zucchini, perfect for grilling
Root veggies like beets and turnips last for months when vacuum sealed. Prepping them into cooking portions ahead of time means you can throw together a weeknight dinner in no time.
You can also use these bags for sous vide. Just drop the sealed portion straight into your water bath—no extra fuss.
Travel-Friendly Snacks and Lunches
Vacuum-sealed produce makes the best grab-and-go snacks. No more mushy cherry tomatoes or bruised carrots at the bottom of your bag. We love packing sealed cherry tomatoes, snap peas, and baby carrots for hikes or long car rides.
Cut veggies keep their crunch way longer in vacuum bags than in regular containers. Cucumber slices stay crisp for days, and celery doesn’t go limp.
Travel snack favorites:
- Baby carrots paired with single-serve hummus
- Apple slices (tossed with lemon juice so they don’t brown)
- Bell pepper strips in all the colors
For lunch prep, we like to seal salad parts separately—greens in one, diced veggies in another, proteins in a third. This keeps everything fresh until you’re ready to toss it together.
Vacuum-sealed bags save space too. You can pack a week’s worth of snacks in the room that regular containers would take for just a couple of days.
Eco-Friendly Packaging and Sustainability Tips
Smart packaging at the farmers market helps cut down on food waste and keeps your produce protected. A few simple swaps can save money and help the planet at the same time.
Reusable Bags and Compostable Packaging Choices
Canvas totes and mesh produce bags are must-haves for the market run. They’re sturdy for tomatoes, gentle for greens, and just plain handy.
Beeswax wraps are surprisingly good for cheese and baked goods. They mold around odd shapes and keep things fresh—no plastic needed.
Glass containers with tight lids are perfect for juicy berries or marinated olives. You can see what’s inside, and they stack nicely in the fridge.
Favorite reusable options:
- Canvas bags – easy to wash, last forever
- Mesh produce bags – let fruits and veggies breathe
- Glass containers – airtight, so things don’t spoil
- Beeswax wraps – a natural swap for plastic wrap
A lot of vendors now use compostable paper bags or containers made from cornstarch. They break down on their own and cushion delicate produce on the trip home.
Reducing Single-Use Plastic in Your Market Routine
Bringing your own containers goes a long way toward ditching plastic bags. A medium container fits a couple pounds of apples, while smaller ones are great for herbs and spices.
Ask vendors to skip the plastic for things like potatoes or onions—they’ve got their own protective skins.
A small cooler bag with ice packs keeps dairy and meat safe, so you don’t have to worry about spoilage on a longer trip.
Plastic-cutting moves:
- Bring containers sized for your usual haul
- Use newspaper or cloth for wrapping fragile produce
- Look for vendors with paper or minimal packaging
- Invest in insulated bags for anything that needs to stay cold
Sizing your containers for what you actually buy makes the whole routine smoother.
Frequently Asked Questions
Portable vacuum sealers can turn a farmers market haul into a stash that lasts, but let’s be real, you probably have a few questions. Which foods work best? How do you know your sealer’s doing its job? Here’s what we’ve learned—sometimes the hard way.
What are the must-try foods to preserve with a vacuum sealer right from the farmer's market?
Fresh herbs are a top pick—they keep their flavor and color for weeks, not days. Vacuum sealing locks in those fragrant oils in basil, cilantro, and parsley.
Hard cheeses from local dairies are another win. Aged cheddars and goudas stay mold-free and tasty for months in the fridge.
Stone fruits like peaches and plums do great with vacuum sealing after a quick pre-freeze. It keeps them from getting squished and holds onto that perfect ripeness for smoothies or baking.
Leafy greens like kale and spinach stay crisp if you dry them well before sealing. Skip the pre-washed stuff and grab whole bunches so you can manage the moisture.
Berries need a gentle touch, but they’re worth it. We pre-freeze them on a tray, then seal them up—no crushing, just fresh flavor that lasts.
How can you tell if a portable vacuum sealer is actually keeping your goods airtight and fresh?
The bag should hug the food tightly, with no air pockets. If it starts puffing up, the seal probably failed.
Run your fingers along the seal line—it should feel smooth, no gaps or wrinkles. A good seal looks like a solid band across the bag.
When you open a vacuum-sealed bag, the food should look and smell fresh. If it’s slimy, discolored, or smells off, something went wrong.
We like to test new sealers by sealing a slice of bread and leaving it out. If it stays soft, the seal’s good. If it goes stale fast, time to troubleshoot.
If your sealer has a vacuum gauge, the reading should stay steady. If it drops between uses, you might have worn seals or a mechanical issue.
For the DIY crowd: Any hacks for using a handheld vacuum sealer without specialty bags or equipment?
Mason jars work great with handheld sealers that come with jar attachments. We seal everything from chopped onions to berries in old jars.
If you’re out of special bags, regular plastic storage bags will do in a pinch. Poke a tiny hole for the vacuum nozzle, then seal it up with tape or a knot as soon as you’re done.
You can use a Ziploc and a straw—zip it almost shut, suck out the air, yank the straw, and seal the rest of the way.
Food-grade containers with tight lids can work, too. Remove as much air as you can by hand, then use your sealer’s hose if it has one.
Freezer bags are thicker and hold a vacuum better than regular storage bags, so they’re less likely to pop or leak.
Ever jarred a chuckle? What are the quirkiest foods that surprisingly benefit from vacuum sealing?
Marshmallows get denser and chewier after sealing, and they last forever. We stumbled on this and now bring them camping—total upgrade.
Bananas, peeled and sliced, don’t turn to mush in the freezer if you vacuum seal them. They’re perfect for smoothies months later.
Mushrooms shrink down into little flavor bombs. A bag that starts out full turns into a concentrated umami stash for soups or sauces.
Lettuce leaves can handle a gentle vacuum seal—just enough air out to slow wilting, but not so much that you crush them.
Avocados, when sealed at peak ripeness with a squeeze of lemon juice, basically hit pause on the browning process.
Can you share tips for maintaining and cleaning handheld vacuum sealers for folks who dislike reading manuals?
Wipe the sealing bar with a damp cloth after each use to keep food bits from messing up the next seal. Let it dry before packing it away.
Clean the vacuum chamber about once a month with a cotton swab and warm soapy water. Any gunk in there will hurt suction power.
Swap out the foam gaskets when they look squished or torn—usually every 6 to 12 months, depending on how much you use your sealer. It’s a tiny part, but it makes a huge difference.
Keep the air intake vents clear by brushing them with an old toothbrush. Clogged vents make the motor work overtime and kill suction.
Store your sealer with the lid cracked open so the gaskets don’t get permanently squished. It’s a small habit that keeps things working longer.
What's the real deal on the shelf-life extension of veggies and fruits when vacuum sealed, any firsthand experiences?
Fresh herbs? Instead of wilting after a few days, they can hang on for two or even three weeks in the fridge if you vacuum seal them. Honestly, it’s kind of wild to see parsley still perky after a fortnight.
Berries, especially the delicate ones, usually get mushy in a couple days, but with vacuum sealing, you’re looking at a solid week, sometimes two. I’d recommend pre-freezing them for a bit so they don’t get squished—it really helps keep that nice bite.
Carrots and celery are a different story. When you vacuum seal them (just make sure they’re bone dry first), they can stay crisp for almost a month. Compare that to the usual sad, limp sticks after a week or so in the crisper drawer.
Leafy greens are tricky, but if you dry them well and seal them up, they’ll last close to two weeks. Still, I’ve had a few batches go slimy faster than expected, so results can vary.
Stone fruits—think peaches, plums—hold their peak for up to two weeks if you vacuum seal right after a quick freeze. Otherwise, you’re lucky to get five days before they start getting too soft. Anyone else tried this? I’m curious if it works as well for nectarines.
Share:
Vacuum Sealing & Microwave Reheating: Safety Tips and Best Practices
Vacuum Sealing & Microwave Reheating: Safety Tips and Best Practices