
Check out our latest home & kitchen collection!
You know that sinking feeling when you can't find something important at home or work? You dig through boxes, shuffle papers, and wonder why your organizing efforts seem to unravel so fast
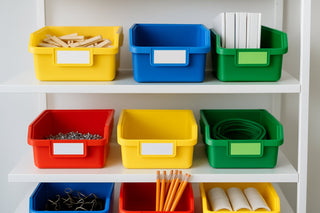
Color-coding, when paired with smart labels and the right bins, creates visual systems that actually work with how our brains process information. Assigning colors to categories and matching them with clear labels cuts out guesswork and makes it tough to mess up where things go.
The real magic is in how simple and sustainable this is. We're not just making things look pretty for a day or two. We're building systems that stick because they play to how we naturally sort and remember stuff. Organization starts to feel less like work and more like a habit.
Key Takeaways
- Color-coding taps into our brain's visual strengths, making sorting and finding things faster and more natural.
- Pairing labels with the right storage containers keeps systems easy for anyone to maintain.
- These tricks work everywhere—from kitchens to closets—by using visual cues and practical storage.
The Power of Color-Coding
Color-coding can turn chaos into order by using our brain's knack for processing visuals. With the right color choices, sorting becomes almost automatic.
Psychology Behind Color Organization
We process colors way faster than words, which makes color-coding a super-efficient way to organize. Studies show visual categories help us remember and decide faster.
Colors spark different feelings, too. Red means urgent, grabs attention. Blue feels calm and professional. Green is about growth or being done.
Yellow energizes, gets us thinking. Orange signals caution or something pending. Purple feels special or premium.
When we assign colors with intention, they become instant cues. Our eyes spot patterns and categories before we even realize it, so we spend less energy on decisions.
Consistency matters. Once we set color meanings, our brains start to expect them, making the whole system feel second nature.
Assigning Colors to Categories
Start by figuring out your main categories. List what needs sorting, then group into 4-6 main buckets—any more and it gets confusing.
Pick colors that fit the category. Red bins for urgent or hazardous stuff. Green for finished tasks or recycling. Blue for work documents or references.
Use bright colors like yellow or orange for things you grab a lot. Neutrals like gray or beige can hold seasonal or rarely-used things.
Here's a quick framework:
| Category Type | Suggested Colors | Examples |
|---|---|---|
| Urgent/Active | Red, Orange | Bills due, current projects |
| Reference | Blue, Navy | Manuals, archived files |
| Completed | Green | Finished work, seasonal items |
| Supplies | Yellow, Purple | Office materials, tools |
Make sure your labels match your bin colors for a consistent look.
Tips for Selecting a Color Palette
Stick to 4-6 colors max. Too many, and it just gets overwhelming.
Pick colors that really stand out from each other. Skip combos like navy and royal blue, or two similar greens.
Lighting matters. Office fluorescents can wash out colors, while sunlight can make them pop. Test your picks in the actual space before buying a bunch of bins.
Think about what colors are easy to find in stores. Reds, blues, greens, and yellows are everywhere. Fancy colors might be a pain to replace or expand later.
If others will use your system, remember color-blindness. Red and green together can trip people up. Use blue and yellow, or add patterns and shapes to labels for extra clarity.
And honestly? Pick colors you like. If it feels good to use, you’re way more likely to stick with it.
Labeling Strategies That Last
Good labels need the right materials, clear fonts, and smart placement. Waterproof labels and a decent label maker can turn a temporary fix into something that actually lasts.
Choosing the Right Label Materials
Vinyl labels hold up to moisture, scuffs, and daily handling way better than paper. Paper labels tend to peel off in humid spots—we’ve all seen it.
Waterproof labels are a must for kitchens, bathrooms, and garages. Look for ones made for your space.
Label makers give you neat, consistent results with sticky backing that lasts. They’re great if your handwriting is, well, not your strong suit.
Here’s a quick rundown:
- Vinyl: Tough for high-traffic spots
- Polyester: Stands up to chemicals
- Paper with lamination: Cheap for indoors
- Removable adhesive: Good for temporary sorting
Permanent adhesive works if you don’t plan to move stuff. Removable is best if you like to change things up.
Temperature swings can mess with adhesives, so check that your labels are rated for your space.
Best Fonts and Readability Tips
Sans-serif fonts like Arial or Helvetica are easy to read, even small. Skip the fancy fonts—they’re a pain when you’re in a hurry.
Go bigger than you think. 12-point minimum is a good baseline so you’re not squinting.
Contrast is key:
- Black on white
- White on dark colors
- Dark blue on light gray
ALL CAPS slows us down, even though it looks bold. Use sentence case and maybe bold for clarity.
If your labels are narrow, use a condensed font. Wide labels can handle regular spacing.
Keep your formatting consistent—one font family for everything just looks better.
For color-blind folks, avoid red-green combos. Blue and yellow are safer bets.
Labeling for Easy Access
Put labels where your eyes naturally go—eye level, front and center.
Front-facing labels on bins save you from having to move everything. Side labels only work if things never move.
In deep storage, use labels on both the front and top of bins so you can spot them from any angle.
Group labels the same way in each area. Spice jars do best with labels on the front; storage bins need them on the front and top.
Size your labels for how far away you’ll be—desk labels can be small, but storage across the room needs to be bigger.
Use bigger or colored labels for main categories, smaller or plain ones for subcategories. It helps your eyes find the right spot fast.
If you’re in a high-touch area, cover labels with clear tape or laminate them to keep them from wearing out.
Smart Storage Bins for Every Space
The right bins can turn a cluttered mess into something you actually want to keep organized. But it only works if you pick the right materials, sizes, and stack them smartly.
Picking the Right Storage Containers
Match your bins to their job and location. Plastic bins are the go-to for most things—they resist moisture and wipe clean easily.
Clear bins let you see what’s inside without opening everything. That alone saves so much time.
Some size guidelines:
- Small (6-12 quarts): Crafts, bathroom stuff, desk supplies
- Medium (18-54 quarts): Seasonal clothes, toys, pantry items
- Large (64+ quarts): Holiday decor, blankets, garage stuff
Stackable bins use vertical space best. If you get them from the same brand, they’re more likely to stack securely.
Metal bins are great for tools or damp basements. They cost more but last forever in rough spots.
Stacking and Placement Techniques
Put heavier bins at the bottom. It keeps stacks stable and stops lighter stuff from getting crushed.
Don’t stack more than three or four high. Any taller gets wobbly and makes it a pain to reach the bottom.
Some quick placement tips:
- Keep what you use most at eye level or within easy reach
- Stash seasonal things up high or out of the way
- Heavy bins go on sturdy shelves or the floor
Label both the front and sides. Side labels help when bins are packed against walls or under shelves.
Leave a little space between stacks for airflow. It keeps things dry and makes bins easier to grab.
For stuff you use all the time, rolling carts make bins mobile and save your back when reorganizing.
Decluttering for Real Life
Decluttering isn’t about perfect Instagram shots—it’s about making your actual stuff manageable. The trick is building simple systems that help you decide what stays and what goes, fast.
Sorting Items for Keep, Donate, Discard
Grab three bins: keep, donate, discard. That’s all you need.
Set a timer for 15 minutes and tackle a small area. Pick up each thing and decide right away. If you’re stuck for more than 10 seconds, it probably goes in the donate bin.
Questions for the keep pile:
- Have I used this in the last year?
- Does it do something for me now?
- Would I buy it again?
Donate stuff that’s still good but just not right for you—clothes that don’t fit, books you’ve read, kitchen gadgets collecting dust.
Trash broken, expired, or just plain useless stuff. Don’t donate stained clothes or dead electronics—no one wants those.
Color-coded bins speed things up. Try green for keep, blue for donate, red for discard. The color cues help you stick to your choices.
Making Downsizing Manageable
Downsizing can feel huge—so break it up.
Start with one drawer or shelf. Finish it completely before moving on. Small wins keep you going.
Try the one-in-one-out rule for tough categories. Buy a new shirt? An old one leaves. It keeps the clutter from creeping back.
Set daily goals that are realistic. Maybe just clear one surface or sort one box. Small steps beat marathon sessions that leave you wiped out.
Take photos of sentimental stuff you can’t keep but want to remember. Works great for kids’ art, old cards, or family things you just don’t have space for.
Most important: don’t shop while decluttering. You can’t organize your way out of too much stuff if you keep bringing more home.
Color-Coding and Labeling in the Kitchen
Kitchen organization is a breeze when you assign colors to food types and use clear labels for freshness dates. Smart labels help prevent cross-contamination and make cooking less hectic.
Organizing the Pantry
Give each pantry zone a color. Green labels for produce, red for proteins, yellow for grains—it’s instant recognition.
Sample pantry color system:
- Green: Veggies and fresh herbs
- Red: Raw meats and seafood
- Yellow: Grains and pasta
- Blue: Dairy
- Orange: Snacks and treats
Clear bins with colored labels beat opaque ones every time. You see what’s inside without digging.
Add expiration dates to labels to cut down on food waste. Use a traffic light system—green for fresh, yellow for “use soon,” red for almost expired.
A wall-mounted label maker saves counter space and keeps your system easy to update. You can whip up new labels whenever you restock.
Making Meal Prep Easier
Color-coding makes meal prep way less stressful. Group ingredients by recipe or diet needs. Give each family member their own color for snacks and meals.
Meal prep color ideas:
- Assign each day a color
- Use three color groups: breakfast, lunch, dinner
- Special colors for allergies or dietary needs
Pre-labeled containers speed up the week. Prep ingredients in their color-coded bins, then just grab and go at mealtime.
Set up fridge zones with colored bins or labels. Veggies in green, leftovers in yellow, raw proteins in red.
Clear labels help you avoid kitchen mishaps. Nobody wants to grab yesterday’s fish by mistake when everything’s labeled and dated.
Mastering Clothing and Closet Organization
Color-coding can turn a messy closet into something you can actually use. Labels keep it that way, so you’re not hunting for your favorite shirt every morning.
Seasonal Sorting with Color-Codes
Let's be honest—closet organization often feels like a battle against chaos. But if you follow nature's lead, you can use seasonal color shifts to keep things fresh. In the warmer months, shove those whites, yellows, and pastels right up front so you don't have to dig for a tee when it's already sweltering.
When the cold creeps in, just swap the order. Those deep burgundies, navy blues, and forest greens deserve the spotlight, matching the season's heavier fabrics and cozier mood.
Spring? That's anyone's guess. Weather can't make up its mind, so keep light blues and soft pinks handy for easy layering. Honestly, flexibility is your best friend.
Here's how the seasonal color system breaks down:
- Summer: Whites, yellows, bright blues, pastels
- Fall: Burgundy, orange, brown, deep reds
- Winter: Navy, black, dark green, gray
- Spring: Light blues, pinks, lavender, mint green
Try arranging each color group from lightest to darkest. It just looks better, and you'll find the right shade faster on those rushed mornings when coffee hasn't kicked in.
Labeling Tricks for Clothing Storage
Labels are a lifesaver if you want to keep your closet from sliding back into chaos. Stick to one method for everything—consistency really does make life easier.
Transparent bins with colored labels are a game-changer for accessories. You can spot that blue scarf without turning the whole bin upside down. For your off-season stuff, get specific. Labels like "Winter - Dark Blues" or "Summer - Light Pastels" take the guesswork out of swapping wardrobes.
Invest in labels that survive a little abuse—think waterproof or laundry-safe. Removable tags on hangers help you keep up the color-coding, even when you're racing through laundry day.
Bin labeling tips:
- Go big with the font
- Add a little color swatch to each label
- Stick labels at eye level
- Swap out faded ones as soon as they start to peel
Mixing labeling styles just creates confusion. Find a system that works and stick with it. It's not glamorous, but it saves headaches.
Frequently Asked Questions
Setting up a sorting system isn't just a one-and-done thing. It takes planning, a little trial and error, and some honest maintenance. Here are a few questions that come up all the time:
What are the top tips for implementing a color-coded sorting system that won't lose its charm over time?
Pick colors that actually make sense to you. Red for urgent stuff, green for finished tasks, blue for everyday—use what feels natural. Don't pick bins that show every smudge; white looks sharp at first but gets gross fast.
Keep your categories broad. "Office supplies" beats "blue pens vs. black pens" because it flexes as your needs change.
Try your system out for a couple weeks before you commit. If you keep ignoring certain bins or mixing things up, tweak your categories now instead of later.
How do you effectively label for a sorting system to ensure it's user-friendly and highly functional?
Use both words and pictures on your labels, especially if you share the space. A little icon next to the text helps everyone, no matter how they process info.
Make labels big enough to read from a couple feet away. No one wants to squint while juggling a pile of stuff.
Choose label materials that can handle your space. Paper won't last in a damp basement, but vinyl will hold up.
Keep label text short and to the point. "File immediately" is way better than a rambling sentence.
Can you suggest innovative ways to use bins in a sorting system that go beyond the usual 'toss and forget' method?
Try staging bins for stuff that's in limbo. One for "take upstairs," another for "return to garage"—batching errands makes life easier.
Set up a processing station with a few small bins. Sort mail right away into "bills," "read later," and "file" so you only touch each piece once.
Clear bins with colored lids are underrated. You can see what's inside but still keep your color code. Perfect for seasonal gear or project supplies.
Nesting bins are a space-saver. Stack them when you don't need them, then pull them out for big organizing projects.
What are some common pitfalls when setting up a home or office sorting system and how can you avoid them?
Don't go overboard with categories at first. Too many just make things confusing. Start with three to five, then add more only if you really need them.
Put bins where you actually drop stuff—not just where they look good. Otherwise, no one will use them.
Pick bins that fit your real volume. If they're too small, you'll end up with overflow and frustration.
Get everyone on board before you change things up. Ask family or coworkers what categories make sense to them, or you'll just face resistance later.
How do you maintain and refresh a sorting system without having to overhaul it completely every year?
Set a reminder for a quick five-minute bin check every month. Dump out each bin and make sure everything still fits the label.
Swap worn-out labels as soon as they start to fade. It keeps things looking sharp and encourages everyone to stick with the system.
Add or remove bins based on what you actually use. If a bin stays empty for months, just ditch it.
Switch up bin locations now and then to stop the habit of tossing everything into the closest one, no matter what it's supposed to be for.
What are the best practices for teaching others to adhere to a new sorting system, especially for those who are organizationally challenged?
Kick things off with a no-judgment practice week. Let folks ask questions, try things out, and mess up without worrying about consequences.
Put up simple visual guides that show what goes in each bin. Honestly, photos beat out written lists—people just glance and know what to do.
Start small. Introduce just a couple of categories at first. Once everyone gets the hang of it, you can layer in more. Piling on too many rules from the start? That just sets people up to bail.
Catch someone doing it right? Say something! A little recognition goes a long way. People respond better to encouragement than to nitpicking.
Have a backup for the weird stuff that doesn’t fit neatly anywhere. An “ask me” bin or box gives people a safety net instead of forcing them to guess or give up.