
Check out our latest collection of compact vacuum sealer for food!
Food spoilage during camping trips can turn your outdoor adventure into a stomach-churning mess. We’ve all opened a cooler to find slimy lunch meat or realized our snacks went stale after just a day on the trail. The challenge only grows when you’re backpacking for days or camping far from any fresh supplies.
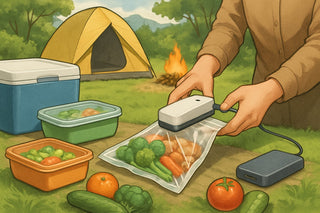
USB-powered vacuum sealers create an airtight barrier that blocks moisture and oxygen from reaching your food, extending freshness up to five times longer than traditional storage methods while dramatically reducing pack weight and space. These little devices have honestly changed the game for outdoor meal planning. Now we can bring fresh ingredients and pre-prepped meals without lugging around a massive cooler or worrying about everything spoiling by day two.
This guide covers the basics—choosing a portable vacuum sealer, prepping meals that’ll actually last, and using these gadgets in the wild. We’ll toss in some practical tips for field use and a few creative ideas for getting more out of your sealer than just food storage.
Key Takeaways
- USB vacuum sealers keep food fresh up to five times longer by removing air and moisture
- These gadgets cut pack weight and space, making multi-day trips way easier
- Good prep and sealing mean you can enjoy real food the whole time you’re out there
Why Fresh Food Matters During Travel and Camping
When you’re out in nature, food safety isn’t just a nice-to-have—it’s essential. If something goes bad, you can’t just pop into a clinic. Proper storage keeps meals safe, nutritious, and, honestly, way more enjoyable.
Risks of Spoiled Food Outdoors
Getting sick from bad food in the woods? That’s a trip-ender. Most of us are hours away from help if something goes wrong.
The temperature danger zone—anything between 40°F and 140°F—lets bacteria multiply fast. Leave food in that range for more than two hours, and it’s risky.
Bacteria like Salmonella and E. coli love warmth. They can cause brutal cramps, vomiting, and diarrhea.
Spoiled food doesn’t just make you sick; it also attracts wildlife. Bears, raccoons, and even smaller critters can sniff out rotten smells from a mile away.
Out here, the fallout gets serious:
- Dehydration from food poisoning is no joke when water’s limited
- If someone gets sick, it can mess up the whole group dynamic
- Emergency evacuations? Expensive and stressful
- Sometimes, the whole trip just ends early
Preventing Foodborne Illnesses
Most food-related sickness is avoidable if you store things right. Keeping perishables below 40°F is the gold standard. Ice melts, but vacuum-sealed portions stay fresh longer in a cooler.
To avoid cross-contamination, always separate raw meats from everything else. Use different boards and knives for raw protein.
Hand washing gets tricky without running water, so pack extra sanitizer and biodegradable soap.
Some packing tricks:
- Pre-freeze vacuum-sealed meats
- Use separate coolers for drinks and food
- Pack items in reverse order of use
- Toss a thermometer in your cooler to keep an eye on temps
Maintaining Meal Quality and Taste
Fresh ingredients make camp meals something to look forward to, not just “fuel.” Nobody wants mushy sandwiches or freezer-burned meat after hiking all day.
Vacuum sealing helps preserve texture. Veggies stay crisp, and meats keep their juices and flavor.
It also stops strong smells (like onions) from seeping into everything else.
Nutritional value drops fast when food’s exposed to air and heat swings. Fresh produce loses vitamins way quicker than you’d think.
To keep things tasty and healthy:
- Seal portions right after buying
- Squeeze out extra air to avoid ice crystals
- Store similar items together
- Use food within safe timeframes
Honestly, if you spend hours planning your trip, your food deserves the same effort.
How USB‑Powered Vacuum Sealers Protect Your Food
USB-powered vacuum sealers pull oxygen out and lock food in airtight bags. This blocks bacteria, slows spoilage, and keeps raw stuff separated from ready-to-eat meals.
Airtight Sealing to Lock In Freshness
When you suck out the air, you basically hit pause on spoilage. These sealers pull the air from special bags, creating an oxygen-free zone that makes it way harder for bacteria to grow.
This works great for camping. Your marinated chicken stays tender, and veggies won’t get soggy after a couple of days in the cooler.
The small size of USB units is perfect for RVs or cramped campsites. You can seal up last night’s steak and actually look forward to eating it again tomorrow.
Why airtight sealing rocks:
- Extends shelf life by 3-5 times
- Stops freezer burn on frozen meals
- Keeps food quality up, even with temperature swings
Reducing Waste and Food Spoilage
Nothing’s worse than opening your cooler to find half your groceries ruined. USB vacuum sealers let you pack just what you need in the right portions.
Pre-seal meal portions at home so you’re not guessing how much to prep. This keeps you from overpacking and tossing food later.
Vacuum sealing keeps food safe from cooler leaks, melting ice, and humidity. Properly sealed bags hold up even when conditions get messy.
You’ll save money, too. Preventing just one package of meat from spoiling can cover the cost of batteries for your entire trip.
Minimizing Cross-Contamination
Raw meat juices in a crowded cooler? Gross and dangerous. Vacuum-sealed bags put a solid barrier between raw and ready-to-eat foods.
Now you can pack raw chicken next to sandwich stuff without stressing. Each sealed bag keeps bacteria out of everything else.
This is extra important on longer trips when you’re juggling lots of ingredients. Each package stays isolated, even if the cooler gets jostled or the ice shifts.
USB sealers also let you portion and separate meal ingredients. Keep raw veggies apart from cooked grains, then mix when you’re ready to eat.
Choosing the Right USB‑Powered Vacuum Sealer for Your Adventure
Picking a good USB-powered vacuum sealer is about finding the right balance: small enough to pack, but powerful and versatile enough to handle your food.
Compactness and Portability
Every ounce matters when you’re backpacking. Look for models under 12 ounces and less than 8 inches long.
The best ones fold down to about the size of a paperback. Some have detachable parts to save even more space.
Size specs to keep in mind:
- Weight: ideally 8-12 ounces
- Length: 6-8 inches closed
- Width: 2-3 inches for easy packing
- Foldable or collapsible design helps
Cases are handy. Hard cases protect the gadget from bumps, but soft pouches save space.
Shape matters, too. Rectangular models usually fit better in your pack than round ones.
Battery Life and USB Charging
Battery life tells you how many bags you can seal before recharging. Most decent USB sealers manage 20-40 bags per charge.
What to look for:
- Battery: 2000-3000mAh for longer trips
- Charging: 2-4 hours via USB-C is fastest
- LED lights for battery level
USB-C models charge up faster than older USB-A ones. Some sealers work while plugged into a power bank, which is a lifesaver on longer trips.
Cold weather drains batteries quicker—sometimes by 20-30%. Keep that in mind for winter camping.
Compatibility With Different Bag Types
Versatility saves weight and hassle. The top models work with various bag brands and thicknesses.
Bag types to check for:
- Standard vacuum bags (3-5 mil)
- Mylar bags for long-term storage
- Reusable silicone bags
- Generic food storage bags
Sealing width matters, too. Six to eight inches covers most camping meals. Wider sealers work for family meals but take up more room.
Starter bag sets with different sizes are a nice bonus.
Some sealers handle textured bags better, which pull out air more effectively but need a stronger motor.
Adjustable heat settings help with different bag materials, so you don’t end up melting anything.
Practical Steps for Safe Food Storage and Meal Prep
USB vacuum sealers really change how you prep and store camp food. The trick is using the right sealing technique for each food, packing smart, and getting the most out of reusable bags.
Sealing Snacks, Meats, and Leftovers
Raw meats need double-sealing to avoid leaks. Seal the meat, then stick that bag inside another vacuum bag for backup. This keeps everything else safe.
Let leftovers cool down before sealing. Hot food causes condensation, which can mess up the seal and invite bacteria.
For snacks like nuts or crackers, leave a little air so they don’t get crushed. Use the pulse function instead of full suction.
Wet foods are tricky. Freeze things like soups or marinades for half an hour before sealing, so liquid doesn’t get sucked into the machine.
| Food Type | Prep Method | Storage Life |
|---|---|---|
| Raw meat | Double-seal, keep cold | 3-5 days |
| Cooked leftovers | Cool first, single seal | 4-7 days |
| Dry snacks | Light vacuum, leave air pocket | 2-3 weeks |
Pack-and-Go Tips for Road Trips and Trails
Organize sealed meals by day and meal type in different cooler sections. This helps keep things cold and easy to find.
Flat-packed bags stack well and thaw quicker than containers. You can fit way more food this way—sometimes 40% more than with rigid tubs.
For day hikes, pre-portion trail mix and jerky into small vacuum bags. They take up almost no space and won’t get crushed.
Put temperature-sensitive stuff in the center of the cooler, surrounded by ice packs. Vacuum-sealed bags conduct cold better than air-filled ones.
Label every bag with what’s inside and the packing date using a waterproof marker. No more mystery meals.
Using Resealable and Reusable Vacuum Bags
Good reusable bags hold up for 8-10 cycles before they start to wear out. Check the seams before every use for tiny holes.
Zip-top bags let you open and close them without cutting. You can re-vacuum after grabbing what you need.
Wash bags with warm soapy water right after use. If they held raw meat, sanitize with a diluted bleach solution.
Textured bags usually seal better than smooth ones. The little channels help air escape more completely.
For longer storage, stash sealed bags in a hard container to avoid punctures from sharp gear.
Operating Tips for Using USB Vacuum Sealers On the Go
USB vacuum sealers need a bit of know-how when you’re tight on space or cleaning isn’t easy. They work best if you use the right technique and take care of them during your trip.
Quick Sealing in Limited Spaces
A flat, stable surface is key for a good seal. Use your car hood, a picnic table, or even a cooler lid if you have to.
How to set up:
- Clear a foot of space around the sealer
- Keep bags handy
- Set up away from sand, dirt, or water
- Put a towel underneath if the surface is uneven
Power can be a challenge when you’re off-grid. Most USB sealers draw 12-15 watts; a 10,000mAh power bank usually gives you 6-8 sealing sessions.
Seal smaller portions to save power and time.
Quick Tips:
- Pre-cut bags before you leave
- Push out extra air by hand first
- Hold bags taut while sealing
- Wait 10 seconds between seals so the machine doesn’t overheat
Cleaning and Maintaining Your Device
Field maintenance keeps our USB sealer working properly throughout the trip. Food particles and moisture—those are the main enemies of portable sealers.
After each use, wipe down the sealing bar with a damp cloth. Dried food residue messes with seal strength and can wreck the heating element.
Daily Cleaning Routine:
- Unplug and let cool for five minutes
- Clean sealing chamber with cotton swabs
- Wipe exterior using a mild soap solution
- Dry thoroughly before packing away
Take a look at the sealing strip every 10-15 uses. If it’s damaged or warped, you’ll probably get air leaks, which isn’t great for food safety.
Store the device in a padded case or just wrap it in a towel. These little USB sealers don’t exactly love getting tossed around—one good bump can ruin the inside.
Beyond Food: Creative Uses for Your Portable Vacuum Sealer
This USB-powered vacuum sealer isn’t just for food. It’s surprisingly handy for protecting camping gear, first aid kits, and important papers from moisture. I’ve used mine to make waterproof pouches for electronics and documents—honestly, it’s a lifesaver when you’re out in the wild.
Packing Camping Supplies and First Aid
Vacuum sealing totally changes how we organize camping stuff. Matches, fire starters, and tinder? They stay bone dry, even in a downpour, once you seal them up.
First aid supplies benefit a lot too. Gauze, bandages, and tape stay sterile and take up way less space—about 60% less, if you want numbers.
Clothing items like extra socks and underwear shrink down dramatically. I’ve managed to pack three days of clothes in the space I’d usually need for just one.
Toiletries are another win. Toothpaste, soap, shampoo—seal them all together and you won’t get that dreaded “shampoo scented everything” situation.
Emergency supplies like batteries, blankets, and whistles last longer when you protect them from moisture. We’ve noticed vacuum-sealed batteries just don’t corrode as quickly in humid places.
Waterproofing Gadgets and Documents
Electronics can be a nightmare to keep dry on camping trips. We seal our backup chargers, batteries, and USB cables in clear bags so we can see what’s what.
Documents need the same treatment. Camping permits, insurance cards, emergency contacts—they all survive accidental dunks if you seal them first.
Cash and credit cards? Trust me, wet money is a pain at campground stores. Vacuum sealing solves that.
Maps and trail guides are another must-seal. Wet paper maps are useless, but a vacuum-sealed one can handle river crossings and rainstorms.
Small electronics—GPS units, headlamp batteries, memory cards—stay dry and are easier to find in a packed bag when they’re sealed. The clear bags help you spot what you need without digging.
Frequently Asked Questions
When we’re planning our next camping adventure with vacuum-sealed meals, a lot of questions come up about food safety, storage times, and gear care. People worry about bacteria, travel rules, and which brands work best.
What's the real deal on food freshness: How long can vacuum-sealed meals last on my travels?
Vacuum-sealed cooked meals usually last 1-2 weeks in the fridge, and up to 2-3 months in the freezer. That’s plenty for most camping trips, since we’re rarely out longer than a week or two.
Temperature is everything. If you’ve got a decent cooler with ice, your meals should stay fresh 3-5 days. Without refrigeration, eat vacuum-sealed food within 24 hours—better safe than sorry.
Dehydrated, vacuum-sealed foods stick around way longer. Store them in a cool, dry place and they’ll last 1-2 years. Perfect for backpackers who need lightweight, long-lasting meals.
If the seal’s broken or something smells weird, just toss it. No point taking chances.
Are all my snacks safe? Identifying which foods are ideal for vacuum sealing before a camping trip.
Not every food loves being vacuum sealed. We’ve found that cooked meats, stews, pasta, rice dishes, and prepped veggies seal up nicely and reheat well.
Sharp snacks like crackers or chips can poke holes in bags, so use some padding or just pick softer foods. Crusty bread? It gets squished and loses that nice texture.
High-moisture foods need extra care. Pat things dry before sealing, and avoid sealing stuff with lots of liquid—it can mess with the process.
Delicate foods—berries, pastries—need the pulse feature so they don’t get crushed. It pulls out most of the air without smashing everything.
Got a compact USB sealer? Let's chat about the best cleaning practices to keep it sealed like a pro!
Clean your compact USB sealer every few uses to keep it working well. Unplug and let it cool first.
Wipe the sealing bar with a damp cloth to clear away food gunk. The heating element can get buildup that messes with your seals. For stubborn spots, a soft brush works.
The drip tray pops out for easy cleaning—just wash it with warm, soapy water. Clean the vacuum chamber with a damp cloth, but don’t let water get near the motor.
Once a month, do a deeper clean: use a cotton swab dipped in rubbing alcohol to wipe the sealing elements. This clears out oils and keeps food flavors from mixing.
Travel pals, take note: What are the rules for jet-setting with vacuum-sealed goodies in your bag?
TSA says vacuum-sealed solid foods are fine in both carry-on and checked bags. You can bring your sealed camping meals on flights, no big deal. Just remember, liquids or gels in carry-ons have to follow the 3-1-1 rule.
International trips are trickier. Many countries ban meat, dairy, or fresh produce at the border. Stick to store-bought or non-perishable foods if you’re flying overseas.
Sometimes, vacuum-sealed bags puff up during flights because of cabin pressure. That doesn’t always mean the seal’s broken, but double-check before eating.
I’d suggest packing sealed items in hard-sided containers to avoid punctures from other stuff in your bag. Label everything so security can see what’s what—makes life easier.
Can tiny invaders thrive in a sealed space? Discover if bacteria can crash your vacuum-sealed food party!
Vacuum sealing slows down bacteria, but it doesn’t wipe them out. Anaerobic bacteria—like botulism—actually like oxygen-free spaces, so you still need to watch temps.
Let cooked food cool to room temperature before sealing. Hot food makes condensation, and moisture is a playground for bacteria inside the bag.
Vacuum sealing really cuts down on aerobic bacteria (the kind that spoil food fast), so your meals last longer. But nothing lasts forever—stick to safe storage timelines.
The best defense is good prep: clean hands, sanitized surfaces, and fresh ingredients. That’s what really keeps your vacuum-sealed food safe on the trail.