

Check out our latest collection of compact vacuum sealer for food!
Living in a cramped urban apartment means every square inch of counter space is precious real estate. We've all played that familiar game of kitchen Tetris, shuffling appliances just to carve out enough room to prep a meal. That constant tug-of-war between what we want in the kitchen and what actually fits can make even the most enthusiastic home cook sigh in frustration.
Vertical compact vacuum sealers take food preservation off your counters and into those overlooked spaces—walls, tight shelves, even inside cabinets. These little machines can keep food fresh up to five times longer and barely take up any room. Some are as small as 14 x 6 inches, yet they still bring serious sealing power.
It’s all about rethinking how we use the kitchen. Instead of piling everything onto that tiny counter, why not build up? With smart storage, clever furniture, and a few tricks, even the smallest kitchen can feel surprisingly functional.
Key Takeaways
- Vertical compact vacuum sealers cut the clutter and help food stay fresh up to five times longer
- Strategic vertical storage and multi-use furniture make kitchens under 100 square feet work harder
- Smart storage paired with compact appliances creates a more organized, less stressful kitchen
Why Counter Space Is Gold In Urban Apartments
Urban apartments force us to get creative. Every inch of counter is a battleground. Typical kitchen layouts in these places don’t exactly do us any favors.
Challenges Of Compact Living
If you’re in a small apartment, you know the drill—everything’s a puzzle. Studios average about 500 square feet, and that means every surface has to earn its keep.
Counter space? That’s the most hotly contested area. We need it for prepping, for the coffee maker, toaster, and all those daily must-haves. But then, where do we actually cook?
Storage? It’s a constant obsession. With barely any closet space, we have to be choosy about which gadgets stick around.
Counters do triple duty: prep area, storage, sometimes even a makeshift dining table. It’s a lot to ask from a few feet of laminate.
Typical Kitchen Layouts In Small Apartments
Urban apartments mostly stick to a couple of kitchen styles. Galley kitchens are everywhere—two counters facing each other with a narrow walkway.
You might get 6-10 feet of counter, but that shrinks fast once you add a sink, stove, and a couple of appliances.
Single-wall kitchens are even trickier. Everything’s lined up along one side, leaving maybe 4-6 feet of real workspace. The fridge alone can eat half of that.
Corners? They’re usually wasted because standard appliances don’t fit, so we end up with awkward dead zones.
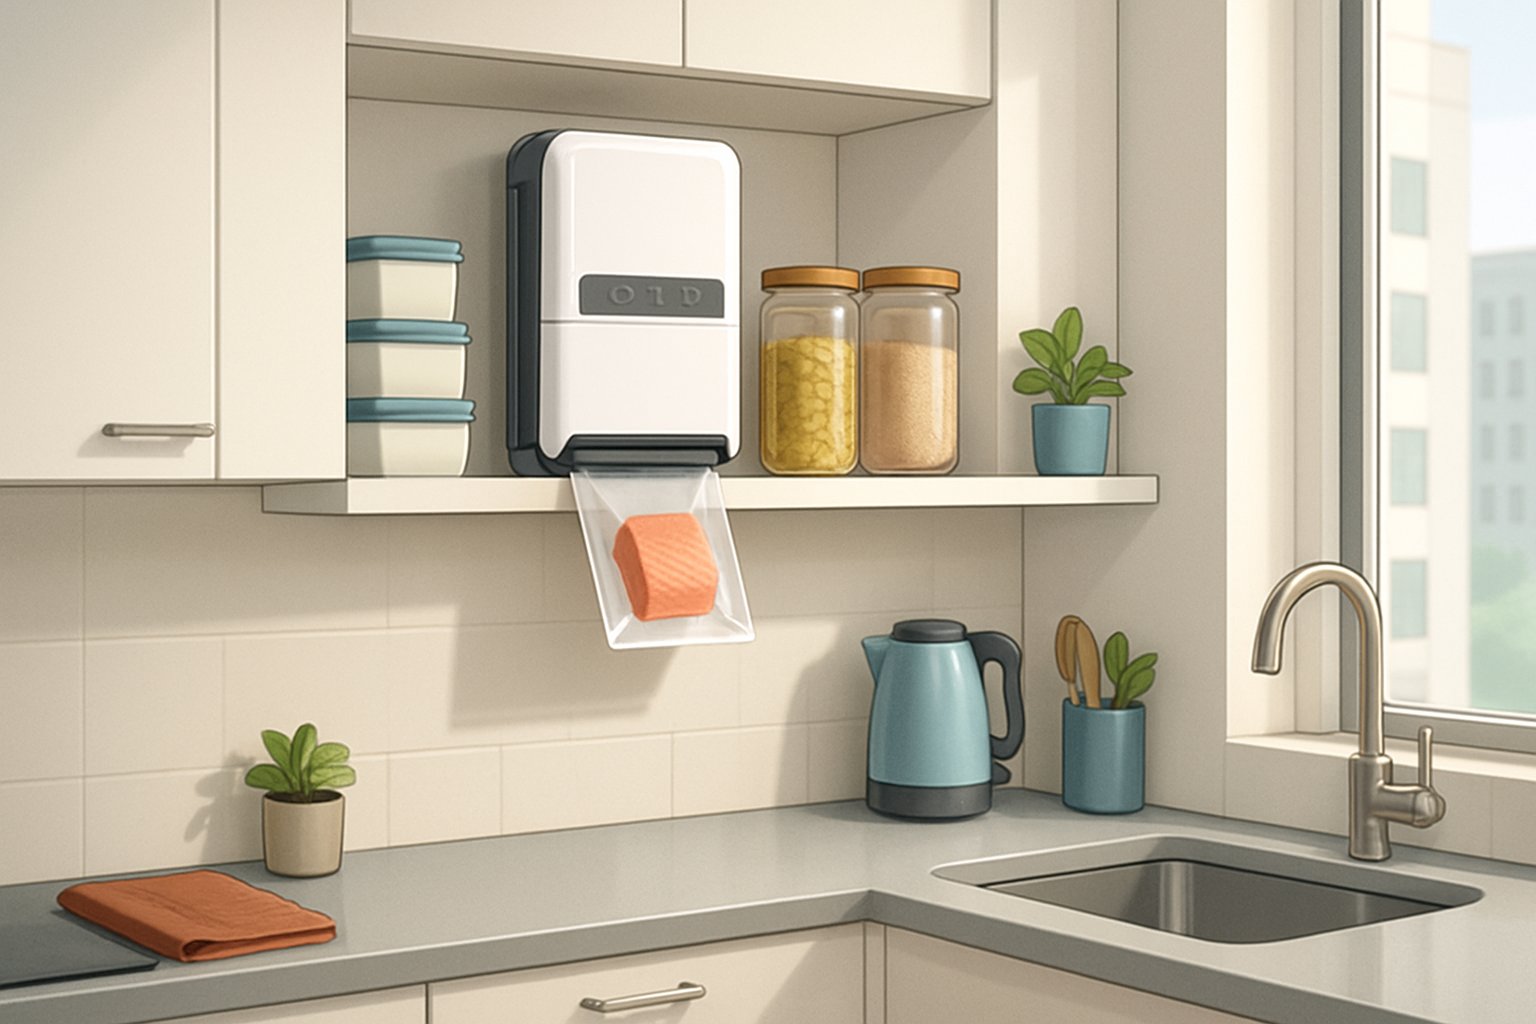
Vertical Compact Vacuum Sealers: The Ultimate Space Saver
Vertical vacuum sealers totally change how we stash appliances in tiny kitchens. By standing upright, they free up those precious counters and still do the job.
How Vertical Designs Free Up Counters
Traditional vacuum sealers hog counter space with their horizontal shape, but vertical models flip that on its head. You can stand them up against the backsplash or tuck them into narrow cabinets.
That vertical space is a lifesaver in a studio. Instead of swallowing 18 inches of counter, these take just 6 inches and stand tall.
Most vertical sealers are about 14 x 6 inches—smaller than your average cutting board.
They slide neatly between other appliances or into slim gaps. When you’re not sealing, just stash them in a cabinet. Out of sight, out of mind.
Choosing The Right Model For Limited Spaces
Size counts, but features matter too. In a small kitchen, you want a sealer that fits but also works for your needs.
Look for bag alignment guides—they help avoid waste when your prep area’s tiny.
Check if it has cord wraps or accessory storage built in. That’s handy when every inch matters.
Don’t settle for weak power just because it’s compact. Good vertical sealers still keep food fresh five times longer, even if they’re half the size.
Wet and dry settings are useful. When you don’t have room for extra gadgets, versatility is gold.
Where To Store A Vertical Vacuum Sealer In A Small Apartment
The trick with vertical vacuum sealers is to keep them handy but off the counter. Let’s look at some ways to make that happen—without making your kitchen feel even smaller.
On Open Shelves And Tall Cabinets
Open shelves are a lifesaver when you need your vacuum sealer close by but don’t want it taking over your counter. Hang floating shelves at eye level or just above, so you can grab the sealer when you need it.
Kitchen pantry shelves usually have enough depth for most vertical sealers. Measure first—most are 6-8 inches wide and 12-15 inches tall.
Tall cabinets work too. Dedicate a shelf to your sealer, and maybe keep bags and accessories right below.
Quick tip: Make sure the shelf can handle at least 15-20 pounds. Some of these sealers are heavier than they look.
Upper cabinets are an option, but if you use the sealer daily, don’t put it too high up—you’ll regret it.
Inside Multi-Functional Furniture
Multi-use furniture is a must in apartment life. Kitchen carts with closed storage can hide your vacuum sealer and give you extra prep space on top.
Storage ottomans? They’re not just for shoes. If your sealer’s on the lighter side, you can stash it inside and still have extra seating.
Bar carts aren’t just for cocktails anymore. The bottom shelf fits most vertical sealers, and the top can hold coffee or a plant.
| Furniture Type | Best For | Weight Limit |
|---|---|---|
| Kitchen cart | Heavy sealers | 30+ lbs |
| Storage ottoman | Light sealers | 15 lbs |
| Bar cart | Medium sealers | 20-25 lbs |
Credenzas and console tables with closed storage keep your sealer dust-free. Pull it out when you need it, hide it when you don’t.
Maximizing Efficiency: Integrating Vacuum Sealers With Smart Storage
Smart storage turns your vacuum sealer into more than just a one-trick pony. Pair it with over-the-door organizers or under-bed systems to squeeze out every bit of space.
Pairing With Over-The-Door Organizers
Over-the-door organizers are a sneaky way to create a mini sealing station. Most can handle 20-30 pounds, so lightweight vertical sealers fit just fine.
Put your sealer on the middle shelf of a three-tier organizer. Bags and accessories go up top, finished packages down below.
What you’ll need:
- Sturdy door organizer (at least 25-pound capacity)
- Non-slip mats to keep the sealer steady
- Clear bins for organizing bags
It’s all about easy access without losing counter space. Just open the pantry or closet door and everything’s right there.
This works especially well in galley kitchens where cabinet doors face your work area. You keep things flowing and hide the sealer away when you’re done.
Leveraging Under-Bed Storage And Murphy Beds
Under-bed storage isn’t just for shoes and sweaters—rolling carts can turn that dead space into a spot for your vacuum sealer.
What works best:
- Cart height: keep it under 8 inches
- Weight: up to 50 pounds
- Casters that lock so it doesn’t roll away
Murphy beds are another wild card. Fold the bed up, and you get a wall of storage deep enough for sealers, bags, and even some bulk groceries.
Custom murphy beds often have shelves 18-24 inches deep—plenty for a compact sealer and supplies.
If you’re building out a murphy bed, add an outlet inside. That way, you can use the sealer right there, no extension cords needed.
This setup is a game-changer for studios, where kitchen space is at a premium.
Complementary Urban-Apartment Hacks For Small Kitchens
Hidden storage ottomans and wall-mounted racks help clear up counters fast. These tricks, paired with vertical vacuum sealers, make even tiny kitchens work.
Using Ottomans With Storage For Kitchen Supplies
Dining areas can double as storage with ottomans that hide kitchen stuff inside. They’re perfect for bulk items, appliances you don’t use every day, or just extra towels.
Great ottoman stash ideas:
- Paper towels and cleaning gear
- Baking pans you rarely use
- Table linens and towels
- Niche appliances—waffle maker, anyone?
Keep ottomans close to the table or kitchen entrance for easy grabs. If you can, pick water-resistant materials—spills happen.
The best part? Your counters stay clear, and the ottoman does double duty as a seat for guests or extra workspace.
Wall-Mounted Racks And Overhead Shelving
When you’re short on counter, go vertical. Wall racks and shelves turn empty walls into real storage.
Must-have vertical options:
- Magnetic knife strips—ditch the block
- Spice racks—mount inside cabinet doors
- Pot rails—hang pans within reach
- Over-the-door organizers—extra space for cleaning supplies
Floating shelves above counters keep daily items handy. Over-the-door organizers are great for things like foil and plastic wrap.
Mount stuff where you can actually reach it. Everyday tools should be low; seasonal stuff can go up high.
Selecting Multi-Functional Furniture For Better Kitchen Organization
Multi-purpose furniture can make even the tiniest kitchen feel bigger. Pieces that combine seating, storage, and workspace mean you don’t need a separate dining room just to stay organized.
Sofa Beds With Built-In Storage
Sofa beds with storage underneath are surprisingly handy in studios where the kitchen and living room blend together. Stash big kitchen items—slow cookers, mixing bowls, seasonal gear—under the cushions or in the armrests.
They’re triple-duty: seating, a bed for guests, and a hiding spot for stuff you don’t use every day. Look for models with easy-access storage—lift-up seats or drawers are way better than complicated folding setups.
You’ll get about 10-20 cubic feet of space, enough for small appliances or linens. Reinforced frames are a must if you’re opening and closing the storage a lot.
Place your sofa bed to naturally separate the kitchen from the living area. It gives you extra seating when friends are over, and keeps overflow kitchen stuff close but out of sight.
Expandable Tables And Drop-Leaf Counters
Drop-leaf tables and expandable counters give you more space to work when you need it, and tuck away when you don’t. A 24-inch table can double in size for prep, then fold down so you can walk by.
Wall-mounted drop-leaf counters are awesome in galley kitchens. Mount them at counter height (36 inches) so they’re useful for real cooking. Folded down, they barely stick out.
Look for:
- Strong brackets—should hold at least 50 pounds
- Smooth folding—no sticky hardware
- Heat-resistant tops—put down hot pans without worry
Rolling carts with expandable tops are another good call. You get storage underneath and a bigger work surface up top. Many have locking wheels so they stay put.
If you can, grab a model with built-in outlets. It keeps cords tidy and lets you move things around as you need.
Frequently Asked Questions
Here are some quick answers to common questions about using vertical vacuum sealers in tiny kitchens—setup, storage, and day-to-day use.
How do you efficiently use a vertical compact vacuum sealer to maximize kitchen counter space?
Mount your vertical vacuum sealer on a wall or inside a cabinet to keep your counter totally clear. Lots of models include mounting brackets for walls or cabinet doors.
Set it up at chest height for comfort—no need to stoop over. This makes sealing easier in tight kitchens.
Keep vacuum bags in a nearby drawer or hang them on a hook next to the sealer. That way, everything’s close by but not in the way.
Take advantage of the vertical design—slide it into narrow spots between appliances or cabinets where a horizontal sealer would never fit.
Can you give some tips for maintaining and cleaning a compact vacuum sealer to ensure its longevity?
We usually wipe down the outside with a damp cloth after every use—nothing fancy, just enough to stop gunk from hardening.
Once a week, I clean the sealing strip using a cotton swab and a bit of warm, soapy water. Any stray food bits or bag scraps get cleared out before they can cause trouble.
Every month or so, check the vacuum chamber for any messes or spills. Most vertical sealers come with a drip tray you can just rinse in the sink.
If the suction power drops, swap out the sealing gasket. Replacement parts are easy to find and can add years to your machine.
Keep your sealer somewhere dry. Moisture can mess with the electronics, and nobody wants a flaky vacuum sealer down the road.
How do vertical vacuum sealers compare to traditional ones when it comes to saving space in urban apartments?
Vertical models usually take up 60-70% less counter space than the old-school horizontal vacuum sealers. For city kitchens, where every square inch matters, that’s a big deal.
You can mount vertical units on a wall or stash them inside a cabinet—try doing that with one of those bulky horizontal models. Suddenly, you’re not using up any counter space at all.
Traditional sealers need clear space on both sides for bag positioning, which feels awkward in a small kitchen. Vertical units just need a bit of room in front, so you can tuck them into tighter spots.
Storing a vertical sealer is a breeze. They’ll fit into narrow cabinets or slide onto slim pantry shelves—places where horizontal models just don’t stand a chance.
They do tend to run a bit slower since you’re sealing one bag at a time, but honestly, in a cramped apartment, most folks would happily trade a little speed for all that extra space.
Share:
Does Bag Thickness Matter? Comparing 3‑, 5‑ and 7‑Mil Vacuum Sealer Bags
Does Bag Thickness Matter? Comparing 3‑, 5‑ and 7‑Mil Vacuum Sealer Bags