

Check out our latest collection of compact vacuum sealer for food!
Mason jars half-full of stale rice or clumpy flour—yeah, most of us have seen that sad sight in our pantries. Buying dry goods in bulk sounds smart until they lose freshness or attract those annoying pantry pests before we can use them. But vacuum-sealing these items in mason jars? That’s a game-changer. It can keep food fresh and pest-free for years, not just months.
Using a vacuum sealer with the right jar attachment pulls air out of mason jars, locking in an airtight seal. That keeps grains, beans, pasta, spices—pretty much any dry good—good for way longer. No heat, no complicated canning, just a few tools and some basic steps. Here’s how to pick your attachments and avoid the usual sealing headaches.
If you’re meal prepping, trying to save money by buying in bulk, or just tired of tossing spoiled food, vacuum-sealing is worth a shot. This guide covers electric vacuum sealer attachments and manual options, so you’ll find something that fits your gear and budget.
Key Takeaways
- Vacuum-sealing mason jars removes air, stretching dry goods’ shelf life from months to years
- Using the right jar attachments and techniques helps avoid broken seals and spoilage
- Both electric and manual methods can work for vacuum-sealing dry goods in mason jars
Why Vacuum-Seal Dry Goods in Mason Jars?
Vacuum sealing dry goods in mason jars has some real perks. It keeps air out, extends shelf life, and blocks out moisture and pests way better than regular containers.
Benefits Over Traditional Storage
Let’s be honest, regular storage leaves our pantry staples open to air, moisture, and—ugh—bugs. When we vacuum seal dry goods in mason jars, it’s like giving our food its own little fortress.
How vacuum-sealing helps:
- Pest Prevention: No air gaps means bugs can’t get in
- Moisture Control: Keeps humidity out, so no clumping or spoilage
- Oxidation Prevention: No air, so nuts and seeds don’t go rancid
You can fit more in your pantry, too, since vacuum-sealed jars compress things a bit. And with clear glass, you can see exactly what’s inside.
Mason jars beat flimsy plastic or paper containers, hands down. They’re tough, reusable, and don’t wear out after a few uses.
Shelf Life Extension for Dry Goods
The numbers are pretty convincing. Vacuum sealing can triple how long your dry goods last.
Typical Shelf Life Extensions:
- Flour: 8 months → 2+ years
- Rice/Grains: 6 months → 4-5 years
- Nuts/Seeds: 3 months → 1-2 years
- Spices: 1 year → 3+ years
- Coffee Beans: 2 weeks → 6+ months
It’s all about getting rid of oxygen. Without it, food doesn’t go stale or rancid nearly as fast. Foods with natural oils, like nuts, see the biggest benefit, but even plain rice stays good much longer.
Airtight Seal and Food Preservation
The real magic is in that airtight seal. Mason jars are great for this, especially with their two-piece lids and a good vacuum sealing attachment.
A solid vacuum seal removes nearly all the air—about 99%. That means bacteria, mold, and yeast can’t thrive.
What makes it work:
- The lid’s rubber gasket forms the main seal
- Vacuum pressure pulls the lid tight
- Glass rims are super smooth, so nothing sneaks in
You can usually hear a little “pop” when you open a well-sealed jar. That’s how you know the vacuum held. If you store them right—cool and dry—these seals can last for years.
Plus, the airtight seal keeps the flavors and aromas in your spices, coffee, and teas from fading.
Essential Tools and Attachments for Vacuum-Sealing Mason Jars
Getting good results with vacuum-sealing mason jars means having the right stuff—jars, vacuum sealer, attachments, and a few extras. Here’s what you’ll need.
Choosing the Right Mason Jars
Not every mason jar is created equal for vacuum sealing. Ball and Kerr jars are the go-to brands—they have consistent threading and rim sizes that seal well.
Wide-mouth jars make life easier. They’re simpler to fill and clean, and most attachments fit better on them.
Go with quart jars for big stuff like rice or beans. Pint jars are perfect for spices or smaller batches.
Check jars before using them. Look for chips, cracks, or scratches, especially around the rim. Even tiny flaws can ruin a seal.
You don’t need brand new jars, but the rim must be perfectly smooth. Older jars can have little nicks that mess things up.
Picking a Compatible Vacuum Sealer
You want a vacuum sealer with decent suction. Models with higher kPa ratings seal jars faster and better.
Auto-stop features are handy—they prevent over-sealing, which can make lids impossible to remove or even damage jars.
Handheld sealers are portable but usually weaker. They’re fine for occasional use, but if you’re sealing a lot, a countertop model is better.
Corded models are more powerful, but cordless ones are convenient if you’re sealing jars somewhere without outlets.
Selecting Jar Attachment Kits
Most vacuum sealers don’t come with jar attachments by default.
A good kit gives you both sizes and connects to your vacuum sealer’s hose port. Generic attachments are cheaper, but sometimes they don’t fit as well or last as long.
The attachment needs to fit snugly over the jar lid. If it’s loose, you won’t get a good seal.
Some kits come with extra gaskets. These can wear out, so having spares is smart, especially if you’re sealing a bunch of jars.
Canister attachments can work in a pinch but aren’t as convenient or reliable as the dedicated jar attachments.
Recommended Accessories and Supplies
New mason jar lids are a must. Used ones might not seal right since the sealing compound gets worn down.
Keep some extra canning bands on hand. You can reuse them unless they’re bent or rusty. Bands just hold the lid in place during storage.
Labels and markers help you remember what’s in each jar and when you sealed it. Waterproof labels are best—they won’t fall off if things get humid.
Funnels make filling jars way less messy, especially with flour or cocoa powder. Wide-mouth funnels work best.
A jar lifter isn’t essential, but it does make handling jars safer and easier if you’re working with a lot at once.
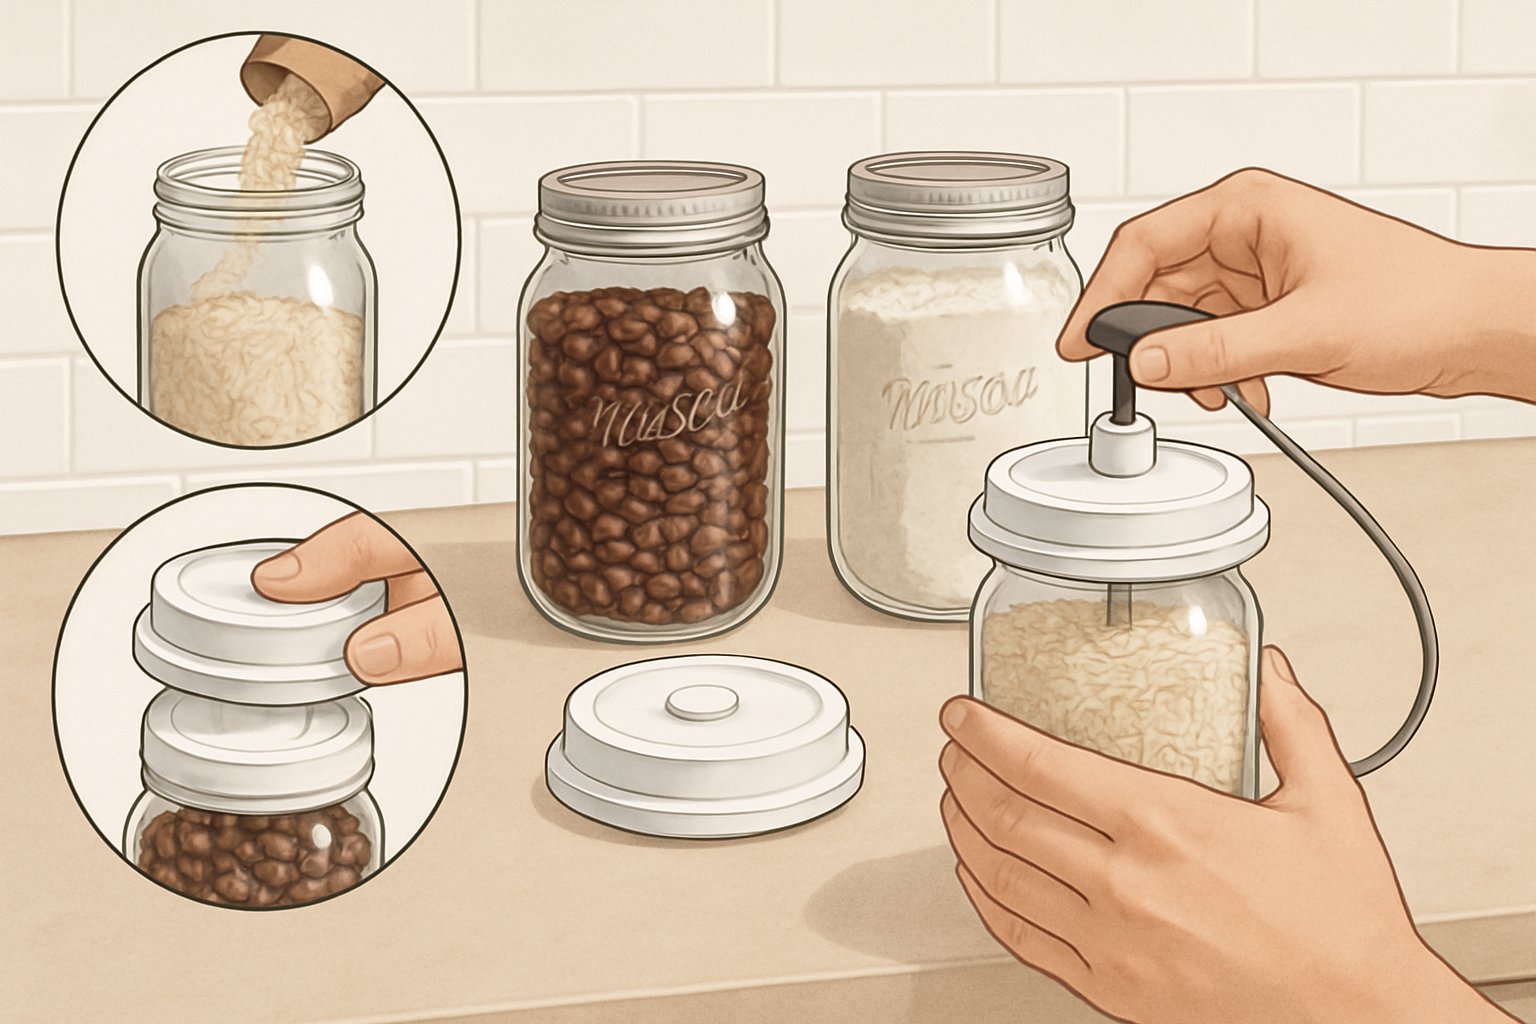
Step-by-Step Attachment Guide to Vacuum-Sealing Dry Goods
Here’s how to vacuum seal mason jars with attachments, step by step. It’s all about using the right attachment for your jar size and following a simple process.
Preparing and Filling Mason Jars
Start by sterilizing your jars and lids—boil them for 10 minutes, even if they’re new. This keeps bacteria from ruining your seal.
Let jars cool before handling. Fill with dry goods, leaving about an inch of headspace. That space helps the vacuum form properly.
Before sealing, check:
- Jar rim is clean and dry
- No cracks or chips on jar or lid
- Dry goods are at room temp
Put the flat lid on top, but skip the screw ring for now. That goes on after sealing. Make sure the lid sits flat.
Attaching the Vacuum Sealer and Accessories
Grab the right jar sealing attachment for your jar—regular mouth or wide mouth.
Place the attachment over the flat lid and press down gently so it seals around the edge. It should sit flush.
Connect the hose to the attachment, and the other end to your vacuum sealer’s accessory port. Most newer sealers have a port for this.
Double-check:
- Hose is snug on both ends
- No air leaks around the attachment
- Jar is stable on the counter
Operating the Vacuum Sealer
Turn on your vacuum sealer and hit the vacuum/seal button. You’ll hear the motor as it sucks air out—usually takes 15-30 seconds.
Watch for the lid to pull down a bit—that’s a good sign. The machine usually stops automatically when it’s done.
Let the machine finish the cycle; don’t stop it early. Some make a click or beep when they’re done.
If the vacuum doesn’t hold, check the rim and attachment. Sometimes you just need to reposition and try again.
Detaching and Testing Your Seal
Unplug the hose first, then lift off the attachment. The lid should stay put if you’ve got a good seal. Now screw on the metal ring, just finger-tight.
Press the center of the lid. If it’s sealed, it won’t flex or pop. It should feel firm and a bit concave.
Good seal signs:
- Lid stays down
- No flexing or movement
- Lid center is slightly indented
Label your jars with the contents and date. Store them in a cool, dark spot. Sealed this way, dry goods last a lot longer.
Manual and Alternative Methods of Sealing Mason Jars
No electric vacuum sealer? No problem. There are manual ways to get the air out of mason jars, from oxygen absorbers to hand pumps and even old-school canning.
Using Oxygen Absorbers
Oxygen absorbers are the simplest no-tool method. These little packets have iron powder that grabs oxygen inside the jar.
Just drop one or two packets into your filled jar before screwing on the lid. They work in a day or two to suck out the oxygen.
Absorber sizes:
- 100cc for pint jars
- 300cc for quart jars
- 500cc for half-gallon jars
Biggest plus: no equipment needed. Just add the packet and wait.
Downside? They don’t work well in humid conditions and lose effectiveness if left open to air before use.
Hand Pump and DIY Solutions
Manual vacuum pumps are another option. These use hand pressure to pull air out through special lid attachments.
Even brake bleeder pumps from auto stores can work. Hook the hose to a modified lid and pump out the air yourself.
DIY pump setup:
- Hand vacuum pump ($15-25)
- Modified lid with a valve
- Rubber gasket for a tight seal
The Pump N Seal device is a popular manual tool. It works with regular and wide-mouth jars and reusable lids.
Pump the handle 8-10 times until it gets hard to push. If there’s a gauge, it’ll show when you’ve got enough vacuum.
Manual methods take more effort, but they’re cheap and don’t need electricity.
Canning Lids for Dry Storage
You can use traditional canning lids for dry goods, too—no vacuum equipment required. The hot pack method works well for this.
Fill clean jars with dry goods, leave some headspace, and put the lid on finger-tight.
How to do it:
- Clean jar rims
- Center lid on rim
- Screw band on finger-tight
- Let the jars cool naturally
As the jars cool, they pull a bit of air out and create a partial vacuum. You’ll hear that classic “pop” when the lid seals.
This works best with totally dry foods like rice, beans, or flour. Any moisture can mess up the seal and cause spoilage.
Don’t reuse canning lids for this—they’re single-use. But the jars themselves? Use them as many times as you want.
Tips for Successful Long-Term Storage
Picking the right dry goods and keeping things organized—those really are the keys to making vacuum-sealed food storage work over the long haul. When you’ve got the right products and clear labels, it gets way easier to avoid waste and keep your stash fresh.
Choosing the Right Dry Goods
Let’s be honest, not every dry good is a winner for vacuum sealing in mason jars. Low moisture is what you want—otherwise, you’re just asking for trouble with spoilage or a failed seal.
Great options for vacuum sealing: rice, beans, lentils, quinoa, pasta. All those grains and legumes have moisture levels under 14%, so they’re built for the long run.
Flour, sugar, and powdered stuff usually work well too. Just steer clear of anything sharp-edged that might poke a hole in your sealing gear.
Spices and seasonings? Absolutely. Whole spices especially—those can stay potent for a couple of years if you seal them up right. Ground spices don’t last quite as long, but they still do better in a vacuum.
Coffee beans and tea leaves really benefit from vacuum sealing. You can keep their flavor and aroma much longer than if you just leave them in the bag.
What to skip: Anything oily (like nuts, especially after a few months), anything damp, or stuff that’s so fine or compressible it might mess up your jars.
Labeling and Organizing Your Pantry
A little organization goes a long way. If your vacuum-sealed jars are just tossed on a shelf, you’ll forget what’s what in no time.
What to put on your labels: Product name, sealing date, and the original expiration if you have it. Waterproof labels or a permanent marker save you from smudged messes later.
Jot down what you’ve sealed in a notebook or a phone app. Track when you sealed it and where you put it. It sounds a bit much, but it pays off when you’re hunting for that last jar of lentils.
Storage spots matter. Stash jars somewhere cool and dark—sunlight and temperature swings can mess with your seals.
Keep like with like. All grains in one spot, spices in another. It makes cooking and rotating stock easier (and you won’t end up with five open jars of chickpeas).
Different jar sizes help, too. Smaller jars are perfect for spices you reach for all the time; big jars are better for bulk staples.
Common Problems and How to Avoid Them
Three things will mess up your vacuum sealing game: overstuffed jars, worn-out lids, and moisture sneaking in. Any of those can wreck your seal and ruin your food.
Overfilling and Improper Seals
It’s tempting to pack jars to the brim—who wants to waste space? But overfilling is a rookie mistake.
When you jam jars too full, the vacuum attachment can’t get a good grip on the lid. Food bits end up between the rim and the lid, and then you’ve got a leaky seal.
Leave 1-2 inches of headspace at the top. That gives your sealer room to do its job and keeps bits from interfering.
Run your finger around the jar rim before sealing. If you feel a chip or crack, grab a different jar. Even the tiniest flaw can break the vacuum.
Wipe down both the rim and lid. Oil or crumbs will ruin your airtight seal.
Reusing Old Lids
Here’s a spot where you can save a few bucks. Unlike canning, vacuum sealing lets you reuse lids—within reason.
Bent or warped lids? Toss them. If the rubber gasket underneath is cracked or missing, don’t risk it.
Store used lids flat—stack them in a drawer, maybe with a cloth between layers to keep things tidy.
After 8-10 uses, or if you see any wear, swap in a new lid. Honestly, a cheap lid isn’t worth losing a jar of good food.
Dealing with Moisture
Moisture is the enemy here. Even a little can cause mold, spoilage, or a bad seal.
Make sure everything is bone dry before you seal it. If you’re not sure, spread it out on a baking sheet and let it air dry.
Sometimes we toss in a food-safe desiccant packet for things like rice or flour. It’s a nice extra layer of protection.
Powders like flour can clog your vacuum gear. Try laying a coffee filter or paper towel over the contents before sealing.
Store jars somewhere cool and dry. Big temperature swings can cause condensation inside, which is just asking for trouble.
Frequently Asked Questions
Vacuum sealing mason jars raises all sorts of practical questions. Here’s what you really need to know—methods, gear, and how long you can count on your food staying fresh.
What's the most reliable method to vacuum seal a mason jar for storing my culinary creations?
If you want consistency, use a vacuum sealer with a jar attachment and air hose. Start by sterilizing your jars in boiling water for about 10 minutes.
Fill the jar with your dry goods, set the flat lid on (skip the ring for now), and pop the jar attachment right on top.
Connect the air hose from the attachment to your vacuum sealer’s accessory port. Hit the vac/seal button and let the machine do its thing—it’ll stop when the air’s gone.
Afterward, pull off the attachment and screw the ring on. This setup gives you a solid, reliable seal for long-term storage.
Can you spill the beans on how vacuum sealing compares to traditional canning for longevity?
Vacuum sealing and canning are totally different animals. Canning gives you shelf-stable food for years, no fridge needed.
Vacuum-sealed dry goods in jars stay fresh for months—sometimes longer—but you still need to store them right. Perishables? Even vacuum-sealed, they need the fridge or freezer.
Canning uses heat to kill bacteria and create a sterile environment. Vacuum sealing just removes oxygen, which slows spoilage but doesn’t sterilize.
For dry stuff like grains or spices, vacuum sealing is fantastic. For wet foods or true emergency storage, canning wins.
DIY Time: Got any tips for vacuum sealing glass jars in the comfort of my kitchen?
Keep both regular and wide-mouth attachments handy—mason jars come in both styles, and you’ll save yourself some hassle.
Sterilize jars and lids before you start, even if they look clean. Ten minutes in boiling water is enough to knock out any lingering bacteria.
Don’t overfill. An inch of headspace is usually plenty.
If you’re struggling with a stubborn seal, try stacking both attachment sizes (regular on the lid, wide-mouth on top). Sometimes that extra pressure helps.
Label your jars right away. Trust me, once you’ve got a row of dried peppers, you won’t remember which is which.
How long can I expect my herbs to stay fresh in mason jars with a vacuum seal?
Dried herbs usually keep their flavor for 6-12 months when vacuum sealed. Where you store them makes a big difference.
Cool, dark places (think pantry or cellar) help them last closer to a year. Heat and light zap their potency fast.
Whole herbs outlast ground ones. We usually crush or grind them right before using to keep the flavor strong.
Fresh herbs, even vacuum sealed, still need the fridge and last maybe a week or two. The vacuum slows wilting, but nature does its thing.
If you’ve dehydrated herbs properly, you can stretch their life to two years in a vacuum-sealed jar—assuming you store them right.
Just curious: What's the top-notch mason jar vacuum sealer that won't break the bank?
Most vacuum sealers can handle mason jars just fine if you've got the right attachments. I’d say the real key is finding a sealer with a solid accessory port—brand isn’t as big a deal as you might think.
Honestly, the jar sealing attachment makes a bigger difference than the vacuum sealer itself. A good attachment gives you reliable, repeatable seals no matter what machine you’re using.
If you can, go for a vacuum sealer that already comes with both regular and wide-mouth jar attachments. No one likes shelling out extra for those little parts later.
Mid-range sealers, usually in the $50-100 range, do the job for mason jars without any fuss. You don’t need all the bells and whistles for something this simple.
Before you buy, double-check that you can get replacement attachments easily. It’s annoying to get stuck down the road, scrambling for overpriced parts.
Share:
Marinate in Minutes: Fast Flavor‑Infusion Tricks Using Your Kitchen Vacuum Sealer
Are Vacuum‑Sealed Meals Safe? USDA Storage Rules Every Cook Should Know