

Check out our latest compact vacuum sealer for food collection!
Prepped ingredients don’t all play by the same rules when it comes to storage. The container that keeps chopped onions crisp might turn your fresh herbs into a soggy mess, and what keeps chicken safe could be total overkill for cooked grains.
Each prepped ingredient needs its own storage method, think moisture, bacteria risk, and how fast it goes downhill after you cut or cook it. Knowing these differences? That’s the difference between ingredients that last all week and those that go bad by Wednesday.
As soon as we chop, slice, or cook something, we change how it needs to be stored. Cut surfaces mean more air and bacteria exposure, proteins enter totally different safety zones after cooking, and some foods want a little airflow while others need a tight seal. Honestly, it’s not rocket science, but you do need to know which rules fit what you’re storing.
Here’s a rundown of the basics for storing different prepped ingredients so your meal prep actually survives until you eat it. From the best containers for each food to the right temperatures, these strategies help you dodge waste and keep things tasting fresh.
Key Takeaways
- Prepped ingredients need tailored storage based on their moisture, bacteria risk, and texture needs
- The right containers, cooling, and fridge temps stretch freshness and keep food safe
- Simple systems like FIFO and clear labeling help you use things up before they spoil
The Science Behind Storing Prepped Ingredients
Chopping, cooking, or prepping ingredients changes their biology, making them more likely to spoil. If you know what’s happening at a cellular level—and how air, bacteria, and temperature play in—it’s way easier to keep food safe and tasty for longer.
Food Safety Factors to Consider
Bacteria thrive in the “danger zone”—that’s 40°F to 140°F (4°C to 60°C). At room temp, some bacteria double every 20 minutes. So, we keep prepped stuff at or below 40°F in the fridge.
Cross-contamination ramps up after prepping. Chop veggies on the same board as raw chicken, or store cut produce above leaking meat, and you’re asking for trouble. Raw proteins should always live on the bottom shelf in sealed containers.
Key food safety practices:
- Cool cooked food to below 40°F within two hours
- Store raw and ready-to-eat foods separately
- Use clean tools and surfaces for each ingredient
- Keep the fridge at 35-38°F for best results
Some bacteria don’t make food look or smell bad, so you can’t rely on your senses. Temperature and proper storage really aren’t optional if you want to avoid getting sick.
Why Prepped Ingredients Spoil Faster
Cutting or chopping busts cell walls, releasing enzymes and moisture that speed up decay. An uncut apple has its own little armor and stays fresh for weeks. Slice it, and enzymes start browning it almost instantly.
More surface area means more exposure to airborne bacteria and mold. A whole onion can hang out at room temperature for weeks, but diced onion in the fridge? It starts breaking down in just a few days. No more protective layers, and moisture escapes fast.
Cooking’s a whole other thing. It kills most bacteria but also softens up cell structures and adds moisture—perfect for new bacteria if you don’t cool and store the food quickly. Shelf life drops a lot—most cooked stuff lasts only 3-5 days in the fridge, while some raw ingredients can go weeks.
Impact of Air, Moisture, and Temperature
Oxygen triggers oxidation, breaking down vitamins, messing with colors, and adding weird flavors. Vitamin C is especially touchy—cut bell peppers can lose half their vitamin C in just a few days if exposed to air. Airtight containers help slow that down.
Moisture’s a balancing act. Too much, and bacteria and mold move in. Too little, and food dries out and loses texture. The trick is just enough humidity to keep things crisp but not soggy.
Temperature is huge. Every 10°F increase can double the speed of spoilage reactions. That’s why the back of the fridge (coldest spot) is better than the door (warmest) for prepped foods. Freezing at 0°F basically hits pause on bacteria, so frozen prepped ingredients last months instead of days.
Understanding Types of Prepped Ingredients
Prepped ingredients all behave a bit differently in storage—structure, water content, and enzymes play a part. Some hold up for days, others fall apart within hours, so you really do need to match storage to the ingredient.
Highly Perishable vs. Stable Ingredients
Not every prepped ingredient is equal when it comes to shelf life. Highly perishable stuff like cut avocados, mushrooms, and soft herbs start going downhill almost instantly—oxidation and moisture loss hit fast. Use them right away or give them special treatment (like acid or water submersion).
Stable ingredients—think chopped onions, diced carrots, cubed squash—hold up for 5-7 days if you store them right. Firmer cells and less water help them resist breakdown. You can prep these at the start of the week and not stress.
Highly Perishable (1-2 days): Sliced avocado, cut tomatoes, chopped soft herbs, sliced cucumbers, cut mushrooms
Moderately Stable (3-4 days): Bell peppers, broccoli florets, marinated proteins, cooked grains
Very Stable (5-7+ days): Chopped onions, diced carrots, celery sticks, shredded cabbage
Batch Cooking and Ingredient Prep
Batch cooking turns raw stuff into ready-to-eat components, and that totally changes how you store them. Cooked grains like rice or quinoa last 4-5 days in airtight containers; raw veggies might lose their crunch but still be safe.
Browned ground meat gives you 3-4 days after cooking, but raw portioned meat needs cooking within 2 days. That matters for meal prep. Cook a big batch of beans and keep them in their liquid for up to a week, but raw proteins? They need faster use.
Let cooked food cool to room temp before refrigerating, or you’ll get condensation and soggy meals. Plus, it helps keep bacteria from multiplying.
Special Considerations for Fresh Produce
Fresh produce gives off ethylene gas as it sits, which speeds up ripening and spoilage in nearby foods. Apples, tomatoes, and bananas are big offenders, so stash them away from ethylene-sensitive veggies like greens and broccoli.
The crisper drawer is there for a reason—it keeps humidity higher for fresh produce. Use it for whole veggies and prepped stuff like carrot sticks in water or lettuce wrapped in paper towels.
Once you cut produce, you lose the protective skin and expose the insides to air and bacteria. That’s why prepped produce needs more attention than whole items. A whole pepper lasts two weeks, but diced? Use it within 4-5 days, even with perfect storage.
Essential Storage Techniques for Prepped Foods
Keeping prepped ingredients fresh mostly comes down to three things: cooling food right, separating ingredients, and tracking what’s what so nothing turns into a science experiment in the back of the fridge.
Cooling and Storing Foods Safely
Hot food straight into a sealed container? That’s a no-go. Let cooked stuff cool for about 30 minutes, lids off or just loosely covered. Otherwise, you get condensation, soggy food, and a happy place for bacteria.
But don’t wait forever—food hanging out between 40°F and 140°F is in the danger zone. Once the steam’s gone, seal it up and get it in the fridge.
Quick cooling tricks:
- Spread food on baking sheets for more surface area
- Put pots in an ice bath
- Divide big batches into shallow containers
- Stir now and then to release heat
Shallow containers are a lifesaver. A deep tub of rice or stew takes forever to cool, but the same amount in a shallow container chills in under an hour. Store cooled stuff on the middle or lower fridge shelves—temps are more consistent there.
Portioning and Ingredient Separation
Storing different ingredients in separate containers isn’t just for neat freaks. Raw proteins need their own sealed containers on the bottom shelf—no dripping onto ready-to-eat foods. Chopped veggies, cooked grains, and proteins all last longer and taste better when kept apart.
Portioning into single servings makes meal prep actually doable. Instead of opening a big tub of cooked chicken every day (and letting in air and bacteria), portion it out right after cooking. Individual portions stay fresher than a big container you open over and over.
Different foods have different shelf lives, even when stored right. Cooked proteins: 3-4 days. Roasted veggies like Brussels sprouts: up to 5. Storing them separately means you’re not tossing everything just because one thing turned.
Labeling and Tracking Expiration Dates
No one actually remembers what day they prepped something. A piece of masking tape and a marker fixes that in five seconds.
Label with:
- Date prepped or cooked
- What it is (especially if it all looks the same)
- “Use by” date if you’re feeling organized
Most meal prep is good for 3-5 days in the fridge. Write the prep date so you know what needs eating first. For frozen stuff, label what it is—frozen rice and mashed cauliflower look identical after a week.
First-in, first-out (FIFO) means new containers go behind old ones, and you always grab the oldest first. Saves money and you’re not stuck with mystery containers from two weeks ago.
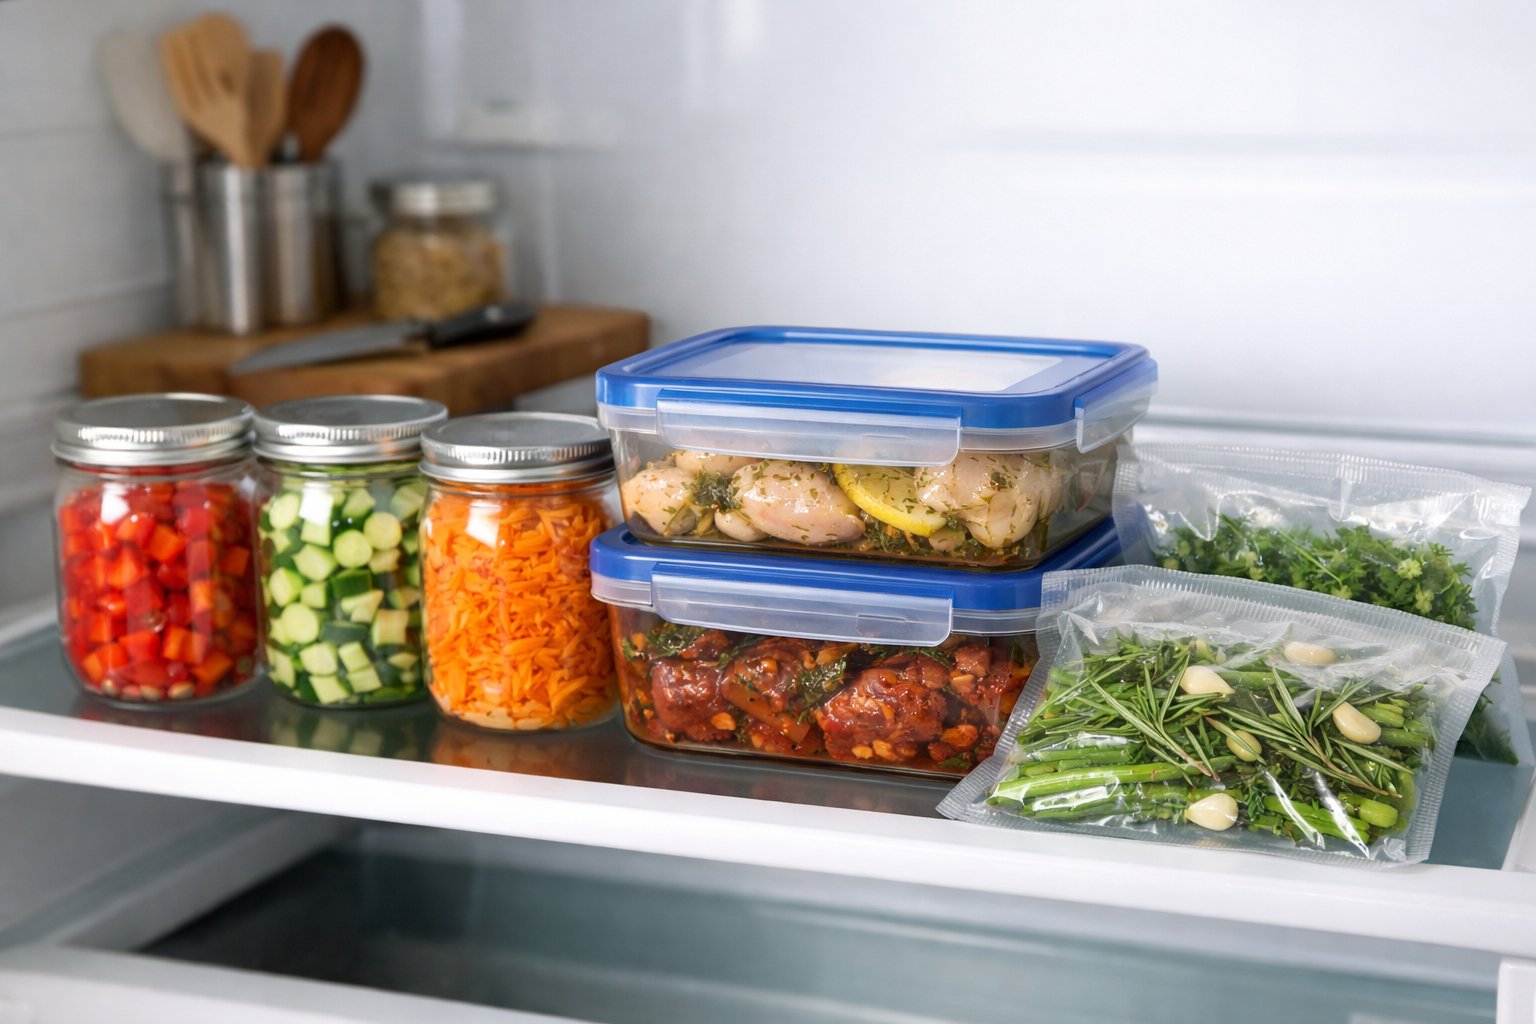
Choosing the Right Storage Containers
The container you use really does make a difference in how long your prepped ingredients stay fresh and safe. Each material has its perks, depending on what you’re storing, how long it needs to last, and whether it’s headed for the fridge, freezer, or pantry.
Glass vs. Plastic: Pros and Cons
Glass containers don’t react with food and won’t hang onto smells or flavors from last week’s leftovers. You can reheat right in them without worrying about chemicals leaching in. They’re dishwasher-safe, tough, and if you’re careful, last forever.
Downside? They’re heavy and can break if you drop them. Not great for hauling to work or school.
BPA-free plastic containers are lightweight and don’t shatter. They’re handy for meal prep on the go or lunches. Most modern ones are safe, but always check for “microwave-safe” labels.
Plastic can stain (hello, tomato sauce) and sometimes holds onto odors. It scratches easier than glass, and those grooves can hide bacteria. For oily or fatty foods, glass is better—plastic can absorb some of that over time.
When to Use Airtight or Vacuum-Sealed Containers
Airtight containers keep air and moisture out. Use them for chopped veggies, cooked grains, and cut fruits that need protection from humidity and oxidation. They also keep strong smells contained and stop cross-contamination.
Vacuum sealing pulls out all the air, making food last much longer than regular airtight containers. It’s great for raw proteins, blanched veggies for the freezer, and dry goods in bulk. Vacuum-sealed bags save freezer space and prevent freezer burn, since there’s no air for ice crystals.
Vacuum sealers are a bit of an investment, but if you batch-prep for the long haul, they’re worth it. For daily meal prep, regular airtight lids are usually enough and way easier.
Honestly, we save vacuum sealing for stuff we won’t use in 3-4 days or anything headed for the freezer.
Freezer Bags, Mason Jars, and Alternative Options
Freezer bags use thicker material than regular storage bags, so they don’t tear or get brittle in the cold. We always squeeze out as much air as possible before sealing—less air means less freezer burn. They’re handy for raw meat, chopped aromatics, and even liquids like stock or sauce.
We lay bags flat to freeze, which makes them stackable and saves a surprising amount of space.
Mason jars pull double duty for pantry and fridge. Wide-mouth jars make it easy to scoop out nut butters, dressings, or overnight oats. When freezing liquids, we leave some headspace since freezing expands the contents and can crack glass if it’s too full.
Jars are great for layered salads, marinated veggies, and dry goods like rice or flour. The clear glass lets us check what’s inside at a glance—no more mystery leftovers.
Silicone bags give us a reusable option, metal containers last forever, and divided containers are clutch for keeping ingredients separate.
Refrigeration vs. Freezing: Custom Storage Rules
The fridge keeps meals ready for a few days, while the freezer stretches storage out to weeks or months. Each needs its own approach to keep food safe and tasty.
Storing Meals in the Fridge
The fridge is best for meals we’ll eat within three to five days. It needs to stay at or below 40°F to slow down bacteria.
After cooking, we let food cool for about 30 minutes before sealing it up. That way, condensation doesn’t make everything soggy. But we don’t want to wait too long—food shouldn’t sit between 40°F and 140°F for more than two hours, or bacteria will multiply.
Fridge storage basics:
- Store cooked proteins and grains on upper or middle shelves
- Keep raw ingredients on the bottom shelf to avoid drips
- Use airtight containers to lock in moisture and flavor
- Place newer meals behind older ones
Soups and stews do well in the fridge for up to five days, but leafy greens or herbs fade after two or three. Storing components separately and assembling just before eating helps keep things fresh.
Glass containers are especially good for the fridge—they don’t hold onto smells or stains, and you can reheat right in them.
Freezing Meals for Extended Freshness
Freezing stops bacteria cold at 0°F or below, letting us keep meals for weeks or months.
Food should be fully cooled before freezing—putting warm food in the freezer can raise the temperature and mess with everything else. We portion meals into single servings before freezing, so we don’t have to thaw an entire batch just for one meal.
How long foods last in the freezer:
| Food Type | Freezer Storage Time |
|---|---|
| Cooked proteins | 2-3 months |
| Soups and stews | 4-6 months |
| Cooked grains and pasta | 1-2 months |
| Casseroles | 2-3 months |
Freezing bags flat on a baking sheet first helps save space. Once frozen solid, we stack them upright like books—super convenient for grabbing just what we need.
Certain foods just don’t freeze well. High-water veggies like cucumbers or lettuce get mushy. Cream-based sauces sometimes separate, though a good stir after reheating usually brings them back.
Preventing Freezer Burn and Loss of Quality
Freezer burn shows up as ice crystals and dry spots when moisture escapes from food. It won’t make us sick, but the texture and flavor take a hit.
Air is the real problem. We use airtight containers or freezer bags and squeeze out as much air as possible. Flimsy containers with loose lids just don’t work for long-term freezing.
Tips to avoid freezer burn:
- Use freezer-specific bags or containers
- Press out all the air before sealing
- Wrap items in plastic wrap before putting them in containers for extra protection
- Don’t refreeze food that’s already been thawed
Label everything with the date and what’s inside. It’s too easy to end up with a pile of mystery containers. Most frozen meals start losing quality after about three months, even if there’s no obvious freezer burn.
Temperature swings inside the freezer can cause issues too. Opening the door a lot or keeping food in the door exposes it to warmer air. We keep everyday items up front and stash long-term stuff in the back where it stays coldest.
Smart Storage Habits for Meal Prep Success
Rotating food, actually tracking what’s in the fridge, and portioning meals make all the difference between eating what we prep and letting it go to waste.
First-In, First-Out Food Rotation
FIFO—first in, first out—is how restaurants do it, and it works at home too. We put newer containers behind older ones, so we use up what’s oldest first. This keeps us from finding strange science experiments in the back of the fridge.
We label containers with the prep date—no more guessing if that chicken is from Monday or last Thursday.
Quick FIFO setup:
- Label containers with prep dates before storing
- Stack new meal prep containers in the back
- Keep clear containers up front
- Do a fridge scan every few days
We also set up fridge zones: top shelf for ready-to-eat, middle for proteins and grains, bottom for raw stuff. This way, rotation happens almost automatically.
Managing Shelf Life and Meal Prep Duration
Most meal prep lasts three to five days, but it depends on what you made. Cooked grains and roasted veggies are best around day three. Leafy salads get sad after two days, even in the best containers.
We keep an eye on timelines: raw proteins need cooking or freezing within two days. Cooked meats and pasta dishes usually stay good for four days. Soups and stews often taste better after a day or two and last up to five days.
Freezing is our backup plan—if we know we won’t eat something in time, we freeze it early, not when it’s already going downhill. Frozen cooked meals keep decent quality for two to three months at 0°F.
Smell and looks matter more than dates sometimes. If something’s slimy or smells funky, we don’t risk it.
Extending Freshness with Portion Control
Dividing meals into single servings before storing keeps us from opening the same container over and over. Each time we open food to air and room temp, it loses a bit of shelf life. Individual portions mean we only touch what we’re about to eat.
We use small containers for proteins and grains, bigger ones for soups and stews. Portioning also stops us from thawing and refreezing, which ruins texture and isn’t safe. Once thawed, it’s eat or toss.
For sauces or marinades, ice cube trays are a secret weapon. We freeze cubes and pop out just what we need—works great for pesto, stock, or tomato paste.
Layering matters too. We keep wet stuff separate from dry in divided containers. Salad dressing gets its own little cup, not poured on greens days ahead. That way, nothing goes soggy before we’re ready to eat.
Frequently Asked Questions
Good storage keeps prepped ingredients fresh, blocks bacteria, and stretches shelf life. Knowing which containers to use, how to organize the fridge, and which foods can hang out together makes all the difference between crisp and mushy.
What's the number one thing to remember when storing prepped ingredients?
Temperature, hands down. Keep your fridge at or below 40°F (4°C)—that’s the magic number for slowing bacteria.
A fridge thermometer is worth having because built-in ones aren’t always right. The danger zone is between 40°F and 140°F, where bacteria thrive.
After that, airtight containers are key. They keep air out, which stops oxidation and keeps moisture in. Even a cold fridge can’t save your food if it’s not sealed well.
How can improper storage affect the shelf life of meal-prepped foods?
Bad storage can cut shelf life in half—or worse. Something that should last five days might go off in two.
Air speeds up oxidation, breaking down nutrients and changing flavors. Leafy greens get slimy, cut fruit browns, and proteins start to smell. Too much moisture makes food soggy; too little dries it out.
Cross-contamination is a big risk too. If raw meat juices drip onto ready-to-eat food, that’s a recipe for foodborne illness. Temperature swings from keeping food in the fridge door or near vents also shorten how long things stay safe.
In the realm of chopping and dicing, what storage blunders could put your prep at risk?
Using the same cutting board for raw meat and veggies without washing in between is a huge risk. Bacteria can jump right onto foods that might not get cooked.
Letting chopped ingredients sit out too long gives bacteria a head start. Anything left out more than two hours gets sketchy. We move prepped items to the fridge as soon as possible, even if we’re still working.
Washing produce before storing adds moisture that speeds up spoilage. It’s better to wash right before using.
Sealing hot food in containers traps steam, making things soggy and encouraging bacteria. Let food cool a bit before sealing.
Could the order of ingredients in the fridge make or break your meal prep game?
Definitely. Where food goes in the fridge matters for safety and freshness. Raw proteins always go on the bottom shelf so nothing drips onto other food.
Cooked and ready-to-eat foods belong up top. The middle shelves are usually the most stable in temperature, good for dairy and prepped veggies.
The fridge door is warmest, thanks to all the opening and closing. Avoid storing milk, eggs, or anything delicate there. The back of the shelves stays coldest, so that’s where we keep sensitive stuff.
Crisper drawers have higher humidity, which is great for most veggies and greens. We keep fruits separate since they give off ethylene gas that can speed up ripening (and spoilage) of nearby produce.
Are there any 'counter-intuitive' tips for storing commonly prepped foods?
Not every veggie belongs in the fridge. Tomatoes, onions, garlic, and potatoes actually do better at room temp in a cool, dark spot.
Herbs last longer if you treat them like flowers—trim the stems, stand them in a jar of water, and loosely cover with a plastic bag. Way better than stuffing them in a container.
Avocados and apples brown slower with a squeeze of lemon, but keeping the pit in an avocado or pressing plastic wrap right onto the surface helps too. For apples, store them away from other produce so they don’t speed up ripening.
Bread stales faster in the fridge. Weird, but true. Leave it at room temp if you’ll eat it soon, or freeze for longer storage—skip the fridge entirely.
Is there a cheat sheet for which prepped ingredients can buddy up in the fridge?
Some combinations work surprisingly well, while others just make a mess. Leafy greens usually get along with veggies like carrots, celery, and peppers—no drama there.
Always stash raw proteins far from everything else. Use different containers, different shelves—just keep them away. Even if you’ve got raw chicken sealed up, don’t let it touch anything ready to eat.
Fruits like apples, bananas, and pears give off ethylene gas, which speeds up ripening and can turn veggies or berries mushy way too soon. Keep those fruits separated. Berries and grapes? They’re pretty chill together, since neither gives off much ethylene.
Cooked grains, pasta, and proteins can hang out on the same shelf, but seal them up in their own containers. Onions and garlic, though—those need airtight containers or they’ll sneak their flavors into butter, cheese, or anything else that soaks up smells.
Dairy’s fine next to dairy, but avoid putting it near anything too pungent. I usually wrap cheese in wax or parchment paper instead of plastic—it lets it breathe a bit and keeps it from picking up weird smells from whatever’s nearby.
Share:
How Portion-Based Storage Improves Cooking Results
How Portion-Based Storage Improves Cooking Results