

Check out our latest collection of compact vacuum sealer for food!
A pantry should make cooking easier, not turn every meal into a search mission. When dry goods, snacks, and bulk staples all share the same crowded shelves, it is harder to see what you have, use food before it goes stale, and avoid buying duplicates.
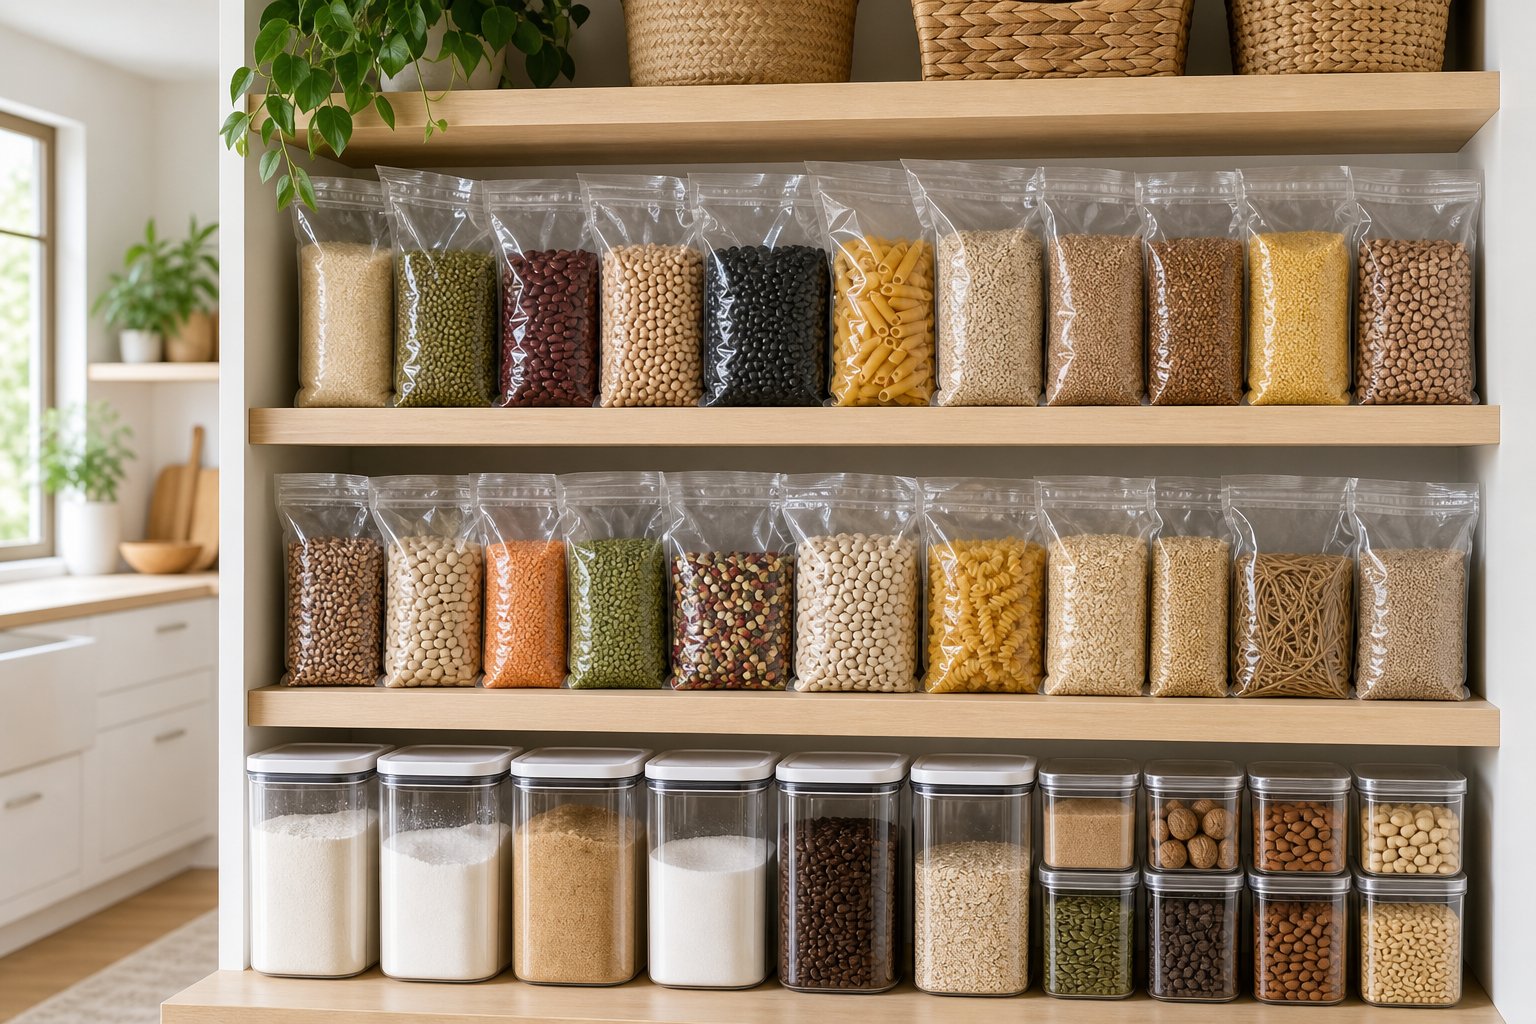
The easiest fix is a simple two-part system: vacuum bags for backstock and canisters for daily staples. Vacuum bags protect bulk items you do not need right away, while clear canisters keep flour, rice, coffee, cereal, and snacks visible and easy to reach.
This guide shows you how to divide your pantry into active and storage zones, choose the right bags and canisters, label everything clearly, and build a system that keeps food fresher, shelves neater, and grocery planning simpler.
Key Takeaways
- Vacuum-sealed bags are your friend for bulk backstock for longer shelf life and less waste.
- Keep everyday items in canisters you can actually see and reach, separate from your backup stash.
- Organize by how often you use things, and label everything so you don’t lose track.
Fundamentals of Pantry Storage Design
If you want your pantry to work for you, start by figuring out your space and splitting it into zones, with one for daily-use stuff and another for long-term storage. The layout and shelving you choose will either make this system a breeze or a pain to keep up with.
Assessing Your Pantry Space
Start by measuring your pantry’s width, depth, and height. If you’re thinking about wall-mounted storage, check the distance between studs, and watch out for any outlets or lights that could get in the way.
Small pantries need a bit of creativity. Check if you have enough clearance on your pantry door for an over-the-door organizer (these are great for lightweight things like seasoning packets or snacks that don’t need vacuum sealing).
Take a look at any weird corners, sloped ceilings, or pipes that mess with your shelf space. These awkward spots are perfect for stashing bulky vacuum bags you don’t need to grab often. Snap a few photos from different angles. You’ll thank yourself later when you’re planning the setup.
Choosing the Right Layout
Go with adjustable shelving because you’ll want the flexibility as your needs shift. We usually space shelves 14 to 16 inches apart for canisters, and leave 18 to 24 inches between lower shelves for bigger vacuum bags or bulk containers.
You want to see everything at a glance. Shelves deeper than 16 inches make stuff disappear in the back unless you install pull-out drawers. Stackable containers help you use vertical space, but keep your most-used canisters at eye level, somewhere between 48 and 60 inches from the floor feels about right.
Corner pantries get a boost from lazy susans or tiered risers that pull things forward. Wall-mounted racks near the entrance are handy for spices or small canisters, while deeper shelves can handle the backstock in vacuum bags.
Zoning for Backstock Versus Daily Use
Put your daily-use canisters like flour, sugar, coffee, and snacks front and center at eye level. Keep these about a foot or so from the shelf edge so you don’t have to reach.
Save the lower shelves and floor for vacuum-sealed backstock like rice, pasta, or baking supplies you only need once in a while. These bags stack up neatly and stay fresh for months. Anything you rarely use (think specialty flours or extra vacuum bags) can go way up high, above 72 inches.
Use bins, baskets, or shelf dividers to mark clear boundaries between zones. We like to keep a little refill station near the pantry entrance, so we can break down vacuum bags and top off daily canisters without making a mess everywhere. This keeps the chaos contained and your pantry looking sharp.
Selecting Containers and Storage Solutions
The right containers make all the difference. We stick with airtight canisters for daily-use stuff and vacuum bags for the bulk goods we’re stashing away for later.
Airtight Containers and Canisters for Everyday Items
Airtight containers keep your go-to ingredients fresh and easy to grab. Clear ones are best for flour, sugar, rice, pasta, and cereal because you can see what’s inside without opening every lid. Look for containers with silicone gaskets or locking lids to keep out moisture and pests.
Mason jars are awesome for spices, coffee beans, and smaller amounts of grains. They’re dishwasher safe and stack nicely if you stick to the same size. Stackable containers with flat tops make the most of your shelf space and stop that annoying “jar avalanche.”
For dry goods like oats, nuts, and baking ingredients, 2-4 quart containers hit the sweet spot. They fit most shelves and hold enough for a week or two. Label everything with the contents and refill date so you know when it’s time to pull from your vacuum-sealed stash.
Vacuum Bags and Bins for Bulk Backstock
Vacuum bags are the secret weapon for backstock. A good vacuum sealer pulls out the air, so you can store 10-20 pounds of dry goods in way less space. We use them for big buys like rice, beans, flour, coffee, and nuts that we won’t open for a while.
Stack these vacuum-sealed bags in bins to keep things organized and protected. Clear bins let you spot what’s inside fast, but if your pantry gets a lot of light, go with opaque bins to keep food quality up. Wire baskets are good for onions and potatoes since those need airflow, but don’t use vacuum bags for those.
Label every vacuum bag with what’s inside, how much, and the date you sealed it. Flat bags stack up neatly in bins or can even stand upright in deeper containers. We like grouping similar items in each bin, such as one for baking, one for grains, and one for snacks.
Comparing Materials: Glass, Plastic, and Metal
Glass containers are our favorite for daily canisters. They don’t hold onto smells, won’t stain (looking at you, turmeric), and you can see exactly what’s inside. Mason jars and glass canisters with bamboo or metal lids look nice on open shelves. The downside? They’re heavy and can break, so maybe skip them if you’ve got little kids or not much space for pouring.
Plastic containers are lighter, less expensive, and won’t shatter. BPA-free ones are safe for food and do a decent job of keeping things airtight. Plastic lids and gaskets wear out faster, but honestly, at the price, replacing them every few years isn’t a big deal.
Metal canisters block light and keep things like coffee, tea, and spices fresh. They look sleek, and they’re tough. The only catch is you can’t see inside, so it’s harder to keep track of what you have. We use metal just for stuff that really needs to be kept in the dark.
Budget-Friendly Storage Options
Start simple: get a few core container sizes instead of buying every shape under the sun. Usually, six 4-quart, six 2-quart, and a dozen pint mason jars cover most needs, and you can do it for under $60. Add a basic vacuum sealer and a starter pack of bags (usually $40-80 for the machine plus 20-30 bags).
Wicker baskets from discount stores are great for corralling vacuum-sealed bags, and you don’t need a custom system. Shelf liners stop things from sliding around, and a roll of vinyl liner is less than ten bucks. Stackable bins go on sale all the time, so you can mix and match as your pantry grows.
Buy vacuum bags in bulk to save money. There is no need to pay for fancy name brands. Generic heat-seal bags work just as well for dry goods. Save glass jars from pasta sauce or pickles for free pantry storage. Just wash them well and peel off the labels.
Organizing Your Pantry by Usage and Frequency
The best pantry system matches how you actually cook and snack. Stuff you use every morning should sit right at eye level in easy-to-grab containers, while your backup stash can hang out up high or down low.
Storing Daily Essentials within Easy Reach
We keep our daily essentials like coffee, tea, oats, granola, oils, spices, and snacks between shoulder and waist height, right at the front of the shelf. You shouldn’t have to move anything else to get to these.
Canisters beat vacuum bags for daily use because you can just pop the lid and scoop. We go for square or rectangular canisters because they fit better and don’t waste shelf space. A lazy susan is perfect for oils, vinegars, and sauces; just spin it and grab what you need.
For snacks, we toss bars, crackers, and bread into open bins or baskets that slide forward like drawers. This keeps everything visible and stops half-eaten bags from getting buried in the back.
Shelf risers double your space for smaller stuff like spices or tea boxes, so you can see everything instead of stacking jars on top of each other.
Strategic Placement of Bulk and Backstock Supplies
Store lightweight vacuum-sealed bags of flour, rice, pasta, and grains on the highest shelf so they’ll stay compact and out of the way. Heavy stuff like 25-pound bags of rice or cases of cans go on the floor or lowest shelf so you don’t risk dropping anything.
Vacuum bags shrink bulk items down to about a third of their original size, so you can fit way more up top. We label every bag with what’s inside, when we bought it, and how much it weighs. No more guessing games.
A can organizer rack on a middle or lower shelf keeps cans visible and rotating. The angled design pushes older cans to the front, so you use them before they expire. If you buy in bulk, this setup pays for itself pretty quickly.
Optimizing Door and Wall Space
The inside of your pantry door is prime real estate that most people ignore. We hang an over-the-door rack here for lightweight, often-used stuff like seasoning packets, spice jars, small snacks, and condiment packets.
Over-the-door shoe organizers with clear pockets are surprisingly handy in the pantry. Each pocket fits small things like gravy mixes, taco seasoning, soup packets, tea bags, or single-serve oatmeal. The clear vinyl means you can see everything at a glance.
Don’t hang heavy stuff like cans or glass jars on the door because those hinges aren’t made for it. Stick with items under four ounces per pocket or rack slot. We use door space for things we reach for at least once a week but that would otherwise get lost on a shelf, like a special hot sauce or that good balsamic vinegar.
Strategies for Food Preservation and Longevity
Good food preservation really comes down to matching your storage method to how often you use each item. Vacuum sealing locks out air and keeps your backstock safe from freezer burn and spoilage, while airtight canisters keep your everyday staples fresh without the hassle of resealing every time.
Benefits of Vacuum Sealing Backstock
A vacuum sealer sucks the air out of storage bags, creating an oxygen-free space that keeps food fresh way longer. We’ve seen this work wonders for bulk flour, rice, and dried beans you want to stash for months. No oxygen means nuts and whole grains don’t go rancid, and dried herbs and spices keep their flavor.
Vacuum sealing also stops freezer burn, making it great for proteins and batch-cooked meals you want to store long-term. Foods in vacuum-sealed bags take up less space than rigid containers, so you can cram more into your pantry or freezer. The seal keeps moisture out, so your dry goods won’t clump or get moldy.
If you’re not planning to use something for weeks or months, vacuum sealing is just hard to beat. Always label each bag with what’s inside and the date you sealed it. First in, first out keeps your system running smoothly.
Best Practices for Food Storage
Temperature and location matter just as much as the container. Keep vacuum-sealed bags in cool, dark spots, definitely away from sunlight and heat. Pantry basics do best between 50-70°F, while anything in the freezer needs to stay at 0°F or below.
Before sealing food, make sure it’s bone dry. Even a tiny bit of moisture can let bacteria grow inside a sealed bag. We always let washed produce air-dry completely, and we cool cooked foods to room temp before sealing them up.
Label everything with:
- Item name and quantity
- Storage date
- Expiration or use-by date
Every month, check your backstock for broken seals, weird smells, or any sign of mold. Mylar bags with oxygen absorbers pair well with vacuum-sealed bags for grains and legumes you want to store long-term. Rotate your stock: move older stuff to the front and stash the newest bags in the back.
Maintaining Freshness with Canisters
Airtight containers are great for everyday staples since you open and close them a lot. Mason jars and vacuum-sealed canisters keep out humidity and bugs, with no need to vacuum seal every time you grab something.
We honestly love clear containers because you can see exactly how much is left, with no more running out of sugar halfway through a recipe. Glass mason jars are fantastic for dry goods and seal tightly with their two-piece lids. BPA-free plastic canisters are lighter and stack easily on pantry shelves.
Pick canister sizes based on how fast you use things. If you go through a couple cups of flour daily, you’ll want bigger containers. Smaller canisters (1-2 quarts) are perfect for spices or specialty ingredients, while 4-6 quart ones handle flour, cereal, and the like.
Always clean and dry canisters before refilling because leftover oil or moisture can cause issues. Store them away from heat, like the stove or dishwasher, since temperature swings can mess with the seal.
Labeling, Inventory, and Pantry Maintenance
A simple, consistent labeling and inventory system keeps your pantry organized without making it a chore. We’ve found that regular labels and a quick weekly check keep things running smoothly.
Setting Up an Effective Labeling System
Your labeling method should work for both vacuum bags in storage and the containers you use every day. On vacuum bags, we write three things: what’s inside, how much, and when we sealed it. For example, "Arborio Rice / 5 lbs / 06/2026" gives you all you need to know.
For daily canisters, we keep labels simple, with just the item name and maybe a refill date. Put the labels in the same spot on each container so you don’t have to hunt for info.
Vacuum bag labels go right on the bag or get applied before sealing since you won’t reuse them. Canister labels should peel off easily or be generic enough to use again. Chalkboard labels or dry-erase markers are great for containers you refill with different things.
Using a Label Maker for Organization
A label maker turns pantry chaos into something that actually looks planned. We like models that print water-resistant labels since pantries get humid and spills happen.
Print labels for vacuum bags before you seal them. Add category tags like "BAKING," "GRAINS," or "SNACKS" so you can sort bags quickly without reading every word.
On canisters you use daily, label makers deliver that neat, professional look that makes you want to keep things organized. We print labels a bit smaller than the space and stick them at the same height for a tidy lineup.
If your label maker has memory, save templates for things you use all the time, like "All-Purpose Flour" or "Coffee Beans." It speeds up restocking.
Maintaining Order Over Time
Weekly check-ins take maybe five minutes if your system works. We glance at canisters to see what needs refilling, check vacuum bag labels for upcoming expiration dates, and wipe up any messes.
Each month, rotate your backstock so older bags move forward, and double-check that your inventory matches what’s actually there. This helps you avoid buying doubles. For pricier or bulk items, we keep a quick note on our phones with current quantities.
If you find yourself reaching into backstock bags for daily use, it’s probably time for bigger canisters, or maybe that item just belongs in your regular rotation.
Replace worn-out labels right away. With a label maker, you’ll have new ones ready in no time.
Small Space and Specialty Pantry Hacks
If your kitchen is tiny, the vacuum bag and canister system is a lifesaver. Small spaces force you to get creative, and mixing vertical storage with clever repurposing can turn awkward corners into real storage.
Vertical Solutions for Compact Kitchens
Vertical storage is a game changer when you’re short on space. We hang wire baskets inside cabinet doors to hold vacuum-sealed spice packets or small canisters. An over-the-door organizer, usually meant for shoes, works surprisingly well for vacuum bags of grains, dried fruit, or snacks. Each pocket keeps bags easy to spot and grab, and you don’t lose shelf space.
Stackable bins help you organize backstock vacuum bags. We sort them by category, with pasta in one and baking supplies in another, and stack them in a closet or even under the bed. This keeps backstock separate from daily-use canisters and makes the most of vertical space. Pull-out drawers under wall cabinets hold your most-used canisters at eye level, so you can refill quickly without digging through deep shelves.
Creative Use of Corners and Nooks
Corners often go unused, but they’re perfect for a lazy susan loaded with canisters. We keep our most-used stuff like flour, sugar, and rice on a turntable in a corner cabinet, so everything’s a quick spin away. Vacuum-sealed backstock bags fit right behind the lazy susan, protected until you need them.
Narrow gaps between appliances or next to the fridge can fit slim rolling carts. We use these to store vacuum bags vertically, almost like files. The bags stay flat, labels face forward, and you just roll the cart out when it’s time to restock. Wire baskets on awkward wall spots or the side of cabinets give you instant storage for smaller vacuum bags or overflow canisters.
Repurposing Everyday Items for Storage
Magazine holders on their side make great dispensers for vacuum-sealed bags. We label each holder, such as beans, lentils, and pasta, and stack them on shelves. Bags slide out one at a time, and you don’t need fancy racks.
Vertical tension rods inside cabinets split up sections for different bag sizes. We separate small snack bags from big backstock portions, so nothing slides into a pile. Over-the-door shoe organizers with clear pockets let us stash smaller canisters or pre-portioned bags where they’re visible but not in the way. Each pocket acts like a mini bin, and setup takes seconds.
Frequently Asked Questions
Here are quick answers to the most common questions about using vacuum bags and canisters in a pantry system.
Which pantry staples hold up best in vacuum bags for long-term backstock, and which ones shouldn’t be vacuum sealed?
Rice, oats, dried beans, lentils, pasta, flour, dehydrated vegetables, and dried fruit work well in vacuum bags because they are dry and shelf stable.
Avoid vacuum sealing brown sugar, powdered sugar, very fine powders, soft foods, and anything with moisture. Sharp pasta shapes may need thicker bags so they do not puncture the seal.
What’s the smartest way to split groceries between vacuum-sealed backstock and daily-use canisters?
Keep 2-4 weeks of frequently used items in canisters, then vacuum seal the rest in refill-sized portions. This keeps everyday staples easy to reach while protecting bulk food from air and moisture.
For example, divide a large bag of rice into smaller vacuum bags, with each bag sized to refill one canister.
How do you label and track dates when you rotate vacuum-sealed refills into everyday canisters?
Label each vacuum bag with the item name, quantity, purchase date, and seal date before storing it.
Use the oldest bag first when refilling canisters. A simple pantry note, phone list, or shelf label can help you track what needs to be used next.
What can you vacuum seal in jars versus bags, and when does each make sense for pantry storage?
Use jars for items you want to see, protect from crushing, or open more than once, such as spices, coffee beans, specialty flours, and small baking mixes.
Use bags for bulk staples like rice, beans, flour, oats, and pasta. Bags save more space and work well for long-term backstock.
How can you set up a vacuum-bag backstock zone in a small pantry with deep shelves so nothing gets lost in the back?
Use pull-out bins, sliding baskets, or labeled clear containers so bags can move forward easily.
Group items by category, such as grains, baking, snacks, and legumes. Stack bags flat, label the front or top, and keep the oldest bags closest to the front.
What are the common downsides of vacuum sealing dry goods, and how do you avoid the usual mistakes?
The most common mistakes are sealing food with moisture, overfilling bags, using thin bags, and storing bags where sharp foods can puncture them.
To avoid problems, make sure food is dry, leave enough room for a strong seal, use food-grade textured bags, and check seals before placing bags into backstock.
Partager:
What Makes Vacuum Canisters Better for Foods That Crush Easily?
Can Vacuum Storage Help Keep Opened Pantry Packs Easier to Manage?