

Check out our latest golf collection!
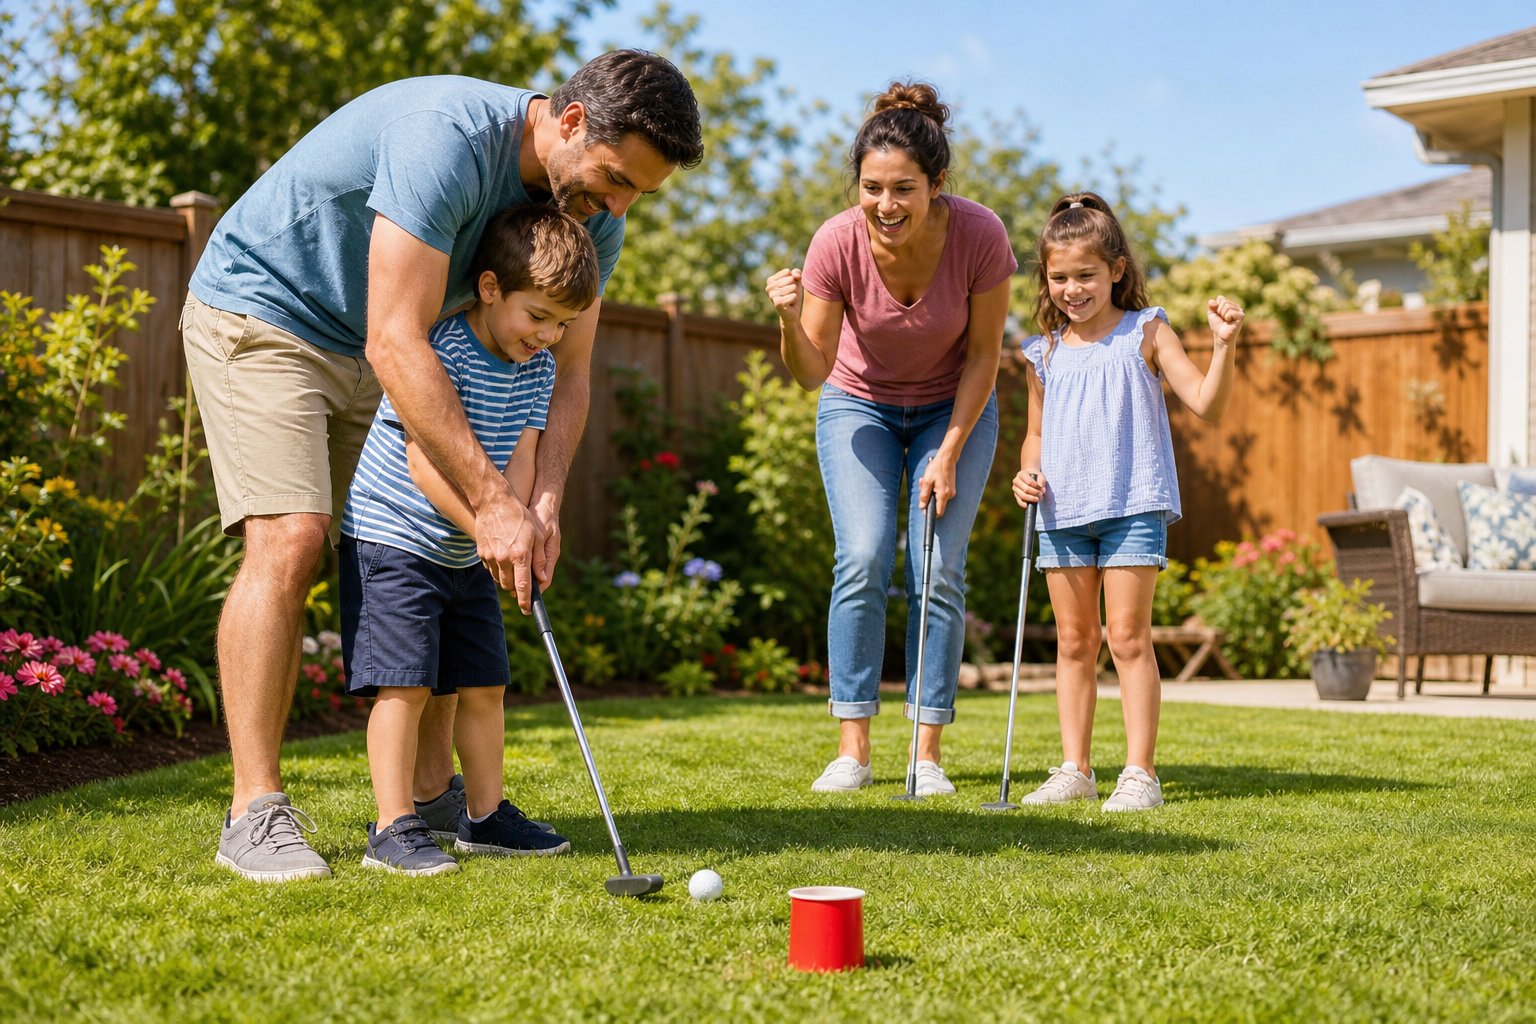
A simple backyard golf game can turn an ordinary weekend into something everyone actually wants to join. You do not need a huge lawn, expensive gear, or advanced building skills. With a small putting area, a chipping target, a few safe practice balls, and some easy DIY obstacles, your yard can become a fun family course in just a weekend.
The best setup depends on your space, budget, and who will be playing. A tiny patio can work with a compact putting station, while a larger yard can handle several holes, target zones, and themed challenges.
In this guide, you will learn how to plan the layout, choose materials, build simple golf holes, add obstacles, and keep the game safe, easy, and fun for all ages.
Key Takeaways
- Pick a game style and materials that fit your space and budget so you can actually finish it over a weekend.
- Build holes with good drainage, smooth surfaces, and obstacles that make things fun for everyone.
- Add features like decorations, adjustable challenges, and enough space between stations so nobody feels cramped.
Planning Your Backyard Golf Game Space
Every great backyard golf game starts with figuring out where it’ll go and what kind of space you’re working with. The spot you pick, how you measure it, and how you lay things out will decide if your course becomes a weekend favorite or just a pain to maintain.
Choosing the Right Location
Try to find a flat spot with decent drainage so you don’t end up with puddles after every rain. If you can, go for somewhere that gets a bit of shade in the afternoon, especially if summers get hot where you live. It keeps everyone comfortable and stops the turf from getting too hot to touch.
Stay away from putting your course right under big trees. Leaves, sap, and random debris just make cleanup a chore and can mess up your playing surface. Leave a good three or four feet around the edge so people can swing and walk around without bumping into things.
Think about where you can see the course from inside. If you can spot it from the kitchen or patio, you’ll probably use it more often. Oh, and always check for buried wires or pipes before you start digging. Seriously, one quick call to the utility company can save you a huge headache.
Measuring and Mapping Your Layout
Grab a measuring tape and jot down the length and width of your chosen area. Sketch out a rough map on graph paper, maybe one square equals a foot. It doesn’t need to be fancy. It just needs to be enough to help you picture where everything goes.
Mark down any trees, flower beds, or sheds on your sketch. You can use these as obstacles or boundaries if you want. Most backyard mini golf setups work well with three to six holes, depending on how much room you have.
Plan for each hole to be about 6 to 8 feet long. That’s enough space for interesting putts but doesn’t eat up your whole yard. Leave a couple of feet between holes so people can move around. Double-check your measurements before you buy supplies or start digging.
Adapting for Different Yard Sizes
If your yard is under 500 square feet, stick to a small putting green or maybe two or three simple holes in a straight line or L-shape. Focus on making one great hole instead of trying to cram in too many.
With a medium yard (500 to 1,500 square feet), you can do a real mini golf course with four to six holes. Try a loop that brings players back to the start. It’s easier to keep an eye on kids that way. Curved paths between holes look cool and don’t need extra space.
Big yards (over 1,500 square feet) give you room to get creative. Try adding bumps, longer putts, or even zones for different skill levels. Beginners can use a flat area, while more advanced players get tougher holes with banks and obstacles. Mix up the difficulty so things stay interesting.
Selecting Materials and Essential Tools
The stuff you use really matters if you want your backyard golf game to last. We like materials that are tough, budget-friendly, and don’t need constant fixing.
Best Options for the Putting Surface
Artificial turf made for putting greens works best. Go for a pile height between 10mm and 15mm for a real golf feel without all the lawn care. Most outdoor turf has UV protection and drains well, which is great if you get lots of rain.
For smaller or portable setups, green felt is cheap, easy to cut, and works indoors too. Just don’t expect it to handle wet weather. We usually glue felt to plywood for a smooth surface you can stash away.
If money’s tight, try outdoor carpet from a hardware store. Look for low-pile green or grey. Golf balls roll pretty well on it, and it usually lasts a couple of seasons if you take care of it.
Recommended Borders and Bumpers
Pressure-treated lumber is our go-to for borders. Grab 2x4s or 2x6s for the frame. They stand up to rot and bugs much better than regular pine. That treatment really helps if your course sits right on the ground.
For bumpers and obstacles, we like 1x4 pressure-treated boards or PVC trim. PVC costs more but you’ll never have to paint or seal it. Both cut easily and work with wood glue or exterior screws.
If you’re building for little kids, pool noodles make great bumpers. Just split them lengthwise and stick them on with spray adhesive. They’re soft, colorful, and easy to pull off when the kids get better at aiming.
Gathering Essential Construction Tools
A circular saw or mitre saw will handle all your lumber cuts. Always cut treated wood outside and wear a mask because those chemicals can be nasty.
You’ll need a hole saw for your drill to make the golf cup holes. Standard cups are 4.25 inches across, so we use a 4.5-inch hole saw to be safe. A cordless drill with extra batteries really speeds things up.
Keep wood glue, exterior screws (2.5 to 3 inches), a measuring tape, a carpenter’s square, and a utility knife handy. The knife is perfect for cutting turf or felt with a straight edge. Use a staple gun to attach turf to wood frames so it won’t split the boards.
Building Your DIY Mini Golf Holes
Each hole comes together in three steps: build a sturdy frame, cut and set the cup, and lay down a smooth surface. Whether you’re making a straight shot or something with a curve, these basics always apply.
Assembling the Base and Frame
We usually cut pressure-treated lumber to frame each hole. For an 8-foot hole, two 8-foot pieces and two 3-foot 2x4s do the trick. Treated wood stands up to rain and bugs, so it’s worth it.
Lay out the boards on the ground to make a rectangle. Add some wood glue at the corners, then screw them together with 3-inch deck screws. Don’t forget to pre-drill so the wood doesn’t split. It doesn’t have to look perfect, just be sturdy and square.
If you’re building on grass, level the ground first. Knock down any high spots so the frame sits flat and doesn’t wobble. For extra stability, drive landscape stakes through the sides every couple feet. That keeps things from shifting when people play.
Cutting and Installing the Hole
A golf cup is 4.25 inches across, but you don’t have to be exact. A 4 or 4.5-inch hole saw works fine and fits most big plastic cups or cans. Place the hole about a foot from the end of your frame so putts have room to drop in.
Drill the hole through your base material. If it’s plywood, clamp it down and go slow so you don’t tear out the bottom. For grass, just dig with a trowel to match your cup size.
Pop your cup or can into the hole so it sits flush with the surface. Pack dirt or sand around it to hold it in place. We like plastic cups because they’re lighter, safer for kids, and easy to move if you want to change things up.
Attaching the Putting Surface
Artificial turf makes your frame feel like a real green. Measure the inside of your frame and add a couple extra inches on each side. Use a sharp utility knife to cut the turf. Score it a few times instead of trying to slice through in one go.
Lay the turf in the frame, with the grain running toward the hole for smoother putts. Pull the edges tight and staple them every six inches along the inside of the frame. Work from one end to the other, keeping the surface taut.
Cut a circle in the turf a little smaller than your cup hole so it fits snugly. If you’re making several holes, check local flooring stores for turf scraps. They’re way cheaper than buying a full roll, and you can piece together a whole course from leftovers.
Creating Obstacles and Themed Features
Obstacles turn a plain putting green into a real game. Let’s look at a few simple ways to add challenge and personality.
Easy DIY Obstacle Ideas
PVC pipes make great tunnels. Just cut them to a foot or so, then attach them with zip ties or outdoor glue. Players love the challenge of hitting through a tight space.
Scrap plywood ramps add hills and bumps. A gentle 15-degree slope works for most people. Sand the edges so no one gets splinters, and anchor them with stakes so they don’t move.
Garden hoses can outline winding paths or make curves. Just lay them out and pin them down with landscape staples. Pool noodles work the same way and come in bright colors that make the course pop.
Flower pots set up as pylons force players to aim around them. Terra cotta or plastic pots last through rain and sun. Bricks or concrete blocks make tough walls that send balls bouncing in new directions, and their weight keeps them in place.
Incorporating Themed Obstacles
Pirate themes are always a hit. Set up a little treasure chest (even a painted box) as an obstacle. Add a skull flag or wrap twine around stakes for that pirate-ship vibe.
For a jungle look, use potted plants as “trees” to putt around. Toss in some rubber snakes or toy animals for extra fun. A sandbox can double as a desert trap where you need a precise shot.
Space themes are fun too. Paint rocks as “moon craters,” use silver spray-painted cardboard as UFOs, and let kids imagine their own sci-fi adventures. Castle themes work with painted cardboard towers or foam blocks as fort walls.
Stick to one theme per hole or carry a single idea through the whole course so it feels put together, not random.
Adding Colourful Details for Fun
Spray paint instantly livens up boring materials. Paint ramps bright blue, make PVC tunnels neon orange, or give blocks a wild purple finish. Outdoor-rated spray paint holds up best.
Green felt over plywood creates a smooth, classic look. Just stick it down with outdoor spray adhesive, starting from the center and working out so you don’t get bubbles. It’s a budget-friendly way to get a nice roll.
Use different colors for each hole, such as yellow for the first, red for the next, and so on. It helps everyone keep track when you’ve got a crowd playing.
Painted rocks as hole markers are a fun touch. Let the kids decorate them with acrylic paint, then seal with outdoor varnish. Add striped stakes, ribbons, or even string up some LED lights for night games. All these little details make your mini golf course feel special without costing much.
Finishing Touches and Set-Up Tips
Once you’ve got the main playing area ready, how you secure the edges and choose your portability options really decides if your backyard mini golf will survive those endless weekend games with the family.
Securing Borders and Surfaces
Loose edges and shifting materials can ruin a good game fast. I’d suggest using landscape edging or treated lumber to frame each hole. This keeps the artificial turf and putting surfaces from curling or splitting at the seams. For a temporary setup, metal or plastic edging stakes do the trick. If you’re going permanent, pressure-treated wood borders look and hold up better.
When you’re building DIY mini golf obstacles or ramps, anchor plywood bases with ground stakes or just toss a couple of sandbags on them. Glue down artificial turf along the seams with outdoor adhesive that stands up to UV rays. If you’re using carpet scraps to save money, double-sided outdoor tape can create a surprisingly strong bond but still lets you pull it up for winter.
Check corners and where materials meet every week for the first month. Those spots lift first, especially after a rainstorm or when kids are charging between holes.
Portable vs. Permanent Designs
Portable setups let you reclaim your yard for other things. We’ve built individual hole stations on plywood (about 4x6 feet per station) that you can move, stack, and stash in the garage. Drill some holes and thread rope through for handles. It’s not fancy, but it works.
Permanent designs make more sense if you’ve got some space to dedicate and want a cleaner look. Sunken borders, built-in obstacles, and continuous artificial turf pull the whole course together and save you from setting up every time. Of course, you’re giving up that part of your yard to golf, so it’s a bit of a commitment.
A hybrid approach might be best: permanent putting surfaces with removable obstacles. This way, you can change up the hole layouts whenever you want without rebuilding the whole thing.
Maintenance for Long-Lasting Play
Artificial turf and putting surfaces need a good brush to keep the fibers upright. I usually grab a stiff push broom once a week, brushing against the grain to fluff up any matted spots. Give the turf a rinse every month to stop dirt from messing with the ball roll.
Seal wood obstacles every year with outdoor stain or polyurethane. Before each game, check for splinters, especially on ramps and bridges where hands grab on. Metal rails and cups need a coat of rust-prevention spray if you live somewhere humid.
Keep scorecards, pencils, and golf balls in a waterproof box near the course. Swap out any cup with cracked edges. Sharp plastic isn’t worth the risk.
Making It Family-Friendly and Engaging
Backyard golf only works if everyone actually wants to play, right? That usually means tweaking the difficulty, getting creative with scorekeeping, and sometimes turning practice into a mini event.
Adapting Rules for All Ages
Set up multiple tee positions at different distances for each hole. Markers at 3 meters for little kids, 5 meters for teens, and 8 meters for adults keep things fair and fun. You can also use bigger cups or targets for younger players.
Try a “mulligan rule” where each player gets one free do-over per round. It keeps beginners from getting frustrated, and the game moves along. For very young kids, let them move closer after a miss instead of counting every stroke.
Skill-based handicaps work too. Give less experienced players a 2-3 stroke head start, or let them skip the trickiest obstacles. It keeps the competition fair without making anyone feel awkward about their skill level.
Creative Scorekeeping and Challenges
Counting strokes is fine, but mixing things up keeps everyone interested. We use a points system where players hit certain themed obstacles for bonuses, or land in specific zones for multipliers. Hole-in-one? That’s 5 points. Finish in two strokes? Give yourself 3.
Challenge cards make things more interesting. Assign special tasks for each hole. Try “putt with your non-dominant hand,” “shoot backwards through your legs,” or “bank the shot off the side.” Players pick up bonus points for completing these, no matter their final score.
Hang a family leaderboard somewhere visible, such as the garage wall, chalkboard by the course, whatever works. Track seasonal records, best streaks, even funny stuff like “most creative miss” or “longest recovery shot.” It’s a good way to keep everyone motivated between games.
Themed Family Tournament Ideas
Weekend tournaments add some real excitement to backyard golf. We’ve started running monthly “major championships” with a 9-hole format and little prizes for the top three. Homemade medals or small trophies make it feel official.
Seasonal themes are a blast. Try a Halloween night putting contest with glow-in-the-dark balls, or a summer series where you rack up points through June and July. Decorate your obstacles to match the theme and make players putt around them.
Partner scrambles are a nice change. Team up family members and take alternating shots. Pair adults with kids for balance, and share one scorecard to keep the pressure off individuals but still keep it competitive.
Frequently Asked Questions
Here are quick answers to common questions about building a simple backyard golf game for family weekends.
What materials do you actually need to set up a backyard putting and chipping game on a budget?
Start with artificial turf, plywood or outdoor carpet, wood boards for borders, screws, a staple gun, and a plastic cup or golf cup for the hole.
For chipping, add a small target board, foam or plastic practice balls, and a hitting mat. Use leftover wood or turf scraps to keep costs lower.
How much space should you plan for, and what layout works best for a typical Canadian backyard?
A small chipping station can fit in about 10 by 15 feet. A basic putting area works well in a 6 by 10 foot space.
For narrow yards, use a straight layout. For larger yards, build three to six short holes with enough walking space between each one.
What are some easy DIY targets and scoring rules that keep kids and adults engaged?
Use a board with three to five holes and give each hole a different point value. Easier lower holes can be worth 1 point, while harder top holes can be worth 3 to 5 points.
Let kids stand closer and adults stand farther back. First player to 21 points wins.
How can you make the course safe around patios, windows, and neighbours without killing the fun?
Face chipping targets away from windows, patios, and property lines. Use a fence, hedge, net, towel, or padded backstop behind the target.
Choose foam or plastic practice balls for safer play, especially in smaller yards or around kids.
What type of practice balls and clubs make the most sense for backyard play and different skill levels?
Foam balls are best for beginners, kids, and tight spaces. Plastic wiffle-style golf balls feel more realistic but still limit distance.
Kids can use a 7 iron or 9 iron, while adults can use a wedge for chipping. Any basic putter works for the putting area.
How do you set up a simple game that works in wind, on uneven grass, or after a bit of rain?
Use heavier plastic practice balls on windy days and place a hitting mat on a plywood base if the grass is uneven.
After rain, let the area drain before playing. Artificial turf usually dries faster than regular grass, especially if it is slightly raised or placed on a firm base.
Partager:
How to Practice Golf Chipping Accuracy at Home Without a Full Yard
How to Use Target Pockets to Make Golf Practice More Measurable