

Check out our latest collection of compact vacuum sealer for food!
One small patch of trapped moisture can turn a clean reusable vacuum sealer bag into a home for odors, mildew, and weak seals. Drying each bag completely before storage protects the bag, your food, and the time you spent cleaning it.
Reusable bags can hold water in corners, textured channels, valves, and zipper seals even when the outside looks dry. The safest approach is to remove excess water, keep the bag open, and let air reach every surface.
In this guide, you will learn the best drying methods, useful tools, storage practices, and simple checks that help keep reusable vacuum sealer bags clean, dry, and ready for your next meal prep session.
Key Takeaways
- Drying completely keeps mold away and helps your reusable vacuum sealer bags last longer
- Air drying upside down on a rack works best for getting all the moisture out
- Only store bags when they're fully dry, in a cool, ventilated spot to protect the seal
Why Proper Drying Matters for Reusable Vacuum Sealer Bags
If you leave moisture inside reusable vacuum sealer bags, mold grows, the sealing performance gets worse, and your stored food isn't safe. When you dry bags completely, you protect your investment and make sure they work every time you need them.
Risks of Storing Damp Bags
When you store damp vacuum seal bags, you basically set the stage for mold and mildew to show up fast, sometimes in just a day or two. Moisture collects in seams and around the valve, and we've seen bags develop black spots and musty smells just from being put away a little wet. That stuff sticks around and can end up on your food next time.
Moisture weakens the seal over time. Water trapped along the gasket or seal strip stops the bag from sealing properly, which leads to air leaks and spoiled food. The valve on many reusable vacuum bags can also stop working right if it stays damp, so you lose suction power.
Bacteria love damp places. If you put a damp bag in a dark cupboard, it becomes a perfect home for germs. This risk jumps if you didn't get every bit of food off during cleaning.
Impact on Food Freshness and Safety
If you use a vacuum bag that's not totally dry, you add unwanted moisture to your food. That extra water causes freezer burn, speeds up bacterial growth, and shortens how long your meats, veggies, and meals will last. Always check that bags feel dry before you fill them.
Leftover moisture also messes with the vacuum process. Your sealer has to work harder, and the final seal might look weak or unfinished. Foods in poorly sealed bags lose freshness way faster than they should.
Cross-contamination is a big worry if moisture mixes with leftover food bits from the last use. Even if you cleaned your bags well, a damp environment can wake up bacteria and let them multiply.
Environmental and Cost Benefits of Drying Thoroughly
When you dry reusable vacuum bags properly, they last a lot longer than if you store them damp. We've managed to get 50 to 100 uses out of bags we always dry well, but bags left damp often need replacing after just 10 or 20 cycles. That means less waste and more value from your reusable bags.
You’ll save money, too. A good set of reusable vacuum sealer bags isn't cheap, so protecting them by drying them right means you won’t have to buy new ones as often. Plus, you avoid wasting food from failed seals or contamination.
Drying keeps the bag material in good shape. Plastic or silicone stays flexible, seals remain tight, and valves keep working. That means better results and less hassle when you're prepping meals for the freezer.
Step-by-Step Guide to Drying Vacuum Sealer Bags
You need to get rid of excess water, set up the right air-drying spot, and check for any leftover moisture before putting your bags away. Each step helps keep your bags clean and ready for next time.
Shaking Off Excess Water
After you wash your reusable vacuum sealer bags, turn them inside out if you haven’t already and shake them firmly over the sink. Most of the water trapped in corners and along the seal will come out this way.
Grab the bag by the opening and snap it downward a few times, and you'll see droplets fly, especially from those tricky textured areas. If your bags have valves or gaskets, gently squeeze around those spots to push out hidden moisture.
Pat the inside with a clean, lint-free towel to soak up what’s left. Pay extra attention to the seal channel and ridges. This first step really cuts down on drying time and helps avoid that annoying damp smell.
Air Drying Techniques
Air drying is the safest way to dry vacuum seal bags because heat can warp plastic and mess up the seal. Set the bags upside down on a clean surface in a spot with good airflow. Let air move through the inside.
Open a window or put the bags near a fan to speed things up, but don’t use direct heat. Sunlight can break down some bag materials, so just stick with room temperature air.
Once the inside feels dry, flip the bags right-side out and let the outside finish drying. This two-step method covers both surfaces. In our experience, bags need about 4 to 8 hours, depending on how thick they are and how humid it is.
Using Drying Racks and Hanging Methods
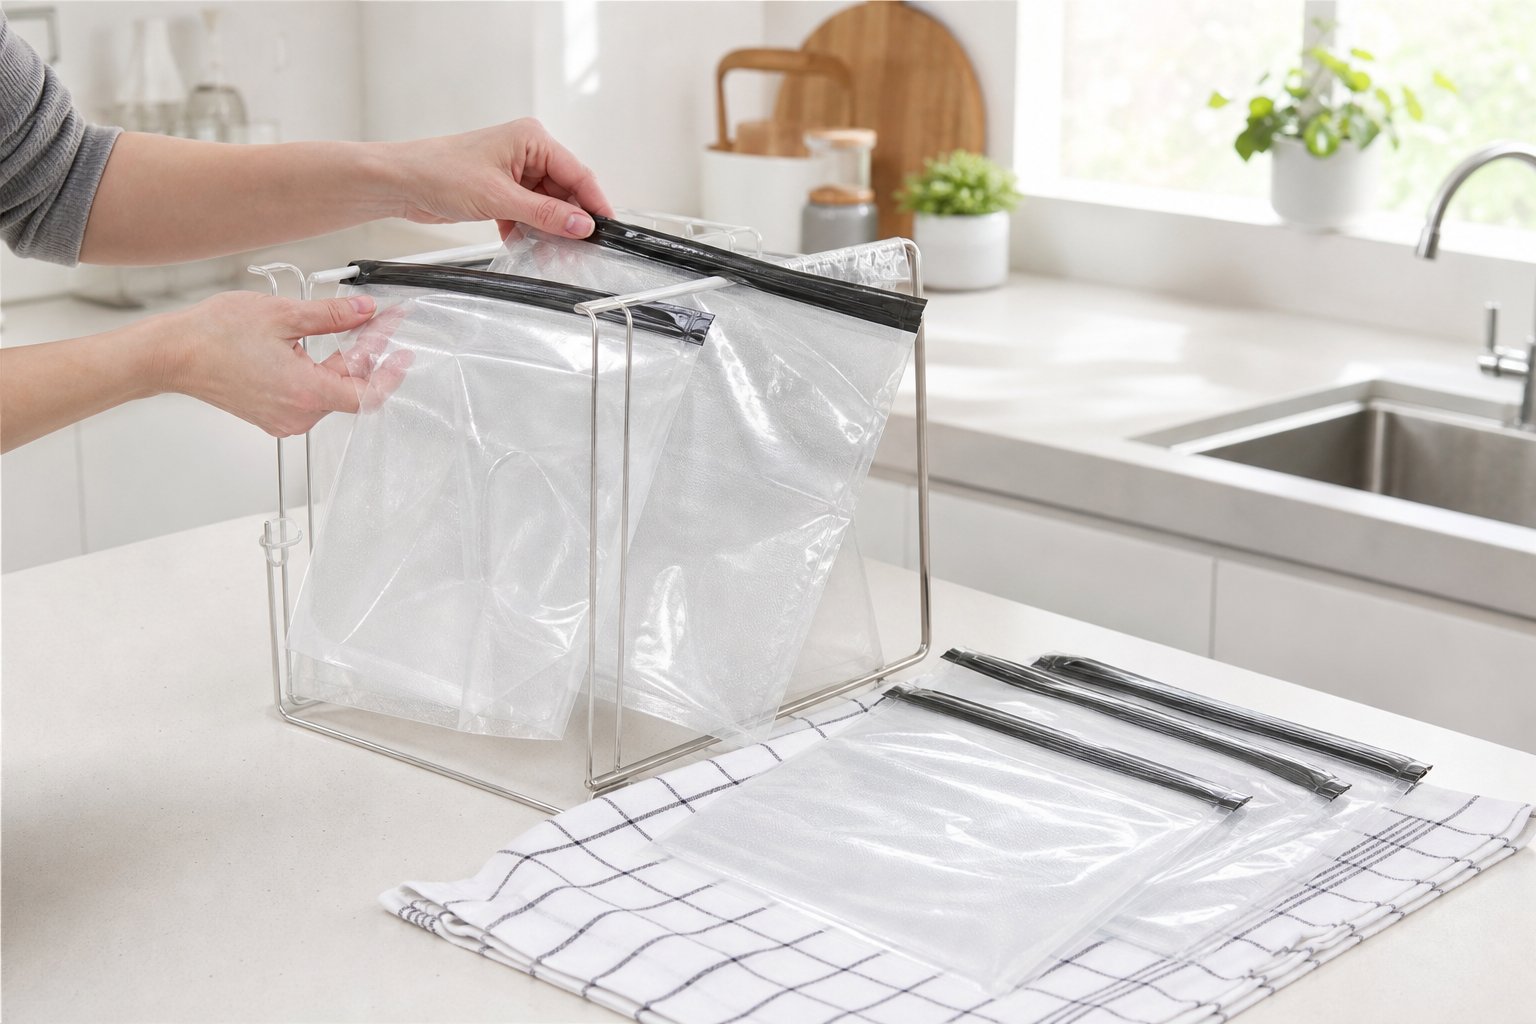
A drying rack made for vacuum bags props them open and lets air reach every part. These racks have prongs or slots that hold the bag open so the sides don’t touch and trap moisture.
You can get creative, too. Bottle drying racks or wooden dowels across a bin work fine. Some people use pants hangers with clips to hang big bags upside down. This works especially well for jumbo sizes.
| Method | Best For | Drying Time |
|---|---|---|
| Dedicated drying rack | Multiple bags, daily use | 4-6 hours |
| Bottle drying rack | Standard-sized bags | 5-7 hours |
| Hanging with clips | Large or gallon bags | 6-8 hours |
| Towel propping | Occasional use, few bags | 6-10 hours |
Whatever you use, keep the seal area exposed. That’s where moisture loves to hide and where most problems start if you skip drying.
Inspecting Bags for Moisture Before Storage
Before you put your vacuum seal bags away, run your fingers along the inside, especially in corners, around the seal, and near the valve. If you feel any dampness, give them more time.
Hold the bag up to the light. If you see water spots or cloudy patches, that’s trapped moisture. Pinch the outside of the seal channel; it should feel dry and just a bit tacky, not cool or slippery.
Give the inside a sniff. If it smells fresh and neutral, you’re good to go. Any musty or sour scent means you need to dry it more or maybe even wash it again. We usually do a quick air seal test after drying to make sure the gasket still works and nothing got damaged during cleaning.
Choosing the Right Tools for Fast Drying
The right drying tools make a big difference. With the right setup, your bags dry in hours instead of days. We suggest picking up some drying aids made for reusable bags and a brush to get water out of the tricky seal areas before you even start air drying.
Dishwasher-Safe Drying Rack Options
A dishwasher-safe drying rack for vacuum bags gives you vertical support so air can reach every surface. Look for racks with multiple arms or prongs that hold bags open at different angles. Adjustable spacing is handy since bags come in all shapes and sizes.
Some racks have weighted bases to stop them from tipping when you load them up. Others come with suction cups or clips that attach to your counter or sink. The main thing is to keep space between bags so they don’t touch and stay damp.
Metal racks with coated prongs won’t rust or react with food bits. Plastic racks are lighter and easy to move around. If you’re short on counter space, go for racks that fold up.
Using Bottle and Bag Brushes for Drying Prep
A silicone bottle brush or a vacuum sealer bag cleaning brush helps you sweep out water trapped in corners and seal grooves before you start drying. These brushes reach deep into the bag where towels just can’t. We always use one right after rinsing to push water toward the opening.
Long-handled brushes are best for bigger bags. Silicone bristles flex to fit the bag’s shape and won’t scratch. We like to keep a brush just for vacuum bags, not for dishes.
A gasket cleaning tool works wonders on the seal channel. Run it along the gasket after washing to get rid of trapped water. This step really cuts down on drying time and helps avoid seal failures.
Handheld vs. Countertop Drying Aids
Handheld tools like towel-lined clips let you hang bags from cabinet handles or dish racks. It works fine for one or two bags, but gets awkward if you’re drying a bunch. Clips can leave marks if you don’t move the bags around.
Countertop racks stay put and handle lots of bags at once. Tree-style racks with vertical arms are our go-to for small kitchens. Some have drip trays underneath to keep your counters dry.
If you need something portable, folding stands are flexible and easy to store. Weighted racks are sturdier, especially if your bags are still heavy with water.
Best Practices for Storing Dried Vacuum Sealer Bags
After you’ve dried your reusable vacuum seal bags, how you store them makes a huge difference. We’ve noticed that storage can make or break whether your bags stay fresh and ready or turn into a magnet for bacteria.
Preventing Recontamination After Drying
One of the biggest mistakes people make is tossing freshly dried bags somewhere they’ll just pick up new dust or grease. After all that effort washing and drying, you don’t want them to get dirty again.
Set aside a drawer or container just for your clean vacuum sealer bags. This keeps them away from raw food, random kitchen tools, and clutter. The storage spot should be totally dry because any moisture can lead to mildew and ruin your bags.
Avoid storing bags:
- Under the sink (way too humid)
- Near the stove (cooking vapors stick to everything)
- In drawers with other kitchen stuff that might smell
- Anywhere with direct sunlight (it breaks down the plastic)
If you use some bags for raw meat or fish, keep them in a separate section from bags for dry goods, even if they’re clean. It’s just an extra precaution to avoid cross-contamination.
Flat vs. Rolled Storage Approaches
How you store your bags changes how long they last and how easy they are to grab when you need them.
Flat storage is best if you have the drawer space. Stack bags by size in a flat pile. This stops creases and keeps them in top shape for sealing. We like this method because you can see all your bags at once.
Rolled storage saves space in tight kitchens. Roll each bag loosely from the open end to the sealed end, then use a rubber band or pop them upright in a container. Don’t roll them too tight because tight creases can mess up the seal.
For bags with channels (those textured ones), flat storage keeps the pattern in better shape and helps your sealer work best next time.
Labelling Clean Bags for Future Use
Let's be honest, nothing beats a simple labelling system for keeping your bag collection from turning into a chaotic mess. Once you start building up a stash of reusable vacuum seal bags in all sorts of sizes, things can get out of hand pretty fast.
Grab a permanent marker and jot down the bag size and what you last stored in it right on a corner. That way, you can quickly spot which bags work best for chicken, veggies, or pantry stuff. Some folks swear by colour-coded stickers to tell apart bags used for raw proteins and those for cooked foods. Honestly, whatever helps you keep track works.
What should you include on your labels?
- Bag dimensions (makes portion planning way easier)
- Date you last cleaned it
- What type of food was inside (proteins, veggies, dry goods)
If you want to get really organized, add tally marks for each reuse. You'll get a realistic idea of when a bag's nearing retirement, usually after about 15 to 20 uses, depending on what you've put in them.
Avoiding Common Drying and Storage Mistakes
Even people who use these bags all the time mess up the drying and storage part. The biggest issues usually come from rushing the drying, missing hidden moisture in the seals, or putting bags away before they're truly dry.
Overlooking Moisture in Seals and Gaskets
Moisture loves to hide in the seal area. Water sneaks into gasket grooves and zipper channels, making a cozy home for mold and mildew, even if the rest of the bag feels dry.
After washing, grab a vacuum sealer bag gasket cleaning tool or a small silicone brush to check these spots. Run your finger along the seal groove. If it feels damp at all, press a clean, dry cloth into the channel to soak up the water.
Corners, where the seal meets the bag edge, are the worst offenders. They hold onto water and just don't dry as fast. A reusable vacuum bag wash brush with a narrow tip helps you get into those tight spots while cleaning and checking after washing.
Don't just trust your eyes. Touch every part of the gasket and zipper area before deciding the bag's ready for storage.
Storing Bags Too Soon
If you put away a bag that's even a little damp, you'll end up with musty smells and maybe even bacteria. Bags can feel dry outside but still be moist inside, especially if you live somewhere humid.
After wiping down your bags, prop them open on a drying rack for at least 2-4 hours in a breezy spot. Flip them inside out halfway through so both sides get some air. If you don't have a rack, just drape them over a clean dish towel on your counter.
Before you stash them away, do a final touch test inside and around the seals. The bag should feel totally cool and dry, with no sticky or chilly spots hiding moisture. Store bags flat or gently rolled in a drawer or cabinet, away from heat, to keep their shape and seals in good shape.
Dealing With Stubborn Odours or Residue
If your bags still smell after washing, there's probably food or oil stuck in the material or gasket. Dish soap sometimes just can't handle strong smells like garlic, fish, or curry.
When odours stick around, mix up a baking soda and water paste and scrub it into the inside and seals with a vacuum sealer bag cleaning brush. Let it sit for 15-20 minutes, then rinse well with warm water. White vinegar works too, but make sure you rinse it out completely so it doesn't mess with your next batch of food.
Gasket residue usually needs a gentle scrub with a soft silicone brush. Stay away from abrasive scrubbers because they'll scratch the plastic and give bacteria places to hide. If the smell won't quit after a few washes, the bag's probably absorbed oils and it's time to toss it for safety's sake.
Maintaining the Performance and Longevity of Vacuum Seal Bags
If you check your bags regularly, use the right cleaners, and stick with compatible machine accessories, your vacuum seal bags will last for months or even years. Catching wear early and picking the right tools keeps your seals strong and your food safe.
Inspecting for Wear and Tear
Always check bags before using them, even if they seem fine. Run your fingers along the seal to feel for thin spots or rough patches. Hold the bag up to the light. Tiny holes or stress marks near the corners show up that way.
Focus on the gasket area where the bag meets your vacuum sealer. That spot takes the most pressure and usually shows damage first. If you see discoloration, stiffness, or small cracks, retire the bag.
Bags that hold raw meat or strong-smelling foods wear out faster than ones for dry goods. Marking bags with a small dot each time you reuse them helps track their lifespan. Most decent bags survive 10 to 15 uses if you clean them right, but it really depends on what you store and how often you seal.
Compatible Cleaning and Drying Products
Mild dish soap and warm water get the job done for nearly all reusable vacuum seal bags. Skip the harsh detergents and bleach because they leave residues and weird smells. A soft silicone brush gets into corners and seams without scratching anything.
For stubborn smells, soak bags briefly in a mix of one part white vinegar to three parts water. Baking soda paste lifts stains from tomato sauce or berries without harming the bag. Always rinse thoroughly after any treatment to keep cleaning agents from building up.
Dishwasher-safe drying racks made for vacuum bags let you air-dry several bags upright with good airflow. They're honestly much better than just draping bags over random dish racks or counters. If you use a handheld or portable vacuum sealer, smaller bags dry faster and fit nicely on a collapsible rack.
Maximizing Usability With Machines and Accessories
Your vacuum sealer and bag need to work together for good seals and longer bag life. Many vacuum sealers work with standard embossed bags, but always confirm bag compatibility and thickness before buying in bulk. Thicker bags hold up better to repeated use but need stronger suction.
Keep a small repair kit with spare gaskets and valve parts if your bags use them. A vacuum sealer bag gasket cleaning tool keeps valve areas clear and extends the bag's life. Clean gaskets regularly to avoid air leaks that can spoil your food.
Vacuum sealer reviews usually mention which machines work best with reusable bags. If you're thinking about upgrading, look for models with adjustable suction. Lower settings are great for delicate or older bags because they won't stress weak seals. Handheld sealers use gentler suction, so they're good for bags that are wearing out but still usable.
Frequently Asked Questions
These quick answers cover the most common questions about drying and storing reusable vacuum sealer bags.
What's the fastest way to dry reusable vacuum sealer bags after washing without leaving water spots?
Shake out excess water, wipe the bag with a clean lint-free towel, and place it open on a drying rack with good airflow. A microfiber cloth can remove remaining water spots.
How can you dry the inside corners and seams so there's no trapped moisture?
Use a clean bottle brush, rolled paper towel, or dry cloth to reach the corners and seams. Keep the bag propped open until every area feels completely dry.
Is air-drying enough, or should you use a dish towel or drying rack to speed things up?
Air drying is usually enough, but towel drying first saves time. A drying rack also keeps the bag open so air can reach the inside.
Can you safely use a low-heat setting like a fan or hair dryer to dry vacuum sealer bags?
A fan is safe and effective. A hair dryer may be used on a cool setting from a safe distance, but avoid heat that could warp the bag or weaken the seal.
How do you prevent musty smells or mildew if the bags don't dry fully before storage?
Do not store the bag until it is completely dry. If it smells musty, wash it again, rinse thoroughly, and let it dry fully before reuse.
What's the best way to store reusable vacuum bags so they stay dry and ready for the next meal prep run?
Store clean, dry bags flat or loosely rolled in a cool, ventilated drawer or container. Keep them away from humidity, heat, and direct sunlight.
Partager:
How to Vacuum Seal Frozen Meat: Should You Seal Before Freezing or After?
How to Tell When a Vacuum Sealer Bag Has Lost Its Seal and What to Do Next