

Check out our latest collection of compact vacuum sealer for food!
Most of us have dashed out the door with barely enough time for coffee, let alone a decent breakfast. If you’ve ever tried making a smoothie while running late, you know how much of a hassle it can be. But, honestly, prepping vacuum-sealed smoothie packs ahead of time can make mornings feel way less frantic.
Vacuum-sealed smoothie packs let you prep weeks’ worth of breakfasts in one go, slashing your morning routine down to just a few minutes. I’ve found that this method keeps everything fresher than those usual freezer bags, and you don’t have to fuss with portions when you’re half awake. No more digging for berries or measuring spinach while the clock’s ticking.
What’s great is how flexible this system is. You can mix up flavors, work around food allergies, and still get a balanced meal—even on your busiest days. Whether you’re just feeding yourself or a whole crew, it scales up or down and saves cash compared to those pricey store-bought smoothies.
Key Takeaways
- Vacuum-sealed packs keep ingredients fresh for weeks and make mornings quick and easy
- Smart layering and ratios help your smoothies blend perfectly every time
- Meal prepping in bulk cuts grocery costs and helps you skip breakfast indecision
Why Choose Vacuum‑Sealed Smoothie Packs
Vacuum-sealed smoothie packs keep things fresher than regular freezer bags, speed up your mornings, and take the guesswork out of breakfast. They keep ingredients good up to five times longer, and you can have breakfast ready in under two minutes.
Time‑Saving Solution for Busy Lifestyles
You can prep a whole week’s worth of smoothies in about 15–20 minutes on a Sunday, instead of spending 5–7 minutes every single morning gathering stuff from all over the kitchen.
Here’s the math:
- Traditional smoothie prep: 35 minutes per week (5 minutes × 7 days)
- Vacuum-sealed prep: 20 minutes total prep + 14 minutes blending (2 minutes × 7 days)
- Time saved: 1 minute per day
It’s even better if you pick up fruit on sale and prep everything at once. Portion out the ingredients, seal up the bags, and stack them in your freezer.
No more one-handed digging through frosty fruit bags. Just grab a pack, add your liquid, and blend.
Consistency and Freshness in Every Pack
Vacuum sealing pulls out the air that causes freezer burn and those annoying ice crystals. Your smoothie packs can last up to three months instead of just a few weeks in regular bags.
The sealed packs keep spinach from tasting weird and prevent berries from freezing into a single rock-hard lump.
Each pack usually has:
- 1 cup frozen fruit
- 1 cup greens (spinach or kale)
- 1 scoop protein powder
- Any boosters you like
You get the same nutrition and flavor every time—no more “oops, this is all kale” mornings.
Reducing Morning Stress and Decision Fatigue
Honestly, who wants to think before coffee? With these packs, you make all the choices on Sunday, so you don’t have to stand in front of the freezer debating berries vs. strawberries.
Morning stress, gone:
- No hunting for ingredients
- No measuring or portioning
- No last-minute spinach panic
- Just rinse the blender and you’re done
Everything’s sealed and ready, so you’re way more likely to stick to your healthy breakfast plans instead of grabbing a granola bar on your way out.
How to Prep 5‑Minute Smoothie Packs at Home
Making vacuum-sealed smoothie packs is pretty straightforward. You just need the right combos, a good sealing technique, and some smart storage.
Essential Ingredients for Balanced Nutrition
Base Ingredients (per pack):
- 1–2 handfuls leafy greens (spinach, kale, or whatever you like)
- 1½ cups fresh or frozen fruits and veggies
- 1 scoop protein powder or Greek yogurt powder
- ½ teaspoon spices (turmeric, cinnamon, ginger—pick your favorite)
Try to include at least one fruit for sweetness and one veggie for extra nutrients. Berries, bananas, and mangoes are solid choices, and veggies like carrots, beets, or cauliflower blend in well.
Don’t add liquids to the packs. Keep things like almond milk or juice separate—add them when you blend.
Prep everything first. Wash and chop fruits, de-stem berries, peel ginger—just make sure it’s all blender-ready.
Use fresh or frozen ingredients, or a mix. It helps with texture and keeps things from turning into a brick.
Step‑By‑Step Vacuum‑Sealing Guide
You’ll need:
- Vacuum sealer machine
- Quart-size vacuum sealer bags
- Permanent marker
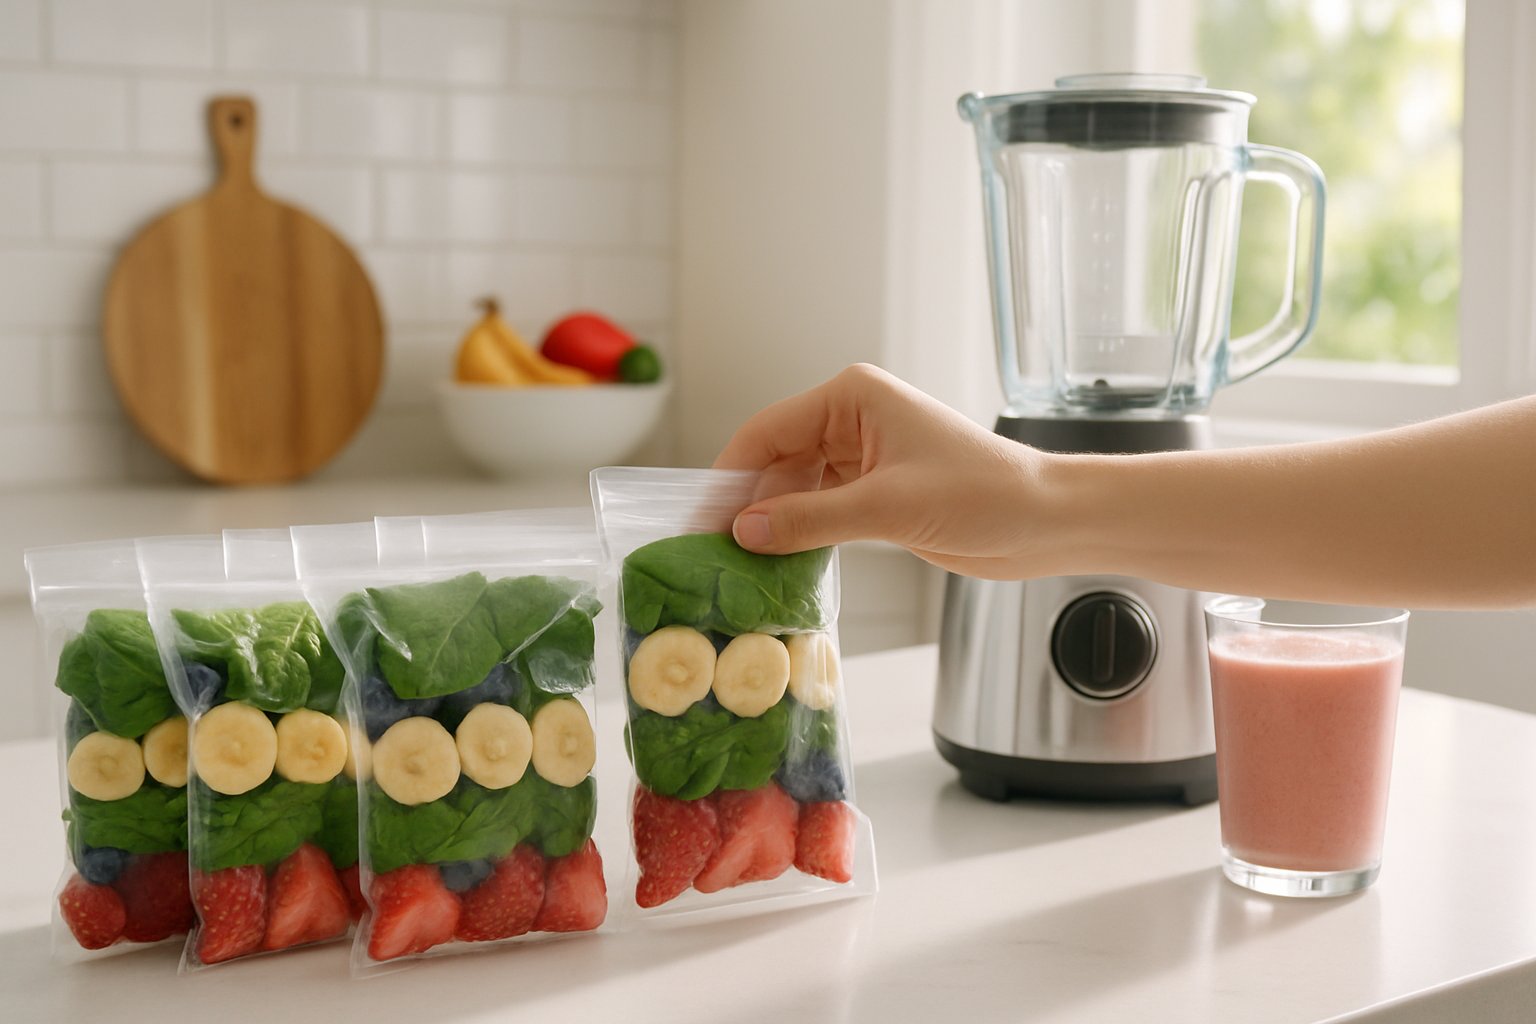
Lay your bag flat. Greens go in first, pressed toward the top. Protein powder and spices go in the middle so they don’t stick to the sides. Add the fruits and veggies last. Leave about three inches at the top for sealing.
Use the “gentle” setting if your sealer has one—no one likes squished fruit.
Label the packs right away with what’s inside and the date. Makes a difference when you’re half asleep.
Storage Tips for Maximum Freshness
Store packs flat in the freezer so nothing clumps together. Stack them like files for easy grabbing.
How long they last:
- Packs with fresh greens: up to a week
- Packs with only frozen stuff: up to three months
Take a pack out 15–30 minutes before blending. It’ll blend easier if it’s not rock solid.
Keep different flavors in separate spots. I like to group tropical blends in one corner and berry mixes in another.
Pro tip: Make several of the same kind at once. It’s faster and you get more consistent results.
If you spot ice crystals on older packs, use those first. They’re still fine, but the texture might be a bit different.
Building the Perfect Smoothie Pack
A good smoothie pack needs the right balance. You want the right texture, plenty of nutrition, and flavors that actually work together—not just a random freezer dump.
Choosing Fruits, Veggies, and Add-Ins
Frozen fruits are easiest. Berries, mango, cherries, and banana slices blend well and bring a ton of nutrition. If you use fresh fruit, cut it small.
Leafy greens go on top to avoid sogginess. Baby spinach is mild and blends up smooth. Kale’s good if you’re into a stronger flavor.
Carrots and other root veggies add sweetness and color. Shred them so they blend in.
| Best Additions | Why They Work |
|---|---|
| Fresh ginger (1-inch piece) | Anti-inflammatory, adds zing |
| Fresh mint sprigs | Cooling flavor, helps digestion |
| Turmeric (½ tsp) | Antioxidants, warm flavor |
| Chia seeds | Omega-3s, thickens things up |
Always prep your produce before bagging—hull strawberries, pit cherries, peel ginger. It’s a pain to do later.
Balancing Protein, Fiber, and Healthy Fats
Put the protein powder in the middle of the pack so it doesn’t stick to the bag. Aim for 15–25 grams per serving. Plant-based powders go well with fruit; whey blends in easily.
You’ll get fiber from fruits and veggies, but I like to add flaxseed or hemp hearts for a boost (and some good fats).
For healthy fats and extra staying power:
- 1 tablespoon almond butter (super creamy)
- 2 tablespoons coconut flakes (tropical vibe)
- ½ avocado (best added fresh, but you can freeze it)
The sweet spot for ratios: 40% fruit, 20% veggies, 20% protein, 20% extras. It’s balanced and keeps you full until lunch.
Customizing Flavors for Every Palate
Got a sweet tooth? Try mango, pineapple, coconut flakes, and vanilla protein. Use coconut water for a real tropical kick.
If you love greens, go for spinach, cucumber, green apple, mint, and a little lemon juice powder. Pineapple juice covers up any “green” taste.
Chocolate fans—seriously—try frozen banana, spinach (you won’t taste it), chocolate protein, and a pinch of cinnamon. Almond milk makes it rich.
Spice things up with berries, fresh ginger, a dash of cayenne, turmeric, and orange juice.
Label each pack with the flavor and your preferred liquid. Trust me, it saves confusion. Some favorites: coconut water, almond milk, OJ, or just water if you want to keep it light.
Quick Blending and Serving Tips
The right blender and liquid make a huge difference. You want your smoothie creamy, not chunky, and you want to actually drink it on the go—not eat it with a spoon.
Blenders That Make Mornings Faster
High-powered blenders (think 1000 watts or more) crush frozen stuff without making you stop and shake the thing every 10 seconds.
Personal blenders with travel cups are a lifesaver—blend and go, no extra dishes.
Preset smoothie buttons help, too. Most decent blenders have a frozen fruit setting that works for these packs.
A tamper tool helps push down stubborn chunks, so you don’t end up with icy bits.
Wide-base blenders pull everything down toward the blades, so you don’t get stuck with frozen clumps on the sides.
Liquid Bases for Different Dietary Needs
You need enough liquid to get things moving, but not so much that your smoothie turns watery. Half to three-quarters of a cup per pack is usually right.
Dairy milk gives you creaminess and protein. Whole milk is rich, skim is lighter.
Plant-based milks:
- Almond milk: Light, low-cal
- Oat milk: Sweet, creamy
- Coconut milk: Rich, tropical
- Soy milk: High protein
Coconut water is great for hydration and keeps fruit flavors bright—awesome for green smoothies or post-workout.
If you’re in a rush, add a couple tablespoons of liquid to the pack before freezing. It helps the blender get started.
Making It On-the-Go Friendly
Mason jars with tight lids are spill-proof and most fit blender attachments. You can drink right from them.
Insulated travel mugs keep smoothies cold for hours, so you don’t end up with a separated mess.
Reusable straws (metal or silicone) are sturdy and handle thick smoothies better than paper ones.
Blend your smoothie a little thinner than you want—it’ll thicken as it sits, especially if you’re taking it to go.
Pop your travel container in the freezer for 10 minutes before pouring in your smoothie. It helps keep things cold and stops it from melting too fast.
Creative Flavor Combinations
Vacuum-sealed smoothie packs really shine when you mix sweet, tart, and creamy flavors, and sneak in extra nutrition. Pair up ingredients that freeze and blend well—there’s a lot of room to experiment, and honestly, that’s half the fun.
Berry, Nut Butter, and Oatmeal Blends
Classic Berry Almond Crunch brings together frozen mixed berries, rolled oats, and almond butter for a breakfast that’s both filling and flavorful. I usually toss in a handful of spinach—honestly, you won’t even taste it, but you’ll get the extra nutrients.
Oats thicken things up and add a bit of sweetness, so there’s rarely any need for extra sugar.
Strawberry Peanut Butter Power mixes frozen strawberries, natural peanut butter, and a scoop of chia seeds. It’s got a good dose of protein and healthy fats.
Frozen banana chunks balance out the strawberries’ tartness and give the blend that creamy texture we all want.
Blueberry Cashew Vanilla is all about frozen blueberries, raw cashews, and vanilla protein powder. Cashews blend down super smooth—almost like a milkshake.
A dash of cinnamon brings out the vanilla. I’ll add rolled oats if I want it to keep me full longer.
Tropical Green and Citrus Boosts
Pineapple Mango Green uses frozen pineapple, mango, and fresh spinach. Don’t worry—the fruit totally covers up the “green” taste.
Coconut flakes add a bit of healthy fat and a tropical vibe. A squeeze of lime juice brightens up the whole thing and helps keep it fresh.
Orange Ginger Kick is frozen orange, fresh ginger, and kale. Ginger’s got that digestive kick and a bit of heat.
The oranges’ sweetness mellows out the kale. Toss in frozen banana if you want it creamier and a little extra potassium.
Citrus Avocado Mint combines frozen lime and lemon, half an avocado, and fresh mint. The avocado makes it super rich—no dairy needed.
Mint cools things down and might help digestion. A drizzle of honey helps cut the citrus tartness.
Chocolate, Protein, and Coffee Smoothies
Mocha Banana Protein blends frozen banana, cocoa powder, and cold brew concentrate. I throw in vanilla protein powder for staying power.
A spoonful of almond butter makes it creamy and adds healthy fats. Honestly, it tastes like dessert but it’s actually good for you.
Chocolate Cherry Recovery combines frozen cherries, cocoa powder, and chocolate protein powder. Cherries are a natural source of anti-inflammatory compounds.
Greek yogurt powder brings in probiotics and more protein. I like this one after a workout.
Espresso Chocolate Chip is cold espresso, mini dark chocolate chips, and frozen cauliflower. Sounds weird, but the cauliflower just makes it creamy—no weird taste.
Cinnamon brings out the coffee notes and helps with blood sugar. I stick with unsweetened cocoa powder for deep chocolate flavor.
Long-Term Benefits of Prep-Ahead Breakfasts
Vacuum-sealed smoothie packs do more than just save time in the morning. They help us stick to better eating habits, cut down on waste, and honestly, save a surprising amount of money over time.
Supporting Healthy Habits
When breakfast is already decided, we eat better—it’s just easier. Those vacuum-sealed packs in the freezer mean we’re not scrambling or reaching for junk food.
Having healthy stuff ready to go makes consistency almost effortless. If the easy option is good for us, we’ll actually choose it.
Just seeing those smoothie packs in the freezer reminds us we’ve already put in the work. It’s like a little nudge from our past selves.
Studies show prepping meals ahead leads to eating more fruits and veggies. With smoothie packs, that just sort of happens—no extra willpower needed.
Setting aside time on the weekend for prep gives a little structure to the week. When we plan ahead, we make better choices instead of just reacting to hunger.
Minimizing Food Waste
Vacuum-sealed smoothie packs turn ingredients that would spoil into ready-to-go breakfasts. Instead of letting fruit rot in the fridge, we portion it out and freeze it.
Buying produce in bulk during sales and freezing it right away saves money and guilt. No more discovering sad, fuzzy berries at the back of the drawer.
Frozen ingredients keep their nutrients for months, unlike fresh produce that loses vitamins over time. Those packs lock everything in at its best.
Overripe bananas and soft fruit? Perfect for smoothie packs. What might’ve gone to waste becomes the star of breakfast.
Portioning everything out means we don’t overbuy. We know exactly what’s in the freezer and can shop smarter.
Saving Money Over Time
Homemade smoothie packs are way cheaper than anything from a juice bar. Those can run $8-12 each, but making them at home is just a couple bucks per serving.
Buying in bulk—frozen fruit, protein powder, whatever’s in season—really adds up to more savings.
We skip the overpriced pre-made packs at the store too. Those usually cost twice as much as making our own.
A decent vacuum sealer pays for itself pretty quickly if you’re prepping often. One purchase, years of use.
No more emergency breakfast runs either. With smoothie packs ready, we’re not tempted by expensive grab-and-go options.
Frequently Asked Questions
Here are some of the most common questions about making vacuum-sealed smoothie packs—ingredient ideas, freezing tips, storage options, and a bit about nutrition.
What are some quick and nutritious smoothie ingredients for on-the-go mornings?
Frozen berries are my top pick—they’re packed with antioxidants and easy to prep. Blueberries, strawberries, raspberries… they all work great.
Greek yogurt is a must for protein and that creamy texture. One serving usually has about 15-20 grams of protein, so it keeps you full.
Spinach and kale blend in easily and don’t overpower the fruit. I’d start with baby spinach if you’re new to greens—it’s milder.
Chia seeds and ground flaxseed are simple ways to add fiber and omega-3s. Just a tablespoon of chia seeds gives you 5 grams of fiber and thickens things up.
How do I properly freeze fruits and vegetables for my smoothie packs?
Always wash and dry produce before freezing—extra moisture leads to ice crystals and nobody wants a watery smoothie.
Berries can go straight into freezer bags. For bigger fruits like bananas, peel and slice them first for easier blending later.
For delicate berries, flash freeze them on a baking sheet for a couple hours, then transfer to containers.
Blanch leafy greens for 30 seconds, then dunk in ice water. This keeps them green and helps preserve nutrients.
Can you recommend the best types of containers for meal prepping smoothie packs?
Vacuum-sealed bags are my favorite—they keep air out and prevent freezer burn. FoodSaver bags work well and store flat.
Mason jars are good if you’ll use the packs within a week. Just leave some space at the top for expansion.
Silicone freezer bags are a reusable, eco-friendly choice. They seal tight and you can toss them in the dishwasher.
Individual containers with tight lids are handy for single servings. I like the rectangular ones—they stack nicely.
Is it healthier to have smoothies rather than a traditional breakfast?
Smoothies can be super nutritious if you use whole fruits, veggies, and some protein. You can sneak in a lot of produce without much effort.
You get all the fiber from the whole foods, unlike juice where it’s stripped away. That helps digestion and keeps you full.
Traditional breakfasts—say, eggs and toast—offer different nutrients, especially for steady energy. The key is making sure your smoothies have enough protein and healthy fats.
I like to mix it up—some days smoothies, some days a solid breakfast. Keeps things interesting and balanced.
What are the top smoothie combinations that can help with weight loss?
Spinach, berries, Greek yogurt, and chia seeds make a solid weight loss combo—protein, fiber, antioxidants, and under 300 calories.
Green smoothies with cucumber, celery, and apple are light but filling thanks to all the water content.
For lasting fullness, I use unsweetened almond milk, protein powder, and frozen berries—aim for at least 20 grams of protein.
Half an avocado adds creaminess and healthy fats, which help with nutrient absorption and keep you satisfied longer.
How far in advance can I make and store these vacuum-sealed smoothie packs?
We’ve kept vacuum-sealed smoothie packs in the freezer for up to three months and honestly, they still tasted great. Just make sure you squeeze out as much air as you can when sealing—otherwise, you’ll get that dreaded freezer burn.
If you’re tossing in high-water stuff like cucumber or watermelon, you’ll want to use those up within 6-8 weeks. They just get icy faster than the denser fruits. Not a dealbreaker, but something to keep in mind.
Honestly, I usually prep enough for about 2-3 weeks at a time. That way, I’m not stuck prepping every weekend, but I still get all the fresh flavors.
Don’t forget to label each pack with the date—just grab a permanent marker and scribble it on. I like to shuffle the oldest ones to the front of the freezer so nothing gets lost in the abyss.
Share:
Food‑Allergy Safety at Home: Prevent Cross‑Contamination With Individual Sealed Portions
Vacuum Sealing Cheese Without Crushing It: Understanding Pressure Settings