

Check out our latest compact vacuum sealer for food collection!
Planning dinner every night is exhausting. You end up staring at the fridge, out of ideas, and often just order takeout or let groceries wilt in the crisper. A "cook once, store smart" weekly routine means you prep several meal components in one go, then stash them so they actually taste good all week. Suddenly, your kitchen feels less like a daily battleground and more like a system that’s got your back.
We've all been there: 6 PM, no plan, no energy, and a creeping sense of defeat. The beauty here isn’t about elaborate recipes or marathon meal-prep Sundays. It’s about batching your cooking smartly and storing food so you’re not choking down soggy leftovers by Wednesday.
This routine is all about practical storage and prep that fits real life. You’ll figure out how to plan a menu that saves time, set up your kitchen for success, and keep meals tasting fresh all week.
Key Takeaways
- Batch cooking once a week cuts down on daily dinner stress and food waste
- Storing meal components the right way keeps flavors and textures intact
- Consistent prep and storage habits make the routine sustainable
What Is a "Cook Once, Store Smart" Routine?
Basically, you prep a bunch of meal components in one session, then store them so they stay fresh. It’s not about making a week’s worth of identical meals. It’s about having versatile building blocks you can mix and match, depending on what you’re actually in the mood for.
Benefits of Cook Once, Store Smart
You get out of the kitchen faster because that one big cooking session replaces a week’s worth of daily prep. Most people can knock out 4-6 components in 2-3 hours, and suddenly you’re saving 30-45 minutes a day.
Food stays fresher because you’re storing raw or partly cooked ingredients, not just finished dishes. Veggies keep their crunch when they’re not swimming in sauce. You waste less food, too, since you only combine things when you’re actually going to eat them.
You also get more flexibility than with traditional meal prep. If you get invited out midweek, those prepped components just wait for you. No guilt, no waste.
Common Myths About Meal Prep Routines
People often think meal prep means eating the same sad leftovers for five days straight. Not here. You’re prepping building blocks—maybe seasoned ground beef that’s tacos one night, stuffed peppers the next, and a rice bowl after that.
You don’t need fancy containers or gadgets. Just a handful of airtight containers in a few sizes and your usual kitchen tools. Glass or BPA-free plastic, 2-cup and 4-cup sizes—done.
And you don’t have to do it all on Sunday. Split it up if you want, or pick a day that actually fits your life.
How This Method Differs from Traditional Meal Prep
Traditional meal prep is all about finished meals in containers. Here, you’re prepping ingredients, proteins, grains, veggies, sauces, to assemble on the fly.
Storage changes too. You keep foods in their best conditions: marinated chicken in one container, roasted veggies in another, cooked grains in a third.
You don’t have to plan every single meal in advance, either. Just make sure you’ve got enough variety in your prepped stuff to keep things interesting.
Planning Your Weekly Menu with Efficiency in Mind
Good cook-once routines start with recipes that share ingredients and prep steps, and actually use what’s in season. Think about how dishes connect, and how ingredients can do double duty across the week.
How to Choose Versatile Recipes
Look for recipes that overlap on ingredients but taste completely different. Roast a whole chicken and you’ve got three meals: dinner, tacos, and soup stock.
Batch prep techniques save time. Roasting veggies? Double up and use them in bowls, frittatas, or sandwiches. Favor dishes where you keep components separate until serving—like burrito bowls or pasta—so they store and reheat better.
Proteins that cook well in bulk are your friends: ground meat, whole chickens, pork shoulder, beans. Skip recipes with delicate textures or cream sauces unless you’re eating them right away.
Organizing Ingredients for Maximum Use
Group your shopping list by overlapping ingredients, not by recipe. If onions, garlic, and olive oil pop up in three dishes, just get what you need and prep it all at once.
Common groupings:
- Aromatics: onions, garlic, ginger, celery
- Proteins: chicken thighs, ground beef, beans
- Grains: rice, quinoa, pasta
- Produce: bell peppers, carrots, greens
Use up the most perishable stuff first—herbs and greens—while heartier veggies last for days. That way, nothing gets slimy in the back of the fridge.
Seasonal and Dietary Considerations
Build your menu around what’s in season—it’s cheaper and tastes way better. Winter squash in January, tomatoes in July, root veggies in the fall. You get the idea.
Dietary restrictions? They actually help you plan. Keep base recipes neutral, then add proteins or dairy to individual portions. A veggie curry stays flexible if you serve chicken on the side.
Keep a shortlist of meals everyone likes. It saves you from decision fatigue and keeps the week running smoothly.
Smart Kitchen Prep: Getting Ready for Success
If you want batch cooking to work, you’ve gotta get organized. The right tools, a clear workspace, and some basic equipment make all the difference.
Batch Cooking Essentials
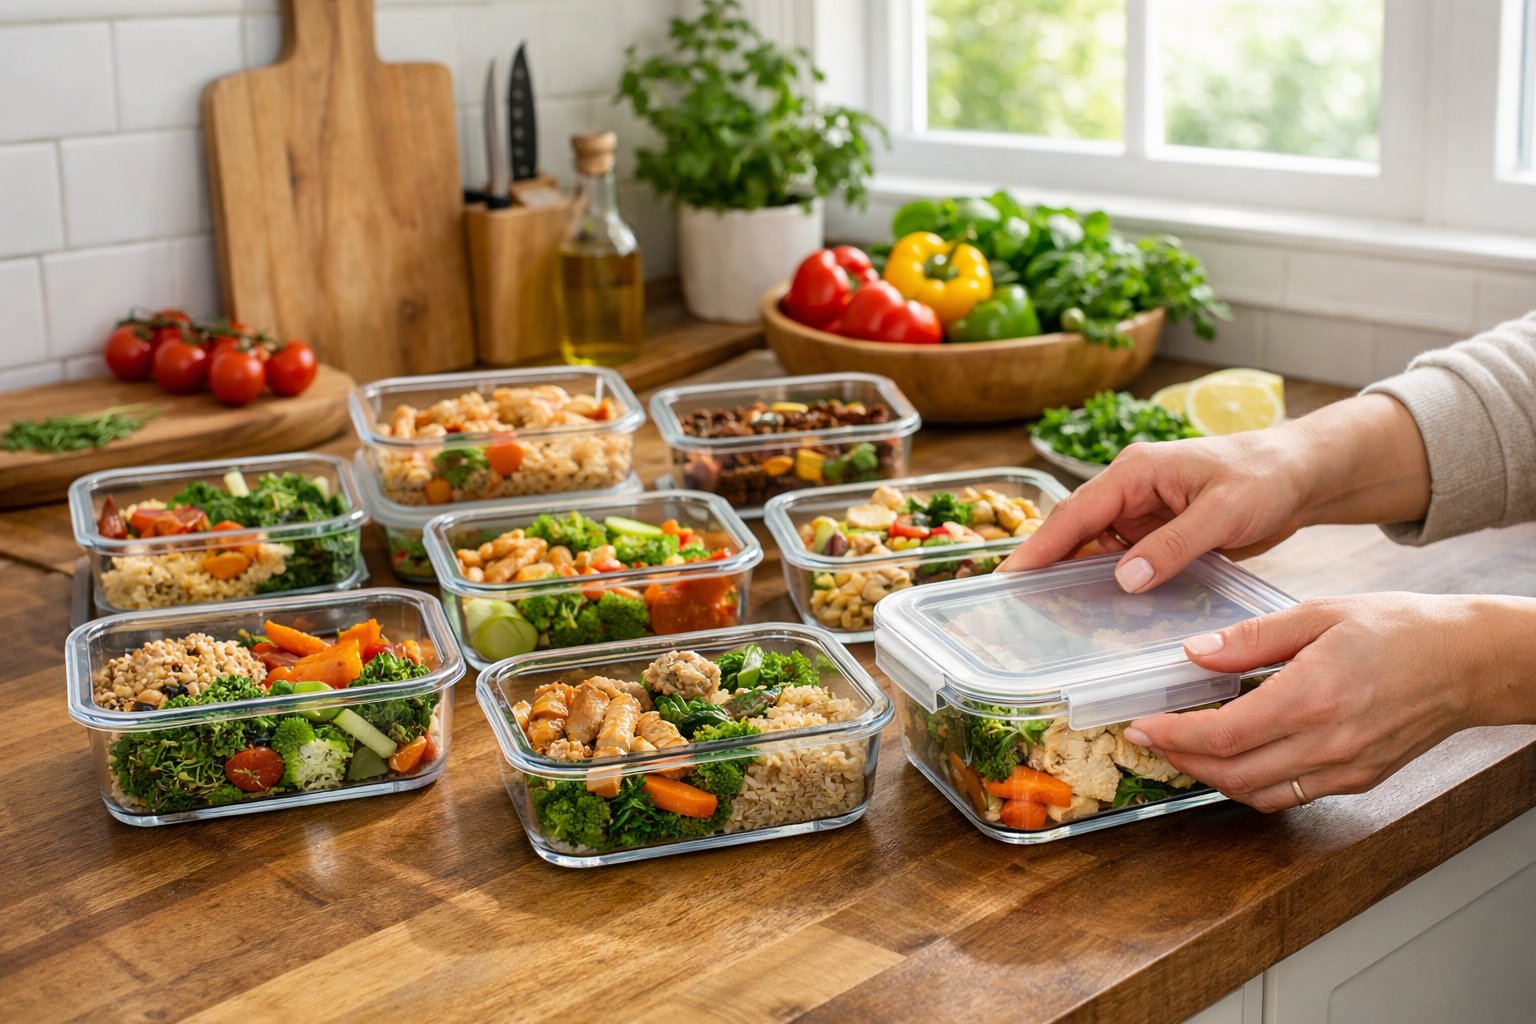
You can’t batch cook without good storage. Glass containers with tight lids are best—they don’t hold smells and keep food fresh. Aim for at least a dozen containers: small (2 cups) for sauces, medium (4 cups) for meals, large (8 cups) for family portions.
Label makers or just masking tape and a Sharpie help you keep track of what’s what and when you made it. Write the dish and date on every container. It’s a tiny effort that saves you from mystery meals later.
Freezer bags are a must for long-term storage. Get the kind that lay flat so you can stack them. If you want to go all-in, a vacuum sealer is even better—it keeps food fresh for months, not just weeks.
Setting Up Your Workspace
You’ll want three zones: cutting, cooking, and cooling. Put your cutting boards and knives near the sink. Cooking stuff—oils, spices, utensils—should be near the stove.
Don’t forget a cooling zone. Hot food needs to cool off before you stash it, or you’ll just end up with soggy, unsafe meals. A wire rack on the counter helps air circulate and speeds things along.
Clear your counters before you start. Extra appliances, mail, random clutter—they just get in the way when you’re trying to juggle multiple recipes.
Kitchen Tools That Make Prep a Breeze
Sharp knives are non-negotiable. You really only need three: a chef’s knife, a paring knife, and a serrated one for bread or tomatoes.
Food processors chop veggies in seconds. Use them for onions, carrots, and peppers that show up in several recipes. Sheet pans (have at least four) let you roast a ton of veggies at once.
Slow cookers and pressure cookers handle tough cuts of meat while you work on other things. They’re lifesavers for batch cooking.
Storage Strategies for Lasting Freshness
The right containers, a tidy fridge, and clear labels mean your food actually lasts—and you remember to eat it.
Selecting the Right Storage Containers
Glass containers with airtight lids are your go-to for proteins, grains, and sauces. They don’t stain or smell, and you can see what’s inside.
For freezing, use containers that won’t crack and leave a little space for expansion. Look for “freezer-safe” on the label.
Container cheat sheet:
- Grains/pasta: shallow rectangles
- Soups/stews: round, 2-4 cups
- Chopped veggies: vented or lined with paper towels
- Proteins: flat, stackable
Silicone bags are great for marinades, single portions, and stuff you want to freeze flat. Write on them with dry-erase markers and reuse them.
Making the Most of Your Fridge and Freezer Space
Put the newest prepped items in the back of the fridge; move older stuff forward. This way, nothing gets lost and forgotten.
Top shelves have the steadiest temp—good for leftovers and ready-to-eat meals. Bottom drawers are for raw ingredients and produce that needs humidity.
Fridge zones:
| Fridge Location | Best For | Temp Range |
|---|---|---|
| Top shelf | Ready-to-eat, dips | 35-38°F |
| Middle | Dairy, eggs, prepped | 35-38°F |
| Bottom | Raw proteins | 32-34°F |
| Door | Condiments, drinks | 40-45°F |
In the freezer, freeze soups and sauces flat in bags. Once they’re solid, stand them up like books. It’s weirdly satisfying and saves a ton of space.
Labeling and Dating for Easy Access
Always label containers with what’s inside and when you made it. Painter’s tape or labels work fine. This stops the guessing game and helps you use food while it’s still good.
Include dish name, prep date, and a “use by” date. Example: “Black Bean Soup, 3/4/26, Use by 3/8/26.”
Color-coding helps too—blue for breakfast, green for lunch, red for dinner.
Safe storage times:
- Grains/pasta: 4-5 days in the fridge
- Proteins: 3-4 days
- Raw chopped veggies: 3-5 days
- Soups/stews: 4-5 days
- Most foods: 2-3 months in the freezer
A small whiteboard inside your pantry or on the fridge keeps track of what’s in the freezer. Saves you from buying doubles or letting stuff get freezer-burned.
Maintaining Quality and Flavor Through the Week
Smart reheating and a little variety keep your batch-cooked food from turning boring or dry. You want meals to taste fresh, not like leftovers.
Best Practices for Reheating
Different foods need different reheating tricks. Proteins like chicken and beef do best in a covered skillet with a splash of broth or water—keeps them juicy. Casseroles and grains? Oven at 350°F, covered with foil for 15 minutes.
Rice and pasta need a little water before microwaving—about a tablespoon per cup, covered for a minute or two. Steamed veggies just need a quick zap so they don’t get mushy.
Quick reheating guide:
- Proteins: Stovetop with liquid (5-7 min)
- Soups/stews: Stovetop, medium heat (8-10 min)
- Grains: Microwave with moisture (1-2 min)
- Roasted veggies: Oven at 400°F (5-8 min)
Don’t reheat food more than once—it just gets sad, and it’s not safe either.
Tips to Avoid Food Fatigue
Meal boredom creeps in fast, so we try to head it off with a little planning and a lot of variety. Instead of slogging through the same meal five days in a row, we prep base ingredients that can morph into several different dishes.
Take seasoned ground turkey, for instance. It might fill tacos on Monday, mix into pasta sauce midweek, and top a rice bowl by Friday. Roasted chicken thighs? We’ll eat them whole the first night, shred them for sandwiches later, and dice them into fried rice when we’re tired of the rest.
Side dishes get the same treatment. Rather than making one giant batch of veggies, we cook three smaller ones. It takes about the same time, but the variety keeps things interesting. Batch cooking doesn’t have to mean monotony.
Refreshing Leftovers Creatively
Leftovers don’t have to taste tired. We usually toss in something fresh right before serving—maybe a handful of herbs, a squeeze of lemon, or a spoonful of yogurt. It’s quick, but it makes a big difference.
Texture matters too. We’ll top grain bowls with toasted nuts or seeds, sprinkle crispy fried shallots on soup, or add fresh greens that wilt from the heat. These little extras only take a minute or two.
Some quick refreshers we like to keep handy:
- Fresh cilantro, parsley, or basil
- Lemon or lime wedges
- Greek yogurt or sour cream
- Toasted sesame seeds or slivered almonds
- Crispy tortilla strips or croutons
Switching up sauces and condiments is another trick. Roasted veggies taste totally different with pesto, tahini, or just a drizzle of balsamic.
Developing Your Own Smart Storage Habits
We all want storage systems that actually work—not just a pile of empty containers gathering dust. The real key is building habits that fit how we cook and eat, organizing for speed, and tracking freshness without turning it into a chore.
Building a Weekly Storage Routine
Pick a day—Sunday’s common, but Wednesday works too—to prep and store food. During that session, we cook our grains, proteins, and vegetables. As soon as something’s done, we portion it out while it’s still warm (but not hot) into storage containers. This stops us from reheating one big batch over and over, which only speeds up spoilage.
We label everything right away. Masking tape and a marker do the trick, or a label maker if you’re feeling fancy. Each container gets the contents and the prep date.
We also do a quick fridge sweep before starting. Anything that’s about to turn gets worked into that week’s plan. Takes five minutes, but it saves food and helps us figure out what we actually need to cook.
Organizational Tricks for Quick Grabs
We organize the fridge and freezer by meal component—proteins in one spot, grains in another, veggies somewhere else. This way, we can mix and match without digging through everything.
Clear containers are a lifesaver. You can see what’s inside without opening each one. We stack similar sizes to save space and avoid the dreaded fridge avalanche.
Our usual zones:
- Top shelf: Ready-to-eat stuff and leftovers (it’s warmest here)
- Middle shelves: Cooked proteins and grains
- Bottom shelf: Raw ingredients waiting for prep (coldest spot)
- Door: Condiments and sauces only (this area fluctuates in temp)
A small bin at the front of each shelf holds items that need to be eaten in the next day or two. That “eat first” zone is our go-to when we’re in a hurry.
Tracking Use-By Dates Without Fuss
Instead of full dates, we just use numbers. If we prep on Sunday, everything gets a “1” for Monday, “2” for Tuesday, and so on. Most things are gone by day four, so if it says “4,” it needs to be eaten by Thursday.
For the freezer, we jot down the month and year. Frozen meals last a couple of months, so we don’t sweat the details. We move older stuff to the front each week.
A little whiteboard on the fridge helps us keep track of what’s inside without opening every container. We jot down the main items and erase them as we use them. It’s a 30-second habit that saves us from “what’s in this mystery tub?” moments.
And honestly, if something looks or smells off, we toss it. Labels are helpful, but our senses are better judges.
Frequently Asked Questions
Meal prep only works if the techniques, storage, and organization all fit together. Here are some answers to the questions we get most about keeping food fresh, handling leftovers, and making a prep routine that doesn’t take over your life.
What are the best techniques for meal prepping that lasts all week?
We batch-cook proteins and grains in one go—usually Sunday afternoon. Chicken breasts, ground turkey, and beans stay fresh for four or five days in airtight containers.
Veggies are a little trickier. We prep sturdy ones like carrots and broccoli early, but leave delicate greens until midweek to avoid wilted salads.
Portioning right after cooking matters more than you’d think. Individual servings cool faster and make weekday meals a grab-and-go situation.
Can you share some clever food storage hacks for maximizing freshness?
A paper towel at the bottom of cut veggie containers soaks up extra moisture and keeps things crisp for a couple more days.
Glass containers with snap lids seal better than most plastics, and if we stick to one or two sizes, they stack neatly.
For herbs, we treat them like flowers: trim the stems, pop them in a jar with an inch of water, and loosely cover with a plastic bag before refrigerating. They last way longer.
How do I organize my kitchen to streamline my meal prep routine?
We set up zones for different tasks. The prep area’s by the sink with cutting boards and knives handy. The cooking zone keeps pots, pans, and utensils close to the stove.
Clear containers go at eye level in the fridge and pantry so we can see what we’ve got. No more digging through stacks.
Everything gets a label with the prep date. We use whatever’s handy—label maker, permanent marker, you name it.
What's the secret to balancing variety and simplicity in meal planning?
We stick to three core proteins and swap up the seasonings and sauces. Grilled chicken goes Greek one night, Asian the next, just by changing the flavors.
Switching up grains—rice, quinoa, pasta—keeps things from getting dull. They all cook about the same time, but the meals feel totally different.
We keep a short list of five favorite recipes that work every time, and usually try one new thing each week for fun.
Could you suggest some essential tools for efficient bulk cooking?
A big stockpot or Dutch oven is a must for soups, stews, and grains. We use it for everything from beans to pasta.
Sheet pans make roasting a breeze. We’ll cook a few pounds of veggies or protein at once on two pans.
An instant-read thermometer helps us nail the right temperature for proteins, so nothing’s undercooked or dry. We check a few pieces to be sure.
A food processor saves a ton of time. We use it to chop veggies, whip up sauces, and shred cheese—way faster than doing it all by hand.
What strategies can I adopt to ensure I efficiently use leftovers?
We like to repurpose leftovers instead of just reheating the same meal. For example, roasted chicken turns into chicken salad, gets tucked into a quesadilla, or becomes the base for a soup later in the week.
Leftover grains? Those are easy to reinvent. Plain rice morphs into fried rice, quinoa gets tossed into salads, and leftover pasta mixes with fresh veggies and whatever sauce we have lying around.
Every Friday, we do a "clean out the fridge" meal. It's a bit of a grab bag—random leftovers come together in stir-fries, grain bowls, or maybe a frittata if we're feeling ambitious.
Sometimes, freezing single portions saves the day. We try to label everything with what's inside and the date, so our freezer turns into a stash of our own homemade convenience meals. Honestly, these beat anything you'd find in the store.
Share:
How to Store Fresh Herbs Without Crushing Their Texture
How to Store Fresh Herbs Without Crushing Their Texture