

Check out our latest compact vacuum sealer for food collection!
Fresh herbs can turn any meal into something special, but honestly, they tend to wilt or get crushed before we even use them. The real issue? It’s usually our storage habits, not the herbs. Most folks just throw them in the crisper drawer in their plastic wrap, cross their fingers, and end up with a slimy, sad pile by the weekend.
If you want herbs to stay fresh and keep their texture, you’ve got to match the storage method to the herb and pay attention to airflow and moisture. Basil and cilantro, for example, need totally different care than rosemary or thyme. We’ve all grabbed what should be fresh parsley, only to find a squished, blackened clump destined for the trash.
A handful of easy storage tweaks can stretch your herbs’ lives from a few days to weeks. Whether you like to keep them in a glass of water, wrap them up in the fridge, or freeze them for later, there’s a way to make it work for you, without sacrificing that crisp, just-picked feel.
Key Takeaways
- Each herb type needs its own storage style for best flavor and texture
- Balancing moisture and airflow keeps herbs from getting slimy or limp
- You’ve got options for both short-term freshness and longer-term storage
Understanding Fresh Herb Types
Fresh herbs generally fall into two main groups, and how you treat them makes a big difference in whether they end up crisp or crushed.
Soft versus Woody Herbs
Soft herbs—think basil, cilantro, parsley, mint, dill, chives, tarragon—have delicate, easily bruised leaves and stems. Stack them too tightly or press down, and you’ll get that infamous slimy mess lurking in your fridge.
Woody herbs (rosemary, thyme, oregano, sage) are tougher. Their thicker leaves and stems can handle a bit more roughhousing, but they’ll dry out fast if you’re not careful.
So, soft herbs? Handle with kid gloves from the get-go. Woody ones? They’re sturdy, but don’t push your luck.
Stem and Leaf Structure
Soft herbs come with thin, hollow stems—little straws that pull water up to the leaves. Once you cut them, those stems need water right away if you want the leaves to stay plump.
Their leaves are high in water, low in protection. Even a gentle squeeze can leave a brown bruise that spreads quickly.
Woody herbs, on the other hand, have stiff, almost bark-like stems and waxy leaves that lock in moisture. They don’t suck up water as easily after cutting, but their leaves are naturally firmer and less likely to flop.
Why Texture Matters
Texture’s the first thing you notice when chopping herbs. Crisp basil slices clean and smells amazing. Wilted basil? It just kind of smears and tastes flat.
Keeping herbs’ structure intact means you get that signature crunch or snap, plus all the flavor and aroma. Nobody wants soggy cilantro on tacos or limp mint in a cocktail. When herbs hold up, they’re also perfect for frying as garnishes or muddling in drinks. Once they get mushy, forget about it.
Prepping Herbs for Storage
Getting herbs ready to store is just as important as where you put them. Timing, gentle washing, and careful handling all matter.
Harvesting Herbs in the Morning
If you’re picking your own, do it in the morning—after the dew dries but before the sun gets hot. Early harvest means the herbs are full of moisture and essential oils (usually around 8–10 a.m.).
Cut with sharp, clean scissors or shears, not your hands. Snip above a leaf node to encourage more growth, and don’t take more than a third of the plant. For soft herbs, cut whole stems instead of picking leaves one by one.
Washing and Drying Guidelines
Give herbs a gentle rinse in a bowl of cool water—don’t blast them under the tap. Swish them around, then shake off the water.
A salad spinner works for sturdy herbs like parsley or mint, but go easy—don’t spin them into oblivion. For fragile ones like basil or cilantro, lay them on a clean towel and pat them dry (no rubbing or pressing).
Make sure they’re dry before storing. Even a little leftover moisture can invite mold and ruin the texture fast.
Gentle Handling to Prevent Bruising
Bruised herbs lose their oils and get spotty. Treat them like you would delicate salad greens; support the stems, don’t grab big handfuls of leaves.
When moving herbs from the cutting board, use both hands and don’t cram them into containers. If you spot any damaged leaves, pick them out—they’ll spoil first and can take the rest down with them.
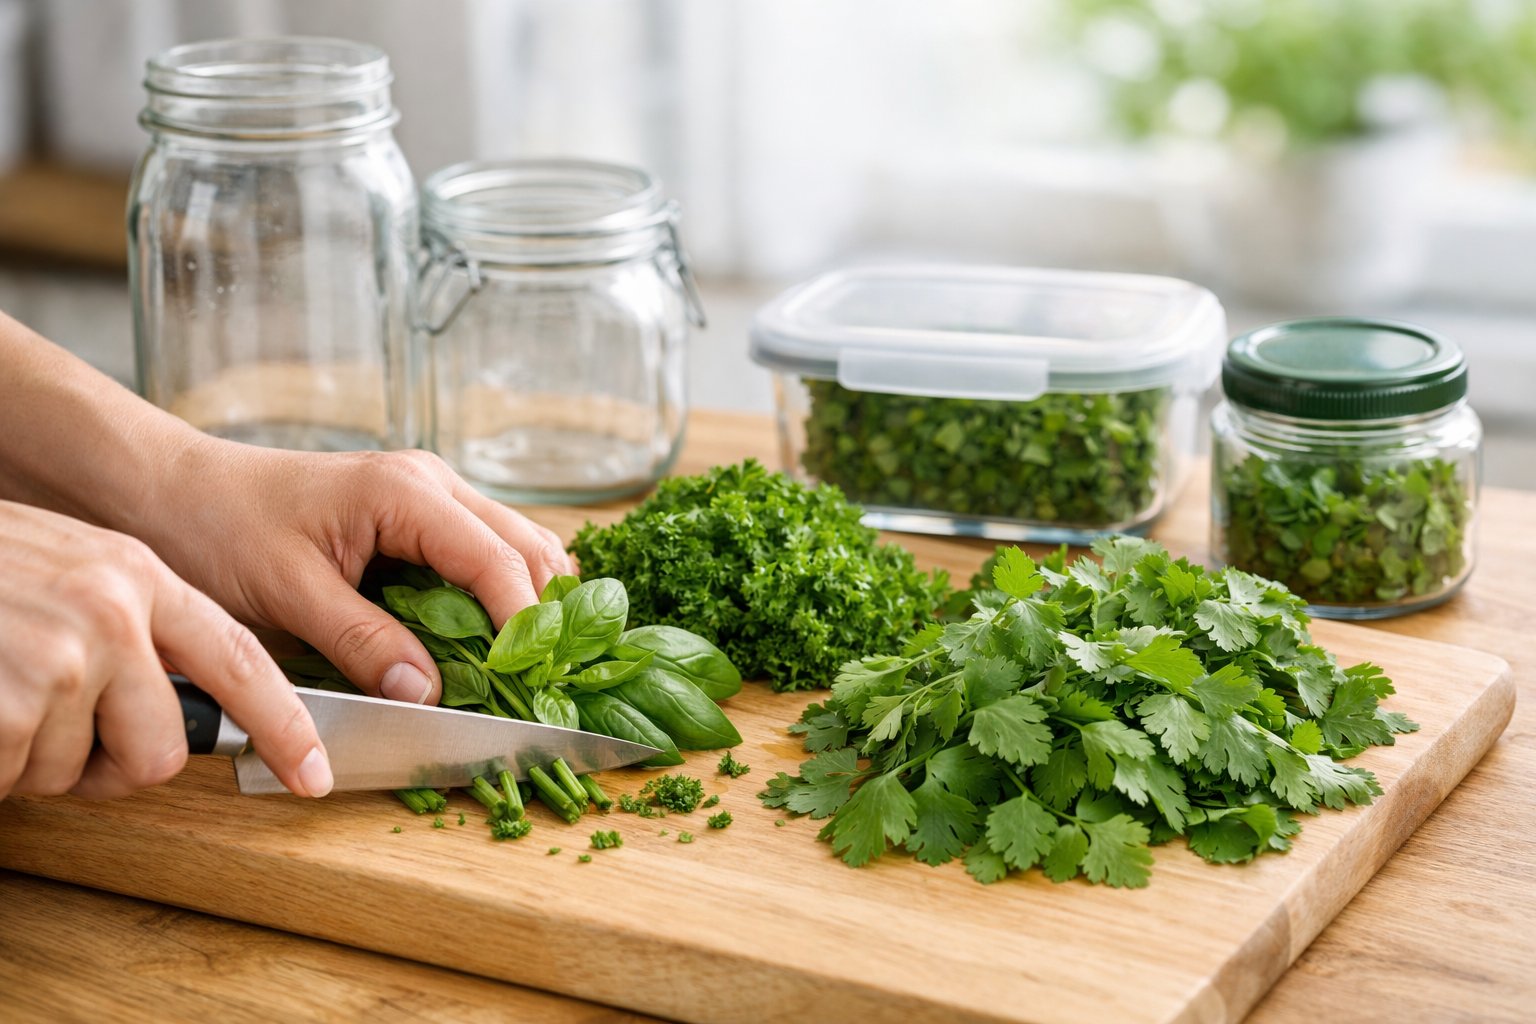
Storage Solutions for Tender Herbs
Tender herbs like cilantro, parsley, and dill need a bit of TLC to keep their leaves and stems in good shape. The trick is balancing moisture and airflow.
Jar-in-Water Method
For soft herbs, treat them like a bouquet. Trim about half an inch off the stems at an angle and stand them in a jar with an inch or two of water. The stems go in the water; the leaves stay dry.
Loosely cover with a plastic bag, leaving some air at the top. Stick the jar in the fridge for most herbs, but not basil (more on that in a sec). Change the water every couple of days.
Done right, herbs can last up to two weeks like this. The stems drink up water, and the loose cover keeps them from drying out or rotting.
Damp Paper Towel Wrap
If you don’t have room for jars, wrap herbs in a just-barely-damp paper towel. Roll them up gently—don’t squeeze. Slide the bundle into a zip bag, but leave it a little open for air.
This works great for cilantro, mint, or tarragon. Check every few days; swap the towel if it gets soggy or bone dry.
Room Temperature Storage for Basil
Basil is super sensitive to cold. Store it at room temp, away from direct sun.
Put the stems in a jar of water, just like flowers. Don’t cover or refrigerate. Change the water daily and pinch off any yellowing leaves. Basil will stay fresh and fragrant for about five to seven days this way.
Best Practices for Woody and Hearty Herbs
Woody herbs—rosemary, thyme, sage, oregano—do better with dry storage. Their firm stems don’t soak up water, and too much moisture just breeds mold. Wrap them loosely in a dry paper towel, then pop them into a partially open bag or container in the fridge’s crisper drawer.
Paper Towel and Bag Approach
Wrap woody herbs in a dry paper towel and put them in a plastic bag or container. The towel catches condensation but keeps things just humid enough to prevent the leaves from drying out.
Leave the bag a bit open or poke holes for airflow. Sealing it tight will trap moisture and encourage mold.
Change the paper towel every few days if it gets damp. Oregano and sage seem to last longest this way; thyme sometimes needs more frequent changes since its tiny leaves hold more surface moisture.
Optimal Crisper Drawer Settings
Set your crisper drawer to low humidity for herbs. High humidity works for lettuce, not herbs.
If your drawer has vents, open them up for better airflow. Don’t overcrowd—herbs need space, or moisture gets trapped between bunches.
Keep woody herbs in the coldest part of the crisper, usually at the back (about 1–4°C). Consistent temps help prevent condensation, which can spoil herbs fast, no matter how well you wrap them.
Freezing Without Texture Loss
Freezing herbs is a bit of a balancing act. You want to protect the leaves from ice damage and keep the flavor strong. The best method depends on the herb and how you’ll use it.
Freeze Herbs in Ice Cube Trays
Chop herbs and pack them into ice cube trays, filling each about two-thirds. Cover with your choice of liquid (see below).
Once frozen, pop out the cubes and stash them in labeled freezer bags. Each cube is roughly a tablespoon of herbs—super handy.
Small compartments freeze herbs fast, making smaller ice crystals and less damage. You can grab just what you need, no thawing a whole batch.
Whole Leaf Freezing Methods
For sturdy herbs like rosemary, thyme, and sage, freeze whole sprigs on a baking sheet. Once frozen, transfer to airtight bags. This stops them from clumping and lets you grab a sprig at a time.
Make sure the herbs are bone dry before freezing. Any water left will turn into big ice crystals and wreck the texture. Salad spinner first, then air dry on towels for half an hour or so.
Woody herbs handle freezing like this better than soft ones. Basil, cilantro, and parsley get mushy if frozen whole, so save those for the oil or water cube method.
Freezing Herbs in Oil or Water
Olive oil helps protect delicate herb leaves from ice damage. Fill ice cube trays with chopped herbs, cover with oil, and freeze. These cubes go straight into the pan—super flavorful.
For soups or tea, use water instead of oil. The process is the same, but soft herbs will still soften up a bit more in water cubes, though they hold flavor better than if you freeze them dry.
Best Liquid Choices:
- Olive oil – for basil, parsley, cilantro
- Melted butter – sage, thyme (especially for finishing dishes)
- Water or broth – any herb for soups or stews
A 3:1 herb-to-liquid ratio is usually about right—enough liquid to cover, but still packed with flavor.
Long-Term Preservation Solutions
Air drying and dehydrating herbs can keep them usable for months, especially if you store them airtight or mix them into compound butters. These methods lock in essential oils and make it easy to add a punch of flavor whenever you need it—without worrying about texture loss.
Air Drying and Dehydration Tips
Air drying hardy herbs like rosemary, thyme, oregano, and sage works best if you bundle a few stems with kitchen twine and hang them upside down in a cool, dark spot with good airflow. It takes about two weeks, but honestly, you get the fullest flavor this way—no fancy gear needed.
If you’re in a hurry, oven drying speeds things up. We set the oven to 95-120°F, prop the door open, and spread the leaves out on parchment-lined baking sheets. Every half hour or so, we check if they crumble between our fingers. It’s not rocket science, but you do need to keep an eye out so nothing scorches.
Food dehydrators make things pretty foolproof. We set them to 95-100°F, lay out the herbs on trays (don’t crowd them), and rotate trays halfway through. Most herbs are done in one to four hours.
Microwave drying is surprisingly handy for tiny batches. We sandwich herbs between paper towels and zap them at half power in 30-second bursts. You’ve gotta watch closely, but it’s fast and keeps the color bright.
Dried herbs should crumble but not turn to dust right away. We stash them as whole leaves, not crushed, since that keeps the oils and flavor locked in until we need them.
Making Herb Butters for Storage
We chop up fresh herbs and mix about a quarter cup into half a cup of softened butter. Herb butter freezes well for up to six months, and it’s a great way to use soft herbs like basil, parsley, cilantro, or chives that don’t dry well.
We roll the butter into logs using plastic wrap or parchment, twisting the ends to seal. Whenever we need some, we just slice off a round—no need to thaw the whole log.
Ice cube trays are another trick. We press the herb butter into each slot, freeze, then pop the cubes out into labeled bags. Each cube is about a tablespoon, so it’s easy to grab just what you need.
We’ll sometimes add garlic, lemon zest, or black pepper for a savory kick, or toss in mint or lemon balm for sweet butters. They’re magic on everything from grilled steak to scones.
The fat in butter shields herbs from freezer burn and keeps the flavor fresher than if you froze them in water. We’ve noticed herb butters hold up well for four to six months in a regular freezer.
Storing Dried Herbs in Airtight Containers
Once herbs are dry and cooled, we move them straight into glass jars with tight lids. Mason jars are our go-to—they seal tight and you can see what’s inside.
Since light and heat zap herb flavor, we stash jars in a cool, dark pantry or cabinet, far from ovens or sunny spots. This way, dried herbs stay punchy for six to twelve months.
Labeling jars with the herb name and date is a must—trust me, everything looks the same once it’s crushed, and nobody wants mystery herbs messing up dinner.
| Storage Container | Shelf Life | Best For |
|---|---|---|
| Glass jars | 12 months | All dried herbs |
| Plastic bags | 6 months | Short-term storage |
| Vacuum sealed | 18 months | Bulk quantities |
Whole leaves last longer than crushed ones. We crush them right before adding to dishes—just rub them between your palms over the pot and breathe in that fresh aroma.
If you squeeze a closed container and air escapes, the seal isn’t tight enough. Any leak lets in moisture, and that’s the enemy of good dried herbs.
Frequently Asked Questions
Herb storage isn’t just about tossing them in a bag and hoping for the best. You need to manage moisture, airflow, and containers if you want both flavor and texture to stick around.
What's the secret to keeping herbs fresh in the fridge with a paper towel?
We moisten paper towels (not dripping, just damp) and lay the herbs on top, then roll them up loosely—no squishing. The bundle goes in a plastic bag, but we leave it a bit open for air. Woody herbs like rosemary, thyme, and sage stay fresh this way for two to three weeks.
Can you give me the skinny on using Mason jars for herb storage without bruising them?
We fill a Mason jar halfway with cool water and stand up the herbs, stems down. Keep the bunch loose—cramming them in just bruises the leaves. Slip a plastic bag over the top and secure it with a rubber band. Store in the fridge for soft herbs like parsley, cilantro, or dill. It’s basically the same trick as keeping cut flowers fresh, and it works for up to three weeks.
What are the top-notch containers for maintaining the freshness of herbs?
We like sturdy glass jars for upright storage in water—less likely to tip. For hardy herbs, resealable plastic bags fit rolled paper towel bundles nicely without crushing the herbs.
Container size matters. We split big bunches into several jars or bags to avoid crowding. Gallon bags can hold multiple rolls if each has some space to breathe.
Will herbs maintain their pizzazz in flavor after a stint in the freezer?
Freezing keeps herbs flavorful for months, but the texture takes a hit. They turn limp after thawing, so we stick to using frozen herbs in cooked dishes—soups, stews, sauces. The taste stays strong, but if you want crisp, fresh leaves for a salad, freezing isn’t the answer.
Is there a savvy way to store parsley fresh and vibrant with no fridge in sight?
Parsley really needs a fridge to last more than a day or two. If you’re out of luck, you can stand parsley in water at room temp for about 24 hours, changing the water if it clouds up.
This only buys you a short window, and it works best in a cool room away from sunlight. After a day, parsley wilts fast without refrigeration, and you risk spoilage if you push it much further.
For the love of flavor, what's the best method to store heaps of herbs long-term?
Freezing makes it easy to stash big batches without much daily fuss. We usually wash and dry the herbs, then toss them in ice cube trays with a splash of water or oil, super handy for grabbing just what you need later.
Drying is another solid option, especially for tougher herbs like rosemary and thyme. We tie the stems together and hang them upside down somewhere dry and dark, as long as there's some airflow. After a week or two, they're good to go into airtight containers, tucked away from light and heat. Both freezing and drying keep herbs flavorful for months, though honestly, nothing beats the taste of fresh ones.
Share:
A Guide to Building a “Cook Once, Store Smart” Weekly Routine
A Guide to Building a “Cook Once, Store Smart” Weekly Routine