

Check out our latest home & kitchen collection!
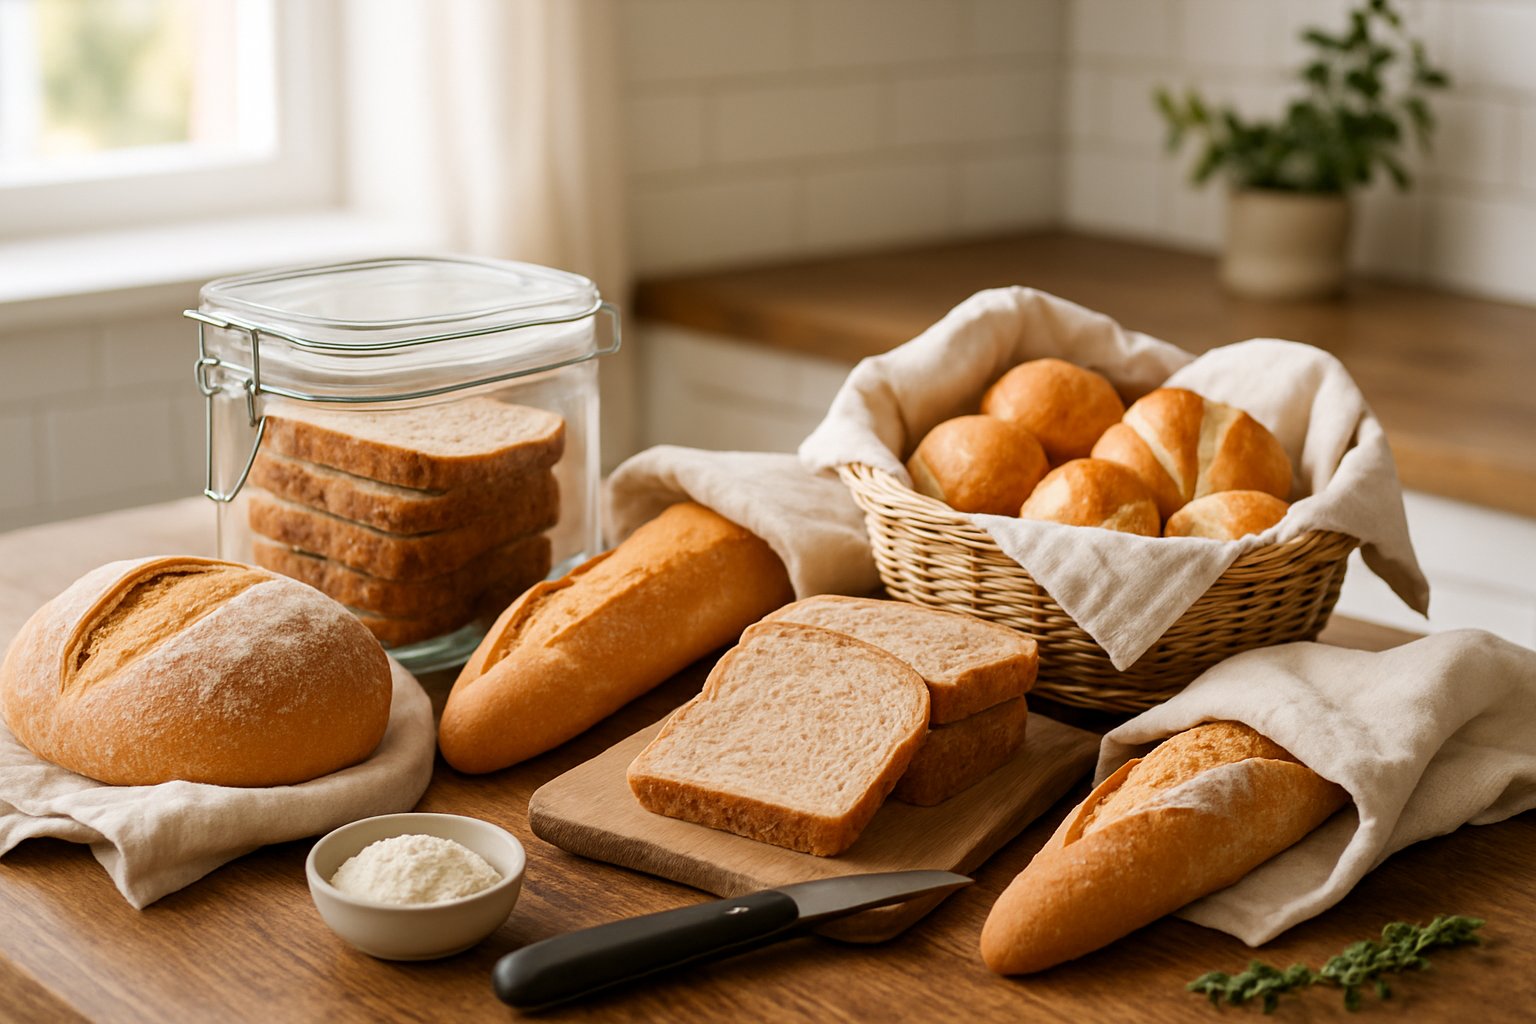
Homemade bread and baked goods deserve better than going stale on the counter or developing freezer burn in storage.
We've all felt that disappointment, biting into what used to be a perfect loaf, now rock-hard, or grabbing a cookie that's lost its texture. The upside? With a few smart storage tweaks, you can keep your baked creations tasting fresh much longer.
The real trick to keeping bread and baked goods fresh is understanding how each item deals with temperature, moisture, and air.
Some things thrive at room temp, others need chilling or freezing. Even your choice of container matters, what keeps cookies crisp will turn bread dry, and vice versa.
Let's get into practical storage for everything from crusty loaves to frosted cakes. Whether you're hoping your weekend bake makes it through the week or stashing a big batch for later, these tips should help cut down on waste and keep your treats tasting just-baked.
Key Takeaways
- Store most bread and cookies at room temperature in airtight containers for best freshness within 2-5 days
- Freeze baked goods you won’t finish in a few days—they’ll keep well for up to three months
- Match your storage method to the item; different baked goods need different care
Why Homemade Bread Goes Stale Quickly
Homemade bread just doesn’t have the preservatives found in store loaves, so it goes stale in days, not weeks. Staling is about moisture loss and some behind-the-scenes changes in the bread’s structure. You can slow it down, but you can’t really stop it.
Differences Between Homemade and Store-Bought Bread
Store-bought bread gets a longer shelf life thanks to preservatives like calcium propionate, sorbic acid, and various emulsifiers. These slow down mold and staling.
At home, most of us stick to flour, water, yeast, and salt. Without additives, your bread starts losing freshness as soon as it cools.
Commercial bakeries use dough conditioners and enzymes, too, which help bread stay soft and moist longer than anything you’ll get with basic ingredients.
So, you get better flavor and texture at first, but homemade bread needs more attention and gets stale faster.
The Science of Staling and Mold
Staling is all about retrogradation—starch molecules in the bread start to crystallize once exposed to air. The starch that softened during baking slowly hardens, pushing water out of the crumb and into the crust.
This speeds up between 32°F and 50°F, which is why refrigerating bread makes it stale faster. Cold temps push the starches to crystallize, but don’t freeze the water.
Mold’s a different beast. It needs moisture, warmth, and oxygen. Homemade bread, with its higher moisture and no preservatives, is a mold magnet.
In dry places, bread usually goes stale before it molds. In humid spots, you’ll see mold before the bread even gets a chance to go rock-hard.
Impact of Ingredients and Moisture Content
Breads with more fat—like brioche or challah—stay fresh longer. Fats coat starches and slow down staling. Adding butter, eggs, or oil can buy you an extra day or two.
Sugar helps too, binding water so there’s less for mold and keeping the crumb soft. That’s why sandwich bread and rolls seem to last longer than a rustic sourdough.
Moist doughs create bread that takes longer to dry out, but if you don’t store it right, that extra moisture can invite mold.
Whole grain breads add another wrinkle—they have oils that can go rancid, so freshness is about more than just staleness.
Essential Bread Storage Principles
Good bread storage comes down to three things: letting it cool fully, handling air exposure, and slicing wisely.
Cooling: the Crucial First Step
Bread needs to cool completely before you stash it away. No shortcuts here—storing warm bread leads to sogginess and mold.
Fresh from the oven, bread’s still steaming inside. The temp can be over 200°F, and it’ll keep giving off moisture for at least an hour. Wrap it up too soon and you trap that steam, making the perfect home for mold.
Put your loaf on a wire rack right after baking. Let air get all around it. Most breads need 1-2 hours to cool all the way.
Yeah, the crust might soften a bit as it cools, but that’s a small price for better shelf life and texture.
Air Exposure and Its Effects
Air is a double-edged sword for bread. Too much dries it out; too little, and you get soggy bread.
For short-term storage (a day or two), a paper bag or bread box works well. They let just enough air in to keep the crust crisp and the inside soft.
Plastic bags seal in moisture and soften the crust—great for sandwich bread, not so much for a rustic loaf. For those, wrap in a kitchen towel, then loosely in plastic.
Cut bread stales faster, so store it cut-side down on a board or plate if you can.
Slicing Strategies for Freshness
Only slice what you need. Each slice exposes more surface area, speeding up staling.
If you do slice, try cutting from the middle and push the halves together for storage. The crust works as a natural shield.
A few slicing notes:
- Only pre-slice if you’re freezing portions
- Use a sharp serrated knife—no squishing
- Clean, quick cuts work best
- Thicker slices hold moisture, but may not fit every use
For freezing, pre-slicing is handy since you can grab just what you need later.
Room Temperature Storage: Best Everyday Methods
Room temp is best for homemade bread you’ll eat in a couple days. The trick is balancing airflow and moisture—too much air dries bread out, too little and you end up with a soggy mess.
Choosing Between Bread Box, Cloth, or Paper
Bread boxes are a solid choice for most loaves. They allow just enough air to circulate and keep bread away from light and temp swings. The humidity inside keeps the bread moist but not moldy.
Paper bags are great for crusty breads—think baguette or sourdough. The paper wicks away extra moisture, keeping the crust crisp. This works best if you’ll finish the bread in a day or two.
Linen or cotton bread bags are a reusable swap for paper. They’re breathable and keep the crumb moist without making the crust tough. Good for rustic, thick-crust loaves.
Plastic bags trap moisture and soften crusts. We use them for soft sandwich bread or enriched doughs that are meant to be tender.
Selecting the Right Containers and Bags
For different breads:
- Crusty breads: Paper or linen bags, or a bread box
- Soft sandwich loaves: Plastic bags, loosely sealed
- Enriched breads (brioche, challah): Plastic bags or airtight containers
- Rolls and buns: Resealable plastic bags or covered containers
With plastic bags, don’t seal them tight for the first day—let steam escape so the crust doesn’t get rubbery. After that, close them up to hang onto moisture.
Reusable silicone bags work like plastic, but better for the planet. Whatever you use, make sure it’s clean and dry—leftover moisture breeds mold.
Ideal Locations for Storage
Keep bread away from heat—stove, dishwasher, sunny spots. A pantry shelf or out-of-the-way counter spot is perfect. Heat speeds up staling and mold, especially in summer.
Don’t store bread near the fridge’s exhaust or heating vents. Those areas get more air movement and temp changes than you’d think. Also, keep bread away from fruit like bananas and apples—they give off ethylene gas, which isn’t great for bread, though it’s not a huge deal for short-term storage.
The top of the fridge? Not a good idea, even if it’s convenient. That spot stays warmer and gets more temp swings. Find a dedicated pantry spot or a quiet corner of your counter.
Bread Box vs. Airtight Container
Bread boxes are best for artisan loaves with thick crusts. They keep airflow up and crusts crisp. Wood or bamboo boxes work better than metal or plastic—they naturally balance humidity.
Airtight containers are great for soft sandwich bread, rolls, and enriched breads. For those, keeping moisture in is key, and the crust isn’t a big concern. Glass or BPA-free plastic both do the job.
We skip airtight containers for crusty sourdough or French bread unless we’re okay with losing the crust’s crunch. If you have to use one, leave the lid cracked for the first day.
For sliced bread, wrap it in paper or a kitchen towel before putting it away. That slows down drying without making the bread soggy.
Plastic Wrap, Freezer Bags, and Long-Term Storage
Freezing lets you keep homemade bread for weeks or months, but you’ve got to wrap it right to dodge freezer burn and dryness. The right materials and a little care make all the difference between bread that tastes fresh after thawing and bread that’s sad and icy.
How to Freeze Bread Without Ruining It
Let bread cool all the way before freezing. Freezing warm bread traps steam, which turns to ice and ruins the texture.
For sandwich loaves and rich breads, wrap in two layers of plastic wrap, pressing out as much air as you can. For storage longer than a month, add a layer of aluminum foil.
Rustic, thick-crust breads need a different approach. Wrap slices or whole loaves tightly in foil first, then put them in a freezer bag. This keeps the crust in better shape and protects the inside from drying out.
Always push the air out of freezer bags before sealing. For extra protection, double-wrap with another bag or heavy-duty foil—your bread should last up to three months this way.
Freezing Sliced vs. Whole Loaves
Slicing before freezing is handy—you can grab just what you need. If you’re worried about slices sticking, slip parchment between them, but most frozen slices separate easily. Slices thaw in minutes on the counter or in seconds in the microwave.
Whole loaves take longer to thaw but hold onto their moisture better. We freeze whole loaves when we know we’ll serve the whole thing at once. Half-loaves are a nice compromise for portion control.
With rolls and buns, wrap them in foil and pack together in a freezer bag. They thaw fast and reheat well—perfect for batch baking.
Best Packaging Materials for the Freezer
Plastic wrap is our go-to for soft-crusted breads. Freezer-grade plastic wrap beats the regular stuff—it’s thicker, sticks better, and just feels more reliable.
Aluminum foil shields crusty breads and adds a solid moisture barrier. Sometimes we wrap bread straight in foil, other times it’s a second layer over plastic wrap when we’re stashing things away for a while.
Freezer bags with zipper seals make an airtight final defense. Heavy-duty ones stand up to pokes and tears much better than the usual sandwich bags.
| Material | Best For | Storage Duration |
|---|---|---|
| Plastic wrap (double layer) | Sandwich loaves | Up to 1 month |
| Aluminum foil + plastic wrap | Sandwich loaves | Up to 3 months |
| Aluminum foil + freezer bag | Rustic breads, sliced bread | Up to 3 months |
| Foil + freezer bag | Rolls and buns | Up to 1 month |
We always scribble the date and contents on each package. Otherwise, who hasn’t found a mystery brick in the freezer months later?
Storage Approaches for Different Baked Goods
Not all bread is created equal—different types need different handling. Soft sandwich loaves crave airtight protection, while crusty artisan breads need to breathe a bit to keep their texture.
Soft Loaves and Sandwich Bread
Fresh, soft bread does best at room temp in an airtight container or a good resealable bag. Wrap it up tight—otherwise, it dries out and goes stale fast, sometimes within a day or two.
A bread box is honestly underrated. It balances airflow and moisture, so your loaf doesn’t get too soggy or dry out. Usually, soft loaves stay decent for a couple of days this way.
If you’ve baked something super moist, like banana or zucchini bread, you’ll want to refrigerate it. Sure, the texture changes a bit, but it’ll last up to a week in a sealed container.
Storage timeline for soft loaves:
- Room temperature: 2-3 days
- Refrigerated (high-moisture): up to 7 days
- Frozen: up to 3 months
We like to slice bread before freezing so we can grab just what we need. Wrap first in plastic, then foil, then into a freezer bag—squeeze out the air for best results.
Rustic and Crusty Breads
Crusty breads are a whole different animal. Plastic bags? Nope. That’s a one-way ticket to rubbery crust.
Paper bags at room temp are our default—enough airflow to keep the crust, well, crusty. That’ll buy you about a day of peak texture. For same-day eating, just park the loaf cut-side down on a cutting board.
Linen bread bags are another option; they’re breathable and a bit more protective than paper. We get maybe a day and a half before the crust softens.
When the crust inevitably gets sad, we revive it in a 350°F oven for 5 to 10 minutes. Spritzing a little water on the outside before baking can help bring back some crunch.
Rolls, Buns, and Sweet Treats
Rolls and buns like it airtight, too—room temp in a container or bag for a couple days. We toss a paper towel in the container to soak up any extra moisture.
Sweet breads (think cinnamon rolls, brioche, challah) have butter and eggs that help them stay moist. These can hang out at room temp for three or four days in a sealed container.
If you’ve got glaze or icing, let it set before wrapping. We slip parchment between layers so nothing fuses together.
Quick reference for rolls and sweet breads:
- Plain rolls: airtight container, 2-3 days
- Sweet enriched breads: airtight container, 3-4 days
- Glazed items: set icing first, then wrap, 2-3 days
Freezing works great here, too. We wrap rolls individually or in small groups so we can thaw just what we want. They bounce back nicely after a few minutes in a 300°F oven or a quick zap in the microwave.
Smart Habits to Prevent Stale Bread and Food Waste
Keeping bread fresh isn’t just about stashing it right—it’s about habits. If you know how to avoid common slip-ups, revive a loaf that’s gone a little stale, and get creative with leftovers, you’ll waste way less (and maybe even save a few bucks).
Common Mistakes to Avoid
We’ve all slipped up here. Biggest mistake? Sticking bread in the fridge. That actually makes it go stale faster, thanks to something called retrogradation—starch molecules re-crystallize quicker in the cold. Room temp or freezer is the way to go.
Another classic blunder: wrapping bread while it’s still warm. That traps steam, which turns into condensation and, soon enough, mold. Let your loaves cool for a couple hours before putting them away.
Cutting bread the wrong way speeds up staling, too. Instead of slicing from one end, cut the loaf in half and slice from the middle—then press the halves together. That keeps the crumb exposed to air to a minimum.
And don’t store all breads the same way. Crusty loaves want airflow (think cloth bags or bread boxes), while sandwich bread needs airtight plastic. Using the wrong method is a fast track to disappointment.
Reviving Day-Old or Stale Bread
Don’t toss that slightly stale bread yet—it’s not a lost cause. The water revival trick is magic: sprinkle water on the loaf, wrap it in foil, and bake at 300°F for 5-10 minutes. Heat and moisture perk up the crust and soften the inside.
For individual slices, toasting is a lifesaver. Even bread that’s lost its charm can toast up beautifully. You can even freeze stale slices and pop them straight into the toaster—they’ll taste almost fresh again.
If you’ve got a chunk of baguette or sourdough, just put it straight on the oven rack at 350°F for a few minutes. The crust crisps up, and the inside warms through.
Creative Uses for Leftover Bread
Stale bread? That’s just tomorrow’s ingredient. Breadcrumbs are the obvious choice—pulse up dried bread, season, and stash in a jar. Way better than store-bought, in our opinion.
French toast and bread pudding actually work best with day-old bread—it soaks up custard without falling apart. Panzanella, that Italian bread salad, pretty much demands stale bread to soak up all the good stuff.
Croutons are another easy win. Cube the bread, toss with oil and spices, bake at 375°F until golden. Or go for bread soup, use it in meatballs, or even make eggs in a basket. The toughest crusts can become crostini for appetizers.
Frequently Asked Questions
Good storage keeps homemade bread fresh for days at room temp, and the freezer can stretch that to a month. Materials matter, and the fridge is a no-go. Plastic-free options work too, if you use them right.
What's the secret to keeping my homemade bread fresh as a daisy for over a week?
Honestly? It’s not going to happen at room temp—unless you freeze it. Homemade bread just doesn’t have the preservatives in store loaves, so you get maybe three days on the counter.
Freezing is the real trick. We wrap bread in foil, then add plastic wrap or a freezer bag. That way, it stays fresh up to a month.
When it’s time to eat, we thaw slices at room temp or microwave for 15-25 seconds. For crusty loaves, we reheat wrapped in foil at 450°F for a bit, then open up for a minute to crisp the crust.
Could you spill the beans on the ideal type of container for maximizing my bread's freshness?
Depends on the bread. For sandwich loaves, we skip containers and just use a double layer of plastic wrap at room temp—good for a couple days.
Bread boxes are great for balancing air and moisture. They keep things fresh without trapping too much humidity.
Crusty breads? No containers. Just put them cut side down on a cutting board. That keeps the crust dry and the inside from drying out.
For rolls and buns, zipper-lock bags are our favorite—room temp for up to two days. They’re also handy for freezing when you pair them with foil.
For all the night owls: How do I ensure my freshly baked bread doesn't turn into a science experiment overnight?
First rule: let bread cool all the way before wrapping. Warm bread plus plastic equals a moldy mess.
Once it’s cool, wrap sandwich loaves in plastic and stash them in a cool, dry spot—counter or pantry is fine.
For crusty bread, just plop it cut side down on a cutting board. That keeps it decent overnight without softening the crust.
We steer clear of the fridge. Cold makes bread go stale faster, not slower.
Fridge or no fridge: How long can I keep my homemade bread before it goes on a mold-venture?
We don’t refrigerate homemade bread. The fridge dries it out and makes it tough in no time.
At room temp, sandwich bread lasts up to three days if you wrap it right. Rustic bread with a thick crust is good for about a day, cut side down on a board.
Rolls and sweet breads with butter or sugar last a bit longer—up to two days in a zipper-lock bag. The extra fat and sugar help.
For anything longer, we freeze. Wrapped well, bread keeps its quality in the freezer for about a month.
Hey, eco-warriors! Got any tips for storing my bread sans plastic with a clean, green conscience?
We love bread boxes for plastic-free storage. They let bread breathe but keep out too much moisture and dust.
Beeswax wraps work for short-term storage—sandwich bread and rolls stay fresh for a day or two, and you can wash and reuse the wrap.
Linen or cotton bread bags are another solid pick. They prevent moisture buildup but don’t dry bread out too fast.
For rustic loaves, we just use a wooden cutting board, cut side down. It’s simple and waste-free.
And if you’re freezing bread, aluminum foil is recyclable. Wrap your loaves in foil and slip them into a reusable cloth bag instead of plastic.
Paper or plastic showdown: Which one will champion the cause of my bread's freshness and taste?
Plastic takes the prize for sandwich bread. I always reach for a double layer of plastic wrap—it just locks in moisture and keeps the bread soft for a few days, maybe three at most.
Paper? Not my go-to. It lets in too much air, so bread dries out way too fast. I only use paper bags if I know the bread's getting eaten within a couple of hours.
Crusty artisan loaves are a different story. I skip both paper and plastic here. Plastic ruins that perfect crust by trapping in moisture, and paper just dries out the inside before you know it.
Freezing bread? I'll wrap it in aluminum foil first—just for a little protection—then add a plastic bag to keep freezer burn away. It works, but honestly, nothing beats fresh bread.
There's one exception: if I've got a super crusty loaf and I'm eating it the same day, I might use paper just to keep the crust crisp while I haul it home. Otherwise, plastic rules the bread box.
Share:
The Role of Proper Storage in Reducing Kitchen Odors
The Role of Proper Storage in Reducing Kitchen Odors