
Check out our latest Coffee & Tea Gears collection!
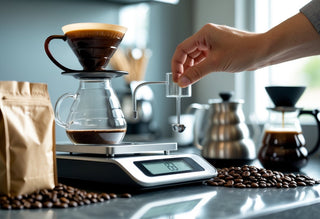
Brewing coffee is all about precision, and honestly, our coffee scale is one of the most underrated tools for getting things right. If we calibrate our scale regularly, every gram of beans and every drop of water hits the mark for a perfect cup. Even tiny errors can throw off our ratios and mess with the flavor we’ve worked so hard to dial in.
Most of us set up our scales for convenience, but how often do we check if they're accurate? Calibration isn't as intimidating or tedious as it sounds—we just need the right steps and a few simple tools. With a little know-how, we can dodge those sneaky inconsistencies and brew with confidence.
Key Takeaways
- Regular calibration keeps coffee scales accurate.
- Calibration is easy with the proper weights and steps.
- Well-maintained scales help us brew consistently great coffee.
Why Coffee Scale Calibration Matters
Calibrating our coffee scale isn’t just for show. It helps our brews taste the way we want every single time, keeping our recipes reliable and our results repeatable.
Impact on Brewing Consistency
Even a small inaccuracy can mess with our brewing routine. If our measurements aren’t spot-on, it’s like rolling the dice every morning—sometimes the coffee is great, sometimes not so much.
When our scale is calibrated, we can stick to our recipes without second-guessing. That’s how we get the same cup, the same flavors, and the same quality day after day.
Inconsistent scales cause frustration, especially if we share recipes. Imagine telling a friend about our perfect pour-over, only for their results to taste completely different. Accurate calibration keeps everyone on the same page.
Achieving True Coffee-to-Water Ratio
The coffee-to-water ratio is the backbone of brewing. If our scale is off—even by a gram or two—our ratio loses its balance.
Let’s say we’re aiming for a classic 1:16 ratio. An uncalibrated scale can quickly turn that precise balance into guesswork, which alters extraction and body in the cup.
When we trust our measurements, we’re free to tweak recipes and expect real results. Accurate ratios let us dial in the exact flavor notes we’re chasing, experiment with confidence, and steer clear of over- or under-extracted coffee.
Here’s a simple illustration:
| Coffee (g) | Water (g) | Exact Ratio | Result |
|---|---|---|---|
| 18 | 288 | 1:16 | Balanced cup |
| 18 | 300 | 1:16.7 | Weaker extraction |
| 17 | 288 | 1:16.94 | Stronger cup |
Reducing Measurement Errors
Measurement errors can sneak in and ruin a brew, especially if our scale drifts over time. Even a high-quality scale needs regular checks, because batteries die and sensor tolerances shift.
Tiny misreads add up, leading to significant errors over multiple brews. We might not notice at first, but over time, that tenth of a gram turns into a big difference in our daily cup.
Calibrating often helps us catch these shifts before they mess with our workflow. It keeps our tools sharp and our tasting notes accurate—because nobody wants their morning ritual to turn into a guessing game.
Understanding Your Coffee Scale
Precision starts with knowing the scale we’re working with, from its design and capabilities to the telltale signs it’s off its game. Honing in on the details lets us enjoy more consistent brews with way less guesswork.
Types of Coffee Scales
Not every coffee scale is created equal. We’ll generally encounter two main types: digital and mechanical.
Digital scales are everywhere now, offering quick, accurate readings—usually to 0.1 gram or better. Many include timers and auto-tare features. They're powered by batteries and tend to be compact, making them easy to tuck away.
Mechanical scales use a spring mechanism. They’re sturdy but less precise, often only measuring to the nearest gram. We don’t see these as often for specialty brewing, but they still pop up in some classic setups.
Some high-end digital models even connect via Bluetooth to brewing apps, adding extra data and tracking—maybe a little extra, but pretty fun for serious home baristas.
Key Features and Specifications
Here’s what really counts when we’re shopping or calibrating:
- Maximum Capacity: Most coffee scales handle between 500g and 3kg. That’s enough for a pour-over set-up and carafe.
- Readability: Many digital models display weight in 0.1g increments, which is critical for dialing in our recipes.
- Platform Size: A wider platform fits larger brewers like Chemex, while compact ones work for single cups.
- Response Time: Faster is better, especially if we’re pouring and timing extraction at once.
- Built-in Timer: Nearly essential for pour-over brewing.
- Power Source: Button batteries, AAA, or USB rechargeable—convenience matters.
If our scale misses some of these, brewing may start to feel like guesswork.
Signs Your Scale Needs Calibration
A scale that isn’t reading accurately can ruin our ratios and leave us chasing inconsistent cups.
Here’s a quick checklist for spotting calibration issues:
- Obvious weight discrepancies (e.g., 100g standard weight reads as 97g or 104g)
- Inconsistent zeroing—if it doesn’t go back to 0.0g after clearing a container
- Unstable or “jumpy” numbers when nothing is changing on the tray
- Repeat brews with identical doses producing different weights
If our favorite brew suddenly tastes “off,” it might not be the beans or grind—it could be the scale drifting out of calibration. Regular checks with a known weight can keep our coffee on point.
Calibration Methods for Coffee Scales
Getting our coffee scale calibrated isn’t rocket science, but it does require attention to detail. Accuracy depends on following the best approach for our equipment, home setup, and long-term consistency.
Using Manufacturer Instructions
Let’s start with the most reliable source: the manufacturer’s instructions. Scale makers almost always provide a calibration method in the user manual or on their official website. We want to use the test weights they recommend—usually 100g, 200g, or 500g.
The calibration procedure varies, but generally we power on the scale, press the “calibrate” or “mode” button, and wait for the display to say “CAL.” Next, we place the required weight on the platform. The scale should beep or flash to show that calibration is complete. If we don’t have the original weights, the brand may sell replacements, or we should contact them for alternatives.
Keeping our instructions nearby means we always know exactly what steps to follow. If we get stuck, many manufacturers have tutorial videos or FAQs online.
DIY Calibration at Home
If we’ve lost our manual or just like to tinker, DIY calibration is an option. We’ll need a known weight—coins work in a pinch. For example, one US nickel weighs exactly 5 grams, and a dollar bill weighs about 1 gram. We can stack coins to reach the needed weight.
Before calibrating, we should be sure the scale is on a flat surface and zeroed out. We enter calibration mode (usually by holding the power or “mode” button—this varies), add our homemade weight, and check if the display matches. If there’s a difference, some scales allow us to adjust and save the correction.
This method isn’t as accurate as using calibration weights, but it’s better than nothing. Let’s not forget to note down our process so we can repeat it as needed.
When to Seek Professional Calibration
If our coffee game is next-level or the scale gets heavy daily use, professional calibration keeps everything precise. Service centers use certified weights traceable to national standards and have specialized equipment that DIY methods usually can’t match.
We might want to seek professional help if our scale shows inconsistent readings, has been dropped, or after a year of steady use. Sometimes, commercial coffee shops are required to recalibrate regularly for compliance.
Professional calibration isn’t usually free, but it minimizes error and extends the scale’s life. If we’re chasing espresso consistency or running a café, it’s a worthy investment.
Choosing Calibration Weights
Getting our coffee scale calibrated comes down to picking the right calibration weight and knowing our options when we don’t have one on hand. Let’s make sure our scale is set up to read accurately, every single time we brew.
Selecting the Right Weight Standard
We want to use a calibration weight that matches the capacity and scale resolution. For most coffee scales, the most common standards are 100g, 200g, or 500g weights, depending on our scale’s maximum.
It’s best to go with a class F2, M1, or higher-quality laboratory weight. These classes mean the weights are within tight tolerances and less likely to cause calibration errors. They’re usually made of stainless steel and come with their exact weight stamped on them. We can buy these individually or as part of a kit, and they’re usually affordable online—just avoid unbranded or sketchy listings.
When calibrating, make sure the weight is clean and dry to avoid inaccuracy. Temperature also matters: calibration weights should be at room temperature. If we misplace the original weight that came with our scale, the instruction manual or the manufacturer's website usually specifies the exact mass we need.
Homemade Alternatives for Calibration
If official calibration weights are out of reach, we can get creative, but need to be precise. Household items with printed weights like coins can come to the rescue.
For example, a US nickel weighs exactly 5.000 grams, and a quarter is 5.670 grams. If our scale takes a 100g calibration weight, stacking 20 nickels gives us a pretty decent approximation (20 nickels = 100g). Here’s a quick reference:
| Coin | Weight | Count for ~100g |
|---|---|---|
| US Nickel | 5.000g | 20 |
| US Cent | 2.500g | 40 |
| US Quarter | 5.670g | 18 (102g) |
Make sure the coins are clean and free from gunk, since dirt can tip the scales. We shouldn’t rely on packaged food or batteries — printed weights often have generous margins for error. DIY options work for a quick recalibration, but for routine accuracy, we eventually want official calibration weights in our kit.
Step-by-Step Calibration Process
Precise coffee scale calibration helps us achieve more consistent brews and lets us trust our gear completely. We need proper prep, smart zeroing, and repeatable routines to make sure our scale stays reliable cup after cup.
Preparing Your Scale and Workspace
First, clear off the counter and remove any objects near the scale. Crumbs, stray beans, or a wet surface can affect measurements by tipping the scale or interfering with the sensors. We want a stable, level platform, so double-check that the scale sits flat and isn’t wobbling.
Wipe the scale clean with a soft, dry cloth to keep dust and oils out of the way. If we use our scale for grinding or brewing, be especially thorough.
Grab the calibration weight that matches the manufacturer’s specifications. If we can’t find the one that came with our scale, a certified weight set is worth the investment. The goal is to work in a clean, uncluttered space so nothing throws off the calibration.
Zeroing and Taring Properly
Before calibrating, always turn on the scale and let it warm up for about 30 seconds. This gives the sensor system time to settle in and adjust to the temperature.
With nothing on the platform, press the “tare” or “zero” button. We want the display to read exactly 0.00g. Some scales can drift slightly, so always check this step before every use.
Place an empty container (if we’re calibrating for brewing directly into a vessel) and tare again, making sure the weight returns to 0.00g. Double-checking this step prevents accidental weight offsets, which could otherwise ruin our brew ratios.
Calibrating for Daily Use
Check your scale’s manual for the exact steps, but most models want you to hold down a couple of buttons to get into calibration mode. When the display asks, plop the calibration weight right in the middle of the platform.
Wait for the scale to register it. If nothing happens, lift the weight and try again—sometimes the contact just isn’t perfect, or maybe the weight’s a little off from what the scale expects.
If you use your scale every day, calibrate it weekly or after any big bump or move. For those who crave precision, a quick spot check each morning before brewing can keep everything dialed in and your pour-over consistent.
Troubleshooting Common Calibration Issues
When your coffee scale goes wonky, it can mess up your whole brewing routine. Figuring out the problem usually comes down to a few classic calibration headaches.
Inconsistent Readings
When your scale gives different weights for the same thing, it’s frustrating. First, make sure the scale sits level and steady—no wobbly table, no drafts from open windows, and no curious pets jumping up.
Gunk on the platform can also mess with readings. Wipe it down with a soft, dry cloth, and get rid of any stray grounds or moisture. Old batteries are sneaky culprits too, so swap them out if it’s been a while.
Still getting weird numbers? Run through the calibration steps again, but use the exact calibration weight your scale asks for. Don’t grab a spoon or something random—accuracy depends on using the right weight.
Drift and Fluctuating Results
Ever seen your scale’s numbers creep up or down while nothing’s touching it? That’s drift. Let the scale warm up for 5–10 minutes after turning it on. Sensitive models need a bit of time to settle, just like we do before coffee.
Big changes in room temperature or humidity can throw things off as well. Calibrate the scale in the same spot where you’ll brew. If you’re near a stove, open window, or anything that changes the environment, expect some hiccups.
If drift won’t quit, try a “tare reset” or do a full factory reset—check your manual if you’re unsure how. Sometimes, that’s all it takes.
Digital Display Errors
Now and then, the screen flashes error codes or just goes blank. Most of the time, a fresh set of batteries fixes it. Overload, low battery, or sensor issues are common error messages.
If the display still acts up, unplug and re-plug the scale (for corded models) or do a factory reset. Occasionally, pressing the buttons or nudging the housing helps if something’s loose inside.
If none of that works, there might be a hardware problem. At that point, reach out to the manufacturer or check if your warranty covers repairs. No one wants to risk a bad brew on a broken scale.
Maintaining Peak Scale Performance
Keeping your coffee scale in top shape isn’t complicated, but a few habits make a big difference. Clean it regularly and store it right, and you’ll get reliable readings and less hassle.
Routine Cleaning Tips
Wipe the scale after every use to keep coffee grounds and spills from piling up. A soft, slightly damp cloth works best for the weighing surface—skip the harsh cleaners and scrubbing.
For digital scales, avoid letting water sneak into the buttons or display. If something dries on, a cotton swab can help with tiny spots. Never submerge your scale, even if it claims to be splash-proof.
Quick checklist:
- Take off the tray and wash it separately if you can.
- Clean underneath—the dust loves hiding there.
- Dry everything before putting it back together.
A clean scale just feels better, and you’ll notice the difference in accuracy.
Storing Your Scale Correctly
Where you stash your scale matters. Keep it somewhere dry and at a steady temperature—humidity and heat can mess with the sensors and batteries.
Don’t stack heavy stuff on top that could bend the platform. The original box, a drawer, or a shelf all work fine.
If you’re putting it away for a while, pull the batteries to avoid corrosion. Make sure nothing sits on the platform, or you’ll risk calibration drifting out of whack.
A little care goes a long way, and you’ll spend less time troubleshooting.
Advanced Tips for Precision Enthusiasts
If you’re chasing perfect brews, the small details start to matter. Even subtle changes in your method or environment can mess with your scale—and your final cup.
Calibrating for Different Brewing Methods
Different brewing methods use different amounts of coffee and water, so your calibration weights should match what you’re brewing.
Example:
| Brewing Method | Typical Coffee Dose | Recommended Calibration Weight |
|---|---|---|
| Espresso | 16-20g | 20g |
| Pour-over | 20-30g | 30g |
| French Press | 30-60g | 50g or 100g |
Run calibration routines for each method you use. If your scale supports multi-point calibration, pick weights that line up with your usual doses. That way, you avoid the little errors that add up over time.
Some smart scales let you customize brewing modes—use those features. If you’re switching from pour-over to espresso, recalibrate. Otherwise, you’re just guessing.
Environmental Factors Affecting Accuracy
Even fancy scales hate drafts, wobbly surfaces, and splashes. Air movement from fans or open doors can make your numbers jump, so keep your scale on a flat, stable spot out of direct airflow.
Pro tips:
- Level matters: Always zero the scale exactly where you’ll brew.
- Humidity: High moisture can mess with the electronics. Wipe up spills and keep the scale away from steaming kettles.
- Temperature: Big swings—like moving from a cold room to a hot counter—can throw off readings. Let the scale sit at room temp before calibrating.
If you ever doubt a reading, just re-tare and check for consistency. Your scale’s only as good as the spot you put it.
Frequently Asked Questions
Let’s tackle some common questions about calibrating coffee scales, from accuracy to troubleshooting. It’s all about keeping your measurements spot-on.
What's the ideal precision for a coffee scale to ensure the perfect cup?
For specialty coffee, look for a scale that measures at least 0.1 gram. That level of detail helps you repeat recipes reliably.
Anything less, and your consistency will probably suffer—especially with pour-overs or espresso.
Why does a coffee scale need to be calibrated and how often?
Calibration keeps your measurements honest. Over time, scales drift. Home users should calibrate every few months or after a drop.
Baristas in busy cafés often do it weekly or even daily.
What are the simple steps to calibrate a digital coffee scale at home?
Grab a calibration weight (usually 100g or 200g). Turn on the scale, enter calibration mode (check your manual), and place the weight when prompted.
Wait for the confirmation, then remove the weight. That’s it—just a few steps and you’re back in business.
Can you troubleshoot common issues during coffee scale calibration?
If calibration isn’t working, check the surface—make sure it’s flat and stable, and there’s no breeze. Use the right calibration weight.
Dead or weak batteries cause all sorts of problems, so try fresh ones if you’re stuck.
How can I verify that my coffee scale is calibrated correctly?
After calibrating, put a known weight on the scale and see if it reads within 0.1g of the value. If it does, you’re set.
Try a few different weights (even coins, if you’re in a pinch) for extra peace of mind.
Is there a difference between calibrating commercial and home coffee scales?
Commercial coffee scales usually feel sturdier and sometimes need heavier weights for calibration. A few even come with built-in calibration features or reminders for regular maintenance—pretty handy if you ask me.
At home, calibration’s a little more laid-back. Still, if you’re chasing that perfect cup, it matters just as much.