
Check out our latest Coffee & Tea Gears collection!
Getting a new cast-iron teapot is pretty exciting, but you can’t just fire it up straight from the box. Seasoning a cast-iron teapot really matters if you want to keep rust away, get better flavor, and help it last. It only takes a few minutes, but this step makes a world of difference for those cozy tea sessions.
You don’t need to be a pro to season a teapot—just follow some clear steps and take your time. With the right approach, you’ll dodge rookie mistakes and keep your teapot in great shape for years. Let’s dive in and set up your new teapot for success from the beginning.
Key Takeaways
- Always season your cast-iron teapot before brewing your first cup.
- Simple steps prevent rust and keep tea tasting right.
- A little regular care keeps your teapot looking and working its best.
Understanding Cast-Iron Teapots
Cast-iron teapots are famous for their durability and ability to hold heat, but not every teapot is the same. Whether you’ve got an enameled or non-enameled version, how you season and care for it depends on its build.
How Cast-Iron Teapots Are Made
Makers pour molten iron into molds to shape these teapots. That process gives them thick walls and great heat retention. You’ll see all sorts of detailed designs, since iron molding allows for a lot of creativity.
Some teapots get an enamel coating inside. That enamel helps prevent rust and makes cleaning a breeze. Others skip the enamel, leaving bare cast iron on the inside, and those need more attention.
The lids usually fit snugly, trapping heat and aroma. Well-designed spouts help you pour without drips. Every little detail in the build affects how you’ll use and care for your teapot.
Why Seasoning Matters
When you season a non-enameled cast-iron teapot, you build a natural, protective layer. Skip this, and water or tea will cause rust in no time. Seasoning also stops flavors from sticking to the pot, so you don’t end up with weird or metallic tastes in your next brew.
A thin layer of tea oils makes your teapot tougher and easier to clean. This means you’ll deal with less rust, staining, or residue inside. It’s kind of like breaking in a cast-iron skillet, except here you’re making sure your tea stays pure.
Definitely skip the soap or harsh scrubbers on a seasoned teapot—they strip away that protective layer. Just rinse gently and dry after each use.
Difference Between Enameled and Non-Enameled Teapots
Enameled cast-iron teapots
Interior: Smooth enamel coating
Care: Simple to clean, doesn’t need seasoning, rarely rusts
Flavor impact: No metallic taste, doesn’t absorb flavors
Best for: Anyone who wants to brew lots of tea types with minimal fuss
Non-enameled cast-iron teapots
Interior: Raw iron
Care: Needs regular seasoning, will rust if left damp
Flavor impact: Develops a patina, can subtly change flavor over time
Best for: People who like traditional care and a bit of character
Non-enameled teapots demand more attention, but some folks love that. Enameled ones are for convenience. It really just depends on how much work you want to put in—and how much personality you want your teapot to show.
Preparing Your New Cast-Iron Teapot
Before you brew your first pot, you’ve got to prep your new cast-iron teapot. Doing it right keeps your teapot in good shape and makes sure your tea tastes the way it should.
Unboxing and Inspecting for Quality
When you unbox your teapot, go slow. These things are heavy, and sometimes the lid or spout can have sharp edges. Check for any cracks, chips, or dents—especially inside, since the enamel lining protects against rust.
Give the handle a wiggle. It should feel sturdy, not wobbly or squeaky. If it’s wrapped in bamboo or something similar, look for loose ends or gaps.
Test the lid. It should sit snug but turn smoothly. If there’s a stainless-steel infuser, check it for dents or sharp bits that could scratch the enamel.
Hang onto any manufacturer’s leaflet for warranty or care info. Spotting problems now is way easier than dealing with them after you’ve started using the teapot.
First-Time Cleaning Steps
Even if your teapot looks spotless, don’t skip this. Manufacturing residue or dust can stick around.
Rinse the teapot well with hot (not boiling) water. Skip the dish soap—leftover soap can mess with tea flavor. Swish the water inside and pour it out.
Wipe the inside and outside with a soft, clean sponge or towel. Don’t use anything rough on the enamel. If you see little specks, just rinse again.
Let the teapot air dry completely, lid off, somewhere with good airflow. Moisture is the enemy here. Once it’s dry, you’re nearly ready to go.
Essential Tools and Materials Needed
You don’t need much to get started. Here’s a quick list:
| Item | Why You Need It |
|---|---|
| Soft sponge/towel | Gentle cleaning, no scratches |
| Tongs or potholders | Safe handling with hot water |
| Clean drying rack | Lets it air-dry with good airflow |
| Kettle (hot water) | For rinsing, not direct boiling |
| Microfiber cloth | Buffing the outside, if you want |
Skip dish soap, abrasive pads, and metal utensils. If you’ve got hard tap water, filtered or distilled water avoids those chalky spots.
Set up your space so you’re not juggling things around the sink. Once you’ve got everything ready, prepping your teapot is a breeze.
Step-by-Step Seasoning Process
If you want your teapot to last, resist rust, and brew great tea, nailing the basics—heating, oiling, and cooling—matters.
Heating and Drying the Teapot
Start by rinsing the teapot with hot water (no soap!) to get rid of dust or factory residue. Dry it thoroughly with a soft cloth—don’t leave any water behind.
Flip the teapot upside down over a low flame or put it in a warm oven (200–250°F/90–120°C) for 10 to 15 minutes. This dries out any sneaky moisture. Even a drop or two left can cause rust before you’ve even started seasoning.
Don’t rush—leftover moisture can ruin your hard work.
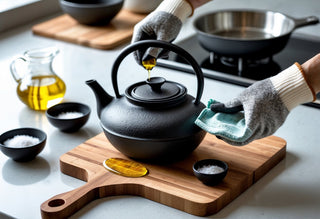
Applying the Initial Oil Layer
With the teapot still warm and totally dry, use a soft, lint-free cloth or paper towel to rub a thin layer of oil on the inside. Canola, flaxseed, or grapeseed oil all work well. Steer clear of olive oil—it can get tacky and taste weird.
Don’t pour oil straight in. Wipe it on evenly, making sure there aren’t any puddles or thick spots. Too much oil just leads to sticky messes instead of a solid protective coat.
Gloves help if you’re not into oily hands or slippery teapots.
Building Up Protective Layers
Seasoning needs a few rounds. After the first oil layer, put the teapot (lid off) back in the oven or over low heat for about an hour. This bakes the oil into the metal and creates a dark, non-stick layer. Let it cool a bit, then repeat—shoot for at least two or three layers.
Each time, keep the oil layer thin and even. Don’t rush and slap on a thick coat. A few light layers beat one heavy one every time. These layers protect against moisture and rust, and give your teapot that signature look.
If you’re short on time, two rounds will do, but more layers mean better protection.
Proper Cooling Techniques
Once you’ve finished the last layer, cooling is key. Don’t dunk the teapot in water or set it in a cold draft. Quick temperature changes can crack or warp the pot.
Just turn off the heat and let it cool slowly in the oven or on the stove. This helps the seasoning set and keeps the metal strong. Once it’s cool enough to handle, you’re ready to brew—and show off—a properly seasoned teapot.
Common Mistakes to Avoid When Seasoning
Let’s get real about some classic mistakes people make when seasoning a new cast-iron teapot. Knowing what to avoid saves you a lot of hassle.
Overusing Oil
It’s easy to think more oil means more protection, but too much just leaves a sticky mess. If you slather on oil, you’ll end up with a greasy, uneven surface that attracts dust. You want just a thin, even coat that bonds to the metal.
Too much oil can also burn during heating, making weird smells and splotchy spots. Stick to about a dime-sized amount on a soft cloth, rub it in, and wipe away any excess. If it looks wet and shiny, you’ve overdone it—wipe off the extra until there’s just a faint sheen.
Quick guide:
| Teapot Size | Amount of Oil |
|---|---|
| Small | Dime-sized |
| Large | Nickel-sized |
Wipe with a dry cloth after oiling to keep things under control.
Using Dish Soap or Harsh Cleaners
You might want to scrub with soap to get things super clean, but dish soap will strip away your hard-earned seasoning. That leaves the metal exposed and ready to rust.
Harsh cleaners and abrasive pads are even worse—they’ll scratch up the surface and mess with the seasoning. They’re not great for flavor, either. Stick with hot water and a soft cloth. For stuck-on bits, a little baking soda on a damp cloth is okay, but rinse and dry right after.
Skip the soap and your seasoning will last way longer.
Skipping Thorough Drying
Moisture ruins cast iron. Even a little water left behind can cause rust fast. After cleaning or rinsing, you’re not done until the teapot is totally dry—inside and out.
Don’t just leave it to air dry. Use a clean towel, and for good measure, set the teapot over low heat for a minute or two. That makes sure every drop is gone. Always leave the lid off until it’s fully dry, so steam doesn’t get trapped inside.
A bit of patience now saves you from rust and peeling later.
Caring for Your Seasoned Cast-Iron Teapot
Regular care keeps a seasoned cast-iron teapot brewing safely and looking sharp. How we handle and store it really makes a difference in keeping it rust-free for years.
Best Practices for Daily Use
Rinse the teapot with hot water before and after each use—skip the soap. Soap can strip away that hard-earned seasoning. Just swirl, pour, and you're good.
Dry the teapot well with a soft towel after rinsing. Any leftover water can sneakily cause rust. Never let tea or water sit in the pot for long stretches.
Don’t use the cast-iron teapot over direct heat or on a stovetop; sudden temperature changes can mess up the enamel lining most have. Be gentle with the lid—those things chip easier than you’d expect.
Quick daily checklist:
- Rinse with hot water.
- Wipe inside and out with a dry cloth.
- Store with the lid off to air dry.
- Avoid dish soap and rough scrubbers.
Storage Tips to Prevent Rust
Good storage habits keep rust away. After cleaning, let the teapot air dry with the lid off so all the moisture can escape. Humidity is the enemy here.
Pick a dry, breezy spot for storage. Resting the teapot on a wooden or cloth trivet (not a cold countertop) helps soak up extra moisture. For extra protection, toss in a little food-safe desiccant or a few grains of dry rice—just remember to remove them before brewing.
If you store teapots together, put a soft cloth or towel between them to avoid scratches. Never stash the teapot in a closed or damp cabinet—airflow is your friend and keeps that seasoned finish happy.
Troubleshooting and Re-Seasoning
Sometimes, cast-iron teapots get rusty or lose their shine. Knowing how to tackle rust and when to re-season keeps your teapot both pretty and practical.
Dealing with Rust Spots
Rust pops up, especially if water hangs around inside too long. For small spots, scrub gently with a soft sponge and a bit of baking soda mixed with water. If it’s stubborn, dab a little white vinegar on the area, but don’t soak the whole interior—just treat the rust.
After scrubbing, rinse with hot water and dry the teapot right away. Pop it into a warm oven (around 200°F or 90°C for 20 minutes, lid off) to make sure it’s bone dry. Skip this, and you’ll probably see more rust.
When to Re-Season Your Teapot
If the teapot looks dull, tastes metallic, or rust keeps coming back, it’s time to re-season. This helps prevent future rust and makes your tea taste better.
Quick checklist before re-seasoning:
- Clean out residue with warm water and a soft brush.
- Dry completely with a towel and gentle heat.
- Wipe the inside with a thin layer of neutral oil (like vegetable or canola)—skip olive oil, it can go rancid.
- Put the teapot (lid off) upside down in a warm oven for an hour.
- Let it cool down slowly before using.
Watch for changes and act fast—your teapot will thank you, and tea time stays easy.
Frequently Asked Questions
We all want our cast-iron teapots to last, brew great tea, and look their best. It helps to know the right steps for seasoning, cleaning, and everyday care.
What's the best way to season a new cast-iron teapot?
Start by rinsing the teapot with warm water (don’t use soap). Wipe it dry with a soft cloth.
Fill it about three-quarters full with boiling water, let it sit for a minute, then pour it out. Do this once or twice, then dry the inside thoroughly.
Any tips for the first-time cleaning of a cast-iron teapot?
Skip dish soap—plain water is safer. Just swish and rinse, no scrubbing or harsh tools.
After rinsing, dry the teapot upside down with the lid off to keep moisture from sticking around.
Should I take any precautions when heating up my cast-iron teapot?
Absolutely. Don’t put your cast-iron teapot over a stove or open flame. They’re for brewing, not boiling.
Pour in already hot water so you don’t damage the enamel lining.
Is it a total disaster if my cast-iron teapot gets a spot of rust?
Not really. A little rust isn’t the end—just scrub it gently with a soft brush and rinse.
You can keep using the pot, but make sure it stays dry to slow down new rust.
How often do I need to re-season my beloved cast-iron teapot?
If you notice rust or odd flavors, it’s time for a fresh seasoning. Otherwise, a yearly refresh is usually enough.
Drying thoroughly after each use means you probably won’t need to re-season very often.
Can I just throw my cast-iron teapot on any heat source, or is that a no-go?
That’s a no-go. Cast-iron teapots really aren’t made for stovetops or direct heat.
They’re built to hold and steep hot water—you pour in water that’s already boiled. If you want your teapot to last, stick to that routine.