

Check out our latest golf collection!
Choosing the right home golf practice tool can make beginner improvement feel much easier. A chipping net helps you work on contact, carry, and target accuracy, while a putting mat helps you build a smoother stroke and better pace control at home.
For most new golfers, a putting mat is usually the better first choice because putting shows up on every hole and gives repeatable practice in a small space. A chipping net is still valuable if your short chips are costing strokes or you want a more active practice setup.
This guide compares chipping nets and putting mats by skill focus, feedback, space, setup, and buying features, so you can choose the option that fits your home and helps your scores improve faster.
Key Takeaways
- Putting mats help most beginners improve faster, since putting is the biggest chunk of your strokes per round and gives instant feedback.
- Chipping nets are great for building confidence with short game contact and trajectory control, especially if you’re tight on space.
- If you can swing it, using both tools gives you the most complete home practice, but starting with a putting mat helps you attack the skill you’ll use most.
Understanding Chipping Nets and Putting Mats
Chipping nets and putting mats each target different parts of your short game. Chipping nets focus on airborne shots, while putting mats are all about ground-level stroke work. It helps to break down what each tool actually does before you decide which one fits your needs.
What Is a Chipping Net?
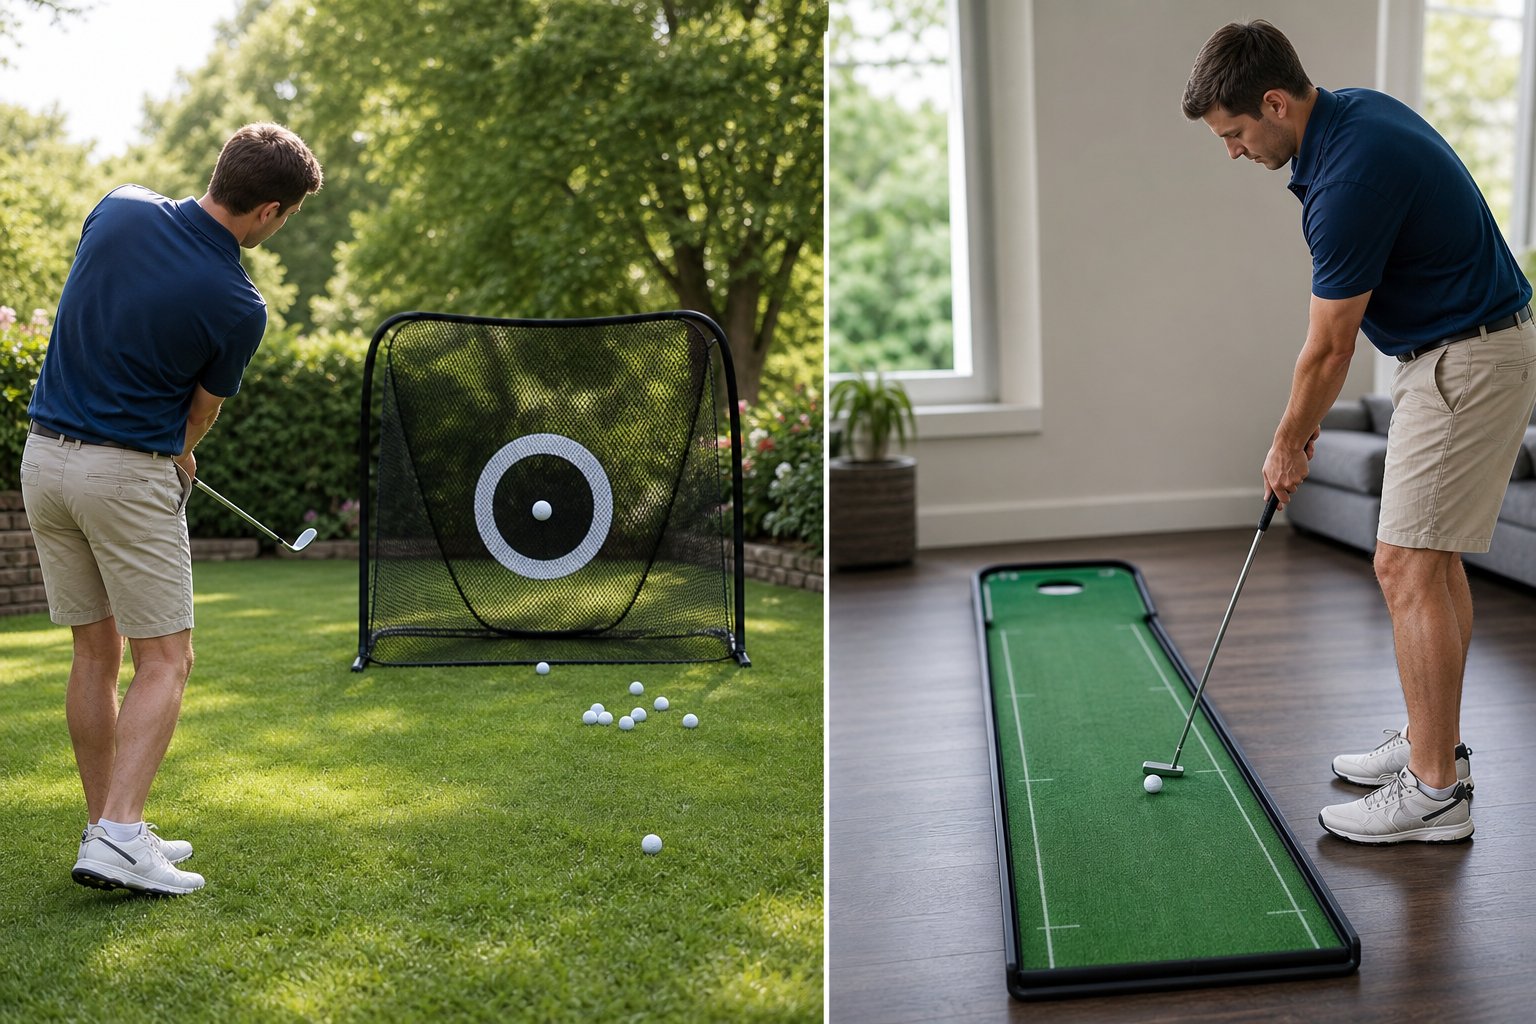
A chipping net is a portable device you can set up at home or in your backyard to practice chip shots. The net catches your golf balls, so you don’t need a full course or range, just a safe spot to swing.
Most chipping nets have multiple target pockets or zones, so you can work on accuracy from different distances. Usually, you’ll get a frame with mesh netting and marked scoring areas. We’ve seen nets that are super simple with just one pocket, and others that are multi-tiered with targets at different heights.
The big advantage? You can recreate real on-course chipping situations without much space. Practice your lofted shots, work on distance control, and build muscle memory for those tricky up-and-downs. Most nets fold flat for storage and weigh between two and five kilos, so you can move them around easily.
What Is a Putting Mat?
A putting mat gives you a practice putting surface, so you can work on your stroke indoors or outside, any time of year. Most mats measure between 2 and 4 meters long and use synthetic turf that feels a lot like a real green.
Good putting mats roll the ball consistently, no matter the weather or what season it is. Many come with alignment guides, target holes, or built-in slopes to keep things interesting and challenge your putting stroke in different ways. The synthetic surface keeps a uniform speed, letting you develop reliable distance control and a repeatable tempo.
You can roll most mats up for storage, and they work on carpet, hardwood, or concrete. The surface texture and speed can vary a lot between models, some are quick like tournament greens, others are slower, more like your local muni.
Key Differences in Design and Use
Primary Function
Chipping nets catch airborne chip shots, while putting mats give you a rolling surface for putts. They train two totally different skills in your short game.
Space Requirements
Chipping nets need about 3 to 5 meters of clearance for safe ball flight, plus at least 2 meters of height. Putting mats just need floor space, usually 2 to 4 meters long and less than a meter wide.
Practice Focus
A chipping net helps you work on trajectory, spin, and carry distance. A putting mat is for stroke mechanics, aim, and reading greens. You’ll need both if you want a complete home setup.
Feedback Type
Chipping nets give you visual and auditory feedback when balls land in target zones. Putting mats offer tactile feedback through the ball’s roll, so you can work on speed control and stroke quality.
Skill Development: Short Game vs Putting
Chipping practice helps you build accuracy and learn to judge distance, while putting practice refines your stroke and builds your ability to read greens. Both tools develop muscle memory, but the movements you practice are pretty different.
Building Chipping Accuracy and Distance Control
Chipping nets make you focus on your target and trajectory, giving you instant visual feedback. Every chip that lands in the net confirms you did something right; misses show you exactly what needs work. This clear feedback speeds up learning way more than just chipping into open space, where it’s hard to know what happened.
As you hit different targets or pockets, your distance control improves naturally. Beginners get a better feel for partial swings when they can see exactly where shots land. Repeating this over and over builds confidence in picking the right club and adjusting your swing length.
Most chipping nets let you practice different shot types, from low bump-and-runs to higher lobs. This variety teaches you how different clubs and techniques affect ball flight. Each shot gives you feedback, so your brain learns to adjust quickly.
Developing Consistent Putting Stroke
Putting mats are great for building a consistent stroke through repetition on a predictable surface. You don’t have to worry about grain or slope, just focus on making a smooth, repeatable motion. That’s huge when you’re still figuring out basic mechanics.
Most decent putting mats have alignment aids and distance markers, so you can practice with clear goals. Beginners tend to improve faster when they can track their progress in direction and speed. Watching the ball roll instantly tells you if your face angle, path, or tempo are off.
Muscle memory comes quickly on putting mats because you’re practicing the same motion again and again. You learn the feel of a solid stroke without worrying about changing green speeds. Once you get outside, you’ll have a solid foundation to build on.
How Both Aids Support Muscle Memory
Both tools build muscle memory by letting you repeat key movements in a controlled environment. Chipping nets train your swing mechanics and hand-eye coordination for the short game, while putting mats hone the fine motor skills needed for a steady stroke. The main difference is in the movement patterns each one reinforces.
Chipping practice gets your body used to dynamic weight transfer and wrist hinge, basically, a fuller motion involving more moving parts. Putting is all about smaller, controlled movements and keeping things stable.
Honestly, you should spend time on both. The skills complement each other, and when you practice consistently, those movements become automatic during real rounds. Practicing often matters more than how long each session lasts.
Practice Experience and Feedback for Beginners
Beginners need feedback they can actually use, something clear and immediate to build confidence and fix mistakes early. Putting mats shine here, giving you visual alignment cues and a realistic ball roll. Chipping nets give you backstop containment and target-based feedback that’s easy to see from across the room.
Visual Feedback and Alignment Aids
Most putting mats have printed alignment lines, target circles, and arrows to help you square your putter face and body. These guides make it super obvious when your setup is off, even before you hit the ball.
Chipping nets give you visual feedback with scored pockets or target zones. When your ball lands in a certain pocket, you know right away if your trajectory and distance were on point. This kind of feedback is intuitive for beginners who might not pick up on more subtle cues.
Key Visual Features:
- Putting mats: Alignment lines, distance markers, gate drills
- Chipping nets: Colour-coded pockets, numbered scoring zones, bullseye targets
With chipping nets, you’re focused on where the ball lands, not so much on your swing mechanics. Putting mats force you to watch the entire ball roll, which helps you connect stroke quality with the result.
Ball Roll, Surface Feel, and Stimpmeter Readings
Good putting mats mimic green speeds measured by stimpmeter readings, usually between 8 and 12 feet. This tells you how far the ball rolls with a standard stroke, so you can practice realistic distance control.
Surface feel is more important than most beginners think. The best mats use nylon or polypropylene fibers that feel like real bent grass. You’ll notice resistance through your putter, just like on an actual green.
Chipping nets don’t give you that tactile feedback, since the ball’s flying through the air instead of rolling on a surface. You’re working on trajectory and carry, not ground interaction.
In our experience, putting mats with stimpmeter speeds between 10 and 11 are ideal for home practice. They’re quick enough to challenge your feel, but not so fast that they’re unrealistic for most courses.
Automatic Ball Return and Backstop Features
Some putting mats have automatic ball return systems that send made putts right back to your feet. This keeps your practice flowing since you’re not chasing balls all over the room.
The backstop on a putting mat catches missed putts too, so balls don’t roll everywhere. Basic mats use ramps, while fancier ones have gravity-fed returns that work from multiple angles.
Chipping nets act as full backstops, catching every shot whether it’s accurate or not. That’s a big plus for indoor practice, since you don’t want to break anything with a wild chip. Most nets come with ground stakes or weighted bases to keep them from tipping.
Retrieval Comparison:
| Feature | Putting Mat | Chipping Net |
|---|---|---|
| Auto-return | Yes (on made putts) | No |
| Ball collection | Walk to backstop | Gather from net |
| Practice flow | Faster for holed putts | Requires frequent retrieval |
Automatic ball return keeps your rhythm going and encourages more reps. Chipping nets make you walk over and collect balls every few shots, which does break up your focus a bit, but hey, at least you’re moving.
Setup, Space, and Home Integration
Each practice system fits different living situations. Knowing how much space you need helps you stick with your routine. Storage and backing materials also matter for where and how you practice.
Best Home Practice Setups for Small Spaces
Putting mats are perfect for apartments or condos since they hardly need any room. Most are 2 to 3 meters long and only about 60 centimeters wide, just enough space for your stance. You can roll them out in a hallway, living room, or even a bedroom without worrying about ceiling height or damaging walls.
Chipping nets take a bit more planning in small spaces. The net might fold down small, but you’ll need at least 3 to 4 meters of clearance to swing safely. Ceiling height is important too, even a short chip needs 2.5 meters to avoid hitting lights or fans.
Balconies can work for chipping nets if you use foam balls. This lets you practice without worrying about breaking windows or upsetting the neighbors. Indoors, basements or garages are usually your best bet if you have the ceiling height.
If you want both tools, rotate them. Leave the putting mat out in a low-traffic spot, and pull out the chipping net when you’ve got the space.
Portability, Storage, and Backing Materials
Most chipping nets fold into a bag about the size of a beach chair. Pop-up designs collapse in seconds, no tools needed. You can stash them in a closet or under the bed.
Putting mats vary a lot in portability. Rubber-backed mats stay put and don’t slide during your stroke, but they’re heavier and don’t roll up as tight. Some premium mats weigh over 5 kilos and are basically semi-permanent. Lighter mats with foam or vinyl backing roll up small for easy storage, but they might move around while you practice. We like rubber backing if you’ve got a dedicated space, and lighter mats if you need to move it every day. Softer backing also protects your floors.
Chipping nets need flat bases or ground stakes for stability. Weighted bags with sand keep nets steady on patios or driveways. Check if your net includes backing supports, or you might need to buy stabilizers separately.
Outdoor and Indoor Use
Putting mats move easily between indoor and outdoor spaces. Weather-resistant materials hold up well on patios during dry spells, but honestly, I always bring mine inside when it rains, no one wants to deal with mould. Good synthetic turf keeps the speed consistent, whether you’re rolling putts in your garage or out on the deck.
Chipping nets really shine outdoors, since you can safely use real golf balls. Backyards, driveways, even a quiet park, just set the net up against a fence or wall for some backup. Indoors, it’s a different story; you’ll want to use foam golf balls to protect your stuff (and anyone walking by).
Temperature doesn’t really mess with these tools much. Putting mats keep their feel year-round, but if it gets really cold, the backing might stiffen up for a bit. Chipping nets hold up in all kinds of weather, though windy days call for extra anchoring.
Honestly, we end up using outdoor chipping nets more, because hitting full shots and watching the ball fly feels way more like real golf. But indoor putting practice happens more often just because it’s so convenient, sometimes I’ll roll a few putts while on a call or watching TV.
Incorporating into Practice Routines
Putting mats fit into daily life almost without thinking. Setup takes seconds, so if you leave yours near your desk or bed, you’ll find yourself practicing during calls, between emails, or right before sleep. That kind of easy access means you’ll actually build the repetition needed for muscle memory.
Chipping nets take a bit more planning. You need shoes, space, and some focus. I’d say it works better to block off 15 or 20 minutes, maybe three times a week, instead of hoping you’ll just do it whenever. The commitment is different from the casual vibe of putting mats.
Mixing both tools gives you a more balanced short game. Alternate chipping and putting days, or maybe save chipping for weekends and keep putting daily. Track your improvement with simple goals, like how many putts you make from two metres, or how many chips land in the target zone.
Portable launch monitors can add a data angle if you’re into that. They’ll show ball speed, launch angle, and distance, which can be motivating. But honestly, if you’re new to all this, just hitting balls and getting the feel is more important than staring at numbers.
Product Features and Buying Guide Essentials
Choosing between chipping nets and putting mats isn’t just about price or looks. The right features and materials really matter for durability and whether you’ll actually use the thing. Here’s a breakdown of what’s worth paying attention to, so you can get something that fits your skill level and budget.
Types of Mats: Tri-Turf, Hitting, Chipping, and 3-in-1
A tri-turf mat gives you three different grass heights on one surface: tight fairway, semi-rough, and rough. That’s super handy for beginners who want to practice different chip shots without buying a bunch of mats. A basic hitting mat usually has one turf thickness, good for irons and drivers, but not great for practicing those tricky short shots near the green.
Chipping mats focus on a realistic fairway or fringe feel with thinner turf, so your short game practice feels more like the real thing. These mats are usually pretty compact, think 13×17 inches, so they fit easily indoors. The 3-in-1 turf mat combines several lies in one, so you can practice chips, pitches, and even full swings without cluttering your space.
If you’re just starting out, I’d go with a tri-turf or 3-in-1 mat for versatility. If you only care about chipping, a single-surface mat works fine.
Durability and Build Materials
Look for mats with rubber or foam backing that grips the floor and doesn’t slide around. That also protects your floor from club hits. Turf density matters too, thicker, denser turf holds up to repeated swings and keeps the feel realistic over time.
For nets, reinforced fiberglass frames or aluminum alloy make a big difference outdoors, especially if you get windy days. Netting like 600D Oxford cloth or high-density mesh can take a beating without tearing. I’ve seen cheap nylon nets rip after just a few weeks, so check material specs before buying.
Ground stakes and fixing pins help keep things put outdoors, while non-skid mat backing is key for indoor stability. If you’re hitting real balls at full speed, make sure your net and mat are rated for high-velocity shots.
Accessories: Nets, Mats, Launch Monitors, Targets
Most chipping mat sets come with foam balls for indoor safety and rubber tees for different shot heights. Foam balls are great for not breaking stuff, but they don’t feel like real golf balls. It’s nice when kits include both, so you can switch between indoor safety and outdoor realism.
Target systems range from single pockets to multi-basket setups that make practice more interesting. Three-target nets help you work on accuracy from different distances, and bigger multi-target golf nets give you several pockets for all kinds of shots. If tracking progress is your thing, adding a launch monitor to your net setup can really level things up, but it’ll cost you.
Carry bags and foldable designs are a lifesaver if you move your gear around or need to stash it away. Pop-up nets go up in under a minute, while rod-based frames take longer but usually stand up better to wind.
Finding the Best Option for Your Budget
Entry-level chipping nets with basic mats start around $30-$50, perfect if you’re just getting the hang of things. Mid-range kits ($60-$120) usually include dual- or tri-turf mats, multiple targets, and sturdier frames. Premium setups with big 10×7-foot nets, tough frames, and multi-surface mats can run $150-$250, but they’ll last for years and handle full swings.
If you’re new, I’d suggest a mid-range golf net and mat combo with foam balls and ground anchors. That gives you room to improve without paying for stuff you won’t use right away. If you’re on a tight budget, a good chipping mat and a basic pop-up net will still give you solid practice.
Look for kits that bundle extras like balls, tees, and stakes. Buying those pieces separately adds up fast. The best value comes from products that match where you are now, but still give you room to grow in your first year.
Enhancing Your Drills: Combining Nets, Mats, and Training Technology
Modern practice setups work best when you mix in a bit of technology with the basics. Launch monitors give you feedback that turns random swings into measurable progress, and using nets and mats together really builds a solid short game foundation.
Integrating Launch Monitors and Simulators
Launch monitors have come down in price, so it’s actually realistic to use one at home. Even the entry-level models track carry distance, ball speed, and launch angle. I’d start with a portable launch monitor that syncs to your phone for instant feedback on every chip or pitch.
The best golf simulator setups combine a launch monitor, an impact screen, and a practice mat that works well with sensors. That combo turns your garage into a mini data lab where you can actually see your improvement over time.
Key metrics for short game practice:
- Carry distance consistency
- Spin rate changes
- Launch angle patterns
- Face-to-path relationship
If you’re watching your spending, swing speed radars are a good first step before going for a full launch monitor. They’re way cheaper and still give you helpful feedback to spot swing issues.
Using Chipping Nets and Mats Together
A good practice setup always includes both a net and a mat that feels like fairway turf. We usually set the chipping net about 10-15 feet away and stand on the mat to mimic real shots.
The breaking ball putting mat works well alongside your chipping net for a full short game session. Try alternating between 15 chips and 15 putts to build the rhythm you’ll need on the course.
Effective combination drill sequence:
- Warm up with foam golf balls (better safe than sorry)
- Chip 10 shots to the high net target
- Putt for 5 minutes
- Chip 10 shots to the low net target
- Finish with some putts on different breaks
The perfect practice perfect putting mat fits right in with net setups, since both focus on repetition and hitting your target. We like to keep both set up all the time, if it’s a pain to set up, you’ll end up practicing less.
Advancing Through Practice Systems
If you want to actually get better, you need a plan. We build routines that rotate between technical work with launch monitors, high-rep practice with nets and mats, and pressure drills that make you perform under stress.
Short, regular sessions work better than marathon practices. Twenty minutes, three times a week, is plenty. Combining a putting mat with a launch monitor keeps you honest, you can track your make percentages and distance control, which really shows your progress.
Progressive 6-week practice system:
| Weeks 1-2 | Work on technique with launch monitor feedback | | Weeks 3-4 | Ramp up to 100 chips and 50 putts per session | | Weeks 5-6 | Add in pressure games and scoring challenges |
Treat your garage or basement like a mini golf lab. We like to switch up practice routines every couple of weeks to keep things fresh and avoid getting stuck in a rut.
Frequently Asked Questions
Here are quick answers to help beginners choose the right home golf practice tool.
Which at-home practice tool gives a beginner faster feedback on short game mistakes?
A chipping net gives the fastest visual feedback because you can see where each shot lands. A putting mat also gives feedback, but it is more focused on roll, aim, and speed.
How much space do you realistically need for a simple chipping or putting setup at home?
A putting mat usually needs 6 to 10 feet of floor space. A chipping net usually needs 10 to 15 feet of distance, plus safe swing room and enough ceiling height if used indoors.
What features should beginners look for in a quality chipping target net?
Look for a stable base, strong netting, quick setup, and multiple target zones. These features make practice easier, safer, and more useful for accuracy work.
What makes a putting surface feel realistic enough to build good pace control?
A realistic putting mat should roll smoothly, have consistent speed, and use a surface that does not feel too slick. Alignment guides and distance marks are helpful for beginners.
How often should a beginner practise chipping versus putting to lower scores sooner?
Most beginners should practise putting slightly more often because putting happens on every hole. A simple split is 60% putting and 40% chipping.
What are the most common setup mistakes that make indoor short game practise less effective?
The biggest mistakes are using an unrealistic surface, practising only one distance, poor lighting, and leaving too little room to swing safely. A better setup makes practice more consistent.
Share:
How to Use a Golf Chipping Net for Short Daily Practice Sessions
Turf Mat vs Grass Practice for Golf Chipping: What Changes at Impact?