
Check out our latest home & kitchen collection!
Deep cabinets are basically the Bermuda Triangle of kitchen storage—stuff goes in and then, poof, you’re on your knees squinting into the abyss, wondering if your favorite Dutch oven will ever return.
We’ve all done the awkward flashlight shuffle, digging for a missing pot. The upside? With a few smart tools, these black holes can actually become spaces you want to use, not dread.
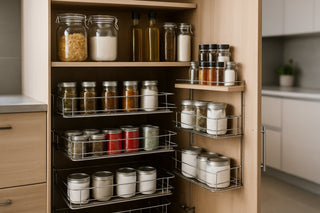
Pull-out baskets and tiered shelves bring everything in deep cabinets within easy reach and help you use every inch of space.
Pull-out baskets glide on tracks, so you can forget the cabinet crawl, and tiered shelves give you that stadium-seating effect—nothing gets lost in the back. These aren’t just for show; they’re tough enough for heavy cookware and hold up to daily rummaging.
What’s great is how these systems work together. Pair pull-out wire baskets for pots and pans with tiered shelf organizers for cans, and suddenly your storage fits your actual life. Deep pantry? Awkward corner? The right combo of these tools can finally kick cabinet chaos to the curb.
Key Takeaways
- Pull-out baskets and tiered shelves make deep cabinets accessible and organized
- You can mix and match these solutions to fit your space, both horizontally and vertically
- Good cabinet organization saves time and keeps things from getting lost
Why Deep Cabinets Need Specialized Organization
Deep cabinets come with their own set of headaches. All that extra depth gives you more room—sure—but it also means stuff gets buried, forgotten, or just plain wasted. Standard organizers don’t cut it.
Common Storage Challenges in Deep Cabinets
We’ve all reached into a cabinet, blindly pushing aside boxes, trying to find something you’re sure is hiding in there. Deep cabinets usually run 24-30 inches deep, way more than the typical 12-15 inches.
This depth creates the classic "black hole effect." Stuff migrates to the back, and unless you’ve got superhuman vision, it’s gone. Without lighting or good organizers, the back 8-12 inches is basically lost.
Visibility is a pain. You end up buying duplicates because you forget what’s already in there. The deeper the cabinet, the less you remember what’s inside.
And let’s be honest—stretching, bending, and crawling into cabinets is no one’s idea of fun. It’s not just annoying; it’s just not practical.
Unused Space and Lost Items Explained
Dead zones are everywhere in deep cabinets. Studies show most people only use about 60-70% of their deep cabinet space unless they’ve got specialized organizers.
Vertical space gets wasted when you pile things too high or don’t use the full cabinet height. Without tiered shelves, you’re stuck with a single layer in a spot that could hold so much more.
Then there’s the "avalanche effect." Stack stuff without bins or baskets, and pulling one thing out can send everything tumbling. It’s a mess, and you start avoiding things just to keep the peace.
Lost item syndrome is real. Items migrate to the back and stay there for ages. We’ve all found expired food, duplicate gadgets, or forgotten baking supplies that would’ve been handy—if only you could find them.
Temperature and humidity can mess with stuff in the back, too, since air doesn’t circulate as well.
Benefits of Upgrading Cabinet Organization
Specialized organizers really do make deep cabinets useful. Pull-out systems and tiered shelves can bump up your usable space by 40%—plus, you actually see and reach everything.
You’ll notice the time savings right away. Less digging means faster meal prep and easier cleanup. You know what you have, so you stop buying doubles and start using what’s already there. That’s a money saver over time.
It’s just easier on your body, too. No more awkward bends or stretches. The organizers bring things to you.
And honestly? There’s something pretty satisfying about opening a cabinet and seeing order instead of chaos.
Pull-Out Baskets: Smart Solutions for Deep Cabinets
Pull-out baskets can turn deep cabinets into spaces where you actually find what you need. These systems run on sliding tracks, come in all sorts of materials, and fit lots of cabinet sizes.
How Pull-Out Baskets Work
Pull-out baskets slide on tracks that you mount inside the cabinet. The whole basket pulls out, so you can finally reach the back without crawling in.
Most use ball-bearing slides, so they’re smooth and can handle a surprising amount of weight—sometimes up to 100 pounds.
You’ll mount the tracks at the height you want, then attach the baskets. Soft-close options are worth it if you hate slamming noises or want them to last.
Full-extension slides mean you see and reach every corner—no more mystery zones.
Basket Materials: Chrome, Wire, and More
Chrome baskets are durable and look sharp, especially in modern kitchens. The finish resists rust and wipes clean easily.
Wire baskets let you see what’s inside and are strong enough for heavy stuff. They’re great for pots or appliances that need some support.
You’ll find other finishes too—nickel, bronze, black powder coat—so you can match your kitchen hardware if you care about that kind of thing.
Some baskets combine wire frames with solid bottoms, which keeps small things from falling through but still lets you see what’s inside.
Fitting Baskets to Different Cabinet Sizes
The width of your cabinet opening determines what basket sizes will fit. Typical base cabinets use 15-18 inch baskets, uppers take 12-14 inch ones.
Minimum cabinet opening:
- 18-20 inches: Narrow baskets
- 21-23 inches: Standard
- 24+ inches: Wide
Depth matters too—baskets usually run 14-22 inches deep. Don’t forget the tracks, which need an extra inch or two.
If you want more than one basket, make sure there’s enough height between them for you to get things in and out comfortably.
Tiered Shelves: Maximizing Vertical Space
Tiered shelves make deep cabinets way more usable by creating levels within one shelf. The right organizer size, good item selection, and a little planning go a long way.
Choosing the Right Tiered Organizer
Measure your cabinet before you buy anything. You want the organizer to fit without blocking the door.
Expandable tiered organizers are super flexible—they stretch from 12 to 24 inches wide, so you can adjust as needed. Fixed-width ones are fine if you know your space.
Material options:
- Wire: Airy and light
- Plastic: Easy to clean, stable
- Bamboo: Looks nice, eco-friendly
For really deep cabinets (over 20 inches), two-tier organizers are usually better than three-tier. Too many tiers and things get lost in the back again.
Step height matters. Most are 3-4 inches, which is great for cans and bottles. Taller steps (like 6 inches) work for big containers but eat up space.
Perfect Items for Tiered Shelf Storage
Canned goods are perfect for tiered shelves. You can line them up by type—soups on the bottom, veggies on top—so you see what you have.
Spices and small jars also fit well. They line up neatly and you can read the labels without moving everything.
Great for:
- Canned foods
- Spices and seasonings
- Small appliance parts
- Baking supplies (like extracts)
- Condiments and vinegars
Stackable bins on top of tiered shelves help corral loose stuff like snacks or packets.
Skip the heavy stuff, though—cast iron or big appliances will just mess up the shelves.
Installation Tips for Tiered Shelves
Start with an empty cabinet—trust me, it’s easier. Wipe everything down before you start.
Put down non-slip shelf liner so your organizers don’t slide around. Cut it to fit exactly.
Set the organizer near the front at first. You might need to adjust before loading it up. Usually, leaving 2-3 inches from the front edge works best.
Put things you use a lot on the front tiers. Less-used stuff goes in the back.
Before you load it up completely, close the cabinet door to check for clearance. Sometimes deep organizers need a little repositioning so the door shuts smoothly.
Easy-Access Upgrades: Lazy Susans and Corner Solutions
Corner cabinets and deep spots can be a nightmare, but there are ways to make them work. Lazy Susans and a few smart tricks can turn those awkward spaces into usable storage.
Using Lazy Susans for Awkward Spaces
Corner cabinets swallow stuff whole. A lazy Susan fixes that—just spin, and everything comes to you.
Full-round lazy Susans are best for cabinets with doors that open all the way. They use the whole space.
D-shaped lazy Susans hug the wall—great for corner wall cabinets that can’t handle a full circle.
For deep cabinets, tiered lazy Susans are a game changer. Stack them to double your space and keep things visible.
| Lazy Susan Type | Best For | Weight Capacity |
|---|---|---|
| Full-round | Standard corners | 15-20 lbs |
| D-shaped | Wall corners | 10-15 lbs |
| Tiered | Deep spaces | 25-30 lbs total |
Measure your cabinet before you buy—most need a couple of inches of clearance all around to spin freely.
Corner Cabinet Organization Tricks
Lazy Susans are great, but they’re not the only answer for corners.
Pull-out shelves are awesome for heavy stuff that’s too much for a lazy Susan. They slide out fully, so you can grab pots or appliances.
For L-shaped corners, try blind corner organizers. These have a fixed shelf in back and a basket that swings out for easy access.
Stackable baskets let you make zones—put baking stuff in one, canned goods in another, cleaning supplies in a third.
Interior cabinet lighting is worth it if you’re always losing things in dark corners. Battery LED strips are easy to stick in, no wiring needed.
Don’t forget vertical space. Adjustable shelves let you fit tall bottles or keep spices within reach.
Organizational Extras: Stackable Bins and Drawer Inserts
Sometimes baskets and shelves aren’t enough. Stackable bins help you use vertical space, and drawer inserts keep small stuff from vanishing into the cabinet void. Using both together can really dial in your storage.
When to Use Stackable Bins
Stackable bins shine when you’ve got tall shelves and not enough stuff to fill them. They’re especially handy in pantries.
These bins let you build neat towers—no more leaning piles or random boxes. They’re perfect for snacks, pasta, or cleaning supplies.
Clear plastic bins are the way to go. You can see what’s inside without unstacking them. Look for bins with drop-fronts or pull-out features so you don’t have to unstack to reach stuff.
Measure your cabinet first, then pick bins that fit with a little room to spare.
Start with two or three bins per stack. Any higher and things get awkward.
Size tips:
- Small (6"x6"): Spices, condiments
- Medium (12"x8"): Boxed food
- Large (16"x12"): Bulk items
Selecting Drawer Inserts for Small Items
Drawer inserts turn chaotic piles of small stuff into something you can actually manage. We use them for everything—utensils, measuring spoons, batteries, twist ties, you name it.
Matching the compartments to your real-life belongings is crucial. Those shiny silverware dividers? Useless if you’re wrangling potato mashers or weirdly-shaped gadgets.
Adjustable inserts are a lifesaver. You can move compartments around as your needs change, so you don’t have to keep buying new organizers every time you get a new kitchen tool.
If you’ve got deep drawers, go for inserts with different compartment depths. Shallow spots are perfect for little things, while deeper sections hold bulkier tools.
Material makes a difference too. Bamboo looks classy, but plastic wipes clean in seconds. Some inserts even have grippy bottoms so they don’t slide every time you open the drawer.
Best applications:
- Kitchen: measuring tools, gadgets, foil boxes
- Bathroom: toiletries, first aid supplies
- Office: pens, paper clips, USB drives
Combining Solutions for a Custom Fit
Honestly, the best results come when you mix stackable bins, drawer inserts, and pull-out systems. This layered method, at least in our experience, solves even the trickiest deep cabinet problems.
Start with pull-out drawers as your base. Stack bins on top for stuff you don’t grab every day. Use drawer inserts inside those pull-outs to keep tiny things from getting lost.
This setup gives you quick access to the things you use most and squeezes every bit of space out of your cabinets. Bins handle the bulk, pull-outs bring everything forward, and inserts keep the little stuff in check.
Sample configuration:
- Bottom: Pull-out drawer with utensil insert
- Middle: Pull-out drawer with snack bins
- Top: Stackable bins for backup supplies
Label everything so everyone knows where things go. We stick on simple adhesive labels—they’re easy to remove when your storage needs change.
Maintenance Tips to Keep Cabinets Organized
Keeping things organized isn’t just about the setup. You’ve got to stay on top of decluttering, labeling, and making sure you don’t overload your cabinets.
Regular Decluttering Habits
Set a recurring calendar reminder—maybe the first Saturday of each month—for a quick cabinet check-in. It’s way easier to do a little maintenance regularly than to tackle a mountain of clutter later.
During these sessions, toss expired products and anything you haven’t used in six months. No one needs a graveyard of forgotten gadgets.
Quick decluttering checklist:
- Check expiration dates on all food items
- Remove duplicate tools or appliances
- Relocate items that don’t belong in the kitchen
- Decide if seasonal stuff should live somewhere else
Seasonal deep cleans—like spring cleaning or before the holidays—pair nicely with monthly upkeep.
Keep these sessions short and painless. Fifteen or twenty minutes per cabinet is enough if you do it regularly.
Labeling and Categorization
Clear labels turn chaos into a system. We use waterproof labels on baskets and shelves so you can spot what’s inside right away.
Effective labeling strategies:
- Front-facing labels on basket edges
- Group items by category: “baking supplies,” “breakfast items,” etc.
- Color-coded labels for each family member
- Picture labels if you’ve got kids or a multilingual household
Consistency beats perfection. Pick a method and stick to it across all your cabinets.
Laminated labels or a label maker last longer. Handwritten tape peels off or fades too quickly.
Don’t forget to update labels when you move things around. Outdated labels just cause confusion.
How to Prevent Overcrowding
The “one in, one out” rule keeps cabinets from overflowing. If you bring home a new kitchen item, something else has to go.
Space management techniques:
- Only fill baskets about 80% full so you can reach things easily
- Leave space between items on tiered shelves—don’t cram
- Use vertical space smartly, but avoid unstable stacks
- Give each category its own zone
We measure baskets and shelves before shopping. That way, we don’t buy stuff that won’t fit.
Keeping a regular inventory helps you spot when cabinets are getting too full. If you’re cramming things in, it’s time to declutter—not just find more storage.
Ask yourself if new purchases really earn their spot. Do you need a third garlic press? Probably not.
Frequently Asked Questions
Organizing deep cabinets with pull-out systems comes with lots of questions—measurements, materials, installation, and how to make things fit. People want to know what actually works and how to avoid common headaches.
What are some must-have features to look for in pull-out cabinet organizers?
Go for full-extension slides so you can reach things in the back without digging around. Soft-close mechanisms are a big plus—they prevent slamming and make your organizers last longer.
Don’t overlook weight capacity. Aim for systems rated at least 75-100 pounds if you’re storing heavy stuff like appliances or canned goods.
Adjustable height is super useful. You can tweak shelf spacing for tall bottles or short spice jars.
Non-slip surfaces or raised edges make a surprising difference. They keep things from sliding around every time you pull out a drawer.
How do you measure your space to ensure a perfect fit for slide-out shelves?
Measure the inside width of your cabinet, side to side. Subtract 2-3 inches for the slide hardware so things move smoothly.
Check the depth from the inside front to the back wall. Most pull-outs need at least 22 inches to work right.
Don’t forget the height—measure between shelves or from bottom to top, and watch out for plumbing or wires in the way.
Measure twice, and check if your cabinet is actually square. Older cabinets can have weird angles that throw things off.
Can you install pull-out shelves in existing cabinets without using screws?
Some temporary options use tension rods or adhesive strips, but they just can’t handle heavy loads or frequent use.
Clamp-on systems exist for certain cabinets, but they’re really only good for lightweight items like plastic containers.
Most sturdy pull-out systems need screws for real support. Luckily, installation is usually just 4-6 screws per slide.
Honestly, it’s worth using screws. With basic tools, installation is simple and your shelves will last for years.
Are there any DIY solutions for creating a pull-out pantry with limited space?
Rolling carts are a handy temporary fix—no installation, just roll them in and out. Pick narrow ones that fit your cabinet opening.
Wire baskets on drawer slides make for a solid DIY pull-out. Hardware stores sell slide kits for around $15-25 per shelf.
You can mount wooden crates or boxes on furniture glides if you’re on a budget. Just sand and seal them so you don’t get splinters.
We’ve seen people repurpose old desk drawer slides too. Just check the weight rating before loading them up.
What are the pros and cons of various materials used in pull-out baskets and shelves?
Wire baskets let you see and air out produce, but tiny things can slip through.
Solid wood shelves look great and hold a lot, but they cost more and need occasional upkeep. They’re perfect for heavy stuff like appliances.
Plastic shelves resist moisture and wipe clean fast, though they don’t hold as much weight. We like them for cleaning supplies and bathroom storage.
Metal mesh is tough and lets you see what’s inside, but it can show fingerprints and water spots. It works well for kitchenware that needs to dry out.
Got any clever tips for organizing a narrow cabinet with a pull-out system?
Vertical dividers really help in narrow cabinets—they keep things like cookie sheets, cutting boards, and baking pans upright and easy to grab.
Tiered shelf organizers are surprisingly handy for making the most of a cramped space. I usually stash spices, canned goods, or those random little containers on them.
If you've got a cabinet door begging for more purpose, try a door-mounted rack. It adds storage for stuff like cleaning supplies or spices, and doesn't steal any room inside.
Pull-out systems that slide out past the cabinet face give you better access, especially when the space is tight. Just double-check you've got enough clearance for them to work smoothly.