

Check out our latest home & kitchen collection!
Meal prep can turn a hectic week into something that actually feels manageable. But let's be honest—when things aren't organized, even the best intentions end with forgotten containers, mystery leftovers, and food you never get around to eating.
The real trick to meal prep? It's all about three things: picking the right containers, using a labeling system that makes sense, and dividing your fridge into zones so you can actually see and reach everything.
Once you get these down, meal prep feels less like a chore and more like a genuine life upgrade.
We've all played fridge Tetris or found a container in the back that could be anything. But with a couple of simple tweaks—better storage, smarter labels, and a little fridge strategy—you can set up a system that actually sticks.
Key Takeaways
- Choosing the right containers and setting up fridge zones helps cut down on waste and makes grabbing meals a breeze
- Good labeling keeps you on top of freshness and ingredients, while portioned containers help you stick to nutrition goals
- Simple routines and solid storage habits keep your meal prep setup running without constant effort
Choosing the Best Meal Prep Containers
The right container can mean the difference between soggy leftovers and meals that taste like you just made them. Glass and plastic both have their place, divided containers are a game-changer for portioning, and getting the size right helps avoid waste.
Glass vs. Plastic: Pros and Cons
Glass containers are hard to beat for reheating and storing anything acidic. They don’t pick up smells or stains, and you can see what’s inside without popping the lid.
Glass Advantages:
- No weird plastic smell after microwaving
- Dishwasher safe, won’t warp
- Can go from freezer to oven (just not the lids)
- Won’t stain or hold onto odors
Glass Drawbacks:
- Heavier to carry around
- Breakable if you drop them
- Cost more upfront
Plastic containers are great for taking food on the go and for prepping big batches without breaking the bank. The newer BPA-free kinds are much safer than old takeout tubs, and they stack nicely in the fridge.
Plastic Advantages:
- Super light, easy to pack
- Won’t shatter—good for kids or travel
- Cheap enough to buy in bulk
- Clear measurements make portioning easy
Plastic Drawbacks:
- Can hold onto smells
- Might warp after a lot of microwaving
- Don’t last as long as glass
Divided Containers for Balanced Meals
Three-compartment containers make it easy to portion out a balanced meal. Usually, the biggest spot is for protein, while the smaller ones are perfect for veggies and grains.
A 36-ounce container with dividers fits a full meal without squishing anything. The dividers keep veggies crisp and stop sauces from taking over the plate.
Ideal Compartment Ratios:
- Large: 16-20 oz (proteins)
- Medium: 8-10 oz (grains)
- Small: 6-8 oz (veggies)
Two-compartment containers are great for simpler meals or when you want bigger servings of just two things. Plus, you can reheat one part without the other if you want.
Snap-closure lids that actually click shut make a big difference for carrying food around. Containers with pull tabs on every corner are a lot easier to open, especially when your hands are full.
Size and Capacity for Effective Portions
Single-compartment containers in the 16-24 ounce range are just right for soups, stews, or grain bowls. For bigger meals or dinner portions, 28-32 ounces works well.
Container Size Guide:
- 16 oz: Snacks or light lunches
- 24 oz: Standard lunch size
- 32 oz: Dinner or heartier meals
- 36 oz: Large or divided meals
Stackable designs save you so much fridge space when prepping a bunch of meals. And if they nest inside each other when empty, your cabinets will thank you.
Honestly, it’s worth getting a set of 10 (or more) matching containers. Uniform sizes make stacking and organizing way easier than dealing with a random mix of shapes and brands.
Mastering Portion Control with Container Systems
Container systems take the guesswork out of portioning. You get the right amount for each food group, and when you put these in the right fridge spots, everything stays fresh and easy to grab.
Matching Portions to Your Meal Plan
Color-coded containers make portion control almost automatic. Green usually means a cup of veggies, red is three-quarters of a cup of protein.
The usual system: purple for fruit, yellow for carbs, blue for healthy fats. Each size lines up with a serving size, so you’re not stuck measuring or weighing everything.
Container Size Reference:
- Green (1 cup): Leafy greens, broccoli, peppers
- Red (3/4 cup): Chicken, fish, tofu
- Purple (1 cup): Berries, apple slices, grapes
- Yellow (1/2 cup): Brown rice, quinoa, sweet potato
- Blue (1/3 cup): Nuts, avocado, olive oil
You can always adjust the number of containers depending on your activity level or goals. If you’re more active, maybe two yellows per meal. If you’re watching calories, stick to one.
Once you get used to it, you don’t really need measuring cups or scales—just fill the containers and go.
Smart Container Placement in the Fridge
Give each type of container its own spot in the fridge to keep things organized and safe. Middle shelves are the sweet spot for protein containers since the temp is most stable there.
Vegetable containers do best in the crisper drawers—humidity helps keep them fresh. Fruit containers should go up top, so you can actually see and grab them for snacks.
Optimal Fridge Placement:
- Top shelf: Fruit containers, overnight oats
- Middle shelves: Protein portions, ready meals
- Bottom shelf: Raw ingredients for prepping later
- Door compartments: Healthy fats, dressings
- Crisper drawers: Fresh veggie containers
Stack the same type of container together, but don’t mix up different foods in a single stack—nobody wants their strawberries tasting like last night’s curry.
Try to rotate meals so the ones you made first are in front. That way, you don’t end up with forgotten food at the back.
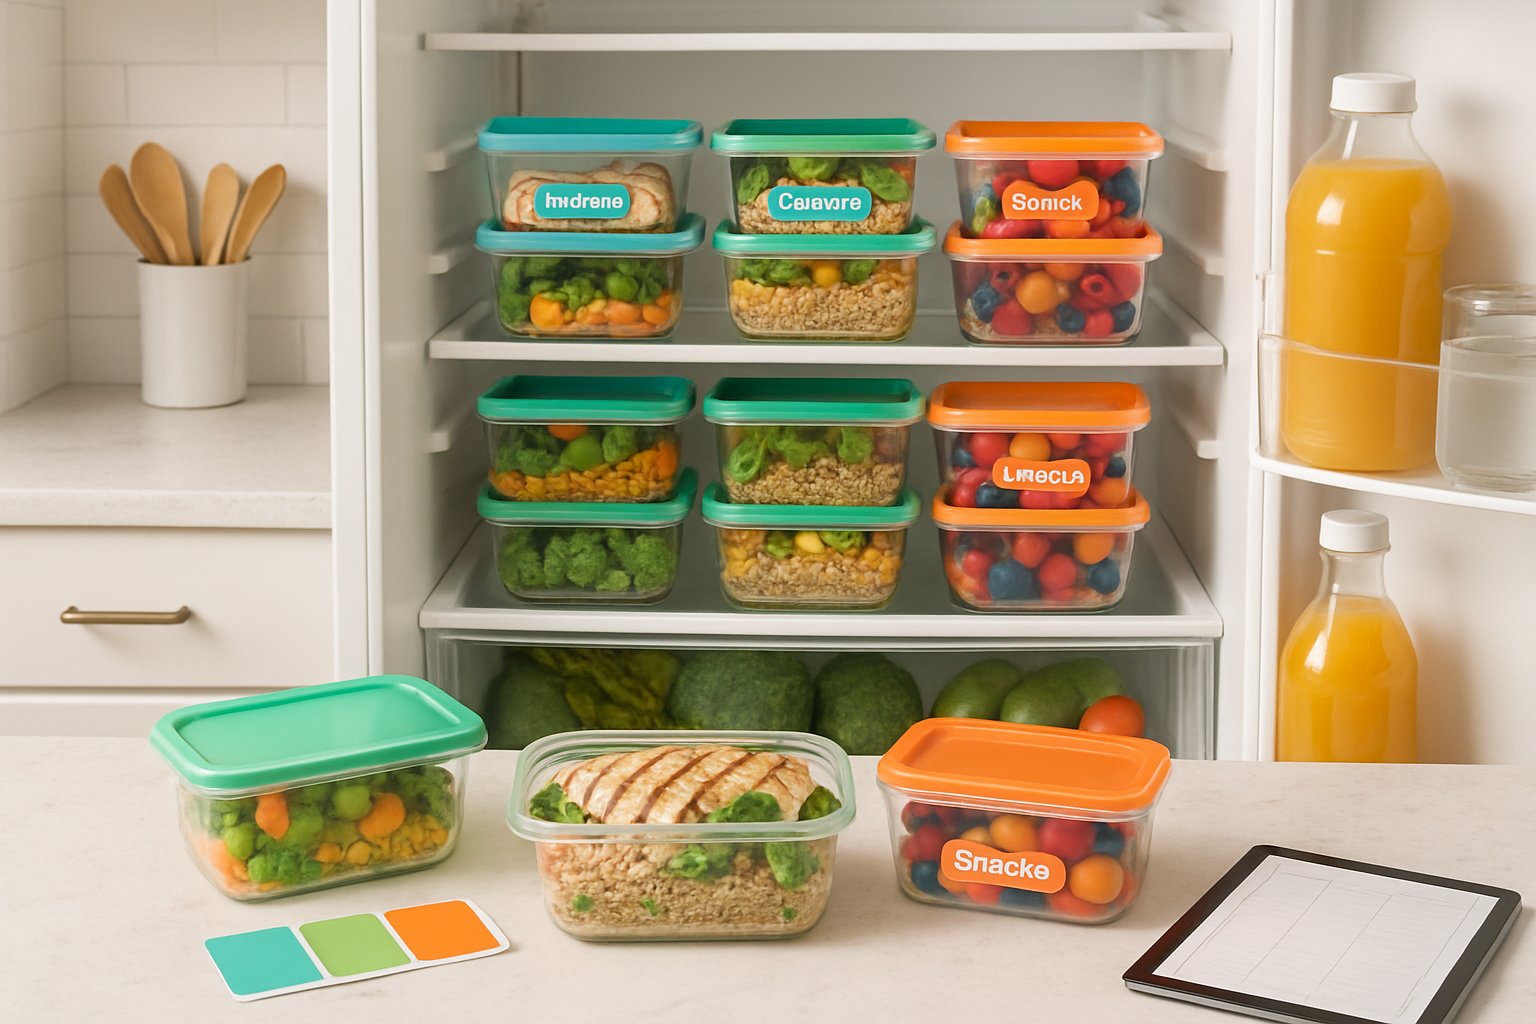
Labeling Hacks to Track Meals and Ingredients
Labels are the unsung heroes of meal prep. They make it easy to see what’s what and when you made it, so nothing gets lost or wasted.
Best Label Types for Meal Prep
Waterproof write-on labels are a lifesaver. They survive the dishwasher, microwave, and freezer without peeling off or fading.
Clear containers work best with these—you can see the food and the label at a glance. Go for labels that wipe clean if you’re reusing containers.
Freezer-safe labels are a must if you’re batch cooking. Regular labels tend to fall off in the cold, and then you’re left guessing.
Color-coding is another way to keep things straight. Maybe green for Mondays, blue for Dad’s meals, red for anything spicy.
Chalkboard labels look great on glass and can be wiped clean with a damp cloth. Chalk markers make it easy to update info for the next round of meals.
Date Marking and Rotation Tips
Always add the prep date and a use-by date to every container. Most prepped meals last 3-5 days in the fridge and 1-3 months in the freezer.
Write dates in MM/DD format to avoid confusion, and adding the day of the week can help with planning.
First in, first out is the rule to live by. Put newer containers behind older ones, and eat the oldest first.
If you batch cook ingredients, jot down simple instructions right on the label. “Reheat 2 min” or “Add dressing before eating” saves you time later.
For food safety, write reminders like “Thaw overnight” or “Serve cold” directly on the label. It’s easy to forget in the rush.
Creating Fridge Zones for Organized Meal Storage
Setting up fridge zones for different food groups and knowing how temps vary on each shelf can make a huge difference. You’ll keep things fresher and find what you need without digging.
Designating Spaces for Each Food Group
Give each food group its own home in the fridge. Top shelves are great for prepped meals and grab-and-go containers.
Ready-to-eat meal prep containers do best on the top shelf, where the temperature stays steady around 38-40°F. It keeps your hard work visible and easy to reach.
Middle shelves are the dairy and protein zone—think yogurt, cheese, cooked meats. It’s a bit cooler here, about 35-38°F.
Produce goes in the crisper drawers—veggies in high humidity, fruits in low. This keeps veggies from wilting and fruit from overripening.
Condiments and sauces fit best in the door bins. The temps there fluctuate more, but it’s fine for dressings and hot sauces.
The bottom shelf is for raw ingredients—meat, fish, stuff you still need to cook. It’s the coldest spot and keeps things safe.
Optimizing Shelf Placement and Temperature
Put your most-used meal prep containers at eye level so you don’t forget about them. Middle shelves are the control center for the week’s meals.
Temperature guide:
| Zone | Temperature | Best For |
|---|---|---|
| Top shelf | 38-40°F | Leftovers, prepared meals |
| Middle shelves | 35-38°F | Dairy, cooked proteins |
| Bottom shelf | 32-35°F | Raw ingredients, meat |
| Crisper drawers | 32-35°F | Fresh produce |
| Door | 40-42°F | Condiments, dressings |
Don’t stuff the shelves too full—air needs to move around to keep everything at the right temp.
Stick to the FIFO (First In, First Out) method. New containers go in the back, and you eat the older ones first.
Clear, stackable containers that fit your zones make it easy to see what’s left and grab what you need, even on busy mornings.
Achieving Balanced Meals with Effective Prep
Planning out compartments and picking colorful ingredients can turn basic containers into balanced, interesting meals. Divided containers help keep portions on track, and mixing up ingredients keeps things from getting boring.
Mixing and Matching Foods in Compartments
Each compartment should have a purpose. Usually, the biggest one is for veggies—ideally, half your meal. Protein goes in the next biggest, and carbs in the smallest.
Protein compartments are for lean meats, fish, eggs, beans, or tofu—about the size of your palm. The last section is for carbs like brown rice or sweet potato.
Mixing things up keeps meals interesting. Add hummus to veggies for extra fat and protein, or try Greek yogurt with berries for a snack that feels like dessert.
Prep ingredients separately and mix them up when assembling meals. Chicken can go in a Mediterranean bowl one day and an Asian-inspired dish the next. Keeps things fresh, and you don’t get tired of eating the same thing.
Tips for Colorful, Nutritious Variety
Colorful meals usually mean you’re getting a good mix of nutrients. Red peppers for vitamin C, orange carrots for beta-carotene, dark greens for iron and folate.
Change up your veggies each week:
- Monday: Purple cabbage, orange peppers
- Wednesday: Broccoli, yellow squash
- Friday: Tomatoes, cauliflower
Shop with the seasons for better flavor and price. Winter root veggies like purple sweet potatoes add some sweetness, and summer berries are packed with antioxidants.
Mix up textures, too. Crunchy nuts with soft roasted veggies, crispy chickpeas on top of a grain bowl—it makes a difference. Fresh herbs like cilantro or basil can totally change up the flavor with zero extra work.
Cooking the same veggie different ways—like roasting vs. steaming—keeps things from feeling repetitive.
Maintenance and Storage Tips for Long-Lasting Organization
Taking care of your containers and storing things smartly means your meal prep setup keeps working without much hassle. Clean regularly to avoid odors and stains, and stack things to save space.
Cleaning and Care of Containers
Glass containers last a long time if you treat them right. Don’t shock them with sudden temperature changes—like pouring hot food into a cold dish or vice versa—since they can crack.
For stains or stubborn smells, a baking soda paste works wonders. Let it sit for half an hour, then scrub gently.
Plastic containers need a little more TLC. Skip abrasive cleaners so you don’t scratch them up. If they get cloudy, cracked, or start smelling weird even after washing, it’s probably time to replace them.
Lids and seals are often the first thing to go. Check rubber gaskets for cracks or mold, and hand-wash them when you can—they’ll last longer than if you always toss them in the dishwasher.
Let everything dry completely before stacking and storing, or you’ll end up with mold or mildew (nobody wants that).
Stacking and Storing for Space-Saving
Nest containers by size when putting away empty ones. Stack round with round, square with square—keeps things stable and less likely to topple.
Stash lids separately, maybe in a drawer organizer or even a vertical file holder. That way, you’re not digging around for a matching top mid-meal prep (we've all been there).
Set up cabinet zones for different types. Everyday stuff should stay at eye level; random soup containers and specialty pieces can live up high, out of the way.
Try tension rods inside cabinets to split up lids. They’ll stand upright and you can actually see what you have.
Label storage spots with tape or little signs—just enough so everyone knows where things go. It’s not perfect, but it helps keep the system from falling apart.
Clear storage bins are handy for grouping similar containers. You can pull out a whole set at once, which makes life a bit easier.
Frequently Asked Questions
Here’s a grab bag of meal prep questions—everything from saving cash on containers to keeping your fridge looking sharp and your portion sizes on point.
What are the best types of containers for meal prep that'll keep my grub fresh but not give my wallet a workout?
Honestly, glass containers with airtight lids are tough to beat. They last, handle the microwave, and don’t pick up weird smells or stains like plastic sometimes does.
If you’re watching your budget, clear stackable plastic containers work fine. Just make sure they’re BPA-free and have decent locking lids.
Mason jars—yeah, the classic ones—are awesome for salads and oats. Cheap, reusable, and your food stays fresh for days.
Silicone bags are another good call for freezer stuff. They squish down, clean up pretty well, and don’t hog space.
How can I label my meal prep containers in a way that even a forgetful fish would remember what's inside?
Removable labels are your friend. Write the meal name, prep date, and when you should eat it by—big, clear letters with a permanent marker.
Color-coding helps too. Green for salads, red for meats, blue for breakfast—whatever makes sense to you.
Honestly, plain masking tape works great if you’re not feeling fancy. It sticks, comes off clean, and doesn’t cost much.
If you meal prep a lot, a label maker is worth it. The tags don’t smudge and look sharp.
Can you give me the 411 on creating an Instagram-worthy fridge layout that maximizes freshness and convenience?
I like to use the fridge’s temperature zones. Upper shelves are good for grab-and-go meals and leftovers, around 38-40°F.
Keep meal prep containers on the lower shelves where it’s coldest—35-38°F. Dairy and anything fresh last longer down there.
Clear bins make grouping easy. Toss all the breakfast stuff in one, dinner in another. It’s not rocket science, but it helps.
Steer clear of the fridge door for meal prep containers—it’s too warm. Stick to condiments and sauces there.
What portion sizes should I be aiming for if my fitness goals are giving Mo Farah a run for his money?
If you’re active, shoot for 6-8 oz of lean protein per meal—think two decks of cards stacked together.
Carbs? About 1 to 1.5 cups of the good stuff like brown rice or quinoa, depending on how much fuel you need.
Half your container should be non-starchy veggies. That’s where you get your fiber and nutrients without overdoing the calories.
Don’t forget 1-2 tablespoons of healthy fats—avocado, nuts, whatever you like. They help you actually feel full.
Is it better to go full Marie Kondo on my meal prep, or will a little organized chaos not spoil the broth (or the Bolognese)?
Honestly, consistency matters more than perfection. A simple system you’ll stick with beats some elaborate setup you’ll ditch after a week.
Start basic—group similar stuff, use clear containers, label what matters. You can always tweak things later if you get the urge.
Find what actually fits your style. If you love order, go for neat labels and perfect rows. If you’re more laid-back, just keep an eye on food safety and dates. The rest? Up to you.
Got any clever hacks to prevent my meal prep from turning into a game of Tupperware Jenga every time I open my fridge?
Honestly? Stackable containers with the same footprint are a lifesaver. They build these neat, stable towers—no more risky maneuvers just to grab one from the middle.
Try fridge bins for the smaller stuff. Toss all those little containers in, and when you need something from the back, just slide the whole bin out. Way less chaos.
Put your heaviest meals or leftovers on the bottom, then stack the lighter ones up top. Makes sense, right? Gravity’s on your side for once.
And hey, don’t cram every last inch. Leaving a bit of space between stacks makes it way easier to snag what you need without triggering a plastic avalanche.
Share:
Stackable Storage Bins: The Best Ways to Use Them in Every Room
Vertical Storage Hacks: Use Walls, Doors, and Inside-Cabinet Space