
Check out our latest home & kitchen collection!
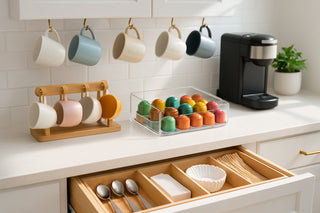
Creating a dedicated coffee station can turn those groggy mornings into something almost enjoyable. Instead of stumbling around the kitchen hunting for pods, your favorite mug, and that elusive sugar dispenser, you can keep everything in one spot.
The key to a good coffee station? Place it near outlets, use smart storage like drawer inserts for pods, and organize mugs for easy access while keeping things tidy.
We've all been there—standing in the kitchen at 6 AM, half-awake, digging through cabinets for coffee supplies. The difference between a chaotic scramble and a smooth coffee routine really comes down to having the right setup.
Whether your kitchen is huge or just a nook, the same ideas apply: give everything a home, use vertical storage, and keep daily essentials close by.
The best part about designing your own coffee station? You don't need to remodel or spend a fortune. With some planning—think mug storage, pod organization, and a few simple drawer inserts—you can create a setup that saves time and maybe even makes your morning coffee feel like a tiny luxury instead of a rushed necessity.
Key Takeaways
- Put your coffee station near outlets and water for convenience.
- Use drawer inserts, vertical storage, and containers to keep mugs, pods, and supplies organized and handy.
- A little maintenance and the right storage will make your gear last and keep your station looking good.
Choosing the Perfect Location for Your Coffee Station
Your coffee station's success really depends on where you put it. Easy access to outlets, enough space for your gear, and a spot that fits into your routine—these things matter. Even the tiniest corner can work as a coffee bar if you pick the right spot.
Finding the Right Spot in Your Home
Kitchen counter corners are the classic choice for a coffee station, and honestly, it's hard to beat. They're close to your usual kitchen workflow and usually near outlets. Claim a dedicated corner instead of letting coffee stuff take over your main prep space.
Your kitchen's layout matters. L-shaped kitchens often have natural corners for a coffee setup. Galley kitchens might need a mobile cart. U-shaped kitchens give you a few options along the perimeter.
Some good spots:
- Kitchen counter corners
- Breakfast nooks
- Dining room console tables
- Pantry alcoves
- Living room side tables
Try to avoid high-traffic zones where people will bump into your setup. Making coffee should feel calm, not like dodging elbows.
Test your chosen spot for a few days. Do you naturally go there in the morning, or does it feel awkward? Trust your routine.
Considering Power and Water Access
Outlets are a must for most coffee stations. Coffee makers, grinders, and kettles all need power. Measure your equipment's cords before you commit to a location.
Power needs:
- Coffee maker: usually needs its own outlet
- Grinder: can share if not used at the same time
- Kettle: standard 120V outlet
- Pod machines: often have short cords
Being near the sink helps a lot—filling water tanks and cleaning up is just easier. If you drink a lot of coffee, you'll really notice the difference.
Extension cords work in a pinch, but they look messy and can be unsafe. Built-in outlets or a tidy power strip are better long-term solutions.
If you're going all-in on a permanent coffee corner, adding an outlet might be worth it. It saves hassle and keeps cords out of sight.
Maximizing Use of Small or Unused Spaces
Small homes need creative solutions. People have made fantastic coffee stations in hallway niches, on stair landings, or even in old closets.
Space-saving ideas:
- Wall shelves with a fold-down worktop
- Rolling carts that fit in tight spots
- Repurposed armoires or cabinets
- Over-the-sink cutting boards as a temporary counter
Use vertical space—floating shelves above your station hold mugs and a few decorative touches. Under-cabinet hooks let you hang mugs and free up the counter.
Look for unused corners: that odd spot beside the fridge or the narrow gap between cabinets might fit a slim cart.
Mobile carts are great in small spaces. Wheel them out for coffee, then tuck them away when you need the space for something else.
Essential Equipment and Must-Have Accessories
A functional coffee station starts with picking the right brewing gear and accessories. Match your coffee habits with equipment that fits your space and budget.
Selecting a Coffee Maker or Espresso Machine
Think about your brewing style and how much coffee you drink. Drip coffee makers are best for brewing multiple cups, and programmable ones are a lifesaver on busy mornings.
Espresso machines come in three main types. Manual machines give you total control but take practice. Semi-automatics balance control and convenience. Super-automatics do everything for you, from grinding beans to frothing milk.
Espresso machines usually need 12-18 inches of counter depth and enough space to remove the water tank.
Budget-wise:
- Basic drip makers: $30-100
- Entry-level espresso: $200-500
- Pro espresso equipment: $1000+
Keep in mind, espresso machines need regular descaling and sometimes repairs. Drip makers are usually lower maintenance—just keep them clean.
French Press, and Cold Brew Options
French press brewing is simple and flavorful. All you need is coarse-ground coffee and hot water. Four minutes later, you've got rich coffee. Glass ones look classy but break easily; stainless steel is tougher.
Cold brew takes patience, but the result is smooth, low-acid coffee concentrate. You can use special cold brew makers or just a mason jar with a mesh filter. Let it steep 12-24 hours, and you've got concentrate for up to two weeks in the fridge.
Each method fits a different lifestyle. French press for flavor lovers, cold brew for summer or sensitive stomachs.
Enhancing Your Setup With a Grinder, Kettle, and Milk Frother
Coffee grinders make a huge difference. Burr grinders give you even grounds; blade grinders are cheaper but less consistent. Grind beans right before brewing for the best flavor. Electric burr grinders run $100-300 but really up your coffee game.
Electric kettles with temp control let you fine-tune your brew. Light roasts like hotter water, dark roasts a bit cooler. Gooseneck spouts help with pour-over.
Milk frothers add that café touch. Handheld ones are under $20 and fine for occasional use. Espresso machines with steam wands make the best microfoam. Electric frothers are a good middle ground.
You don't need everything at once—build your setup as you go, and you'll figure out what matters most to you.
Organizing Your Coffee Mugs Like a Pro
Good mug organization turns cluttered cabinets into something functional—and maybe even fun to look at. The right solution depends on your space, how many mugs you own, and your daily habits.
Displaying Mugs With Racks, Hooks, or Floating Shelves
Mug racks are super space-efficient for the counter. Bamboo or wood racks that hold 6-8 mugs don't take up much room.
Under-cabinet hooks are great for using vertical space. Install them under upper cabinets so your favorite mugs are right there. This works especially well above your coffee maker.
Floating shelves look great and keep mugs handy. Mount them 12-18 inches apart for different mug heights. Group mugs by color or size for a more put-together look.
Open shelving is best if your mugs match. Put your prettiest mugs at eye level, with everyday ones below.
Pro tip: store mugs on top shelves and hang favorites underneath for double the storage.
Choosing the Right Mugs for Your Coffee Ritual
Your mug affects both storage and how much you enjoy your coffee. Ceramic mugs keep coffee warm longer and stack easily. Glass mugs look fancy but need gentle handling.
Think about size—standard 8-12 oz mugs fit most racks and hooks. Oversized mugs need deeper shelves and sturdier hooks.
Match mugs to your brewing style. Espresso cups take up less space. Big travel mugs need their own spot.
Try to limit your collection: 2-3 mugs per person, plus a few guest mugs, is usually plenty. It keeps things organized and avoids clutter.
Mugs with similar handles hang better. Curved handles work well on hooks; angular ones, not so much.
Creative Ways to Store and Show Off Your Collection
Turn your mugs into decor with some creativity. Peg boards with removable hooks let you change up your display as your collection grows.
Use drawer inserts with individual slots for delicate or expensive mugs. Felt lining helps prevent chips and scratches.
Group mugs on floating shelves by color, size, or theme. It looks intentional and keeps things organized.
A vintage ladder makes a quirky mug rack—hang mugs from the rungs or add small shelves between steps.
A rotating lazy Susan in a corner cabinet helps you reach every mug, even the ones in the back.
Show off seasonal mugs on the main shelf and swap them out each month. Store the rest up high or in the back to keep your daily lineup fresh.
Storing Coffee Pods and Beans for Daily Convenience
Storing coffee supplies the right way keeps things organized, preserves freshness, and makes your morning easier. Drawer organizers, airtight containers, and smart placement help your pods and beans stay at their best.
Drawer Inserts and Organizers for Coffee Pods
Drawer organizers turn messy pod collections into neat, easy-to-grab setups. Adjustable dividers let you sort pods by flavor or brand—no more digging around half-asleep.
Some good options:
- Bamboo expandable dividers ($15-25)
- Plastic trays with compartments ($10-20)
- Custom-fit pod holders ($20-40)
Keep your organizer near the coffee maker. Label each section if you have lots of varieties—your future self will appreciate it.
Clear acrylic organizers let you see your pod stash at a glance, so you won't accidentally buy more than you need.
In small spaces, try tiered drawer inserts to use vertical space. They're perfect for deep drawers where single layers waste room.
Storing Beans for Freshness and Easy Access
Beans stay freshest away from light, heat, and moisture. Use airtight containers and keep them close to your grinder to make mornings easier.
Best containers:
- Vacuum-sealed canisters with CO2 valves
- Tinted glass jars with tight lids
- Food-grade plastic with rubber seals
Whole beans last longer than pre-ground. Grind right before brewing for the best flavor.
Keep your beans in a cool, dry cabinet—not on the counter near appliances or sunlight, which can ruin them quickly.
Write the date you open new beans on the container. Most beans taste best for 2-4 weeks after opening, so rotate your stock.
Smart Storage Solutions for Pods and Bean Variety
Managing lots of coffee types takes some planning. Group similar items and use vertical storage to make the most of your space.
Set up zones in your coffee bar:
| Zone | Items | Storage Method |
|---|---|---|
| Daily Use | Favorite pods, current bean bag | Counter-level drawer |
| Backup Stock | Extra pods, unopened beans | Upper cabinet bins |
| Specialty Items | Flavored varieties, decaf | Labeled containers |
Clear, stackable containers are great for bulk pods, especially if your family has different tastes or you love variety packs.
Deep cabinets? Try a pull-out drawer system to keep everything visible and easy to reach.
Magnetic containers stick to the fridge or a metal cabinet and work well for small amounts of different grinds. Just keep them away from heat.
Coffee Station Organization Hacks
A few clever tools can turn a cluttered coffee area into an efficient, space-saving brewing zone. These ideas help you use vertical space and keep essentials close at hand.
Lazy Susans and Tiered Trays for Maximizing Space
Lazy Susans just make life easier at coffee stations. Spin one and everything—coffee pods, sugar, syrups—slides right to you. Stick one in a corner, and you won't have to reach behind appliances anymore.
Tiered trays are a lifesaver in cramped spots. Go for a three-tier style: pods on top, sweeteners in the middle, stirrers at the bottom. Suddenly, you’ve got vertical space you didn’t know you had.
On coffee carts, tossing a lazy Susan on each shelf really bumps up storage. Coffee on one side, tea on the other—it’s simple, but it works.
Getting the size right matters. Measure first—most setups do best with a 12-inch lazy Susan. I like bamboo or acrylic since they don’t stain as easily as metal.
Corners are underrated. Place the lazy Susan so heavier stuff stays toward the back. That way, the platform won’t tip when you spin it.
Utilizing Baskets, Caddies, and Drawer Dividers
Drawer organizers stop your coffee gear from turning into a pile of chaos. Adjustable dividers let you carve out spots for spoons, filters, even cleaning brushes.
Wire baskets under cabinets are great for coffee pods and keep your counters open. Handles make it easy to pull them down when it’s time to refill.
Caddies are perfect for carrying your coffee fixings outside or to a guest room. I like wooden ones with dividers—nothing slides around, and they look good.
Deep drawers? Expandable organizers with lots of compartments help:
- Front: Scoops and stirrers you grab every day
- Middle: Coffee pods, tea bags
- Back: Extra supplies and cleaning stuff
Mesh beats solid plastic for organizers—coffee grounds fall through instead of collecting in corners.
Open Shelving and Display Ideas
Open shelves show off your mug collection and keep everything handy. Arrange by size or color—tall mugs in the back, short in the front. It’s a small thing, but it looks great.
Floating shelves above your coffee maker use up that blank wall. Install them about 18 inches apart so you can fit any mug. I like sticking a little LED strip underneath—makes it feel cozy.
Coffee storage can double as decor. Glass canisters with different beans look sharp and keep things fresh.
Wall-mounted racks with hooks save shelf space and show off your mugs. I lean toward ones with a small shelf on top for extra accessories.
Odd numbers just look better. Three canisters beat two or four every time. Mixing textures—ceramic with woven baskets, say—keeps things interesting.
Keep what you use most at eye level. Higher shelves are for those special mugs you only break out sometimes.
Styling and Personalizing Your Coffee Station
A coffee station should feel like yours, not just another corner of the kitchen. Add your personality, find that sweet spot between style and function, and don’t be afraid to try something a little different. It’s your ritual, after all.
Adding Personal Touches for a Cozy Vibe
Show off mugs that mean something. Line up favorites from trips, gifts, or local shops on your shelves or hooks.
Make a custom coffee menu—chalkboard or framed print, whatever suits you. List go-to drinks, seasonal specials, or just a quote that makes you smile.
Family photos or little pieces of art near your coffee setup add warmth. Even one or two frames can make it feel more like home.
Switch up seasonal decorations—a tiny pumpkin in fall, fresh flowers in spring, a candle when it’s chilly.
Pick out accessories in colors you love. Whether you’re into earth tones, bright shades, or classic black and white, it all adds up.
Handwritten labels on jars or bins give the space some personality and help you remember what’s what.
Blending Style With Functionality
Pick storage that looks good and works hard. Glass canisters, nice trays, drawer organizers—they keep things neat and look intentional.
Go for a cohesive material mix: wood and metal, glass and ceramic. It keeps the look unified and makes sure every piece earns its keep.
Keep daily stuff—mugs, pods—within reach. Stash backups in drawers or cabinets to avoid clutter.
If your coffee spot’s in a dark corner, add some light. Under-cabinet LEDs or a small pendant lamp make a big difference.
Use your walls. Floating shelves or wall storage clear the counter and add display space.
Invest in basics you’ll love for years: a coffee maker that fits your style, matching mugs, coordinated containers.
Inspiration for Unique Coffee Station Ideas
Try a coffee cart. A rolling cart means you can move your setup wherever you want. Cleaning’s easier, too.
Turn a forgotten corner into a coffee nook. Add a shelf, some lighting, and you’ve got a cozy spot—even if space is tight.
Convert a closet into a coffee pantry. Shelves for supplies, a little counter for the machine—it keeps everything tucked away.
Repurpose a vintage cabinet or hutch. It adds character and gives you tons of storage.
Build your coffee station into a kitchen island or peninsula. Hidden storage, clean lines, everything in one spot.
If counter space is precious, mount shelves and hooks on the wall. It’s a smart way to go vertical, especially in small kitchens.
Maintenance and Equipment Longevity
Keeping your coffee station humming means regular cleaning and a little planning. A quick wipe here, a descaling routine there, and your gear will last way longer. It’s worth the effort—repairs aren’t cheap, and nobody wants to drink coffee from a grimy machine.
Descaling and Cleaning Your Machines
Descale every 1-3 months, depending on your water and how much coffee you make. If you live somewhere with hard water, you’ll need to do it more often—mineral buildup is no joke.
Skip the vinegar and use descaling solutions your machine’s maker recommends. They dissolve limescale better and won’t leave weird tastes behind.
Wipe down steam wands right after you use them to stop milk from getting crusty. Empty and rinse drip trays daily so you don’t get mold or funky smells.
Pod machines need their water tank cleaned weekly with warm soapy water. Give the brewing chamber a quick wipe too—coffee oils build up fast.
| Cleaning Task | Frequency | Time Required |
|---|---|---|
| Steam wand cleaning | After each use | 30 seconds |
| Drip tray emptying | Daily | 2 minutes |
| Water reservoir cleaning | Weekly | 5 minutes |
| Full descaling cycle | 1-3 months | 30-45 minutes |
Keeping Accessories and Storage Areas Fresh
Wash your coffee containers every month so old oils don’t spoil new beans. Warm soapy water and a good dry before refilling do the trick.
Pull out drawer inserts weekly and clean them—most plastic ones can go in the dishwasher.
Dust and moisture collect around mugs, so wipe down shelves weekly. Make sure your coffee station isn’t boxed in—good airflow keeps humidity down.
Change water filters as directed, usually every 2-3 months. Old filters can actually make your water worse, which nobody wants.
Tips for Long-Term Care and Maintenance
Use filtered water if you can. It keeps minerals from building up and can double the time between descales.
Keep your coffee station away from windows and heat. Sunlight messes with plastics, and too much heat warps gaskets.
Set reminders for cleaning and maintenance—your phone or a calendar works. Staying on top of it stops little problems from turning into big ones.
Store cleaning supplies right by your coffee setup. If it’s easy, you’ll actually do it.
Swap out worn seals or gaskets as soon as you notice them. Spending a few bucks now can save a lot of hassle (and money) down the road.
Frequently Asked Questions
Small spaces call for clever storage and a bit of creativity. Here are some ideas I’ve found handy for keeping coffee stations tidy and stylish, even when space is tight.
What are some creative ways to store coffee mugs in a small coffee station area?
Wall-mounted mug racks free up counter space and show off your favorite cups. A floating shelf above your coffee maker can hold a bunch of mugs without crowding below.
Under-cabinet hooks are perfect for everyday mugs. Adhesive cup holders stick under cabinets and stay out of sight until you need them.
A tiered mug tree fits nicely in corners and stacks mugs vertically. Some even have storage baskets at the base for extra odds and ends.
Can you suggest some DIY ideas for organizing K-Cups in a compact space?
Mason jars hold about a dozen K-Cups each and look good lined up on a shelf or tray. Label them by coffee type for easy grabbing.
Try a spice rack for K-Cups—just swap in clear containers and mount it near your machine.
A lazy Susan plus small baskets makes a rotating K-Cup organizer. It keeps flavors sorted and doesn’t hog the counter.
What's the best way to incorporate a coffee pod drawer insert into a coffee station?
Pick inserts with adjustable compartments so you can fit any pod size. Measure your drawer first—most need at least three inches of depth.
Put the insert in the drawer closest to your coffee maker. That way, you can go from pod to brew in one smooth move.
Removable dividers are a bonus—some pods are bigger than others, and it’s nice to have options.
How can I set up an attractive yet functional coffee bar in a limited space?
Use a tray to mark off your coffee station and keep everything together. A 12x16 inch tray usually fits a single-serve machine and the basics.
Go vertical with tiered shelves or risers. Coffee maker on the bottom, storage up top.
Look for double-duty pieces like ottomans or servers with drawers. They give you a surface up top and storage underneath.
Are there any clever coffee organizer hacks for countertops that don't sacrifice style?
Vintage canisters hide storage and add a little charm. Matching sets for coffee, sugar, and creamer keep things looking pulled together.
Wooden bead garlands soften the look of appliances and add texture. Wrap them around your coffee gear for a cozy vibe.
A small wooden tray keeps daily essentials—sweeteners, stirrers—corralled. Pick one that fits your kitchen’s colors for a nice finishing touch.
Could you share some unique K-Cup holder options for tight spaces that add a bit of character?
Vintage-style coffee pod houses look a bit like mini barns—kind of quirky, honestly—and they’ll stash about 20-30 K-Cups. They bring a cozy, farmhouse vibe and keep your pods right where you need them.
If you’re into that urban café feel, galvanized metal containers with chalkboard labels might be your thing. Just scribble the flavors on with chalk, and you’re set. Easy to update, and they look cool sitting on the counter.
Multi-tier wire baskets? Those are a life-saver for small counters. They stack up, swing out, and let you see all your options at a glance. You’ll fit a surprising number of pods in just a tiny spot.