

Check out our latest compact vacuum sealer for food collection!
Weekly meal prep sounds amazing, until you open a container on Thursday and discover limp greens, mushy grains, or chicken that’s just… meh. We’ve all been there. But honestly, keeping food fresh all week isn’t about fancy gadgets or luck.
Here’s the real secret: choose ingredients that last, use smart cooling and storage, and keep components separate until you’re ready to eat. When we combine sturdy produce with airtight containers and a little strategy, our Sunday prep actually delivers meals that taste good all week. It’s not rocket science, but you do need to know which veggies won’t wilt, how to cool proteins fast, and why moisture is the enemy.
Let’s get real about the little things that make meal prep work. From picking root veggies over tender lettuce to remembering not to trap steam in a sealed container, these small tweaks can save your sanity. Ready to actually enjoy your prepped meals on Friday? Let’s get into it.
Key Takeaways
- Go for hearty ingredients like root veggies, whole grains, and properly cooked proteins, they hold up way better in the fridge than delicate greens
- Cool food fast before refrigerating, and store each part in its own airtight container to keep moisture and bacteria at bay
- Always keep sauces and dressings separate, and use compartments to keep textures crisp and fresh
Choosing the Freshest Ingredients
Starting with the best ingredients gives us a head start. What we grab at the store decides if our food’s still good by Thursday.
Evaluating Produce Quality at the Store
We hunt for produce that’s firm, colorful, and free of soft spots or bruising. Leafy greens should snap, not droop, and the color should be deep—no yellowing edges.
Root veggies like carrots and beets? They should feel solid, not light or shriveled. Smooth skins with no sprouts are a good sign.
Berries are tricky. We always check the bottom of the container for mold or leaks and skip any with squished fruit.
Citrus should feel heavy (that means juicy) and have tight skin that bounces back when pressed. Tomatoes? They should give a little but not feel mushy.
Quick freshness checklist:
- Bright color
- Firm, not squishy
- Smells fresh (not funky)
- No mold or excess water
- Stems and leaves intact if present
Selecting Lean Proteins and Healthy Fats
Fresh meat looks bright—red for beef, pale pink for pork. Packaging should be cold, sealed, and not swimming in liquid.
Fish should smell like the ocean, not like, well, fish. The flesh should be shiny and spring back when pressed.
For healthy fats, we grab nuts and seeds from the fridge section if possible. Oils go bad faster at room temp. Avocados should be firm with just a tiny bit of give; they’ll ripen through the week.
Whole grains like quinoa and brown rice keep best from stores with a lot of turnover. We check for recent dates and pick grains that look clean and whole.
Understanding Expiration Dates and Seasonality
Sell-by dates are for stores, not us. For proteins and dairy, we stick to use-by dates and make sure there’s enough time to eat them safely.
Seasonal produce tastes better and keeps longer since it hasn’t traveled as far. We try to plan our meals around what’s in season—berries in summer, root veggies in winter.
Shopping early in the week usually means fresher stock. Weekend shopping sometimes means we’re getting what’s left over.
For proteins, we check packaging dates and pick the freshest. Frozen options are a solid backup if the fresh stuff looks sketchy.
Strategic Meal Planning for Lasting Freshness
How we plan meals affects how long our food stays fresh—and whether we actually want to eat it. The trick is scheduling meals by how long ingredients last, batch-cooking basics, and mixing up proteins and veggies through the week.
Building a Balanced Weekly Meal Prep Schedule
We plan to eat the most fragile stuff first—think delicate greens or fish on Monday and Tuesday. Hardier foods like root veggies or chicken can wait until later.
Instead of assembling everything at once, we keep salad fixings separate: greens with a paper towel, dressing on the side. That way, nothing gets soggy.
Here’s how a typical week might look:
Days 1-2: Seafood, tender greens, fresh herbs
Days 3-4: Chicken, bell peppers, broccoli
Days 5-7: Beef or pork, carrots, cabbage, sturdy grains
We also build in flex nights for eating out or leftovers, so we don’t end up with too much food.
Batch Cooking With Prepped Ingredients
Batch cooking is a lifesaver. We make big batches of proteins, grains, and roasted veggies, then mix and match all week. No need to assemble every meal in advance.
Plain grilled chicken works for salads, bowls, wraps, or pasta—just change up the sauces. Same with a big pot of rice, quinoa, or roasted sweet potatoes.
Some go-tos:
- Proteins: Baked chicken thighs, hard-boiled eggs, ground turkey
- Grains: Rice, quinoa, farro
- Veggies: Roasted brussels sprouts, steamed broccoli, sautéed peppers
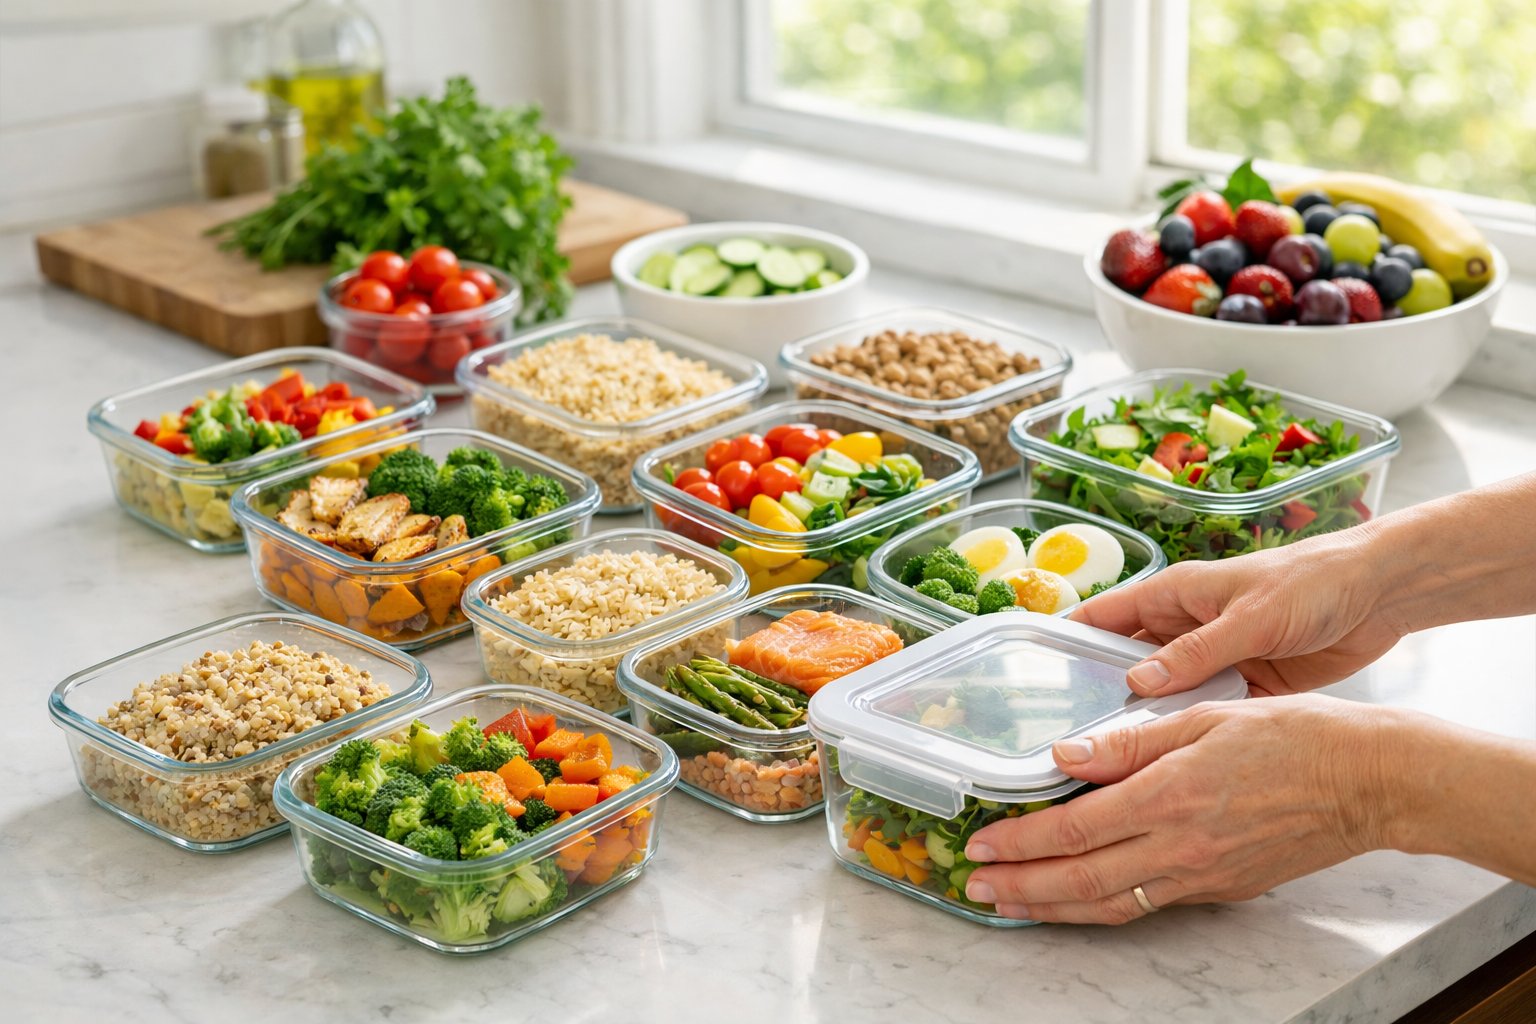
We store everything in separate containers. This keeps stuff fresher since it’s not soaking in sauces or getting mushy from wet veggies. When it’s time to eat, we just build our meal.
Incorporating Variety to Prevent Spoilage
Mixing things up keeps us from getting bored and helps us use up ingredients before they go bad. We rotate proteins, veggies, and flavors every week.
If we buy cilantro for tacos, we’ll plan a Thai dish or curry later in the week to use it up. This way, nothing dies a slow death in the crisper.
Sometimes, we do a mid-week shop for delicate stuff like berries or asparagus. Yeah, it’s another trip, but the payoff is fresher meals at the end of the week.
We also plan one or two “flex” meals—stir-fry or grain bowls—where anything that’s starting to wilt can get tossed in.
Optimal Food Preparation Techniques
How we prep ingredients makes a big difference in how long they last. Washing, cutting, and handling proteins carefully sets us up for a week of fresh meals.
Proper Washing and Drying Methods
We want to clean veggies and fruit without drowning them. For hard veggies like carrots and peppers, we rinse under cold water and dry them completely with a towel right away. Any leftover moisture just speeds up spoilage.
Leafy greens get a soak in cold water, then a spin in the salad spinner to get every drop off.
For berries and delicate stuff:
- Wait to wash until just before eating—otherwise, they turn mushy or moldy
- If we have to wash ahead, we dry them on paper towels and store in lined containers
Root veggies with dirt? Just wipe them off with a damp cloth instead of soaking.
Chopping and Portioning for Storage
How we cut things matters. Bigger pieces stay fresher than tiny ones. We aim for even cuts, but don’t go overboard—too much surface area dries stuff out.
Quick tips:
- Hard veggies (broccoli, carrots): Cut a few days ahead, store airtight
- Softer veggies (zucchini, mushrooms, tomatoes): Prep closer to when you’ll use them
- Herbs: Keep whole on stems wrapped in a damp towel, or chop and freeze in oil
We portion proteins and grains as soon as they’re cooked. This keeps us from opening the whole batch over and over, which just invites bacteria and staleness. Plus, single portions are easier to reheat.
Marinating Proteins for Extended Shelf Life
Marinating adds flavor and helps proteins last longer. Acids like lemon juice or vinegar slow down bacteria, and oil keeps things moist.
Chicken and pork can marinate for 4-24 hours in the fridge. Fish needs less—30 minutes to 2 hours. Beef (especially tough cuts) can hang out in marinade for up to two days.
A few safety notes:
- Always marinate in the fridge, not on the counter
- Use glass or food-grade plastic containers
- Toss any marinade that touched raw meat unless you boil it first
- If you want to baste, set aside some clean marinade at the start
Avoid marinating in metal—it can mess with the flavor. After marinating, drain off extra liquid before cooking for better browning. Cooked, marinated proteins usually stay fresh for 3-4 days.
Selecting the Right Meal Prep Containers
Containers can make or break your meal prep. The right material, a tight seal, and freezer compatibility all help your food last and save you hassle.
Glass Versus Plastic Containers
Glass is tough, doesn’t leach chemicals, and you can microwave or even bake in it. It stays clear, so you always know what’s inside.
BPA-free plastic is lighter and less likely to break—good for taking lunch to work. The downside? It can stain or hold onto odors over time.
We usually avoid microwaving plastic, even if it says it’s safe. Glass lasts longer and keeps food tasting fresher. Clear lids (on either material) make it easy to spot what needs eating.
Using Airtight and Freezer-Safe Storage
Airtight containers keep oxygen and bacteria out, so your food stays fresh longer. Lids with silicone gaskets are best—they really seal things up and stop leaks.
For freezing, we check that both the container and lid can handle cold without cracking. Freezer-safe glass is thicker and less likely to shatter.
Stackable containers save fridge and freezer space. Uniform shapes make them easier to stack, and clear lids help us see what’s inside without playing fridge Jenga.
Benefits of Reusable Silicone Bags
Reusable silicone bags give you a flexible option when you don’t need rigid containers or fancy dividers. They collapse totally flat when empty, which is a relief if your drawers and cabinets are already overflowing.
These bags are great for chopped veggies, marinated proteins, and cooked grains. Most are freezer- and microwave-safe, but it’s worth double-checking the fine print. Silicone doesn’t cling to odors or stains like plastic bags do, which is a small miracle if you’ve ever tried to scrub out spaghetti sauce.
You can jot dates and contents right on many silicone bags with a dry-erase marker—super handy for tracking what’s what. They seal up tight, whether it’s a zip or fold-over closure, so air stays out. Sure, you’ll pay more upfront, but you won’t have to keep buying single-use freezer bags every month.
Proven Storage Solutions for Maximum Freshness
How you organize the fridge and choose containers can seriously extend freshness and make meal prep less of a hassle. The right setup, smart use of crisper drawers, and a simple rotation system go a long way toward cutting waste.
Mastering Refrigerator Organization
Turns out, fridge zones matter more than you’d think. The top shelf stays the most consistent, so we stash leftovers and ready-to-eat stuff up there. Middle shelves are ideal for dairy and eggs, since they’re better off away from temperature swings.
And about the fridge door? It’s actually the warmest place, so we’ve stopped putting milk or eggs there. Now it’s just for condiments, hot sauces, and anything that won’t freak out if it gets a little warmer.
Temperature placement guide:
- Top shelf: Prepped proteins and ready-to-eat meals (35-38°F)
- Middle shelves: Dairy products and marinades (36-40°F)
- Bottom shelf: Raw meats in sealed containers (32-34°F)
- Door: Condiments and stable items only (40-45°F)
We always keep raw stuff on the bottom shelf, just in case of leaks. Glass containers with tight lids are a favorite—they stack well and don’t waste space.
Crisper Drawer and Shallow Container Strategies
Crisper drawers can triple the shelf life of produce if you use them right. We set one to high humidity for leafy greens and herbs, and the other to low for fruits and veggies that rot faster.
Shallow containers (nothing deeper than 3 inches) work better than deep ones. Food cools faster, which is safer, and you can actually see what you’ve got—no more digging through a tower of containers.
For veggies, we line the bottom with paper towels to soak up extra moisture. Herbs last up to two weeks if you stand them upright in a shallow container with a damp towel at the base. Berries? They last way longer unwashed in shallow, ventilated containers.
FIFO Method and Labeling for Easy Access
The FIFO method (first in, first out) keeps older ingredients front and center so they get used first. We put new stuff behind the old, making it easy to see what’s next in line.
Every container gets a label with contents and prep date—just masking tape and a marker, or a dry-erase note on a glass lid. This habit has cut our food waste by nearly 40%. Most prepped veggies last 3-5 days, cooked grains 4-6 days, and proteins 3-4 days if you store them right.
Quick reference shelf life guide:
| Ingredient Type | Refrigerated Shelf Life | Storage Guidelines |
|---|---|---|
| Chopped vegetables | 3-5 days | Shallow containers with paper towels |
| Cooked grains | 4-6 days | Airtight containers, cooled quickly |
| Cooked proteins | 3-4 days | Separate from sauces until serving |
| Fresh herbs | 10-14 days | Upright in water or damp towels |
| Leafy greens | 5-7 days | High humidity drawer, unwashed |
We keep the most perishable stuff at eye level so it doesn’t get lost and turn into a science project.
Freezer Tactics to Prevent Spoilage
A well-organized freezer takes meal prep from a random experiment to a system that actually works. The difference between mushy veggies and food you want to eat? It comes down to cooling food right, avoiding freezer burn, and knowing how to thaw things without wrecking them.
Safe Cooling and Freezer Prep Methods
We never toss hot food straight into the freezer—it’ll warm everything up and create nasty ice crystals. Instead, we let food cool at room temp for 30–60 minutes (max!), then split big batches into shallow containers so they chill faster. Once it’s room temp, we move it to the fridge for an hour before freezing.
For veggies, blanching is a must. We boil or steam them briefly, dunk them in ice water, then drain and pat them dry. This stops enzymes that break down flavor and texture, plus it helps avoid ice buildup.
We label everything before it hits the freezer—contents and date, every time. Masking tape and a Sharpie do the trick, or just write on the bag if it’ll stick.
Preventing Freezer Burn
Freezer burn is just air stealing moisture from your food, leaving weird gray patches and that cardboard taste. Not dangerous, but not delicious.
We squeeze out as much air as possible—either by hand or using the water displacement trick (lower the bag into water to push out air, then seal it). Vacuum sealers are awesome for big batch projects.
For long-term storage, we double-wrap things like meat or baked goods: plastic wrap first, then into a freezer bag or foil. It’s an extra shield against temperature swings.
Freezer should stay at 0°F or below. We check with a cheap thermometer once a month, since temp swings can ruin food without you noticing.
Thawing and Reheating Best Practices
Safest way to thaw? Pop frozen food in the fridge overnight, on a plate on the bottom shelf. Most things need about 24 hours.
If you’re in a hurry, sealed bags in a bowl of cold water work—swap the water every 30 minutes. This is great for veggies, grains, and smaller proteins.
Microwave defrosting is a last resort. If we have to, we use the defrost setting, check every minute, and stir or rotate as needed to avoid weird hot spots.
When reheating, food needs to hit 165°F for safety. We do soups and stews on the stove, stirring now and then, and casseroles or baked stuff in the oven at 350°F, covered with foil. Cooked grains go straight from freezer to microwave with a splash of water to help revive them.
Essential Kitchen Tools for Fresh Meal Prep
Having the right tools can turn meal prep from a drag into something you might actually look forward to. You want gear that makes prep quick and keeps food fresh all week.
Must-Have Tools for Food Prep
Sharp knives are key. Dull blades just crush veggies and make them spoil faster. A good chef’s knife and a paring knife cover most jobs.
Airtight containers with locking lids keep moisture and air out. We prefer glass—they don’t stain, don’t hold smells, and you can see what’s inside without opening. We keep a range of sizes, from tiny for dressings to big ones for grains.
A salad spinner is a must for drying greens so they don’t turn to mush. Produce storage bags with adjustable vents help too—just tweak the airflow for whatever you’re storing.
Labeling and Portioning Essentials
Masking tape and a marker save you from mystery leftovers. We write contents and dates on everything, because even the freshest food won’t last forever.
Measuring cups, kitchen scales, and divided containers help with portioning. If you split things up right away, you’re not constantly opening containers and letting in air. A scale is especially handy for proteins—divide chicken or ground meat into 4-ounce servings and you’re set.
We save plastic wrap for emergencies and use silicone lids or beeswax wraps when we can. Herbs get the flower treatment: trim the stems, stand them in water in a jar, and cover loosely with a produce bag.
Frequently Asked Questions
Getting storage right makes the difference between meals you actually want to eat and sad, wilted leftovers. Containers, temperature, and timing all matter more than you’d think.
What's the secret to keeping your meal prep as fresh as your culinary ambitions?
Honestly, timing is everything. We keep wet and dry ingredients separate until it’s time to eat, and we chill things down fast after cooking.
We always get cooked food to room temp within two hours, then into the fridge at 40°F or below. That keeps bacteria at bay and preserves texture.
Portioning into individual servings helps a ton—smaller portions cool faster and you’re not exposing the whole batch to temperature swings every time you grab a meal.
Any clever hacks for making meal-prep ingredients last beyond the standard expiration date dance?
We put the most perishable stuff toward the back of the fridge where it’s coldest. The door stays for condiments and stable items.
Wrapping leafy greens in paper towels before storing absorbs moisture and keeps them from wilting. We’ve kept spinach and lettuce fresh for days longer with this trick.
For herbs, we treat them like flowers: trim the stems, stand them in a jar with an inch of water, and loosely cover with a plastic bag. They’ll last up to two weeks this way.
Can you spill the beans on the best types of containers to keep our meal prep on point?
Glass containers win, hands down. They don’t stain, don’t hold smells, and go from freezer to microwave without any drama.
We look for airtight silicone or rubber seals—they keep air and moisture out, which means no freezer burn and no weird fridge smells.
BPA-free plastic containers are fine for room temp or for taking meals on the go, but we make sure they’re microwave-safe before reheating.
What's the scoop on maximizing flavor in meal prep dishes throughout the week?
We hold off on adding fresh herbs or lemon juice until we’re ready to eat. They lose their punch if they sit too long and can even make things soggy.
Seasoning proteins lightly during prep, then adding more flavor right before eating, keeps things interesting. Grilled chicken gets salt and pepper at first, then garlic or hot sauce later.
We always keep sauces and dressings separate—no one wants a soggy salad by Thursday. Pour them on just before eating for best results.
Could you enlighten us on the art of freezing meal preps without compromising on taste?
We freeze meals in single portions so we’re not tempted to thaw and refreeze. This keeps texture intact and avoids ice crystals.
Getting all the air out of containers or bags is key. We press out as much as we can, or use the water trick for bags.
Most cooked meals are good in the freezer for two to three months. We label everything with the date and what’s inside, because, honestly, even we can’t tell what’s in that mystery container after a few weeks.
How about sharing tips on arranging our fridges to keep those prepped ingredients vibrant and full of life?
At home, we carve out zones in the fridge for different foods. Raw proteins always land on the bottom shelf, nobody wants chicken juice dripping on their salad, right? Ready-to-eat stuff gets the upper shelves, where temps tend to stay steady.
Those crisper drawers actually matter. We stash leafy greens and herbs in the high-humidity drawer, and toss ethylene-producing fruits or veggies, like apples or peppers, into the low-humidity one. Makes a difference, surprisingly.
If the fridge feels packed, we try to pull back a bit. Letting air move around keeps things cold and safe, and nobody wants to play fridge Tetris every time they open the door. Just a little space between containers goes a long way to keep everything fresh.
Share:
A Guide to Minimizing Food Waste Through Smarter Storage Habits
A Guide to Minimizing Food Waste Through Smarter Storage Habits