

Check out our latest compact vacuum sealer for food collection!
Proper cheese storage can feel like a mystery, but honestly, it’s not rocket science. We’ve all opened the fridge and found that pricey wedge looking sad, sweaty, dried out, or somehow tasting like last night’s garlic pasta. Cheese is a living thing, and it needs a little TLC to stay at its best.
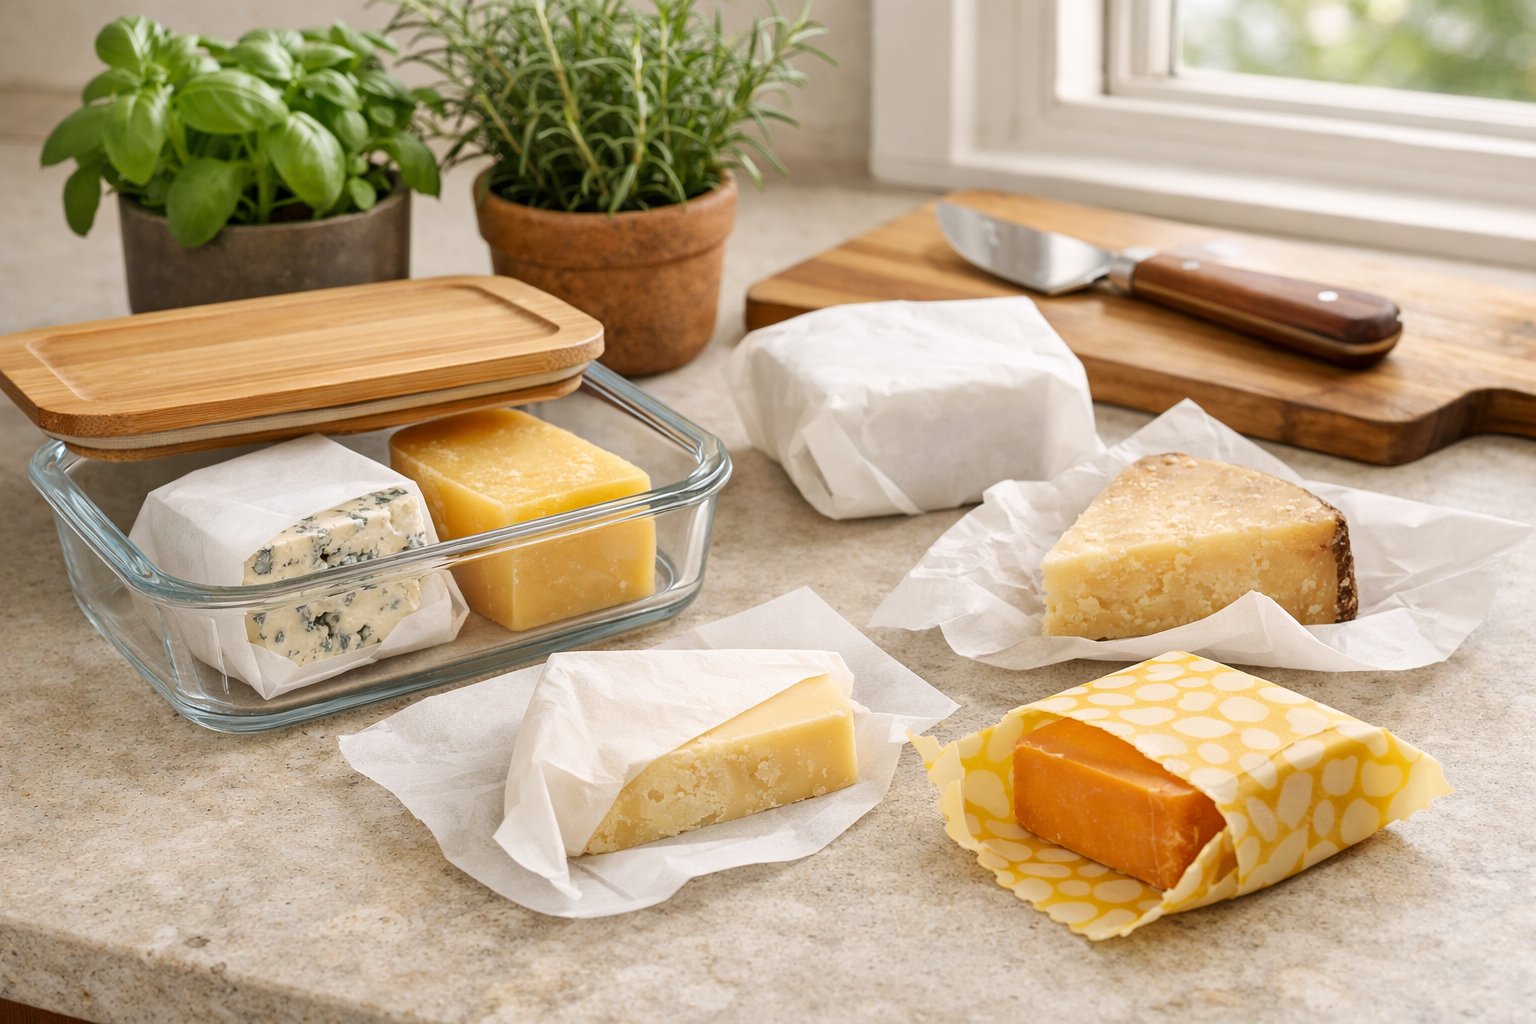
The trick to stopping cheese from sweating, drying out, or picking up weird fridge smells? Wrap it in cheese paper or parchment and stash it in your fridge’s veggie drawer, where the humidity’s just right. Plastic wrap just suffocates cheese and traps too much moisture, which leads to that greasy, slimy mess nobody wants. With the right wrapping, cheese can breathe but won’t turn into a brick.
Let’s get into how to wrap different cheeses, where to put them in your fridge, and which containers actually work. These are the habits cheese pros swear by to keep cheese tasting and feeling like it should.
Key Takeaways
- Wrap cheese in cheese paper or parchment, then store it in your fridge’s vegetable drawer for proper humidity
- Hard cheeses can last months, but soft ones should be eaten within a week or two, each needs a slightly different storage style
- Skip plastic wrap, and use the right wrapping to avoid sweat, dryness, and fridge odors
Why Proper Cheese Storage Matters
Cheese storage isn’t just about keeping things cold. It’s about hanging onto the right moisture, keeping out weird flavors, and making sure the texture stays good.
What Happens When Cheese Isn't Stored Correctly
You ever pull out a chunk of cheddar and it’s all cracked, dry, or sporting some mystery mold? That’s what happens when cheese storage goes sideways.
When cheese sits in dry fridge air with no protection, it loses moisture fast. The outside hardens and cracks, and honestly, it’s just not pleasant to eat.
Cheese is also a bit of a sponge. Got half an onion nearby? Your cheese will taste like it. Its porous nature means it soaks up any aroma drifting around.
If cheese sits at the wrong temperature, bacteria can take over. That’s not just gross—it’s risky. Too much moisture trapped against the cheese gives a perfect home for things you definitely don’t want to eat.
Flavor, Texture, and Aroma: Keys to Freshness
Cheese is alive, in a way. The good bacteria and cultures keep developing flavor after you bring it home. They need a certain environment to do their job. When you store cheese right, you’re letting those cultures keep the cheese tasting how it’s supposed to.
Texture takes a hit if storage is off. Brie can go runny and smell like ammonia if it gets too warm. Gruyère left in dry air just crumbles apart. Humidity’s the secret to keeping cheese at the right consistency.
Aroma matters, too. The smells that make cheese unique disappear quickly if you let in too much air or light. Protecting cheese means you keep those good smells until you’re ready to eat.
Best Practices for Wrapping and Preserving Cheese
Getting the wrapping right makes all the difference. You want cheese to breathe a bit, but not dry out or take on fridge funk. The basics are pretty similar for most cheeses, but there are a few tweaks depending on the type.
Choosing the Right Materials: Cheese Paper, Wax, and Parchment
Cheese paper is the gold standard—it’s made for this. Two layers: one pulls away moisture, the other protects. Cheese can breathe but doesn’t dry out.
No cheese paper? Parchment or wax paper work almost as well. They let a little air in and don’t suffocate the cheese. Parchment is great for semi-hard cheeses like Gruyère or Gouda.
Wax paper keeps moisture in and blocks air, which is perfect for hard cheeses. Butcher paper does the job in a pinch, though it’s not quite as good.
How to Wrap Cheese Like a Pro
If you bought a huge hunk, cut it down. That way, you’re not unwrapping the whole thing every time.
Put your cheese in the middle of your wrapping paper, and fold it around—not too tight, not too loose. Tape the edges if you need to.
Once it’s wrapped, pop it in a loose storage bag or a container with a few holes. That extra layer keeps fridge odors out but still lets the cheese breathe. The produce drawer is your best bet for storing wrapped cheese—it’s more humid there.
Mistakes to Avoid: Skip the Plastic Wrap
Plastic wrap is a cheese killer. It traps moisture, breeds mold, and blocks air. The cheese can’t breathe, so the good bacteria can’t do their thing.
We’ve all seen what happens: the cheese turns slimy, smells weird, and spoils way faster. This goes for any cheese—Brie, Parm, whatever.
If your cheese comes in plastic, rewrap it as soon as you get home. Trust me, it’s worth the tiny bit of effort.
Labeling and Refreshing Your Cheese
Write the cheese name and date right on the paper with a marker. It sounds fussy, but it helps you keep track and use up the old stuff first. Maybe jot down where you bought it if you’re really into it.
Every few days, check your cheese. If the paper feels wet, unwrap and let the cheese air out for 15 minutes before rewrapping with fresh paper. Hard cheeses need this less often; soft cheeses, more often—say, every few days.
Cheese Storage by Type: Hard, Semi-Hard, Soft, and Blue
Different cheeses need different care. Hard cheeses mostly need protection from drying out. Softer cheeses? They need to breathe and stay humid.
How to Store Hard Cheese for Longevity
Hard cheeses like Parmesan or Pecorino Romano have barely any moisture left, so they dry out fast if you’re not careful. The goal is to lock in what’s left without suffocating them.
Wrap hard cheese tightly in wax or parchment, then add a second layer—plastic or foil—just to keep air out. Press out any air pockets.
Stash hard cheese in your fridge’s veggie drawer. It’s more humid there, which keeps texture in check. Done right, hard cheese can last weeks or even months.
Spot some surface mold? Just slice off about half an inch around it. The rest is fine—mold doesn’t dig into hard cheese.
How to Store Semi-Hard Cheese Without Losing Moisture
Semi-hard cheeses like Gouda or young cheddar have more moisture, so they’re a bit trickier. Too dry, and they crack; too wet, and you get mold.
Use the same double-wrap: first wax or cheese paper, then a snug layer of plastic or foil. The inner wrap lets it breathe, the outer keeps air out.
Stick semi-hard cheese in a cheese container or the crisper drawer. These spots are steady and humid. Keep them away from strong-smelling stuff—semi-hard cheese can pick up odors easily.
Once you open the vacuum-sealed packaging, rewrap within a day or two. Otherwise, you risk mold and staleness.
Special Tips for Storing Soft Cheeses
Soft cheeses—think Brie, Camembert, goat cheese—need more gentle handling. They need humidity, but also a bit of air.
Wrap them loosely in wax or cheese paper. Don’t seal them up tight. The loose wrap lets them breathe but still keeps fridge funk out. Then either add a loose plastic wrap or plop them in a partially open container.
If you’ve got fresh mozzarella or feta in brine, keep them in their liquid. No brine? Mix a little salt in water and use that. It keeps them from drying out.
Soft cheeses last about a week or two if you store them right. Check them for weird smells or mushiness—if they start to smell like ammonia, it’s time to toss.
Best Way to Store Blue Cheese and Handle Its Aroma
Blue cheese is its own beast. The mold veins need air, but the smell can take over your whole fridge.
Wrap blue cheese loosely in foil—not plastic. Foil lets it breathe, but also traps the strong aroma better than paper. Some folks like using a cheese container with little vents just for blue cheese.
Tips for blue cheese:
- Store away from other cheeses to keep the mold from spreading
- Put it in the warmest fridge spot (usually the top shelf or door)
- Use an airtight container as a second barrier
- Change the foil every few days if it gets damp
Blue cheese can get more blue-green mold, which is fine. But if you see pink, brown, or black spots, toss it. Blue cheese keeps aging in your fridge, so eat it within three or four weeks for the best taste.
Setting Up Your Fridge for Cheese
Where you put cheese in the fridge matters—a lot. The right spot keeps cheese fresh way longer. Get the location, temperature, and humidity right, and you’re golden.
The Ideal Location: Cheese Drawer, Vegetable Crisper, or Cheese Vault
Most fridges have a cheese drawer, but honestly, the veggie crisper is usually better. It’s more humid and the temperature doesn’t swing as much.
We usually stash cheese in the lower crisper drawer. It’s more stable there and less likely to get blasted by cold air or warmed up every time you open the door.
If you’re really into cheese, a cheese vault or box is a great upgrade. It controls humidity and lets the cheese breathe. These containers create a mini cheese cave right in your fridge.
The back of the fridge near the crisper is colder and more stable. Avoid the door—it’s warm and the temp jumps every time someone grabs the milk.
Why Temperature and Humidity Make All the Difference
Cheese likes it cool, around 35°F to 40°F (4°C). That’s cold enough to slow bacteria but not so cold it messes up the texture.
Humidity is just as important. Too dry, and cheese cracks. Too humid, and you get mold and sweat.
The veggie drawer usually sits at 80-90% humidity, which is perfect for most cheeses. Hard cheeses can handle it a bit drier, but soft cheeses need that high humidity.
The main fridge compartment is usually way too dry—30-40% humidity. That’s why the crisper or cheese drawer always wins out.
Protecting Cheese from Strong Odors in the Fridge
Cheese is basically an odor magnet. Leave it next to leftover garlic shrimp just once, and suddenly your sharp cheddar is channeling seafood.
We keep cheese away from anything pungent—onions, fish, spicy leftovers. Even with decent wrapping, cheese can pull in flavors through tiny gaps or loose seals.
A cheese box helps a lot here. It acts like a little bunker, blocking out most smells but still letting cheese breathe, which is surprisingly important.
Blue cheeses are especially sensitive to picking up outside flavors. We usually wrap them loosely in foil, stick them in a sealed bag, and stash them in a designated container in the crisper. It’s a bit of a hassle, but it keeps both the blue and everything else in the fridge from swapping aromas.
Regular fridge cleanouts are a must. We try to check for expired stuff every week and give the shelves a wipe-down at least once a month.
How Long Can Cheese Sit Out Safely
Cheese can hang out at room temp for 2 to 4 hours, give or take, depending on the type and how warm your kitchen is. Hard cheeses like aged cheddar are less fussy than fresh mozzarella.
We usually let cheese sit out for 30 to 60 minutes before serving. Cold cheese is just... flat. The flavors don’t really come alive, and the texture can get weirdly rubbery right from the fridge.
Once it’s out, though, the countdown begins. Bacteria love warmth, especially on soft or fresh cheeses with more moisture.
If it’s hot in your kitchen (above 70°F), keep cheese out for less time—better safe than sorry. Pop it back in the fridge soon after serving, instead of leaving it out between nibbles.
Don’t just toss cheese back in the fridge after it’s been sitting out with the edges exposed. Always rewrap in fresh cheese paper or parchment to keep it from drying out or picking up fridge funk.
Cheese Storage Containers: Tools for the Organized Cheese Lover
The best cheese storage containers strike a balance—enough airflow to avoid sweaty cheese, but not so much that it dries out or soaks up every fridge odor. Cheese bags and vented boxes beat regular airtight containers by creating a little microclimate that cheese actually likes.
Why Airtight Isn't Always Best
Cheese needs to breathe a bit. If we trap it in a totally airtight container, moisture builds up, making cheese sweaty and encouraging mold. That extra dampness also waters down the flavor and messes with the texture.
A slightly breathable setup works better. Just enough air gets in to stop moisture from pooling, but not so much that the cheese dries out. That’s the magic of old-school cheese caves, and why modern cheese boxes use vented lids or special materials.
Cheese vaults with ridged bottoms and loose lids are a good example. The ridges keep cheese off any moisture, and the not-quite-sealed lid lets air circulate gently. In our experience, cheese lasts longer—sometimes up to 40 days—compared to less than a month in a totally sealed box.
We avoid fully sealed plastic containers for long-term storage. They’re fine for a couple days, but after that, mold is almost inevitable.
Top Picks: Cheese Bags, Storage Boxes, and More
Cheese bags use a two-ply design: waxy inside, porous outside. They keep cheese moist but not sweaty and block out odors. Usually, a pack of 15 costs about $10-15. These are great for weirdly shaped cheeses that won’t fit in a box.
Cheese vaults or storage boxes made of silicone cost around $30 and often come with dividers. If you’re always buying different cheeses, they’re worth it. Plus, you’re not burning through plastic wrap every week.
Glass containers with adjustable vents are nice if you want to see what’s inside and tweak airflow. Look for ones with a dial so you can adjust for hard or soft cheese.
| Container Type | Best For | Price Range |
|---|---|---|
| Cheese bags | Single portions, irregular shapes | $10-15 |
| Silicone vaults | Multiple cheeses, long-term storage | $25-35 |
| Vented glass boxes | Visibility, adjustable conditions | $20-30 |
How to Store Multiple Cheeses Without Mix-Ups
Storing different cheeses together? You’ve got to keep them separate. Otherwise, strong blues can take over everything, and hard cheeses end up soaking up moisture from softer ones.
We use divided cheese boxes with removable partitions to keep things straight. Masking tape and a marker work for labeling—just jot down the cheese name and when you bought it. It’s not fancy, but it keeps things organized and helps track what needs eating soon.
For cheese bags, we write right on the bag with a permanent marker. Name, date, done. Then stash the bags in a single fridge drawer instead of scattering them everywhere.
Stack harder cheeses on the bottom and softer ones on top so nothing gets squished. Keep the whole container on a middle or upper fridge shelf—those spots are less cold than the back, which can be a cheese killer.
Freezing Cheese: When and How to Do It Right
Freezing cheese can save it for months and cut down on waste, but let’s be real—it changes the texture. Hard and semi-hard cheeses freeze better, and wrapping matters if you want to avoid freezer burn or weird smells.
Can You Freeze Cheese Without Sacrificing Quality
Freezing always messes with cheese texture, at least a little. Ice crystals break up the protein structure, so a smooth cheese can end up crumbly or grainy after thawing.
Hard cheeses like cheddar, parmesan, and gouda handle freezing best because they’re low-moisture. Semi-hards like Swiss and provolone are decent too. Soft cheeses—brie, camembert, mozzarella—don’t fare well; they get watery or weird.
The upside? Frozen cheese still melts just fine. For cooked dishes—pizzas, casseroles, grilled cheese—thawed cheese works great, even if it’s not exactly Instagram-worthy for a cheese board.
Flavor mostly sticks around. The bigger issue is that once you thaw cheese, it spoils faster, so use it up quickly.
Best Cheeses to Freeze for Future Use
Hard cheeses are the safest bet. Parmesan, aged cheddar, pecorino romano—they’ll last up to six months in the freezer and don’t change much.
Semi-hard cheeses like gouda, manchego, and gruyere are fine too, especially if you’re cooking with them. They might get a bit crumbly, but the flavor holds up.
Shredded cheese is the freezer MVP. Pre-shredded mozzarella, cheddar, or blends can go straight from the freezer into your dish. No need to thaw first.
Don’t freeze fresh cheeses (ricotta, cottage cheese), soft-ripened ones (brie, camembert), or delicate blues. They just turn into a mess—watery, grainy, or separated.
How to Freeze Cheese Properly
Cut cheese into portions you’ll actually use at once—think 8-ounce blocks or one-cup bags of shredded cheese. This way, you’re not thawing and refreezing, which ruins it faster.
How we wrap it:
- Wrap tightly in plastic wrap or foil
- Put it in a freezer bag
- Squeeze out as much air as possible
- Label with cheese type and date
Vacuum sealing is the gold standard if you have the gear. If not, just press out the air and seal the bag well.
For shredded cheese, just portion it into freezer bags. No need to pre-wrap.
Thawing takes time. Move cheese to the fridge about a day before you need it. Slow thawing keeps the texture from getting even weirder. Never thaw cheese on the counter—bacteria and excess moisture are not your friends.
Frequently Asked Questions
Good cheese storage keeps moisture in check, preserves flavor, and stops your fridge from smelling like a cheese shop gone wild. The right wrapping and placement make all the difference.
What's the best way to wrap cheese to maintain its freshness and avoid it turning into a sweaty mess?
We always reach for cheese paper or parchment instead of plastic wrap. Cheese paper has a waxy, slightly plastic-coated side that keeps moisture in, but still lets cheese breathe. That’s key for avoiding the sweaty, sticky mess you get with plastic.
No cheese paper? Parchment works too. The silicone side manages moisture and lets gases out.
We put the coated side against the cheese, fold it up, and tape it gently. It’s not rocket science, but it helps cheese keep maturing without picking up weird flavors from plastic.
Can you spill the beans on how to keep cheese from drying out in the fridge without resorting to a plastic embrace?
We stash wrapped cheese in the crisper drawer, where it’s a bit more humid. Cheese needs some moisture, just not too much, and the crisper is usually just right.
For blue cheeses, we wrap them in foil and then put them in a ziplock bag. That makes a mini-cave that keeps them from drying out but still lets a little air in.
We also keep cheese in bigger pieces and only slice what we need. The more you cut, the more surface area dries out—so we wait until serving to slice.
Got any clever tips for safeguarding my Gouda from the pungent perfumes of its refrigerator companions?
We always wrap cheese well and keep it in the crisper to block out odors. Cheese paper or parchment is our go-to for a first line of defense.
For the stinkiest cheeses, like blues, we use foil first, then a ziplock bag. That keeps their aroma in check and stops them from infecting the rest.
One odd trick: we sometimes tuck a vinegar-dampened paper towel around the wrapped cheese. The vinegar helps block odors and discourages mold, but doesn’t mess with the cheese’s flavor.
What's the secret to keeping cheese tasting like a dream and not like it's been left high and dry?
We stick to 35°F for cheese storage. That’s cold enough to slow aging but not so cold it wrecks the texture.
If cheese came in brine (like mozzarella or feta), we leave it in there. The brine keeps it moist and fresh longer than anything else.
Every few days, we unwrap cheese and scrape the cut surface lightly with a knife. This “facing” removes any surface moisture or film and can add a few extra days to its life. Not everyone bothers, but hey, it works for us.
How do you keep your cheese's personal space odor-free in a crowded fridge without it throwing a stink?
Honestly, we've just given up some fridge real estate and claimed the vegetable crisper as cheese HQ. That drawer traps smells way better than the open shelves ever could—it's like cheese has its own little apartment in there.
If you've got a cheese crowd, each one gets its own wrapping paper before they hang out together. That way, they're not swapping flavors all over the place.
Whenever we grab a slice, we toss the old wrapping and use fresh paper. The used stuff gets greasy and damp, which just invites weird smells and maybe even some bacteria. No thanks.
Share:
What Makes Some Storage Methods Better for Raw vs Cooked Foods
What Makes Some Storage Methods Better for Raw vs Cooked Foods