

Check out our latest home & kitchen collection!
Food waste is a massive problem that hurts both our wallets and the planet. Americans toss nearly 40% of the food they buy, and a lot of that’s just because we don’t store things right.
Picking the right kitchen containers and storage methods can keep your food fresh for days or even weeks longer, so less ends up in the trash.
We’ve all had that moment, finding a container of leftovers in the back of the fridge, now basically a science experiment. Or discovering wilted produce that never made it into a meal.
The upside? You don’t need to buy fancy gadgets or redo your whole kitchen to keep food from going to waste.
If we just understand how different foods like to be stored and pick suitable containers, our groceries last longer. This guide digs into choosing storage solutions and organizing your fridge so you can save money and stop tossing good food.
Key Takeaways
- Good storage containers keep food fresh longer, saving money and cutting waste
- Different foods need different storage conditions and containers to stay at their best
- Organizing your kitchen and planning meals works even better when you use the right containers
Understanding Food Waste and Why It Matters
Almost 40% of food produced in the U.S. ends up as waste, and about half of that happens in our own kitchens. Proper food storage actually connects to sustainability more than most people realize.
The Impact of Food Waste at Home
Food waste at home stings twice: it hits our budgets and, honestly, it just feels wrong. The average American household throws away about $1,500 in food each year. That’s money straight from our grocery runs, gone.
Why do we waste so much? We overbuy, forget what’s in the fridge, or just don’t know how to store things. Around 95% of wasted food goes to landfills instead of being composted or reused.
It’s wild to think about, but the amount of food wasted in the U.S. could feed hundreds of millions of people. When we throw out food, we’re also wasting the water, energy, and work that went into producing and getting it to us.
Environmental Consequences of Wasting Food
Food waste doesn’t just waste food—it has a huge environmental cost. When food sits in landfills, it breaks down without oxygen and releases methane, a greenhouse gas way more damaging than carbon dioxide.
Every time we toss out food, we’re also tossing out all the resources that went into it: water for growing, fuel for shipping, land for farming. All that effort, just gone because we didn’t use up that bag of spinach or those leftovers.
Key environmental costs of food waste:
- Methane from landfills
- Wasted water and energy from agriculture
- Extra greenhouse gas emissions from production and transport
- Lost farmland use
The Role of Kitchen Containers in Waste Reduction
Using the right storage containers tackles one of the main reasons we waste food: spoilage. If we store food wrong, it goes bad faster. Airtight containers keep produce crisp, stop freezer burn, and help leftovers stay tasty.
Containers also help us organize, so we remember what we have. The “first in, first out” trick is easier when we can see through our containers and keep older stuff up front. Clear containers are a game-changer—no more opening everything just to check.
Portioning food gets simpler with the right containers. Prepping and storing the right amount means we’re less likely to cook too much or let things spoil. Glass jars and sturdy containers make leftovers and meal prep way less wasteful.
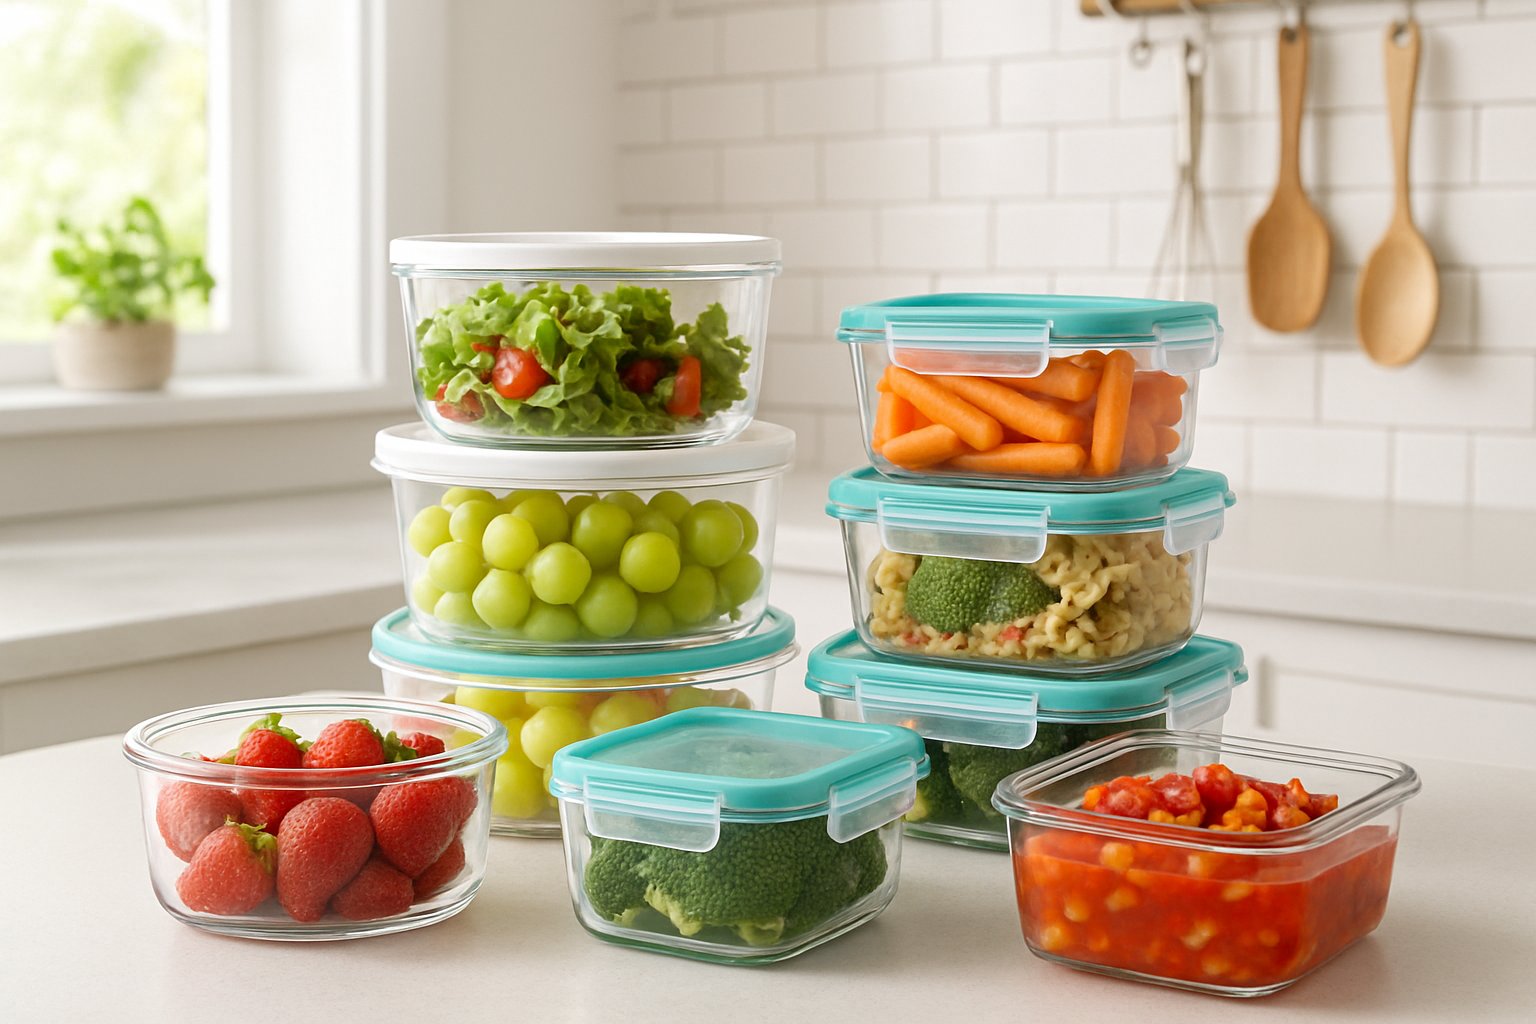
Choosing the Right Kitchen Containers for Food Preservation
Your choice of container really matters for keeping food fresh and out of the trash. Glass, stainless steel, and silicone all have their perks, and alternatives like beeswax wraps are great for certain foods.
Airtight Containers for Maximum Freshness
Airtight containers are your best defense against food going bad. They seal out air and moisture, so food lasts longer—whether it’s pantry staples or last night’s dinner.
Look for containers with silicone gaskets in the lids. Those seals beat basic snap-ons by a mile. You can test the seal by filling the container with water and tipping it upside down—if it leaks, it’s not airtight.
For dry goods like flour, rice, or coffee, airtight containers stop oxidation and keep bugs out. In the fridge, a good seal keeps things from drying out and stops odors from spreading.
The best airtight containers have four-sided locks or twist-on lids with rubber gaskets. Those stay tight even after tons of use, unlike cheap ones that give out.
Glass, Stainless Steel, and Silicone Options
Glass containers are awesome for food storage—they don’t stain or hold onto smells, and you can see what’s inside. Borosilicate glass handles both freezing and baking, so you can take it from freezer to oven. Being able to see inside means you’ll actually use what you have.
Stainless steel containers are tough and keep food at the right temp. Food-grade stainless (look for 304 or 316) won’t react with acidic foods, and it doesn’t make things taste metallic. They last ages and, while they cost more upfront, you probably won’t need to replace them for years.
Silicone containers are flexible and collapse down for storage. They don’t stain or hold smells, and they work in both the freezer and microwave. High-quality silicone is non-toxic and holds up better than most plastics.
All three materials help you ditch single-use packaging. Glass and steel can be recycled, and silicone lasts so long you won’t need to replace it often.
Reusable Bags and Beeswax Wraps
Reusable bags—especially silicone or fabric ones—are handy for storing produce, snacks, and bulk items. Silicone bags seal tight, keeping veggies crisp and protecting frozen meals from freezer burn. They’re dishwasher-safe and last for ages.
Beeswax wraps are different: they’re cotton cloth coated with beeswax, resin, and oil. Warm them with your hands and they mold around food or bowls. They’re perfect for covering cheese, bread, or half an avocado.
Beeswax wraps let food breathe a little, so produce doesn’t get soggy and moldy. They’re not for raw meat or really wet stuff, but they’re a great swap for plastic wrap. Wraps last 6–12 months if you take care of them—just rinse in cool water and hang to dry.
Both options cut down on disposable plastics. Quality reusable bags can last for years, and wraps are easy to refresh with gentle cleaning.
Best Practices for Storing Food and Leftovers
Good food storage means labeling, organizing, and freezing things smartly. These habits keep food safe, help you track what you have, and make it way less likely you’ll waste anything.
Proper Labeling and Dating Techniques
Label everything you put in a container—what it is and when you stored it. A bit of masking tape and a marker works, or you can use reusable labels if you’re into that.
Always write the storage date, not just a random “use by” date. Most leftovers are good for 3–4 days in the fridge, so you can do the math. For frozen stuff, add both the date and what it is—because chili and marinara look the same after a few months.
Keep older stuff up front. For pantry items you don’t finish in one go, jot down when you opened them. This takes seconds and saves you from having to sniff mystery containers.
Pantry Organization and Rotation Systems
Use the FIFO (first in, first out) method for pantry goods. When you restock, move older packages up front so you’ll use them first.
Group similar items together and use stackable containers for things like rice, pasta, and cereal. Clear containers let you see how much you have so you don’t overbuy.
Keep everyday stuff at eye level and stash specialty items higher or lower. Store flour, sugar, and baking stuff in airtight containers to keep bugs out and freshness in. Potatoes and onions prefer cool, dark places with airflow—don’t lock them in airtight tubs.
Check for expiring items every month and move those to the front. Once you get into the habit, it’s second nature.
Freezer Storage Solutions
Split up leftovers and batch-cooked meals into single portions before freezing, using freezer-safe containers. Flat freezer bags are awesome—they stack neatly and thaw quickly.
Squeeze out as much air as you can to prevent freezer burn. This can stretch leftovers from a few days in the fridge to a couple of months in the freezer. Label everything with the date and what’s inside, because frozen food all looks the same eventually.
Put new stuff in the back and keep a list on the freezer door so you don’t forget what’s in there. Stackable containers help keep things tidy. Freezing bread or even cheese and butter when there’s a sale can save money and reduce waste.
Upgrading Your Kitchen for a Zero-Waste Mindset
Going zero-waste starts with changing how we store food and what we bring home. By cutting plastic, making smarter swaps, and shopping from bulk bins, we can seriously reduce packaging waste and keep food fresher.
Reducing Plastic and Disposable Packaging
Plastic sneaks into our kitchens in more ways than we realize—not just bags, but also microplastics from containers, especially when we heat them.
Start by noticing where plastic pops up. Those flimsy produce bags? We use them for minutes, but they last centuries in the landfill. Plastic wrap, baggies, and disposable containers add up fast.
Cut back by picking products with less or no plastic. Root veggies don’t need a bag. Many stores let you bring your own containers to the deli counter.
Simple ways to use less plastic:
- Skip the bag for single items like onions or avocados
- Bring your own containers to the deli or meat counter
- Choose glass or cardboard packaging when you can
- Buy larger sizes or concentrates to cut down on packaging
Sustainable Swaps and Replacements
Swapping disposables for reusables costs more upfront, but these tools last for years and keep tons of trash out of landfills.
Glass containers are MVPs for zero-waste storage. They don’t stain or hold smells, and they keep food fresh without chemicals. Silicone bags are great for freezing or even sous vide. Beeswax wraps cover bowls or wrap sandwiches without the waste.
For dry goods, mason jars are cheap and versatile. You can see what’s inside, so fewer things go stale. Stainless steel containers are solid for lunches and leftovers.
Swaps worth making:
- Beeswax wraps instead of plastic wrap
- Silicone stretch lids for bowls of all sizes
- Cloth produce bags for shopping trips
- Glass or stainless containers instead of plastic takeout boxes
Don’t toss out plastic containers you already have if they still work. That’d just create more waste. Use them until they wear out, then switch to better options.
Bulk Bin Shopping and Minimizing Packaging
Bulk bins let us buy exactly what we need while skipping packaging altogether. Most grocery stores these days have bulk sections for grains, nuts, dried fruit, and spices.
Bring clean, empty containers and get them weighed at customer service before you start shopping. Jot the tare weight on the lid with a dry-erase marker. Fill your containers right from the bulk bins, then subtract the tare weight at checkout.
Start with pantry basics you use all the time: rice, oats, flour, sugar, coffee beans. Many stores have bulk oils, nut butters, and honey in refill stations too. You’ll spend less, since you’re not paying for packaging, and cut down on plastic.
Bulk shopping essentials:
- Cloth bags for lightweight stuff like pasta and grains
- Glass jars for liquids and fine powders
- Permanent marker for labeling
- List of tare weights to make checkout faster
Not every item comes in bulk, and honestly, that’s fine. The goal’s progress, not perfection.
Creative Ways to Reuse and Repurpose Containers
Instead of tossing empty containers, we can turn them into practical tools for storage, composting, and random jobs around the house. These little hacks stretch the life of containers, cut waste, and save some cash along the way.
DIY Storage and Organization Tips
Clear plastic containers are awesome for organizing pantry staples—pasta, rice, dried beans. Since you can see through them, it’s easy to avoid buying things you already have or letting ingredients rot in the back of the cupboard.
Small yogurt cups and condiment jars are handy for kitchen odds and ends. We use them for rubber bands, twist ties, clips, and those mysterious screws that show up in junk drawers. Toss a few in your utensil drawer for instant organization.
Larger containers, like takeout tubs, are great for storing bulk items or leftover ingredients. Slap on some masking tape and a marker to track what’s inside and when you put it there. We also use lidded containers as portable snack holders for road trips or work lunches—crackers, nuts, dried fruit all stay fresh without the need for single-use bags.
Repurposing for Composting and Cleaning
Empty containers make surprisingly good compost bins for kitchen scraps. Drill a few holes in plastic tubs for drainage and airflow, then layer food waste with brown stuff like shredded paper. Smaller containers with tight lids are perfect as countertop compost collectors before dumping into outdoor bins.
Old spray bottles and squeeze containers get a second life holding cleaning solutions. We mix vinegar and water in empty spray bottles for window cleaner, or fill pump containers with diluted dish soap for quick counter wipes. Glass jars with lids are great for homemade scrubs made from baking soda and essential oils.
Uses Beyond the Kitchen
Reusable containers come in handy outside the kitchen too. We cut plastic bottles in half, poke drainage holes, and use them as seedling starters. Bigger tubs become caddies for craft supplies, office stuff, or bathroom toiletries.
Wide-mouth jars are perfect for screws, nails, and drill bits in the garage. Mount jar lids under a shelf, screw the jars into them, and you’ve got hanging storage that keeps small parts visible. Food-grade containers double as pet food scoops or travel bowls for pets.
Smarter Shopping and Meal Prep for Less Waste
A little strategy at the grocery store, plus thoughtful meal prep, lays the groundwork for cutting food waste before it even starts. When we plan around our containers and portion meals intentionally, we buy only what we’ll use and actually use what we buy.
Meal Planning with Containers in Mind
Take a look at your container stash before planning meals for the week. Count how many you have in each size and plan recipes that fit those portions. If you’ve got six medium containers, prep three lunches and three dinners to match.
Planning meals around container capacity helps avoid overbuying. If you’re making a big pot of soup that fills four containers, just buy enough for those servings—no guessing, no waste. Map out which meals go in which containers, and note if they’ll need fridge or freezer space.
Label containers with meal names and dates. Organize them in the fridge with older meals up front, so it’s easy to grab what needs eating next.
Bringing Reusable Bags & Cloth Bags Grocery Shopping
Reusable bags aren’t just for the main haul. We need reusable produce bags for fruits and veggies—cuts down on plastic and keeps produce fresher when you transfer it to storage containers at home.
A solid reusable shopping kit includes:
- Large shopping totes for groceries
- Mesh produce bags for fruits and veggies
- Cloth bulk bags for nuts, grains, dried goods
- Insulated bags for anything temperature-sensitive
Keep these bags in your car or by the front door so you don’t forget. Some stores even give small discounts for using them. At checkout, you can weigh produce right in the bag—no need to take things out.
Reducing Food Waste Through Portioning
Portioning food right after a grocery run saves time and prevents waste during the week. Divide bulk buys into meal-sized portions using containers before stashing them in the fridge or freezer.
Single-serving containers are perfect for snacks—cut veggies, berries, nuts. Wash and prep produce immediately, store it in clear containers, and you’ll see what needs eating first. For proteins, portion them out before freezing—if you need one chicken breast for a recipe, freeze them individually instead of in a big pack.
Divided containers make it easy to build balanced meals: one section for protein, one for grains, one for veggies. This keeps portions in check and helps you eat everything before it spoils. Freezer-safe containers let you stash extra servings from batch cooking, so you’ve got ready-made meals and less temptation to order takeout.
Frequently Asked Questions
Picking the right containers and using them well means understanding materials, sealing, and a few simple tricks. These choices directly affect how long your food stays fresh.
What are the best types of containers for keeping leftovers fresh?
We’re big fans of glass containers with airtight lids. They don’t hold onto odors, resist stains, and you can see what’s inside without opening.
BPA-free plastic containers are great too, especially for stuff you’re taking on the go—they’re light and won’t break. Look for ones with snap-lock lids for a tight seal.
Stainless steel containers are solid for dry goods and foods you won’t microwave. They last for years if you treat them right.
Can vacuum-sealed containers really extend the life of my food?
Absolutely. Vacuum sealing pulls out oxygen, which slows spoilage. In our experience, vacuum-sealed foods last three to five times longer than regular storage.
Meats that usually last a few days in the fridge can stay fresh up to two weeks when vacuum-sealed. Frozen foods keep their quality way longer and don’t get freezer burn.
The upfront cost for a vacuum sealer pays off because you throw away way less food. We waste a lot less produce and protein with this trick, especially when buying in bulk.
Are there any clever tricks to track expiration dates on my container-stored goods?
We just use a permanent marker or masking tape—write the date and what’s inside before you put it away.
Color-coded labels are handy too. Maybe blue for proteins, green for veggies, yellow for prepared meals.
Stick to the first-in, first-out system: put newer stuff behind what’s already there so you naturally grab the oldest first.
What's the role of airtight containers in maintaining food quality?
Airtight seals keep moisture in and contaminants out. That means less bacteria and your food keeps the texture you expect.
It also keeps strong smells contained. No more onions making your whole fridge smell weird.
When food’s sealed up, temperature swings don’t matter as much. Your containers create a little stable zone, which helps keep things fresh between 32°F and 40°F.
How do I choose the right size containers for meal prepping without wasting space?
Measure your usual portions before picking containers. A serving of protein is usually 4–6 ounces, veggies about 1–2 cups.
Rectangular containers stack better than round ones. You can fit more in the fridge and freezer—no wasted corners.
Having a mix of sizes is way more useful than owning a dozen of the same. We use small ones for sauces and snacks, medium for single meals, and big ones for batch cooking.
Any tips for organizing my fridge to make the most of my storage containers?
We like to set up zones for different foods. Raw meats always end up on the bottom shelf, tucked into sealed containers—nobody wants a mess from drips. Ready-to-eat stuff? That lives up top, where it's easy to grab.
Clear containers really help. You can just glance in and see what you've got, instead of popping every lid. It's much easier to keep track of what needs to get eaten soon.
Stackable containers are a lifesaver for using all the space. Instead of weird empty gaps, every inch gets used. Honestly, it's kind of satisfying when it all fits.
Share:
The Right Way to Organize a Small Kitchen for Maximum Efficiency
A Beginner’s Guide to Pantry Organization That Actually Lasts