

Check out our latest collection of compact vacuum sealer for food!
A better lunch routine starts before the morning rush. When meals are portioned, sealed, and ready to grab, workdays and school days feel easier from the start. Vacuum sealing lunch portions helps keep food fresher, prevents leaks, saves fridge space, and makes packing lunch much faster.
This method is especially helpful for meal preppers who batch cook on weekends. Airtight bags help protect flavor and texture, while flat portions stack more neatly than bulky containers. From proteins and vegetables to grain bowls, soups, and snacks, sealed lunches can stay organized and ready for the week.
You do not need a complicated setup to begin. Once you know which foods seal well, how to portion them, and how to store them safely, you can build a simple lunch system that saves time, reduces waste, and keeps meals tasting better.
Key Takeaways
- Vacuum sealing lunch portions keeps food fresh 3-5 times longer than regular containers, plus it prevents leaks and saves space
- Most proteins, grains, veggies, and soups can be portioned and sealed in batches, then stored in the fridge for the week or frozen for later
- Cooling, portioning, and labeling your food properly helps your vacuum-sealed lunches stay fresh, reheat well, and fit right into your busy weekday routine
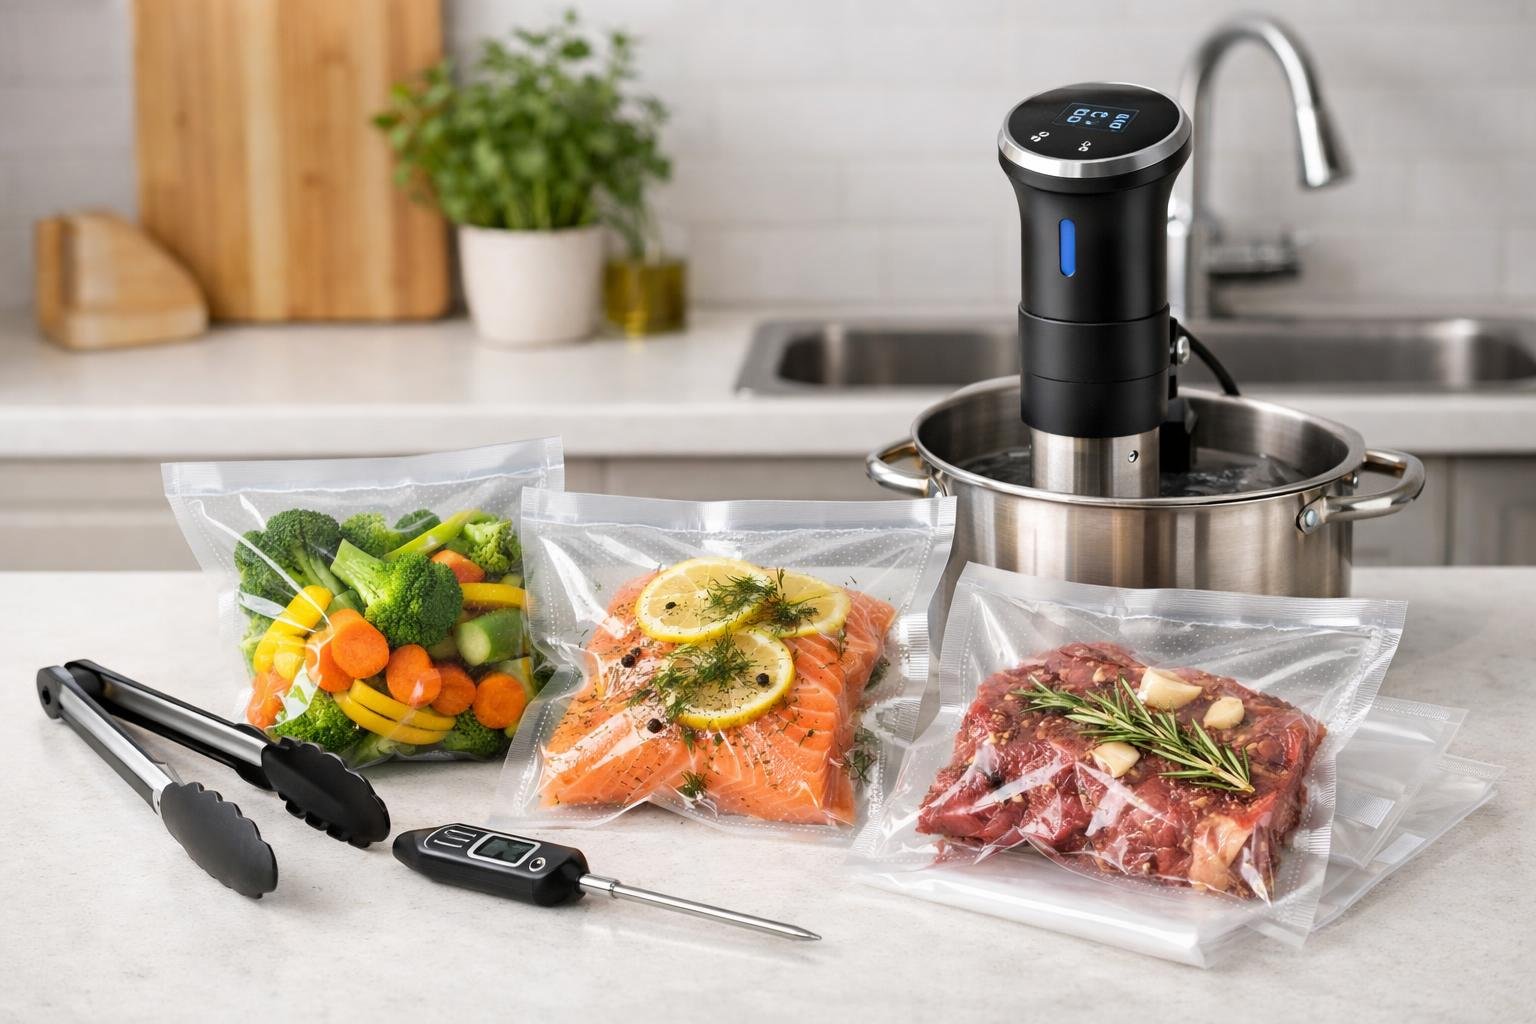
Selecting the Right Vacuum Sealer and Bags
The vacuum sealer and bags you pick will shape how easy lunch prep feels and how well your food survives the week. I'd focus on models that balance ease of use with good sealing strength, then match them with bags tough enough for everyday handling.
Countertop vs. Handheld Sealers
Countertop vacuum sealers are the real workhorses if you meal prep often. They give you a stronger seal and can tackle a bunch of portions fast, which really matters if you're sealing five lunches on a Sunday night. Manual models let you control the vacuum, so you can stop before delicate sandwiches or salads get squished.
Handheld sealers are small and cheap, but you need special zipper bags with valve ports. They're fine for dry snacks, but the seal just isn't as strong for moist foods. For everyday lunch prep, countertop units just make more sense, because they're faster and work with standard bags.
Most countertop sealers have a pulse mode, so you can control suction and avoid crushing softer foods like bread or salad.
Choosing the Best Vacuum Seal Bags
The right vacuum seal bags make all the difference between lunches that stay fresh all week and ones that leak by Wednesday. Look for bags at least 3mil thick if you're packing lunches every day.
I like embossed or textured bags because the little channels help air escape better during sealing. Universal bags fit most machines and are usually cheaper than branded ones, but double-check they're compatible with your sealer's heat settings.
Pre-cut bags are great if your lunches are always about the same size. Bag rolls give you flexibility for weird shapes or big portions, though you'll need to seal one end first.
Bag Size and Material for Lunch Portions
Most lunch portions fit nicely in 20cm x 25cm or 20cm x 30cm bags. The smaller size works for single proteins or snacks, the bigger for full meals with sides.
BPA-free bags are a must, since you'll be eating right out of them. Bags made for freezer storage usually work fine in the fridge and lots are microwave-safe, so you can reheat without hassle.
Buying bags in bulk saves you money. A pack of 100 bags costs less per bag than smaller packs, and if you're prepping five to seven lunches a week, you'll use them up fast.
Getting Started with Vacuum Sealing Meal Prep
If you want to nail vacuum sealing, focus on three things: plan your cooking sessions, cool everything properly before sealing, and keep track of what you store so nothing gets lost in the freezer abyss.
Batch Cooking and Planning Ahead
Set aside a couple hours once or twice a week for batch cooking. It's way more efficient than prepping single meals every day, because you've already got the kitchen messy, the oven hot, and everything out.
Pick 3-4 recipes that fit your week. Grilled proteins, roasted veggies, grain bowls, soups, and stir-fries all vacuum seal really well. Cook more than you need. If you're making chicken, grill eight or ten breasts, not just enough for dinner.
Dividing meals into single servings as you seal them makes portion control automatic. That helps with nutrition and cuts down on food waste since you only thaw what you need. Having a meal plan before you start makes everything go smoother.
Think about your week. Which days are going to be nuts? Prep those meals first.
Cooling Foods Before Sealing
Don't seal hot or even warm food. Heat creates steam inside the bag, which ruins the seal and can mess up your sealer.
Let everything cool to room temp before you portion it. Spread cooked food on a sheet pan or cooling rack to speed things up. For soups and stews, use shallow containers. They cool faster that way.
This part takes a little patience, but it's crucial for food safety and quality. Sealing warm food can also lead to bacteria issues. I usually cook in the morning or early afternoon, let stuff cool while I clean up, then seal and store in the evening.
If you're pressed for time, stick the food in the fridge first and seal it later that day.
Labelling and Date Tracking
Write the meal name and prep date on every bag before you stash it. Use a permanent marker or slap on a freezer-safe label that won't fall off.
I like to add quick reheating notes too, like "microwave 3 min from frozen" or "thaw overnight." It saves a lot of guesswork when you're tired and just want to eat.
How long do common meal prep items last?
- Cooked chicken, beef, or pork: 5 days in the fridge, 3 months in the freezer
- Soups and stews: 5 days refrigerated, 3 months frozen
- Cooked grains and pasta: 5 days in the fridge, 2 months frozen
- Cooked veggies: 5 days in the fridge, 2-3 months frozen
Put newer meals behind older ones so you use up the oldest first. It's a simple habit, but it really helps you avoid wasting food.
How to Portion and Seal Different Foods
Each food type needs a slightly different approach for portioning and sealing if you want to keep things fresh and avoid weird textures. A little prep before sealing makes the difference between food that still tastes good after a few days and meals that just go downhill.
Proteins: Chicken, Marinated Meats, and Tofu
Portion proteins by serving size, about 120-170 grams per person for chicken breast, 140-200 grams for marinated meats, and 150-200 grams for tofu. This keeps portions in check and helps you pack just what you need.
For raw chicken, pat it completely dry before sealing. Too much moisture messes with the seal and isn't great for food safety. Pack each portion in its own bag instead of stacking pieces.
Marinated meats actually get better when you vacuum seal them. The vacuum pulls the marinade deeper in. Seal them at least two hours before cooking, or even the night before. The flavor soaks in way faster.
Let cooked proteins cool to room temp before sealing. Hot food creates steam and can warp the bag. Spreading out cooked chicken or tofu on a sheet pan for 15-20 minutes usually does the trick.
Sealing tip: Leave 7-8 cm of space between the food and where you'll seal the bag. That way, juices or marinades don't get sucked into the machine and ruin the seal.
Vegetables and Blanching Techniques
Most veggies need blanching before vacuum sealing if you want to keep their color and texture. Raw veggies keep breaking down, even in a vacuum, and get mushy fast. Blanching shuts down the enzymes that cause this.
Here's a quick blanching guide:
- Broccoli and cauliflower: 3 minutes
- Green beans: 3 minutes
- Carrots (sliced): 2 minutes
- Bell peppers: Skip blanching
- Zucchini: 2 minutes
- Asparagus: 2-4 minutes, depending on thickness
After blanching, dunk veggies in ice water for the same amount of time, then drain and pat them dry. Any leftover water turns to ice and ruins texture.
Leafy greens like spinach or kale don't seal well raw. Either blanch them first or only pack them after cooking. Cherry tomatoes and cucumbers get crushed by vacuum pressure, so they're not great candidates.
Grains, Soups, and Sauces
Cooked grains like rice, quinoa, and pasta seal well once cooled. Portion them into 180-250 gram servings (about a cup). Spread grains on a sheet pan to cool and avoid clumping.
Soups and sauces take a little extra care. Use bags made for liquids, or a container if your system allows. Only fill bags two-thirds if you're freezing so they have room to expand.
For liquids: Fold the top of the bag over to make a cuff. This keeps liquid away from the seal. Put the bag in a dish while sealing in case anything spills. Some machines have a "moist" or "liquid" setting that stops suction early.
Freeze soups flat in the bag before stacking them upright. Saves space and thaws faster. Always label with reheating instructions, because frozen meals all look alike.
Oily sauces (pesto, curry) can mess with the seal. Freeze them for an hour or two first, then seal while they're semi-solid.
Snacks and Smoothie Packs
Pre-portioning snacks makes lunch assembly a breeze. Seal 30-50 gram portions of nuts, 40-60 grams of cheese cubes, or single servings of hummus or dip in small bags. They'll stay fresh for a couple weeks in the fridge, much longer than in regular containers.
Smoothie packs are perfect for this. Put all your smoothie ingredients (except liquid) into a bag: frozen fruit, spinach, protein powder, whatever you like. One bag = one smoothie. Just dump it in the blender with your liquid.
Keep smoothie packs in the freezer for up to three months. The seal stops freezer burn and keeps berries from sticking together. Label each one with what liquid and how much to add.
Overnight oats don't really need vacuum sealing, but if you want to prep them for later, seal the dry ingredients together. Toss in oats, chia seeds, and dried fruit, then add your milk the night before.
Snacks that seal well:
- Trail mix
- Dried fruit
- Granola
- Protein balls (freeze first)
- Sliced cheese
- Homemade beef jerky
Skip sealing really delicate stuff like fresh berries or soft cookies unless you use the pulse function to control the pressure.
Best Practices for Storing and Transporting Vacuum-Sealed Lunches
Vacuum-sealed lunches need the right storage and handling to stay fresh and safe. The way you organize meals in the fridge or freezer, prep them for taking on the go, and protect them from freezer burn really affects how long your food lasts, and whether you actually want to eat it at the end of the week.
Storing Meals in the Fridge or Freezer
Vacuum-sealed lunches stay fresh in the fridge for about 1-2 weeks, and you can keep frozen portions for 2-3 months, sometimes even longer, depending on what’s inside. I usually freeze meals flat in a single layer first, then stack them upright to save space once they’re solid.
I always label each package with what’s inside and the date before tossing it in the fridge or freezer. It’s a small step, but it spares you from those “surprise” meals later and helps you keep tabs on freshness. I also put newer meals behind the older ones so I don’t forget what needs to get eaten first.
Keep your fridge at 4°C or colder, and your freezer at -18°C. That’s what you need for safe food storage. Stuff like cooked meats, anything dairy-based, or with mayo really needs that cold to avoid bacteria.
Try to store vacuum-sealed bags away from the freezer door, since the temperature there jumps around too much. The back of the freezer keeps things steady, so you’ll get the longest shelf life.
Organizing Meals for Quick Grab-and-Go
I like sorting vacuum-sealed lunches by meal type or day of the week using bins or even just some cheap dividers. Dedicating a fridge drawer or a freezer basket just for lunch portions makes your mornings way less chaotic.
Here’s what’s worked for me:
- Monday to Friday bins for each day’s meal prep
- Protein, grain, and veggie categories so you can mix things up
- Breakfast, lunch, and snack sections for full-day grab-and-go
Standing the bags upright in magazine holders or little bins keeps everything visible. No more digging through piles when you’re running late.
Packing your lunch bag the night before and stashing it in the fridge is a game-changer. In the morning, just add a frozen gel pack or a bottle of frozen water. With the right ice, vacuum-sealed meals stay cold for 4-6 hours, which is totally safe for perishable food.
Preventing Freezer Burn and Maximizing Shelf Life
When sealing, I try to get out every bit of air I can. Even a little trapped air will cause freezer burn, and that ruins texture and taste fast.
If I’m freezing something for more than a month, I’ll double-seal it. Either run the vacuum sealer twice along the edge, or fold the bag over before sealing. It’s a little extra work, but it pays off.
Don’t overstuff the bags. Leaving 8-10 cm between the food and the seal line helps you get a tight seal and keeps the bag from popping open in the freezer.
Foods that freeze best vacuum-sealed:
- Cooked proteins (chicken, beef, pork, fish)
- Soups and stews (just leave some space for expansion)
- Grain-based dishes (like rice bowls or pasta)
- Blanched veggies
For liquids or anything really wet, I pre-freeze them for an hour or two before sealing. That way, the liquid doesn’t get sucked into the machine and you get a solid seal.
Proper vacuum sealing honestly cuts freezer burn by about 80% compared to regular containers or bags. Less wasted food, and your meals still taste good weeks later.
Reheating and Enjoying Your Sealed Lunch Portions
Getting your vacuum-sealed meals reheated the right way can turn an average lunch into something you actually look forward to. I’ve noticed that the right reheating method keeps the flavor and texture you worked so hard to lock in.
Microwave, Boil-in-Bag, and Other Safe Methods
Not all vacuum seal bags handle heat the same. I always check what the manufacturer says before reheating. Most boil-safe bags go straight into simmering water for 10-15 minutes. This is my favorite for soups, stews, and pasta, since it heats everything evenly and avoids those weird hot spots.
For the microwave, I always move the food into a microwave-safe container. Regular vacuum bags just aren’t built for that. I set the microwave to half power and heat in 90-second bursts, stirring in between. That way, the edges don’t get rubbery while the middle stays cold.
If you’ve got a sous vide at work, it’s a fantastic way to reheat. Set it to 60°C and drop in your sealed meal for 30-45 minutes. It warms everything gently and keeps the texture just right.
Oven reheating works for casseroles and grain bowls. I just transfer the food to an oven-safe dish, cover with foil, and bake at 175°C for 20-25 minutes.
Maintaining Flavour and Texture After Sealing
I’ve found vacuum-sealed meals actually keep their flavor better than stuff in regular containers, because no air means no oxidation. Marinated proteins, in particular, taste even better after sitting sealed for a day or two.
Texture really depends on cooling things properly before sealing. I always let hot food cool to room temp first, or else everything gets soggy. For rice and pasta, I toss them with a bit of oil before sealing so the grains don’t clump.
I like to layer ingredients with some thought. Crispy things like nuts or croutons go in a separate bag, and I add them after reheating. Sauces usually get their own little portion, too, so I can control the moisture.
It helps to label each portion with the date and reheating instructions. Most vacuum-sealed lunches last 5-7 days in the fridge, but honestly, I try to eat them within 3-4 days for the best texture.
Creative Lunch Prep Ideas to Try
Vacuum sealing really opens up meal prep options. Your food stays fresh, and it actually tastes good days later. From hearty bowls to easy breakfast packs, there’s a lot you can do to keep your fridge stocked with meals you’ll want to eat.
Meal Prep Bowls and Stir-Fries
Grain bowls and stir-fries are some of the easiest lunches to vacuum seal. I cook up a batch of rice, quinoa, or noodles, then toss in proteins like grilled chicken, tofu, or beef strips. Roasted or steamed veggies like broccoli, peppers, or snap peas finish it off.
To avoid sogginess, I usually keep the grains and proteins together in one bag, and add sauces or dressings just before eating. Stir-fries hold up well because the veggies keep their structure after reheating. I season everything before sealing so the flavors have time to meld. A teriyaki chicken bowl or sesame ginger tofu stir-fry will easily last a week in the fridge when sealed right.
You can swap ingredients based on what you have, so lunch never gets boring.
Overnight Oats and Breakfast Packs
Overnight oats work great for vacuum sealing, especially if you’re prepping breakfast for early mornings or work. I mix rolled oats with milk or a dairy alternative, add chia seeds, and portion them into bags with toppings like berries, nuts, or honey.
If I’m making breakfast packs with things like hard-boiled eggs, cheese, or fruit, I keep wet and dry stuff separate. This keeps everything fresh and prevents mushy textures.
For overnight oats, I seal them individually and store them flat in the fridge. They stack up neatly and don’t take much space. By morning, the oats are soft and ready to eat straight from the bag or in a bowl.
Breakfast packs are perfect for anyone who skips breakfast at home. I’ll seal an egg, some cheese, crackers, and fruit together for a balanced, portable meal.
Marinated Meats and Ready-to-Heat Dishes
Vacuum sealing marinated meats is a real upgrade. The airtight seal helps marinades soak in faster and more evenly than just tossing stuff in a container. I’ll marinate chicken breasts, pork chops, or steak, then seal and chill for a couple hours before cooking.
You can also cook proteins first, then portion them with veggies and grains for easy, ready-to-heat meals. Dishes like teriyaki chicken with rice, beef and broccoli, or lemon herb salmon with quinoa all reheat nicely.
For saucy meals, I freeze them a bit before sealing so the liquid doesn’t get sucked into the machine. Once sealed, these meals last up to two weeks in the fridge or months in the freezer.
Marinated meats stay flavorful way longer when vacuum-sealed. The moisture and flavor stay locked in, so your Friday lunch tastes just as good as it did on Monday.
Frequently Asked Questions
Vacuum sealing lunch portions is simple once you know which sealer, bag size, storage method, and reheating approach work best for your routine.
Which vacuum sealer type works best for portioning meals: handheld, external suction, or chamber?
An external suction sealer is best for most weekly lunch prep. It offers strong sealing, works with standard bags, and is easier to store than a chamber sealer.
Handheld sealers are better for dry snacks or small portions. Chamber sealers are helpful for liquids, but they are usually more than most home kitchens need.
How do you choose the right bag size and thickness for single-serve lunches without wasting plastic?
Most single-serve lunches fit well in 8x12 inch bags. Larger meals, like pasta or grain bowls, may need 11x16 inch bags.
Use 3-mil bags for fridge storage and thicker 4-mil bags for freezer meals. Bag rolls are helpful because you can cut each bag to the size you need.
What foods are tricky to seal for lunch, like soups, saucy pasta, or chopped fruit, and how do you prevent leaks?
Soups, sauces, juicy fruit, and wet pasta can leak during sealing. Pre-freeze liquids or saucy foods first, then seal them once firm.
For chopped fruit, pat pieces dry before bagging. Keep extra moisture away from the seal line so the bag closes properly.
How far ahead can you prep and vacuum seal lunches for the fridge or freezer while keeping food safe?
Cooked proteins, grains, and vegetables usually keep for 7-10 days in the fridge when sealed. For best texture, eating them within the workweek is ideal.
Most cooked meals can be frozen for 2-3 months. Always cool food fully before sealing and store it at a safe fridge or freezer temperature.
What is the best way to label and organise sealed portions so weekday mornings are grab-and-go?
Label each bag with the meal name, date, and reheating instructions. This makes it easier to rotate older meals first.
Store sealed portions flat or upright in bins. Sorting by day, meal type, or family member keeps mornings faster and more organized.
Can vacuum-sealed lunch portions be reheated in the bag, and what is the safest method for microwaving or sous vide?
Only reheat in the bag if the bag is clearly labeled heat-safe. For microwaving, transfer food to a microwave-safe container first.
For sous vide or warm-water reheating, use bags approved for that temperature. When unsure, remove the food from the bag before heating.
Share:
How to Keep Bulk Snacks Fresh With Portion Boxes and Airtight Storage
How to Use a Cordless Vacuum Sealer for Snacks, Leftovers, and Small Daily Portions