
Check out our latest home & kitchen collection!
Open shelving has become the darling of modern home design, promising to transform cluttered spaces into Instagram-worthy displays. Yet, if you've ever tried to keep those shelves looking as perfect as the photos, you know it's not as simple as tossing your favorite books and trinkets on them.
The real trick is juggling three things: styling that actually works and looks good, containment that keeps chaos at bay, and dust control so your display doesn't just look pretty for a day.
We've all seen those magazine shots of perfectly curated shelves and wondered, "How do they keep it that way?"
Honestly, open shelves do collect dust faster than closed cabinets, and without some sort of plan, they can turn into a jumbled mess. Still, with a few strategies, you can enjoy all the perks of open shelving without the constant headache.
If you know how to group your stuff, pick the right containers, and keep up with a simple cleaning routine, you'll turn your shelves into something that makes your home feel better, not more stressful.
Key Takeaways
- Open shelving works best when you balance looks and function with smart styling and containment
- You have to stay on top of dust and clutter because open shelves collect more debris than closed storage
- Good curation and solid installation mean shelves that actually help your space instead of overwhelming it
Benefits of Open Shelving
Open shelving can make a space feel bigger, let you show off your style, and put everything you need right at your fingertips. That’s a pretty appealing combo for anyone who wants a home that’s both functional and easy on the eyes.
Enhancing Visual Space
Open shelves instantly make a room feel more spacious than closed cabinets ever could. When you get rid of those solid doors, your eye just keeps traveling, and the space feels less boxed in.
This is a lifesaver in small kitchens or tight rooms where every inch matters. No bulky cabinet faces crowding you out—just open lines and more light bouncing around.
Perks for your space:
- No more visual heaviness from cabinet doors
- Clear sight lines across the room
- More light, less shadowy corners
- Small areas feel bigger, fast
You can also tweak shelf heights and spacing to fit your needs, which helps keep things feeling open and not jammed together.
Even in a big room, open shelving keeps things from getting that closed-off, heavy vibe. The whole place feels more connected and easygoing.
Showcasing Personal Style
Open shelves let you put your personality on display. Your dishes, books, and little treasures become part of your room’s story instead of hiding behind closed doors.
You can swap out items for the seasons, show off collections, or just rearrange things when you’re in the mood for a change. Everything’s fair game for your evolving style.
Ideas for display:
- Bright dishes for a pop of color
- Vintage finds that start conversations
- Plants to bring in some life
- Books and art that show what you love
Switching up your shelves is as easy as moving stuff around—no reno required.
It’s all about being picky, though. Only put out what you actually like or use; otherwise, it gets cluttered fast.
Easy Access and Functionality
Open shelves make grabbing what you need a breeze. No doors to open, no digging behind piles of stuff.
This is especially handy in kitchens when your hands are full or you just want to get to your plates and glasses without fuss.
Why it works:
- You see everything at a glance
- Grab what you need with one hand
- No cabinet doors swinging out in your way
- Easier to keep organized
Since everything’s on display, you’re less likely to keep stuff you don’t use. It’s a natural filter.
Daily routines just flow better when you don’t have to hunt for things. Cooking, cleaning, hosting—open shelves make it all simpler.
Selecting and Installing Open Shelves
Getting open shelving right starts with picking materials that fit your space and installing them at just the right height. Good placement and sturdy materials make all the difference for shelves that stay organized and don’t turn into dust magnets.
Choosing the Right Materials and Styles
Wood shelves bring warmth and work in almost any room. Pine and oak are great for books, while maple can handle heavier kitchen gear.
Metal brackets with wood shelves give you that industrial vibe lots of folks love right now. They’re strong but don’t look too heavy.
Floating shelves look super clean but need proper anchors. Drywall? Go for toggle bolts. If you hit a stud, even better—more support for your stuff.
| Material | Best For | Weight Capacity | Maintenance |
|---|---|---|---|
| Solid Wood | Living rooms, bedrooms | High | Regular dusting |
| Metal/Wood Combo | Kitchens, offices | Very High | Wipe clean |
| Glass | Bathrooms, displays | Medium | Frequent cleaning |
Glass shelves are sleek in bathrooms but show dust and fingerprints in no time. They’re fine for lighter decor, but I wouldn’t load them up with heavy dishes.
Shelf thickness matters more than you’d think. Thin shelves sag; overly thick ones can feel bulky in tight spaces.
Optimizing Shelf Placement and Layout
Standard spacing is about 12-15 inches, but honestly, it depends on what you’re putting on them. Books need more space than plates.
Eye-level shelves are best for the things you grab all the time. No one wants to reach way up for their everyday dishes.
Mixing up shelf heights keeps things interesting and lets you fit different items. Try a mix of 10-inch and 16-inch gaps for a less boring look.
Wall studs usually dictate where your shelves really go. Sometimes you just have to work with what you’ve got.
Distribute visual weight by putting heavier stuff lower down. It looks better and it’s safer.
Corners need extra support; L-brackets help a lot more than those floating mounts if you’re going out from the wall.
Set your first shelf at a reasonable height—too high and you lose usable space.
Containment and Organization Solutions
The real magic of open shelving is in how you keep things contained and organized. Grouping, hiding, and labeling the essentials makes your shelves work for you, not against you.
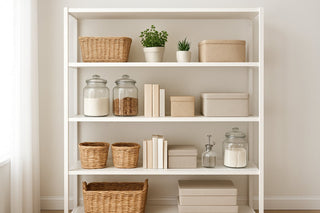
Using Storage Bins and Woven Baskets
Storage bins can turn chaos into calm. Clear ones are perfect when you want to see what’s inside—think office stuff or art supplies.
Woven baskets add texture and hide the not-so-pretty essentials. Seagrass and rattan are nice for keeping things cozy but not cluttered.
Pick the right size:
- Small bins (6-8 inches): Remotes, cords, little tools
- Medium baskets (10-12 inches): Toiletries, cleaning stuff, toys
- Large containers (14+ inches): Linens, seasonal gear, bulk items
Make sure bins actually fit your shelves—nothing should hang over the edge.
Labels help everyone find what they need, even with baskets. Tuck a little tag inside the rim if you don’t want it showing.
Grouping Items for Convenience
Grouping similar things together just makes sense. Keep all your coffee stuff—mugs, filters, sugar—on one shelf and mornings get easier.
Ways to group:
- By function: All bathroom stuff together, all spices in one spot, etc.
- By how often you use it: Keep daily things at eye level, stash the rest up high
- By person: Give each family member their own shelf or zone
Odd numbers look better than even; three is a sweet spot.
Line up books by height for a tidy look. Mixing up horizontal and vertical stacks keeps it from getting too stiff.
If you’re feeling it, group by color—especially for linens or dishes. Sometimes it just looks cool.
Concealing Everyday Clutter
Some stuff just isn’t pretty, but you still need it close by. That’s where good-looking containers come in.
Decorative boxes can hide bills and electronics on office shelves. Pick ones that match your style but still open easily.
Other ideas:
- Fabric cubes for toys and games
- Wooden boxes for tech gear
- Metal tins for crafts or hardware
Hide the ugly stuff behind nicer things. Tuck medicine bottles behind a cute jar. Cleaning sprays behind a basket.
Keep a “junk basket” on each shelf for all the random little things. It’s a lifesaver when you don’t have time to put everything away perfectly.
Stack matching boxes for vertical storage that looks intentional, not accidental.
Open Shelving Styling Principles
Styling shelves isn’t just about tossing things up there. A few design basics can turn clutter into something that actually looks pulled together (well, most days).
Applying the Rule of Thirds
The rule of thirds keeps things from looking too stiff or symmetrical. Odd numbers—like groups of three—just feel right to the eye.
Instead of centering everything, try placing objects at one-third points across the shelf. Maybe a tall vase on the left, some open space in the middle, books on the right.
How to group:
- Small stuff: Sets of 3 or 5
- Medium: Three pieces, all different sizes
- Large: Spread out at third intervals
This keeps shelves from looking like a museum display. The rule works vertically, too—don’t line everything up at the same height.
Playing with Visual Weight and Negative Space
Visual weight is about how much an object stands out—big, dark, or textured things feel “heavier.” Negative space is just the empty bits between stuff, and it’s more important than it sounds.
Balance heavy pieces with lighter ones so one side doesn’t overpower the other.
Quick guide:
- Heavy: Dark books, chunky ceramics, metal
- Medium: Plants, framed photos, glass
- Light: Tiny decor, pale colors
Leave 30-40% of your shelf empty. It gives your eyes a break and makes the things you do display pop.
Layering Objects and Varying Heights
Layering adds depth—some things at the back, some in the middle, a few up front.
Mix up the heights so you don’t end up with a boring straight line. Use stacks of books, small boxes, or a mix of tall and short items.
Ideas:
- Stack books for height
- Use little boxes as risers
- Mix tall vases with squat bowls
- Layer art behind shorter pieces
Aim for a gentle flow, not wild ups and downs.
Choosing a Cohesive Color Palette
A tight color palette keeps things from looking like a yard sale. Stick to 2-3 main colors plus neutrals like white, black, or wood.
The trick is to pick one main color (about 60% of your stuff), a secondary (30%), and a little accent (10%). It’s just enough variety without chaos.
Some options:
- Monochrome: Different shades of one color
- Analogous: Colors next to each other on the wheel
- Neutral + Pop: Mostly whites/beiges, one bright accent
Pay attention to undertones—warm with warm, cool with cool. Mixing them can feel off.
Curating Decorative Objects and Statement Pieces
The heart of open shelving is picking out ceramics, candleholders, or figurines that actually mean something to you and add some spark. Books and personal mementos pull double duty: they’re useful, and they make great conversation starters when you pair them with bookends that show a little personality.
Mixing Ceramics, Candleholders, and Figurines
Ceramic bowls just work as anchor pieces on open shelves. Their curved shapes add a bit of heft that helps ground lighter objects nearby.
For ceramic groupings, we usually stick to:
- One bigger statement piece (maybe a bowl or vase)
- Two or three smaller pieces for support
- Mixing up the heights for a bit of rhythm
Candleholders bring in some vertical energy and actually serve a purpose. Try mixing materials—brass candleholders look fantastic next to matte ceramics. That texture contrast keeps things from looking too one-note.
When it comes to figurines, less is more. Pick ones that show off your personality, but stick to odd numbers. Three small figurines have a nicer flow than pairs or big clusters.
Pro tip: Give your ceramics some breathing room. Crowded shelves lose their punch fast. We like to keep at least 6-8 inches between each grouping so nothing gets lost in the shuffle.
Integrating Books, Bookends, and Personal Mementos
Books do double duty as storage and decor. We like to mix it up—some books stand tall, others get stacked flat with a little decorative thing on top.
Bookends are a fun way to show some personality. Go for ones that fit your vibe, not ones that fight with the rest of your shelf. Heavy bookends are best, otherwise, things start sliding around.
Personal mementos work best when:
- They actually mean something or tell a story
- You group them by theme or color
- They're the right size for your shelves
Family photos, travel finds, or hobby stuff? Sure, but go easy. Too many personal things and suddenly it’s clutter, not curation.
The real magic is in layering. A ceramic bowl on a stack of books—instant style points. Tuck a tiny figurine between book spines for a little surprise. Why not?
Dust Control and Shelf Maintenance
Open shelves gather dust way faster than cabinets, thanks to all that airflow. So, you’ve gotta be smart about materials and stick to a cleaning routine if you want them to look good and actually work.
Choosing Easy-to-Clean Materials
We've learned (sometimes the hard way) that material choice really matters for dust control. Glass, ceramic, and sealed metal containers are our go-tos. Dust wipes right off—no drama, no stains.
Skip porous stuff like raw wood or fabric boxes. Those just grab onto dust and make cleaning a pain.
Smooth, non-porous surfaces can cut dust by nearly half compared to rougher materials. Sealed plastic bins, glazed pottery, powder-coated metal baskets—these are the MVPs for anything you grab a lot.
Clear acrylic containers are a solid pick for little things. They’re low-key, keep dust out, and you can still see what’s inside.
Effective Cleaning Routines for Open Shelves
Let’s be real: open shelves need attention every week if you want them to look decent. Lambswool dusters beat microfiber cloths—the wool actually grabs dust instead of just moving it around.
Every other week, we pull everything down and wipe the shelves with a damp cloth. It’s the only way to stop gunk from building up and turning into a bigger problem.
Quick daily habits help the most. We spend a couple minutes each morning dusting whatever’s in plain sight, usually while coffee is brewing. That way, we don’t end up with a weekend cleaning marathon and regret our open shelf choices.
To make life easier, we group similar things in sealed containers. Less to clean, but the shelves still look open and styled.
Frequently Asked Questions
Open shelving always stirs up questions—how to make it look good, keep it clean, and use it without losing your mind. Here’s what we get asked the most.
What are some clever ways to style open shelving in my kitchen?
Start with the rule of threes—group things in odd numbers for more interest and less clutter.
Mix useful stuff with decorative bits on every shelf. Everyday dishes look great next to a vintage tin or a little herb pot.
Lower shelves are for the things you grab all the time—mugs, plates, you know the drill. Save the high shelves for the pretty stuff you don’t use much.
Tie it all together by repeating colors, materials, or shapes. Got blue dishes? Maybe echo that blue with a bowl or towel somewhere else.
Play with heights. Use little stands or stack things up so it doesn’t look flat and boring.
How can I keep my open shelved items dust-free without becoming a full-time cleaning guru?
Weekly dusting with a microfiber cloth keeps things under control. It’s way easier than letting dust pile up and having to deep clean later.
A little furniture polish or anti-static spray helps, too—it makes dust less likely to stick and future cleaning way easier.
Stack plates and bowls instead of spreading them everywhere. Less surface area means less dust, and it still looks tidy.
Honestly, just use your stuff. Dishes that see daily action don’t get dusty.
For smaller things like spices, glass-front containers keep dust out and still look open.
What are the top containment strategies for maintaining a sleek look on kitchen open shelves?
Matching containers instantly calm down a busy shelf. We like clear glass jars or ceramic canisters for dry goods—organized and easy on the eyes.
Baskets are great for wrangling stuff that doesn’t stack, like snack packs or tea bags. Pick ones that fit your kitchen’s vibe.
Small trays help group things—oils, coffee supplies, whatever. Suddenly, it all looks intentional.
Label your containers, but keep it cute. Chalkboard labels or nice printed tags get the job done without looking messy.
Give everything a spot. Baking stuff here, coffee gear there. Makes finding things a breeze.
In the great debate of open shelving versus cabinets, what are the pros and cons for each?
Open shelves make a kitchen feel airy and open. You can grab what you need fast, and they cost less than cabinets. Plus, you get to show off your favorite dishes.
But, they need more cleaning and constant tidying. Everything’s on display, so you can’t hide messes or mismatched mugs.
Cabinets keep dust out and hide chaos. More storage, less styling stress.
Downsides? Cabinets are pricier and can turn into black holes for stuff you never use. They also make small kitchens feel more boxed in.
Why not try a mix? Take a couple cabinet doors off and see how you like open shelves before going all in.
How do I balance functionality and aesthetics when deciding what to put on my open shelves?
Start with what you use most and find nice versions of those basics. Good-looking everyday dishes work as both storage and decor.
Put heavy, often-used stuff on the lower shelves for safety and convenience. Save the upper shelves for lighter, decorative things.
Honestly, if something doesn’t look good out in the open, put it in a cabinet. Open shelves are basically a display, after all.
Keep purely decorative things to a minimum—about 70% useful, 30% pretty works for us.
Think about where you cook. Keep oils and spices near the stove, dishes and glasses closer to the sink or dishwasher. Makes everything flow better.
Can you dish out some secrets for keeping open shelf dishes guest-ready at all times?
Try storing dishes right-side up instead of stacking them inside each other. It’s a small tweak, but it actually helps keep the eating surfaces free from dust.
Give dishes a quick rinse before tossing them in the dishwasher—even if you’re not starting it right away. Bits of food tend to attract dust and leave ugly spots, especially on pieces you want to show off.
Set aside a few "company dishes" on higher shelves, out of the everyday rotation. When guests pop by, you’ll have spotless plates ready to go.
During your weekly shelf wipe-down, run a cloth over the dishes you use the most. It doesn’t take long, and it keeps them looking fresh.
Honestly, just use your dishes. The ones that get regular action and washing usually stay cleaner than the ones that just sit there gathering dust. Why let them be museum pieces?