
Check out our latest Office & Stationery collection!
Creating a minimalist craft corner doesn’t mean you have to sacrifice creativity—it just makes DIY projects easier, tidier, and, honestly, a lot more fun. With a few practical choices, you can turn even the tiniest nook into a workspace that inspires you. Sometimes, less really is more when it comes to crafting.
Clutter kills motivation. If you trim down your supplies and use smart storage, you get to focus on the fun part: making stuff. By keeping only the essentials and adding a little inspiration, your creative process stays efficient and stress-free.
Key Takeaways
- Pick a small, dedicated spot and keep the furnishings simple.
- Use smart storage—hang onto just the tools you actually use.
- Add a dash of inspiration, but keep it organized.
Choosing the Best Spot for Your Craft Corner
You want your craft corner to work for you, not the other way around. The right spot has good light, enough space, and a vibe that suits your workflow.
Evaluating Natural Lighting
Good lighting just makes everything easier—and let’s face it, your eyes will thank you. If you’re working with color or detail, natural light helps you see what you’re doing (and not accidentally grab neon pink when you meant to use blush). A window with morning or midday sun can make all the difference.
Think about which way your window faces. North-facing windows give nice, steady light. East windows are bright in the morning. South or west? You might get a little too much afternoon heat, so a sheer curtain could help keep things cool.
No window? No problem. Daylight LED bulbs work well and keep your colors true. It’s smart to test your setup at different times of day to see how the light changes.
Utilizing Nooks and Unused Spaces
Most of us don’t have a spare room ready to become a studio. But nearly every home has an unused corner or a spot that doesn’t see much action. Tiny alcoves, a slice of the living room, the end of a hallway, or even under the stairs can work if you get creative.
A compact table or foldable desk, a rolling cart, and a shelf are usually enough. Pro tip: measure your space before you buy anything. A table that fits perfectly beats a massive setup you have to squeeze by every day.
Use vertical space—hang organizers or pegboards for tools and materials. It keeps your work surface clear and makes things easy to grab. Plus, it just looks more put-together (which is handy when someone inevitably wants a tour).
Considering Noise and Distractions
Noise matters, especially if you’re stringing beads or gluing delicate stuff. If you set up near the TV, the kitchen, or a busy hallway, suddenly it’s a group project whether you want it to be or not.
Try to pick a spot away from the chaos. A little buffer—a bookshelf, a curtain, or just being tucked in a corner—can make a huge difference. If you can’t escape noise, headphones or some background music can help you focus.
Keep your craft area just for crafts. It’s tempting to set up next to the laundry, but unless sock sorting is your idea of a good time, you’ll want to avoid that. Fewer distractions mean more creative flow.
Essential Furniture for a Minimalist Craft Corner
You want furniture that helps you stay organized but doesn’t crowd your space.
Selecting the Right Work Surface
A sturdy table is a must. Make sure it fits your space but still gives you enough room to spread out.
A collapsible or wall-mounted drop-leaf table works wonders in small spaces. You can fold it away when you’re not using it.
Go for smooth, durable surfaces like MDF or laminate—they’re easy to wipe down and won’t catch on your supplies. Drawers or a lower shelf can help, but honestly, a simple tabletop is often best for keeping things clean and easy.
Some minimalist favorites:
| Table Type | Features | Ideal For |
|---|---|---|
| Drop-leaf | Space-saving | Tight spaces, multipurpose |
| Standing desk | Adjustable height | Flexibility, ergonomic setups |
| Craft-specific table | Built-in storage | Extra organization |
Multi-Functional Seating
Seating should be comfy and, if possible, do double duty. Compact stools or chairs with storage are perfect.
A flip-top storage bench gives you a seat and a spot for bins or fabric. Armless chairs tuck under the table and keep things looking neat.
If you use cushions, stick to neutral, easy-to-clean fabrics. You want support, but you also want to move around easily, so nothing too bulky.
Stackable stools are a lifesaver. You can pull out extras for a craft night or just tuck them away when you’re solo. It keeps your space open and flexible.
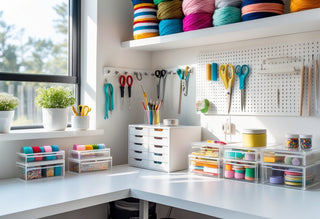
Smart Storage Solutions for Craft Supplies
You want to find what you need fast and keep supplies out of the way—especially if you’re short on space.
Vertical Storage Ideas
Go vertical if your desk is tiny. Wall-mounted pegboards are super handy for scissors, rulers, and tape. Add hooks, baskets, or trays and move them around as your needs shift.
Tall, adjustable shelves let you stash bulkier stuff up high and keep everyday supplies within reach. Magnetic strips for metal tools, racks for thread spools, and stackable bins keep everything visible and easy to grab.
Try installing narrow shelves or rails above your workspace for jars, paints, or brushes. It keeps your desk clear but your tools close.
Hidden and Fold-Away Storage
Hidden spots keep your corner looking tidy. Drawer organizers or stackable bins under the table hide paint, fabric, or glue but keep them handy.
Fold-away furniture—like a wall-mounted drop-leaf table—serves as both workspace and storage. Some carts have lids or compartments to hide messes. Ottomans, benches, or stools with hollow insides are great for stashing extra materials.
Label containers with washi tape or sticky notes so you’re not opening every box searching for that one button.
Organizing Small Supplies
Small stuff—beads, buttons, pins, floss—multiplies fast. Divided boxes, pill organizers, or empty spice jars keep tiny things sorted and visible.
Clear containers help you spot what’s inside. Stack a few drawer units or baskets on a shelf and give everything its own spot.
A quick cheat sheet for minis:
| Item | Storage Idea |
|---|---|
| Beads, sequins | Clear pill organizers |
| Floss, yarn scraps | Mini zip bags |
| Pins, needles | Magnetic cases |
| Buttons | Spice jars |
Repurpose what you have to save cash and space. Keep a tray or basket for in-progress projects so your supplies don’t wander all over the place.
Curating Minimalist Tools and Materials
If you keep only what you use, you’ll find things faster and enjoy your space more. Thoughtful choices—whether you’re buying or just keeping—make a big difference.
Decluttering Non-Essentials
Let’s be real: most of us have a stash of “just in case” supplies. Minimalism means clearing out duplicates, dried-out paints, and tools you haven’t touched in forever. Start by laying out everything and asking, “Did I use this in the last year?”
Quick declutter checklist:
- Toss broken or worn-out tools
- Donate extras
- Keep multi-use items
- Recycle or safely dispose of expired stuff
Cutting the excess gives you more room—physically and mentally—to create. Keep the basics, ditch the “what ifs.”
Quality Over Quantity
A few quality tools beat a drawer full of junk. Invest in good scissors, a solid cutting mat, and a dependable glue gun. It’s worth asking around or reading reviews—good tools last years.
For your most-used stuff, go for brands that last rather than the cheapest thing on the shelf. A couple of sharp craft knives, decent paintbrushes, and a trusty ruler usually cover most projects. Store them where you can grab them fast.
Eco-Friendly Crafting Materials
A minimalist craft corner feels even better when you think about the planet. Choose recycled paper, organic cotton, or biodegradable glues. Lots of art stores now have eco-friendly sections, so it’s easier to make the switch.
Some eco swaps to try:
| Conventional | Eco-Friendly Alternative |
|---|---|
| Acrylic felt | Wool felt or bamboo felt |
| Plastic beads | Wooden or glass beads |
| Synthetic yarn | Organic cotton, bamboo |
Using “waste” like jars, fabric scraps, or cardboard adds character and cuts down your crafting footprint. Local sources are a bonus—supporting small businesses feels good and makes your projects more meaningful.
Maintaining an Organized Craft Area
A tidy craft area means you find stuff fast and spend less time cleaning up. That’s more time for making things, less for hunting through piles.
Establishing a Cleanup Routine
A quick cleanup routine keeps the mess from taking over. Make a habit of wiping surfaces after each project and putting tools back right away.
Try a simple checklist:
| Task | Frequency |
|---|---|
| Wipe surfaces | After use |
| Sweep/vacuum floor | Weekly |
| Put away tools | After use |
| Sort scraps/bins | Weekly |
Keep a basket or bin nearby for fast pickups. If you build cleanup into your process, it gets easier, kind of like rinsing your brushes before they turn into rock-hard mystery sticks.
Regular Purge Sessions
Supplies seem to multiply when you’re not looking. Set aside a little time each month to go through drawers and bins and ditch what you don’t need.
Let’s be honest—dried-up markers and weird fabric scraps aren’t likely to become your next masterpiece. If you haven’t used something in six months, it’s probably time to toss, donate, or recycle it.
Make three piles: keep, toss, donate. Label bins or bags so sorting is quick. Small, regular purges keep your craft space functional and inspiring without feeling overwhelming.
Adding Inspiration Without the Clutter
We all need creative sparks in our craft corners, but nobody wants to drown in stuff. Choose simple, intentional ways to display inspiration so your ideas keep flowing, without the mess.
Display Boards and Minimal Wall Decor
Let’s grab some pinboards, cork strips, or a wire grid to keep inspiration right in front of us. These make it easy to swap out images, fabric swatches, or color palettes whenever we feel like it, without making the walls feel crowded. One simple bulletin board is honestly enough for a rotating display of whatever we’re working on.
A magnetic strip or a slim floating shelf can hold just a handful of favorite items or tools. It’s tempting to fill every inch, but let’s leave some space empty on purpose. That way, the corner feels more open, and the inspiration we pick pops.
For wall decor, choosing just a couple of small prints or a favorite quote works best. No need for a gallery wall or tons of art—keeping it minimal helps the space feel calm and focused. Sometimes just swapping out a piece or two for the season gives the whole area a lift.
Inspiration Notebooks
Instead of letting magazine clippings and loose papers pile up, we can stick to a single inspiration notebook or journal. A small dotted notebook or a sketchbook that fits in a drawer or basket does the trick.
We jot down ideas, tape in swatches, or sketch quick designs whenever inspiration strikes. Keeping everything in one spot means we don’t lose track of good ideas, and flipping through old pages can spark something new.
Using tabs or sticky notes helps us find favorite sections fast. Decorating the cover with a sticker or a bit of washi tape adds a personal touch, but doesn’t clutter up the workspace.
Making the Most of a Small Space
Even the tiniest nook can turn into a productive crafting hub with a few tweaks. Focusing on space-saving solutions helps keep things tidy, and our supplies stay within reach.
Fold-Out and Collapsible Features
Fold-out tables or wall-mounted desks come in handy when floor space is tight. When we finish crafting, we just fold things away, and the room looks neat again. Collapsible chairs or stools can slide under the desk or hang on a hook, so they don’t hog valuable space.
A pegboard on the wall gives us a spot to hang foldable organizers, scissors, and ribbons, clearing up the workspace. A compact cart with collapsible sides can serve as a mobile workstation or tuck into a closet when we’re done. Furnishings that move or fold away make a minimalist craft setup so much easier.
Dual-Purpose Decor
Anything we add to our small craft corner should earn its keep. Storage that doubles as decor? Yes, please. Clear jars hold buttons, beads, or washi tape and look colorful on a shelf.
Mounting a magnetic strip for shears and metal tools turns the wall into a functional tool shed and a bit of an accent, honestly. Decorative baskets stash yarn or fabric and add some texture. A solid storage ottoman gives us extra seating and a spot to hide supplies. When craft essentials blend with the room’s vibe, the space stays uncluttered and feels like ours.
Personalizing Your Minimalist Craft Corner
Adding a personal touch makes a minimalist craft corner feel inspiring without piling on clutter. We don’t need a bunch of knick-knacks—just a few details that show off our style.
A couple of well-chosen pieces change the mood. Think: a small potted plant, a framed bit of our art, or a single patterned storage bin. These bring some personality and warmth.
Here’s a quick table of ideas:
| Personal Touch | How It Adds Character |
|---|---|
| Fabric scrap bunting | Color and texture |
| Custom labels | Organized and individualized |
| Favorite mug | Cozy, personal vibe |
We can swap out these details as our tastes or projects shift. Maybe we switch to seasonal fabric bins or update the inspiration board now and then.
Even practical stuff—scissors, rulers, washi tape—can brighten things up if we pick versions we like looking at. A pop of color on basic tools? Surprisingly cheerful.
Let’s keep it to just a couple of personal touches. That way, the space feels like ours but doesn’t get crowded. Creativity stays in the spotlight, and our craft corner always feels welcoming.
Frequently Asked Questions
We all want craft spaces that work, look good, and don’t get out of hand—even if we’re on a budget or squeezing into a small spot. There’s always a way to make our DIY zones more useful.
What's the best way to set up a craft corner when you're tight on space?
We can use vertical space with shelves and wall-mounted organizers. A fold-down desk saves floor space when we’re not crafting. Keeping only the essentials nearby stops clutter from taking over.
How can I create a stylish craft area without breaking the bank?
Painting a pegboard or tossing on a cheerful tablecloth gives the setup a boost. Repurposing jars, baskets, or trays from around the house works for storage and display. Thrift stores often have affordable tables or unique decor if we’re lucky.
Where can I find some space-saving storage solutions for my DIY materials?
Modular drawer units, slim rolling carts, and stackable baskets are easy to find at home goods stores or online. Clear bins help us see what’s inside, and over-the-door organizers add extra space for supplies. Labels make it quicker to grab what we need.
Got any nifty organization hacks for keeping a craft room tidy?
Grouping similar supplies in bins or dividers helps. Hanging tools and scissors on hooks keeps them handy but out of the way. Donating or tossing stuff we don’t use opens up more space.
Can I transform a tiny nook into a functional craft area, and how?
A floating shelf or compact table can turn almost any corner into a workspace. Good lighting—like a clip-on lamp—makes a huge difference. Hanging storage on the wall keeps surfaces free for crafting.
What are some clever, low-cost DIY storage ideas for craft supplies?
You can toss buttons or beads into old glass jars—it keeps them easy to see and grab. Try hanging a shoe organizer over the door; those pockets are just right for yarn, paints, or bottles of glue. If you’ve got empty tin cans or cereal boxes lying around, dress them up with some paint or fun paper and use them for pencils or as tiny shelves. It doesn’t have to be fancy to work!