

Check out our latest home & kitchen collection!
A kitchen that flows naturally between storage, prep, and cooking areas can totally change how you move through meal prep.
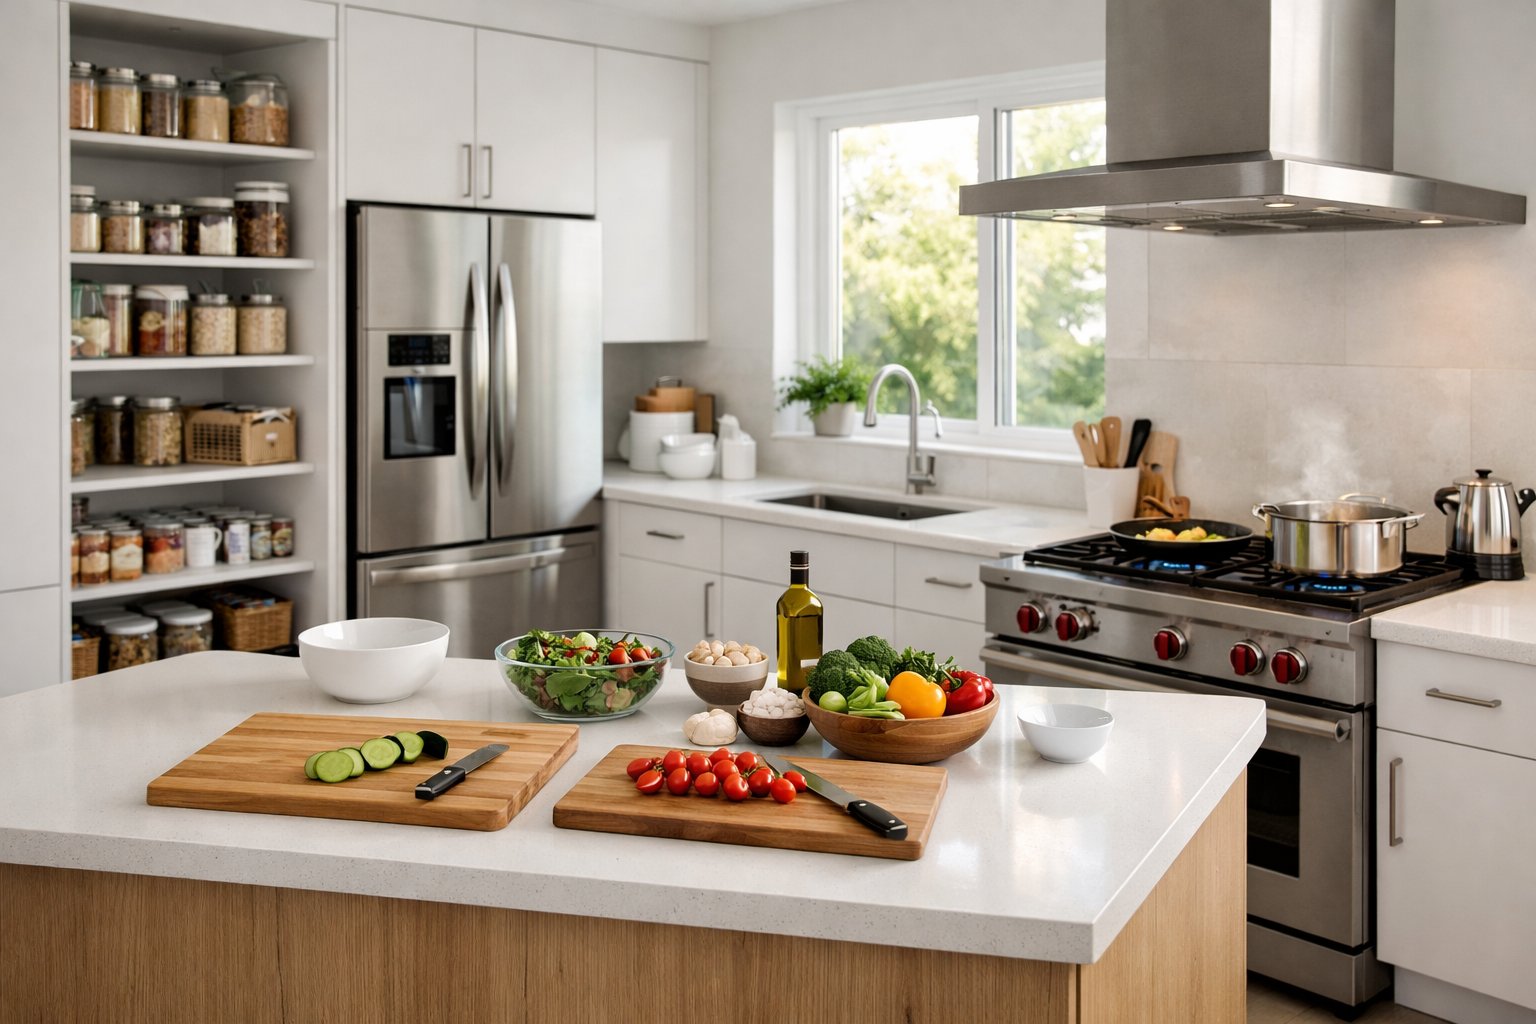
Efficient kitchen flow depends on putting your refrigerator, prep counter, and stove in a sequence that just makes sense, no wasted steps, no running in circles. When these zones connect smoothly, you spend less time hunting for ingredients or tools and more time actually cooking.
We've all had that moment, reaching for olive oil and realizing it's way across the kitchen, or unloading groceries into a fridge that's nowhere near your prep space. Small annoyances like these really add up, making cooking feel more like a chore than something fun.
The upside? You don't need a full kitchen remodel to fix this. Just understanding how your kitchen zones interact can make a huge difference.
Whether your kitchen is a tiny galley or a big open space with an island, the basics of flow still apply. Arrange your storage, prep, and cooking areas to match the way you naturally move. That way, your workspace feels intuitive and, honestly, a lot less frustrating.
Let's dig into how you can map out these connections and make some practical tweaks, nothing fancy, just stuff that actually helps.
Key Takeaways
- Put your refrigerator, prep area, and stove in a logical order so you don't waste steps
- Store frequently used items close to where you'll use them for a smoother workflow
- Watch how you move, then adjust storage to cut down backtracking and traffic jams
Defining the Flow Between Storage, Prep, and Cooking Zones
Efficient kitchen flow comes down to how well your storage, prep, and cooking areas connect. When these zones work together, you actually get to spend more time cooking and less time pacing back and forth.
What Are Kitchen Zones?
Kitchen zones are just areas where certain tasks happen. The storage zone is for pantry stuff, fridge items, and the ingredients you use all the time. The prep zone is where you chop, measure, and get everything ready to cook. The cooking zone is your stove, oven, and all the gear that goes with them.
This setup is basically the old-school kitchen work triangle—refrigerator, sink, and stove, all linked. Each zone needs its own counter space and storage for the tools you actually use there. For example, keep cutting boards and knives in the prep area, pots and spatulas near the stove, and so on.
The best layouts keep these zones close for efficiency but not so close that you’re bumping elbows if more than one person’s in the kitchen.
Why Efficient Flow Matters
Bad kitchen workflow just burns time and energy. If your pasta lives in one corner, your prep area’s across the room, and your stove’s at the far end, you end up making endless trips. A good flow cuts those steps way down.
Ideally, you grab what you need from storage, prep it a few feet away, and then slide it right onto the stove. That’s just how most of us cook anyway, right? Studies in kitchen ergonomics say that cutting down movement between the work triangle points can save up to 30% of your meal prep time.
There's a safety angle too. Fewer trips with hot pans or heavy pots means fewer spills and less chance of accidents.
Common Pitfalls of Poor Zone Planning
Biggest mistake? Splitting up things that go together. If your olive oil’s nowhere near the stove or your mixing bowls are far from your prep spot, you’ll constantly retrace your steps.
Not enough counter space between zones is another headache. If there’s nowhere to set groceries by the fridge or hot pans by the stove, you wind up juggling stuff or making extra trips.
Overlapping zones can be a pain, too. If your prep zone and cooking zone share one little counter, you can’t chop veggies while something’s simmering. And if two people are cooking, you’re bound to bump into each other.
Mapping Out the Kitchen Layout for Seamless Flow
How you physically arrange your kitchen decides if cooking feels smooth or exhausting. Get the zones in the right spots, and you’ll cut out wasted steps and keep everything right where you want it.
Popular Kitchen Layouts and Their Impact on Flow
Kitchen layouts shape how you move. A galley kitchen lines everything up on two walls—straightforward for one cook, but tight if you’ve got company.
L-shaped kitchens wrap work zones around two walls, which helps keep the cooking area away from foot traffic and often leaves room for an island or table. Honestly, this setup feels great when people want to hang out while you’re cooking.
U-shaped kitchens surround you with counters and storage on three sides. Everything’s close, but if the gap between counters gets too narrow (under 42 inches), it can feel cramped. One-wall and peninsula layouts are out there too, and sometimes they’re just what you need in a small or open space.
Strategic Placement of Zones
Put your refrigerator where you usually enter the kitchen workflow—makes sense since that’s where you grab ingredients first. Keep it away from the stove to avoid heat and door collisions.
Give your prep zone the most counter space—ideally 36 to 42 inches, right near both the fridge and sink. Store cutting boards, knives, and mixing bowls here so you’re not running around for basics.
Cluster your stove, oven, and microwave together, with at least 15 inches of landing space on both sides for pots and pans. Keep potholders, utensils, and go-to spices close. The sink should sit between prep and cooking so you can wash, fill pots, and clean up without zigzagging.
Optimizing the Kitchen Work Triangle
The kitchen work triangle links your three main spots: fridge, sink, and stove. Each side should be 4 to 9 feet, with a total triangle of 13 to 26 feet. That’s the sweet spot for efficiency.
Keep the triangle clear—don’t let islands or traffic paths cut through it. In bigger kitchens, you might have more than one triangle: maybe a baking area near wall ovens and another for the cooktop.
The triangle idea still works, but modern kitchens often use zones. If you cook with someone else, consider overlapping zones so you’re not always in each other’s way. Park the dishwasher close to the sink (within 36 inches), and keep trash and recycling near the prep area for easy cleanup.
Fine-Tuning Each Zone: Key Functions and Smart Tools
Each zone needs its own tools and organization to really shine. Good storage keeps ingredients fresh and easy to grab, a smart prep area speeds things up, and a well-organized cooking zone cuts down on steps.
Maximizing the Storage Zone
Go vertical with storage. Pull-out shelves and drawer organizers turn deep cabinets into spaces you can actually use—no more losing stuff in the back. A spice rack near the prep area beats digging through messy cabinets mid-recipe.
Drawer dividers for utensils and measuring tools help keep things neat. Vertical racks for sheet pans, cutting boards, and lids stop the chaos that comes with stacking.
Try grouping items by function, not just type. Baking supplies together, breakfast stuff in its own spot. Clear containers for dry goods make it easy to see what you’re running low on and keep things fresh.
A magnetic knife strip on the wall frees up counter and drawer space. Plus, it keeps your knives sharp and easy to grab.
Creating an Efficient Prep Zone
Your prep area needs a clear, roomy surface with all your go-to tools within reach. Set this up between storage and cooking so you’re not running laps.
Mount racks above or beside the prep spot for peelers, graters, and scissors. Knife storage should be right next to where you cut—whether that’s a magnetic strip, a block, or a drawer insert.
Store cutting boards vertically in a rack or divider so you can just grab what you need. Keep a little bowl for scraps handy to keep your surface clear.
Use drawer organizers for specialty tools—zesters, thermometers, kitchen shears. Group tools by what you use them for: veggies, meat, baking, whatever makes sense.
Organizing the Cooking Zone
The cooking station needs heat-safe tools and the ingredients you use while cooking right there. Store oils, salt, pepper, and key spices next to the stove in heatproof containers or a spice rack.
Pot holders, wooden spoons, spatulas—they all belong in a crock or hanging up beside the cooktop. That way, you’re not opening drawers with messy hands. Keep pot lids close by, in dividers or on a rack.
Store pans right below or beside the cooktop. Drawer dividers or organizers keep them tidy and easy to grab. If you use cast iron or certain pans all the time, hang them if you’ve got the space.
Keep cooking oils on a tray to catch drips and make cleaning easier. It’s a small thing, but it beats scrubbing sticky shelves later.
Optimizing the Flow: Traffic Patterns and Workflow Hacks
Even the best triangle falls apart if you’re always bumping into people or backtracking for forgotten tools. The real trick is managing traffic and putting your most-used stuff exactly where you need it.
Identifying and Reducing Kitchen Bottlenecks
Bottlenecks are where everyone wants to use the same spot at once. The sink’s usually the worst offender—it’s both the cleaning zone and where most prep happens.
Adding a second prep sink on an island or creating a separate coffee station helps a ton. Keeps the morning crowd out of your way when you’re trying to cook.
Trash and recycling bins can slow you down too. If they’re under the sink, you’re always cutting through the cleaning zone. Pull-out bins near the prep area work better, and a countertop compost container saves even more steps.
Pay attention to the path between your fridge and stove. If you have to dodge around an island or the dishwasher, that’s your bottleneck. Sometimes just changing which way a door swings or nudging the dishwasher a couple feet can fix it.
Notice where people naturally walk. If family members cut through your kitchen workflow to get to the garage or pantry, you might need to shift your work triangle or reroute the traffic.
Strategic Appliance and Tool Placement
Keep every appliance and tool within one step of where you actually use it. The stuff you grab all the time should be between your shoulders and knees—not in a cabinet you need a stool for.
Task lighting over prep areas and the stove isn’t just about seeing better—it makes you work faster and safer, too.
The ventilation hood should stick out at least three inches past the cooktop on each side to catch steam and smoke. Bad ventilation just leaves smells and sticky residue everywhere, which means more cleaning later.
Store pots and pans by the stove, knives and boards at the prep zone, and dishes near the dishwasher. You shouldn’t have to open more than one drawer or cabinet for any single task. It sounds obvious, but most kitchens miss the mark because we don’t plan storage around how we actually cook.
Customizing Zones for Specialized Needs
Different cooking styles and households need their own tweaks—maybe you want a baking station, a coffee setup, or a kid-friendly snack zone. Tailoring your kitchen to what you do every day can make all the difference.
Baking Stations and Coffee Bars
A real baking zone needs lower counters—about 34-36 inches—so you can actually get some leverage for kneading dough or rolling pastry. Keep the baking area close to the oven but not smack in the middle of your busiest prep space; nobody wants flour dust everywhere.
Essential baking zone elements:
- Pull-out shelf for stand mixers (needs at least 18 inches vertical clearance)
- Marble or granite insert for pastry work
- Deep drawers for baking sheets and cooling racks
- Storage for flour, sugar, and specialty ingredients
Coffee bars? They work best tucked into corners or along a wall outside the main cooking path. Floating shelves above hold mugs, and a little appliance garage below hides the coffee maker when it’s not in action. A 24-30 inch stretch of counter usually fits a machine, grinder, and a bit of prep space.
If you can, run a water line to the coffee bar so you’re not schlepping pitchers across the kitchen. And make sure there’s an outlet with its own circuit nearby—nobody wants a tripped breaker mid-brew.
Kid-Friendly and Multiuser Zones
Lower counters—think 30-32 inches—let kids help out safely, no step stools required. Set aside a cabinet or drawer with kid-safe tools: plastic measuring cups, wooden spoons, unbreakable bowls. Makes things way easier.
Having more than one prep station keeps everyone from crowding into one spot. A second prep area with its own cutting board storage and knife access lets two people cook without bumping elbows. If you put a prep sink in the island, you get a washing station that’s separate from the main cleanup zone.
Lazy susans in corner cabinets make it easier for kids to grab snacks and lunch stuff on their own. Keep the everyday items down low, within reach, and stash anything risky—like cleaning supplies—up high.
Serving Zone and Entertaining Spaces
The serving zone connects cooking and dining, and you’ll want 36-48 inches of counter near where people eat. Place it so you can move from stove to plating to table without zig-zagging through the kitchen.
A breakfast bar off the island gives you casual seating and doubles as a serving counter during parties. Plan for 24 inches of depth and 30 inches of width per person if you want it to actually feel comfortable.
Built-in warming drawers here keep dishes hot while you finish up the rest. Shallow drawers under the serving counter hold table linens, utensils, placemats—everything you need, right where you need it.
Storage Innovations That Enhance Kitchen Flow
Modern storage ideas really do make life easier by putting what you need exactly where you use it. Less running around, less clutter, more sanity.
Pull-Out Organizers and Drawer Dividers
Pull-out shelves turn deep cabinets from ingredient graveyards into usable storage. Stick these organizers near your prep area for oils, spices, and anything you grab a lot. They’re especially good in corners and lower cabinets where stuff tends to get lost.
Drawer dividers keep utensils and gadgets from turning into a tangled mess. Customize them for your own tools—measuring spoons, whisks, spatulas—so you can actually find what you need without digging around.
Put these smart storage solutions where you actually use them. Pull-out racks for oils and spices near the stove, drawer dividers for knives and measuring cups by the prep counter. This cuts down on pointless trips and keeps things moving.
Vertical and Overhead Storage Solutions
Vertical storage uses your walls and tall cabinets to keep tools handy without eating up counter space. Wall-mounted racks for pots and pans between the stove and prep area mean no more crouching around in cabinets. Magnetic knife strips near your cutting boards? Super convenient.
Overhead pot racks work best above islands or close to where you cook. Hang what you use all the time; stash the rest in cabinets. Tall shelving in the pantry lets you see everything at once, so you’re not hunting for ingredients mid-recipe.
These tricks can boost your kitchen’s storage capacity by about 30%—no remodel required. The trick is to match storage to the task: utensils by the stove, spice racks at eye level near prep, overhead racks where they’re not in your way.
Frequently Asked Questions
Optimizing kitchen flow is really about understanding how you move between zones, managing distances, and making smart layout decisions.
How can I optimize my kitchen layout to improve the movement from storage to prep to cooking?
Put your most-used stuff where you’ll actually use it. Cutting boards and knives go by your prep counter, cooking oils by the stove, and everyday ingredients at eye level in the closest cabinets.
Try mapping your usual routine before you reorganize. If you always grab eggs from the fridge, crack them at the counter, then head to the stove, set those three spots up so you’re not doubling back.
Keep your storage, prep, and cooking zones within a few steps—ideally 4 to 9 feet apart. Too far, and you’ll feel like you’re running laps.
And watch out for traffic. If your family walks through your prep zone to get to the pantry, you’ll be dodging people every time you cook.
What are the ideal dimensions for a kitchen work triangle to ensure efficient meal prep?
The classic work triangle connects sink, stove, and fridge, with a total perimeter of 12 to 26 feet. Each side should be 4 to 9 feet.
Less than 4 feet and you’re bumping into things; more than 9 feet and you’re hiking. Try not to let the triangle get cut by a busy walkway—you don’t want someone crossing between you and the stove with a hot pan in your hands.
Medium-sized kitchens get the most out of the work triangle. Really small or huge kitchens often do better with zones.
Could you give me a quick rundown on creating a new kitchen setup that's both practical and efficient?
Figure out your five main zones: cooking, prep, cleaning, consumables storage, and non-consumables storage. Cooking zone goes around the stove, cleaning by the sink, prep on the counter between them.
Store stuff where you use it. Pots and pans by the stove, knives by the prep area, dish soap by the sink. Simple, but for some reason, a lot of kitchens ignore this.
Give yourself at least 36 inches of clear counter for prep—it makes a huge difference. Tiny prep spaces slow everything down.
Stack similar items vertically with shelf risers, drawer dividers, and pull-outs. You’ll see what you have, and it’s way easier to grab what you need.
Is adding an island to my kitchen work triangle a recipe for success or a space-clogging disaster?
An island’s great if you have at least 42 to 48 inches of space around it. Any tighter, and it’s just in the way.
Islands are perfect for prep—store mixing bowls, cutting boards, and baking stuff underneath. You can put a cooktop or sink in the island, but be careful: it might mess with your work triangle, depending on where your other appliances are.
We’ve seen plenty of islands turn into obstacles because they’re too big or block the fridge-to-stove path. Before you commit, tape the dimensions on your floor and walk through your usual routine.
If your kitchen’s under 150 square feet, skip the island. A rolling cart gives you extra space without eating up the whole room.
What's the secret sauce for balancing different types of work triangles in a kitchen?
If you’ve got more than one cook, set up multiple work triangles that don’t overlap at the main cooking zone. One triangle could link the fridge, prep sink, and microwave; another connects the main sink, stove, and oven.
Set secondary zones along the edges or on an island so people aren’t fighting for the same burner. Assign tasks to each triangle—maybe one person does mains, another handles sides or drinks.
Make sure each triangle has its own counter and storage. Sharing a cutting board or knife drawer just creates traffic jams and kind of defeats the whole point.
When designing an L-shaped kitchen, how do I prevent turning my cooking flow into a Bermuda Triangle?
Try putting your sink in the corner or along one wall, then stick your stove and fridge on opposite legs of the L. That way, you’ll end up with natural work zones and won’t waste steps zigzagging around.
Corner cabinets, let’s be honest, are where kitchen gadgets go to vanish. Toss in a lazy Susan, pull-out shelves, or even a funky corner drawer system so you can actually reach your stuff.
Use the longer leg of the L for your main prep area. There’s just more counter space, and honestly, prepping on the short side always feels a bit cramped, doesn’t it?
Don’t shove tall cabinets or the fridge right up against the corner. It blocks your view, makes the kitchen feel boxed in, and those doors? Awkward.
Share:
Why Matching Storage Improves Kitchen Functionality
Why Matching Storage Improves Kitchen Functionality