

Check out our latest compact vacuum sealer for food collection!
Great cooking starts before the heat does. When your ingredients are washed, prepped, and stored properly, cooking feels smoother, safer, and far less stressful. A few smart habits can help you avoid cross-contamination, cut food waste, and keep everything within easy reach when it is time to cook.
You do not need professional training or complicated tools to handle ingredients well. With a simple routine for planning, prepping, and storing what you buy, you can make everyday cooking more organized and more enjoyable.
In this article, you will learn how to prep ingredients efficiently, store them properly, and keep your kitchen workflow clean and easy.
Key Takeaways
- Organizing your workspace and prepping ingredients before cooking makes everything smoother and safer
- Washing, storing, and portioning ingredients right helps keep food fresh and reduces waste
- Good food safety habits and sharp knives make meal prep faster and less stressful
Start Strong With Meal Planning
Planning what you’ll cook and shopping with intention keeps the kitchen organized and cuts out last-minute stress. These two habits really set the stage for better ingredient handling.
Building a Weekly Prep Routine
Setting aside a bit of time each week to plan meals makes ingredient management so much easier. Start by picking out dishes for the week. Check what’s already in your fridge and pantry so nothing gets forgotten.
When you map out meals, you’ll spot ingredients that overlap. That means less waste and fewer random half-used items lurking in the back of your fridge. For example, if three recipes call for fresh herbs, just buy one big bunch instead of several small ones.
Pick a day to review recipes and jot down what needs washing, chopping, or portioning ahead of time. This keeps you from scrambling during busy evenings.
Batch prepping basics like grains, proteins, or chopped veggies on your planning day saves a ton of time later. Store them in clear containers with dates, and they’ll be ready to grab when you need them.
Creating a Functional Grocery List
Organize your grocery list by store section. This makes shopping so much faster and helps prevent forgotten items. Group produce, proteins, dairy, and pantry staples separately.
Check your kitchen before you write the list. This keeps you from buying duplicates and overstuffing your shelves. Note the quantities you actually need, not just vague amounts.
Focus on versatile ingredients that work in several meals. Things like onions, garlic, olive oil, and stock end up on the list a lot because they’re the backbone of so many recipes. It keeps shopping focused and the pantry manageable.
Be specific: write “three medium carrots” instead of just “carrots.” That way, you buy what fits your recipes and storage, not a mystery amount that ends up rotting.
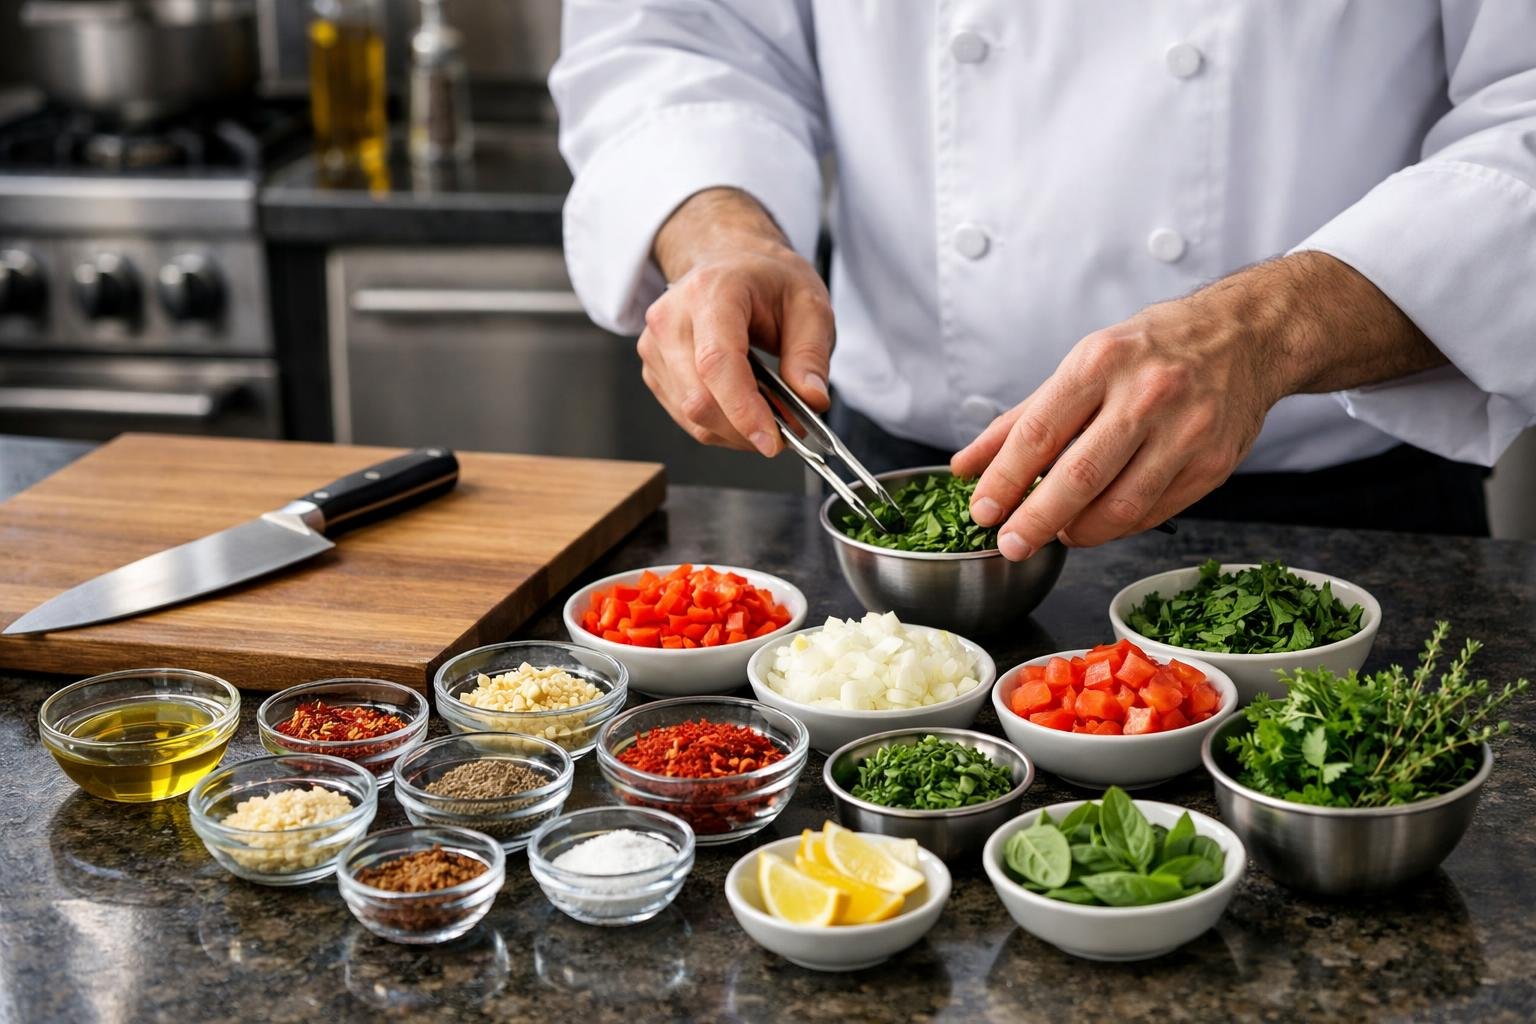
Mise en Place: Your Secret Weapon
Getting everything prepped and in place before you start cooking can turn chaos into confidence. That means setting up a workspace, arranging ingredients in the order you’ll use them, and having your tools where you can actually reach them.
Setting Up an Efficient Prep Station
First, clear your workspace. A crowded counter just leads to forgotten ingredients and unnecessary stress.
Set up three zones: a cutting area with your board, a spot for prepped ingredients, and a discard area for scraps. Keep your go-to tools (chef’s knife, bench scraper, measuring spoons) right by your cutting board. The bench scraper is a lifesaver for moving chopped ingredients without making a mess.
Put your ingredient collection area between the cutting zone and the stove. This way, you’re not running laps across the kitchen mid-recipe. If you’re tight on space, use a big cutting board or baking sheet as a staging area. A small bowl for compost scraps is handy, too.
Temperature matters. Keep cold ingredients in bowls near an ice pack until you need them, especially if you’re prepping in stages.
Gathering and Organizing Prepped Ingredients
Measure and prep every ingredient before turning on the heat. That’s the heart of mise en place.
Small glass bowls or ramekins are your best friends here. Arrange them in recipe order. If garlic goes in first, put it closest to the stove. This keeps you from forgetting or mis-timing anything.
Group together veggies that cook at the same time. Spices that go in together can share a bowl. If you’re juggling multiple recipes, slap a quick label on each.
For things that brown fast (like apples or avocados), prep them last or toss with a little lemon juice. Always keep raw proteins away from ready-to-eat stuff, and position them farthest from everything else.
Selecting Handy Tools for Ingredient Prepping
The right tools speed up prep without cluttering your drawers.
A sharp chef’s knife handles most jobs, but a food processor is a real time-saver when you’ve got lots of garlic to mince, veggies to shred, or breadcrumbs to make. It’s not for everything (herbs turn to mush), but for big chopping jobs, it’s worth the cleanup.
Our go-to tools:
- Bench scraper for moving ingredients and cleaning up
- Microplane for zesting and grating
- Y-shaped veggie peeler for quick work
- Kitchen shears for herbs and trimming
- Small prep bowls in different sizes
- Measuring cups and spoons kept together
A damp towel under the cutting board stops it from slipping. Simple tool choices like these make prep faster and safer, so you can focus on cooking instead of wrestling with your gear.
Washing, Drying, and Prepping Produce
Cleaning and drying produce right before storage helps prevent foodborne illness and keeps things fresh longer. The right approach for each type keeps ingredients crisp and ready.
Using a Salad Spinner for Leafy Greens
A salad spinner gets water off leafy greens way better than just towels. We dunk spinach, kale, and lettuce in a big bowl of cold water for a couple minutes, swishing to loosen dirt.
After draining, we move the greens to the spinner and give them a few good spins. The centrifugal force pulls water away from the leaves without bruising them. Moisture left on greens turns them slimy fast, so this step matters.
Clean your salad spinner after each use. Take it apart and wash with hot, soapy water or run it through the dishwasher. This keeps it from getting funky and helps it last for years.
Best Practices for Washing and Drying
Wash your hands for at least 20 seconds before handling produce. Cold running water is best for most fruits and veggies. Soaking can actually spread bacteria.
For firm things like apples, potatoes, and pears, scrub under running water with a veggie brush. Root veggies need a good scrub to get rid of soil. Berries get a gentle rinse in a colander. Never soak them, or they’ll turn to mush.
Dry everything with a clean towel or paper towels. This small step keeps things from spoiling too soon. Even organic produce needs a wash. Dirt and germs do not care about labels.
Prepping Vegetables for Storage
We prep ingredients right after washing and drying. Cut away any damaged or bruised areas before storing. Rot spreads fast.
Leafy greens last longer wrapped in dry kitchen towels inside airtight containers. The towel soaks up extra moisture but lets air circulate. Herbs do best with their stems trimmed, standing in a jar of water, loosely covered with a plastic bag.
Root veggies like carrots and beets? Leave the peels on and store in a cool, dry place (around 10-15°C). Prepped ingredients in clear containers at eye level in the fridge get used first, keeping waste down and meal prep smooth.
Smart Chopping, Slicing, and Measuring
Good cutting and measuring habits make cooking less of a scramble. With a set workspace and consistent methods, you save time and keep your fingers safe.
Chopping Techniques for Speed and Safety
Start with the pinch grip. Pinch the blade where it meets the handle with your thumb and forefinger, then wrap your other fingers around the handle. It gives you control and keeps your hand from getting tired.
Curl your guide hand into a claw and rest the blade against your knuckles. This keeps fingertips safe and helps your cuts stay even. Same-size pieces cook evenly, which is half the battle.
For chopping, keep the knife tip on the board and rock the blade up and down. Move your guide hand forward as you go. This rocking motion is great for herbs, garlic, and most veggies.
Setup essentials:
- Damp towel under the board
- Board at belly-button height
- Sharp knife (dull blades are dangerous)
- Use wood or plastic boards, not glass or stone
Slicing and Dicing Do's and Don'ts
When slicing, pull the knife back a bit to start, then push forward and down in one smooth move. Let the whole blade do the work.
Do:
- Square off round veggies for a flat surface
- Always cut away from yourself
- Keep thickness consistent for even cooking
- Use separate boards for raw proteins
Don’t:
- Try to catch a falling knife (just step back!)
- Cut on glass, stone, or metal. They dull blades
- Rush through cuts when tired or distracted
- Leave knives loose in sink water
For meal prep, julienne (matchstick) cuts stack well in containers and cook evenly later.
Pre-Measuring Dry Ingredients
Measure dry ingredients before starting to keep your flow once things heat up. Rice, flour, spices, and pasta go in small bowls within reach.
When batch cooking, measure everything into labeled containers ahead of time. Monday’s dinner can be prepped in five minutes if you’ve done this. Pull out pre-measured ingredients, cook, and stash leftovers without breaking your rhythm.
Measuring tips:
- Use scoop and level for flour. Don’t pack it down
- Measure spices into bowls, not over the pot
- Label containers with what’s inside and how much
- Store pre-measured stuff airtight if prepping ahead
For things you use a lot, clip measuring spoons to the container. No more hunting mid-recipe.
Safe Food Handling Essentials
Handling food safely keeps you from getting sick and helps ingredients last longer. The basics? Keep raw and ready-to-eat foods apart, store everything at safe temps, and use a thermometer to check doneness.
Avoiding Cross-Contamination
Cross-contamination is when bacteria move from one food or surface to another. It’s a top cause of foodborne illness. Keep raw meat, poultry, seafood, and eggs away from foods you won’t cook before eating.
Use separate cutting boards: one for raw animal products, another for veggies, fruit, and ready-to-eat stuff. Color-coded boards make it obvious.
Wash your hands with soap and warm water for at least 20 seconds after handling raw ingredients. This includes after touching meat packaging, cracking eggs, or working with unwashed produce. Clean knives, utensils, and counters between tasks, too.
Always marinate meat in the fridge, never on the counter. If you want to use the marinade as a sauce, set some aside before it touches raw food, or boil the used portion thoroughly.
Fridge, Freezer, and Storage Safety Tips
Keep your fridge at 4°C or below, and your freezer at -18°C. These temps slow down bacteria and help ingredients last between shopping and cooking.
Raw meat, poultry, and seafood go on the bottom shelf in sealed containers or on plates to catch drips. No one wants a chicken juice surprise. Cooked foods and ready-to-eat stuff belong on upper shelves where nothing can drip onto them.
Most refrigerated items stay fresh for three to four days after opening or cooking. Label containers with dates so you know what needs using first. Leftovers should hit the fridge within two hours of cooking. One hour if it’s sweltering and over 32°C.
Wrap freezer items tightly to ward off freezer burn and keep things tasting right. Good packaging also helps you stay organized and actually find what you’re looking for (instead of digging through mystery bags).
Using a Food Thermometer for Confidence
A food thermometer is the only way to really know if meat, poultry, seafood, and egg dishes are cooked safely. You can’t tell doneness by colour or texture. Those change too much depending on the cut or how you cook it.
Stick the thermometer into the thickest part of the food, steering clear of bone, fat, or gristle. For whole poultry, check the thigh and the thickest part of the breast. Ground meat needs 71°C, poultry 74°C, and whole cuts of beef, pork, and lamb are safe at 63°C (let them rest three minutes).
Digital instant-read thermometers are a game-changer. They are fast, reliable, and work for everything from roasts to thin cutlets. Wash the probe with hot soapy water between uses to avoid cross-contamination. Test your thermometer’s accuracy by making sure ice water reads 0°C.
Containers and Storage Solutions for Freshness
Good storage containers keep prepped ingredients from drying out or picking up fridge funk. Smart labelling means you won’t forget what’s hiding in the back, and storing batch-cooked meals right can seriously stretch their shelf life.
Choosing Airtight Containers and Bags
Airtight containers block oxygen and humidity. These are the biggest enemies of fresh food. Glass with rubber-sealed lids is great for dry goods like flour or rice since glass doesn’t hold onto smells or chemicals. Make sure the lid really clicks closed.
Plastic containers are light and handy for short-term storage, but they can pick up stains and odours. If you’re storing acidic or oily foods, go with BPA-free plastic. Metal containers work well for coffee, tea, and spices, keeping light out so flavours last.
Reusable silicone bags are flexible, airtight, and don’t hog space in the fridge. They’re awesome for marinating proteins or stashing cut veggies. For long-term freezer storage, vacuum-seal bags suck out extra air and keep food fresh longer.
Best Ways to Store Prep Ingredients
Put raw proteins on the bottom fridge shelf in sealed containers. Original packaging tears too easily. For veggies, it depends on the type.
Wrap leafy greens in slightly damp paper towels inside perforated bags to keep them crisp. Store cut onions and garlic in tightly sealed containers to control their powerful smell. Carrots and celery stay crunchy upright in water-filled containers (swap the water every few days).
Let batch-cooked food cool before freezing to avoid ice crystals. Portion into single servings so you can reheat just what you need instead of thawing a whole batch.
Labelling to Reduce Food Waste
Labels with prep dates save you from guessing how long something’s been around. Masking tape and a permanent marker do the job and peel off glass easily. Write the date and what’s inside. Leftover soup and curry look pretty similar after a week.
Keep a freezer inventory list on a notepad stuck to the door. Cross off items as you use them so you don’t end up with mystery meals months later. It’s a simple way to cut down on waste and make sure you use up food before it’s too late.
Colour-coded labels can help too. Try red for “use now,” yellow for “this week,” and green for “good for a while.” It’s faster than reading every label and helps you spot what needs eating.
Frequently Asked Questions
Good ingredient handling comes down to freshness, safe storage, and a setup that makes cooking easier.
How can I keep my veggies crisp and ready for the chef's knife?
Store greens and herbs with a paper towel in the container to absorb extra moisture. For carrots, celery, and peppers, keep them in cold water in a sealed container and change the water every few days.
What's the secret to ensuring meats stay juicy until they hit the pan?
Pat meat dry, store it on the bottom fridge shelf, and keep it contained so drips do not spread. For more even cooking, let it sit at room temperature for 30 to 45 minutes before cooking when appropriate.
Got any cool tricks for organizing my pantry like a pro?
Group pantry items by category and use clear containers for staples. Add labels and move older items to the front so you use them first.
What's the best way to transfer ingredients from fridge to counter without causing a kitchen calamity?
Set up your prep station first, then use a tray or baking sheet to carry multiple items at once. Only take out what you need for the current step.
How do I make the most of my fridge space to keep everything in tip-top shape?
Use zones in the fridge: raw meat on the bottom, dairy in the middle, and ready-to-eat foods on top. Keep shelves from getting overcrowded so air can circulate properly.
Can you spill the beans on the best containers to keep my food prep on point?
Clear, airtight containers are the most practical choice, especially glass for everyday storage. Reusable bags and silicone trays are also useful for prepped ingredients, marinades, and small freezer portions.
Share:
How Can You Avoid Overcooking Or Undercooking Food
How Do You Build A More Efficient Kitchen Routine