

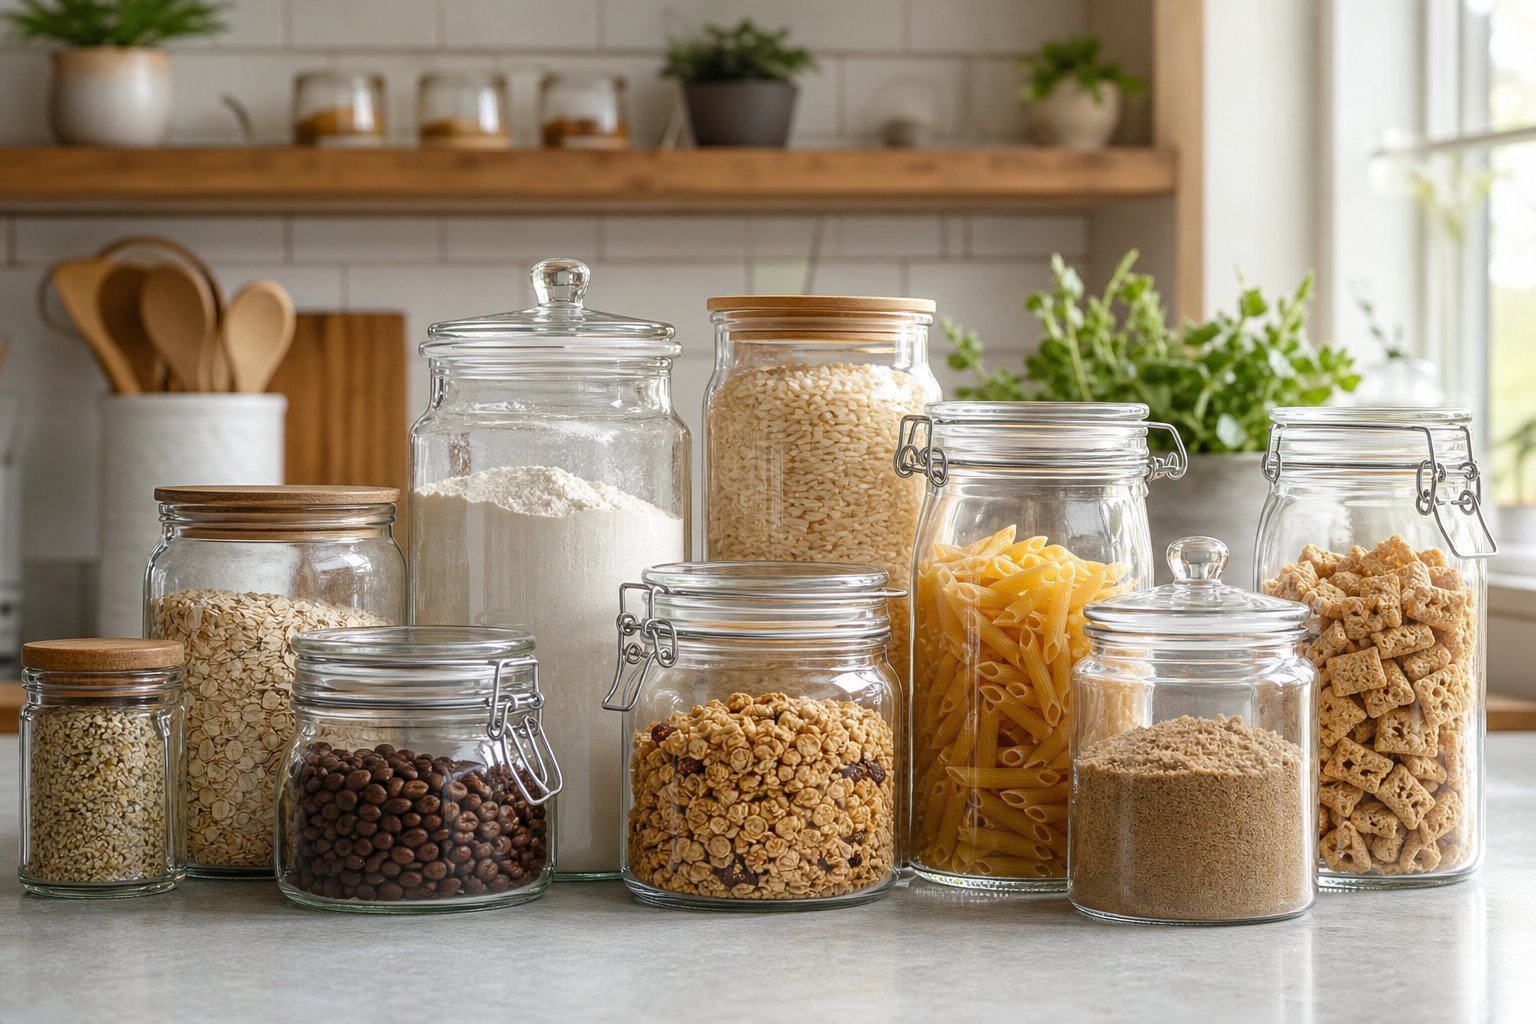
Schauen Sie sich unsere neueste Kollektion an Vorratsgläsern an!
Die falsche Glasgröße kann aus einem Vorratskammer-Upgrade ein neues Lagerproblem machen. Ein Behälter mag im Regal geräumig aussehen, doch Mehl, Müsli oder Nudeln bleiben immer noch in der Originalverpackung stecken.
Das beste Glas ist groß genug, um die gesamte Packung aufzunehmen, leicht zu schöpfen oder zu gießen und so geformt, dass es in den verfügbaren Platz im Regal passt. Mehl und Müsli benötigen in der Regel größere Behälter, lange Nudeln zusätzliche Höhe, und Kaffee bleibt in einem kleineren luftdichten Glas mit weniger Leerraum frischer.
Dieser Leitfaden erklärt praktische Glasgrößen für Mehl, Reis, Nudeln, Müsli und Kaffee, zusammen mit den Details zu Deckel, Öffnungsweite, Form und Kopffreiheit, die die alltägliche Aufbewahrung in der Speisekammer erleichtern.
Wichtigste Erkenntnisse
- Passen Sie die Glasgröße an das an, was Sie tatsächlich kaufen, damit Sie Zutaten nicht teilen oder Überlauf auf der Arbeitsplatte liegen lassen müssen.
- Quadratische und rechteckige Gläser sparen etwa 25 % mehr Regalplatz als runde und hinterlassen keine unnötigen Lücken.
- Deckelstil, Öffnungsweite und Form sind genauso wichtig wie das Volumen, um Lebensmittel frisch zu halten und den täglichen Zugriff weniger lästig zu gestalten.
Anpassen der Glasgröße an die Zutat
Jede Zutat benötigt ihr eigenes Lagerungsvolumen, und die Wahl des richtigen Glases hängt davon ab, wie viel Sie kaufen, wie schnell Sie es verbrauchen und wie viel Platz Sie tatsächlich haben.
Mehl: Frische in großen Mengen bewahren
Allzweckmehl wird normalerweise in 1 kg bis 2,5 kg-Beuteln geliefert, daher benötigen Sie ein Glas, das zwischen 1,5 L und 3 L fasst. Ein 2 L-Glas passt problemlos zu einem 1 kg-Beutel und lässt oben genug Platz, um jedes Mal, wenn Sie schöpfen, eine Mehlstaubexplosion zu vermeiden.
Wenn Sie viel backen oder in großen Mengen kaufen, fasst ein 3-Liter-Glas größere Mengen und passt immer noch in die meisten Regale. Spezialmehle und Vollkornmehl werden oft in kleineren Beuteln geliefert, daher ist ein 1-Liter-Glas in der Regel ausreichend.
Empfohlene Größen:
- 1L Glas: Spezialmehle, kleine Haushalte
- 2L Glas: Standard 1kg Beutel
- 3L Glas: Großlagerung, häufige Bäcker
Lassen Sie ein paar Zentimeter oben frei. Das macht das Schöpfen viel sauberer und hält Mehlstaub vom Deckel fern.
Reis: Vielseitige Volumenlösungen
Reis nimmt im trockenen Zustand nicht viel Platz ein, daher ist er ziemlich einfach zu lagern. Ein 500g-Beutel passt gut in ein 1L-Glas, und ein Standard-2kg-Beutel kommt in einen 3L-Behälter.
Für die meisten Haushalte fasst ein 1,5L-Glas etwa 1kg Langkornreis und passt gut zu Ihren anderen Vorräten, ohne zu viel Regalplatz zu beanspruchen.
Wenn Ihre Familie ständig Reis isst oder Sie große Beutel kaufen, bietet ein 3L-Glas viel Platz und schützt Reis vor Feuchtigkeit und Schädlingen. Kurzkornreis ist etwas dichter, daher benötigt er etwas weniger Platz als Langkornreis.
Durchsichtige Gläser machen es einfach zu sehen, wann der Vorrat zur Neige geht, und Sie werden nie wieder überraschend leere Beutel mitten beim Kochen finden.
Pasta: Verschiedene Formen, verschiedene Bedürfnisse
Pasta ist eine knifflige Sache, da sich die Formen nicht auf die gleiche Weise verpacken lassen. Lange Pasta wie Spaghetti und Linguine benötigen hohe Gläser, normalerweise etwa 25-30 cm hoch. Penne, Fusilli und Muscheln passen in kürzere, breitere Gläser.
Eine 500g-Packung Spaghetti passt in ein 2L-Glas, das mindestens 28 cm hoch ist. Kurze Formen passen in 1L bis 1,5L Gläser, die sich auch besser stapeln lassen.
Nach Pasta-Typ:
| Pasta-Form | Empfohlene Größe | Anmerkungen |
|---|---|---|
| Spaghetti, Linguine | 2L (hoch) | Mindestens 28 cm Höhe |
| Penne, Rigatoni | 1,5L | Breite wichtiger als Höhe |
| Muscheln, Farfalle | 1L bis 1,5L | Lufteinschlüsse bedeuten, dass Sie zusätzlichen Platz benötigen |
| Orzo, kleine Formen | 500ml bis 1L | Dicht gepackt, benötigt weniger Platz |
Einige handwerkliche Formen oder Nudelnester benötigen noch mehr Platz, da sie sich nicht so fest setzen.
Müsli: Knusprigkeit und Platz maximieren
Familienpackungen Müsli enthalten normalerweise 400g bis 750g, was je nach Müsli etwa 1,5L bis 3L tatsächlichem Volumen entspricht. Flocken wie Cornflakes benötigen mehr Platz als dichtes Granola.
Ein 3L-Glas passt zu den meisten Standard-Müslipackungen und hält die Dinge knusprig, indem es Feuchtigkeit viel besser abhält als Karton. Wenn Sie jemand sind, der mehrere Müslisorten gleichzeitig geöffnet hat, eignen sich 1,5L-Gläser hervorragend zur Aufbewahrung von Teilpackungen, ohne Platz zu verschwenden.
Müsli sofort nach dem Öffnen umzufüllen, hält es wirklich länger knusprig. Luftdichte Gläser helfen dabei sehr, besonders wenn Ihre Küche feucht ist.
Wenn Sie wenig Arbeitsfläche haben, versuchen Sie es mit quadratischen oder rechteckigen Gläsern, da diese sich besser stapeln lassen und weniger Platz beanspruchen als runde.
Kaffee: Aroma und Geschmack bewahren
Ganze Kaffeebohnen schmecken am besten, wenn sie innerhalb von zwei Wochen verbraucht werden. Eine Standardpackung von 340 g passt fast exakt in ein 500 ml Glas, wodurch der Kaffee ohne zu viel Luft frisch bleibt.
Gemahlener Kaffee wird schneller alt, daher sind kleinere Gläser (250 ml bis 350 ml) am besten, da sie gerade genug für eine Woche oder so fassen. So verwenden Sie immer frisches Kaffeepulver.
Kaffeeaufbewahrung:
- 250ml bis 350ml: Gemahlener Kaffee, kleine Proben
- 500ml: Typische 340g ganze Bohnen-Packungen
- 1L: Großabnehmer, oder wenn Sie mehrere Brühmethoden verwenden
Dunkles Glas bietet zusätzlichen Schutz vor Licht, aber ehrlich gesagt tut es jedes gute Glas in einem Schrank. Die großen Feinde sind Luft, Feuchtigkeit und Temperaturschwankungen. Luftdichte Gläser bewältigen all das.
Verwenden Sie für Kaffee keine größeren Gläser als nötig. Zu viel Luft beschleunigt die Oxidation und tötet den Geschmack ab.
Behälterkapazität und Öffnungsweite verstehen
Wenn Sie Glasgefäße für Vorräte auswählen, kommt es wirklich darauf an, wie viel sie fassen und wie breit die Öffnung ist. Die Kapazität entscheidet, wie oft Sie nachfüllen müssen, und die Öffnungsweite bestimmt, ob das Schöpfen einfach oder einfach nur ärgerlich ist.
Kapazitätsrichtlinien nach Lebensmitteltyp
Verschiedene Trockenwaren haben ihre eigenen Rhythmen, einschließlich der Geschwindigkeit, mit der sie verbraucht werden, und wie viel Platz sie tatsächlich einnehmen.
Für Mehl eignen sich 32 oz (1 Liter) Gläser für Gelegenheitsbäcker, und 64 oz (Halb-Gallonen) Gläser für wöchentliche Bäcker. Ein 64 oz Glas fasst etwa 4,5 bis 5 Tassen Mehl, was den meisten Standardbeuteln entspricht und Ihre Arbeitsplatte ordentlicher hält.
Reis und Nudeln passen gut in 32 oz Gläser für kleinere Haushalte oder 64 oz Gläser für Familien. Ein Literglas fasst etwa 2,5 Tassen ungekochten Reis (genug für ein paar Mahlzeiten), und ein Halb-Gallonen-Glas fasst grob 6 Tassen. Lange Nudeln benötigen ein hohes Glas, daher ist eine hohe 32 oz Version besser als eine gedrungene.
Müsli braucht viel Platz. 64 oz Gläser eignen sich für Müsli und Müsli, aber passen nicht in eine ganze Schachtel Flocken. Dafür könnten zwei 32 oz Gläser die Lösung sein.
Kaffeebohnen bleiben in kleinen Mengen am frischesten. Ein 8 oz Glas fasst etwa 60-70 Gramm (genug für ein paar Tage), während ein 16 oz Glas eine typische 250g Packung von Ihrem lokalen Röster fasst.
Vorteile von Weithalsgläsern
Weithalsgläser (ca. 86 mm Öffnung) erleichtern das Leben.
Sie können Mehl oder Zucker mit einem normalen Messbecher schöpfen, ohne dass Mehlwolken auf Ihrer Arbeitsplatte entstehen. Normalhalsgläser zwingen Sie dazu, einen Löffel oder Trichter zu verwenden, was Sie nur verlangsamt.
Die Reinigung ist auch viel einfacher. Sie können Ihre Hand und Ihren Schwamm hineinbekommen, anstatt mit einer Flaschenbürste zu kämpfen.
Das Befüllen von Weithalsgläsern aus Beuteln oder Großbehältern ist schneller und weniger unordentlich. Sie können direkt hineingießen, und breitere Trichter passen tatsächlich.
Der Nachteil? Weithalsgläser nehmen etwas mehr Regalplatz ein, so dass Sie nicht so viele pro Regal unterbringen können wie mit Normalhalsgläsern.
Gläser an Regale und Räume anpassen
Messen Sie Ihre Regale, bevor Sie Gläser kaufen. Zu viele Leute merken zu spät, dass ihre neuen 64-oz-Gläser nicht passen.
Standard-32-oz-Weithalsgläser sind etwa 17,5 cm hoch und 10 cm breit. Ein 64-oz-Weithalsglas ist etwa 25,4 bis 26,7 cm hoch. Die meisten Schränke haben 30 bis 40 cm zwischen den Regalen, so dass Litergläser leicht passen, aber Halb-Gallonen-Gläser benötigen höhere Räume.
Für flache Regale (unter 12,7 cm Tiefe) ermöglichen Normalhalsgläser, mehr Behälter hintereinander zu platzieren. Für tiefere Vorratsschränke (8 Zoll oder mehr) funktionieren Weithalsgläser gut, und Sie können immer noch Dinge dahinter aufbewahren.
Auf der Arbeitsplatte fühlen sich kürzere, breitere Gläser stabiler an und wirken weniger unordentlich als hohe, schmale. Sie sind auch einfacher zu greifen, wenn man in Eile ist.
Vergleich von Deckeltypen für Luftdichtheit
Der Deckel macht einen riesigen Unterschied, denn wie lange Ihr Mehl trocken bleibt, Ihr Reis frisch bleibt und Ihr Kaffee sein Aroma behält, hängt alles davon ab. Klemmverschlüsse mit Dichtungen bieten die stärkste Versiegelung, während Schraubverschlüsse zuverlässig und einfach zu bedienen sind.
Luftdichte Deckel für Frische
Luftdichte Deckel halten Sauerstoff und Feuchtigkeit fern, was entscheidend ist, um zu verhindern, dass Trockenwaren alt werden oder verklumpen. Wir suchen nach Deckeln, die rundum dicht schließen, ohne Lücken, ohne Schwachstellen.
Mehl braucht diesen Schutz wirklich, da es schnell Feuchtigkeit aufnimmt und muffig werden kann, wenn es der Luft ausgesetzt ist. Kaffee ist noch empfindlicher; die Oxidation beginnt fast sofort, den Geschmack zu beeinträchtigen. Reis und Nudeln sind nicht ganz so wählerisch, aber sie halten mit einem guten Verschluss länger, besonders in feuchten Küchen.
Auch das Dichtungsmaterial ist wichtig. Silikondichtungen nehmen keine Gerüche an und bleiben flexibel, während Naturkautschuk schneller zerfallen kann, aber anfangs manchmal besser abdichtet. Lebensmittelechtes Silikon scheint Temperaturschwankungen am besten zu vertragen, was wichtig ist, wenn Sie Gläser oft bewegen.
Das Testen ist einfach: Drücken Sie auf den Deckel und achten Sie auf Luftbewegungen. Eine echte Dichtung sollte auch nach mehrmaligem Öffnen und Schließen dicht halten.
Klemmdeckel und Gummidichtungen
Klemmdeckel verwenden einen klappbaren Metallmechanismus, der über einer Gummidichtung einrastet und diese fest um den Rand presst. Diese Anordnung bietet die zuverlässigste Abdichtung für feuchtigkeitsempfindliche Dinge wie gemahlenen Kaffee oder Vollkornmehl.
Die Dichtung sitzt in einer Nut unter dem Deckel und wird beim Zuklemmen komprimiert, wodurch Luft und Feuchtigkeit blockiert werden. Gute Dichtungen fühlen sich etwas klebrig an und federn beim Drücken zurück.
Überprüfen Sie die Qualität des Scharniers, bevor Sie ein ganzes Set kaufen. Metallscharniere halten länger, sind aber schwerer und teurer. Die Klemme sollte mit etwas Widerstand schließen, nicht so locker, dass sie aufspringt, aber auch nicht so fest, dass Sie zwei Hände benötigen.
Es ist klug, Ersatzdichtungen im Voraus zu besorgen. Selbst die besten verschleißen nach etwa einem Jahr, und Ersatz zu haben bedeutet, dass Sie nicht mit einem Glas erwischt werden, das nicht abdichtet.
Schraubverschluss versus Aufsteckdeckel
Schraubdeckel werden auf den Glasrand aufgeschraubt und pressen eine innere Dichtung oder Einlage für einen festen Verschluss. Die meisten Leute kennen diese. Sie lassen sich leicht stapeln und springen nicht auf, wenn man sie beim Umräumen im Vorratsschrank anstößt.
Für Müsli und Nudeln genügen Schraubdeckel, da diese Lebensmittel nicht sehr empfindlich auf etwas Luft reagieren. Das Festziehen des Deckels sorgt für einen zuverlässigen Verschluss, es sei denn, man ist in Eile und schraubt ihn schief an (passiert, besonders an geschäftigen Morgen).
Aufsteckdeckel werden einfach über die Glasöffnung gedrückt. Sie sind schneller zu bedienen und sehen oft schöner aus, besonders mit Bambus oder Kork. Aber ehrlich gesagt beruht ihr Verschluss auf Reibung, daher ist er einfach nicht so dicht.
Wir verwenden Aufsteckdeckel für die kurzfristige Lagerung oder für sichere Sachen wie getrocknete Nudeln oder Müsli, die durch etwas zusätzliche Luft nicht schlecht werden. Schraubdeckel liegen dazwischen und bieten besseren Schutz als Aufsteckdeckel, aber ohne den Aufwand eines vollen Klemmverschlusses.
Organisation Ihrer Vorratskammer für den Alltag
Bei der Organisation Ihrer Vorratskammer geht es nicht nur darum, die richtigen Glasgrößen auszuwählen. Beschriftung hilft Ihnen, den Überblick zu behalten, was frisch ist und was nicht, und smartes Stapeln erleichtert das Greifen von Zutaten, wenn Sie gerade mitten im Rezept stecken.
Beschriften und Rotieren von Vorräten
Beschriften Sie jedes Glas mit dem Inhalt und dem Datum der Befüllung. Das erspart Ihnen das Rätselraten zwischen ähnlich aussehenden Mehlsorten oder Reissorten. Wasserdichte Etiketten oder ein Etikettiergerät sehen ordentlich aus und lösen sich nach ein paar Wäschen nicht ab.
Schreiben Sie das Verfallsdatum direkt auf das Etikett. Das ist der einfachste Weg, ältere Sachen zu verbrauchen, bevor Sie etwas Neues öffnen.
Stellen Sie neue Gläser immer hinter die älteren ins Regal. Wenn Sie nachfüllen, überprüfen Sie auf Reste und füllen Sie neue Zutaten obenauf. Diese Rotation verhindert, dass Zutaten zu lange liegen und alt werden oder Schädlinge anlocken.
Stapeln und Lagern für einfachen Zugriff
Bewahren Sie Ihre wichtigsten Zutaten auf Augenhöhe oder in den unteren Regalen auf, wo Sie sie schnell greifen können. Bewahren Sie die oberen Regale für Dinge auf, die Sie nicht oft verwenden, wie Spezialmehl oder Backzutaten für Feiertage.
Quadratische und rechteckige Gläser lassen sich besser stapeln als runde und helfen Ihnen wirklich, den Platz in Ihrem Regal optimal zu nutzen. Sie wirken auch organisierter, sodass Sie sofort erkennen, was Sie brauchen.
Stellen Sie schwere Gläser (wie Mehl und Zucker) auf die unteren Regale, um Unfälle zu vermeiden. Leichtere Gegenstände wie Nudeln oder Müsli können nach oben. Gruppieren Sie ähnliche Dinge zusammen, damit Sie beim Kochen nicht überall suchen müssen.
Tipps zur Vorratslagerung in großen Mengen
Kaufen Sie Grundnahrungsmittel wie Reis, Mehl und Hafer in größeren Beuteln, wenn Sie genügend Gläser haben. Sie reduzieren Verpackungsmaterial und sparen in der Regel etwas pro Kilo.
Verwenden Sie 32 bis 64 Unzen Gläser für Dinge, die Sie schnell verbrauchen. Mittlere Gläser (16 bis 32 Unzen) eignen sich besser für Dinge, die Sie seltener verwenden, damit die Zutaten nicht ewig darin liegen.
Füllen Sie die Gläser nicht bis zum Rand. Lassen Sie etwas Platz. Das erleichtert das Ausgießen und verhindert, dass Sie beim Abmessen etwas verschütten.
Glasmaterialien, Haltbarkeit und täglicher Gebrauch
Das von Ihnen gewählte Glas bestimmt, wie gut Ihre Vorratsgläser tägliches Schöpfen, Spülen und Temperaturschwankungen verkraften. Deckeldesign und Dichtungsqualität entscheiden darüber, ob Ihr Mehl trocken bleibt oder Ihr Kaffee sein Aroma behält.
Warum Glas Plastik bei der Vorratslagerung überlegen ist
Glasgefäße nehmen keine Gerüche oder Flecken an wie Plastik. Wir haben erlebt, wie Leute auf Glas umgestiegen sind, nachdem ihre Plastikbehälter nach altem Knoblauch rochen oder durch Tomatensauce Flecken bekamen.
Die meisten Vorratsgefäße verwenden Kalknatronglas, da es Küchenteperaturen und gelegentliche Stürze von der Arbeitsplatte verträgt. Es ist das, was man in den meisten Getränkeflaschen findet. Borosilikatglas ist teurer, aber widerstandsfähiger, wenn man warme Dinge einfüllt oder Gläser von heiß nach kalt bewegt.
Glas gibt keine Chemikalien an Ihre Lebensmittel ab. Plastik tut dies manchmal, besonders bei sauren oder öligen Lebensmitteln. Ihr Reis, Ihre Nudeln und Ihr Mehl bleiben sauberer, und Kaffeebohnen schmecken nicht nach Plastik.
Das Gewicht des Glases hält die Gläser stabil, wenn Sie Mehl schöpfen oder nach der letzten Handvoll Hafer suchen. Plastik kippt zu leicht um, besonders die hohen, schmalen. Glas bleibt einfach stehen.
Pflege von Deckeln und Dichtungen
Die Gummidichtung leistet die eigentliche Arbeit, sie hält Feuchtigkeit fern und schließt Frische ein. Überprüfen Sie Ihre Dichtungen alle paar Monate auf Risse, Quetschstellen oder ob sie steif geworden sind. Eine schlechte Dichtung lässt Feuchtigkeit eindringen, sodass Ihr Mehl verklumpt und Ihr Müsli traurig und abgestanden wird.
Nehmen Sie Dichtungen ab, bevor Sie Deckel in die Spülmaschine geben. Hohe Hitze lässt Gummi verschleißen. Handwäsche lässt Dichtungen länger halten.
Einmachgläser mit Metallklammern müssen ab und zu nachgestellt werden. Der Draht wird nach einer Weile locker. Wenn der Deckel wackelig ist oder nicht dicht schließt, passen Sie die Klammer an oder setzen Sie eine neue Dichtung ein.
Ersatzdichtungen sind günstig und leicht zu finden. Wir halten Extras bereit, denn 2 £ für eine neue zu investieren ist besser, als ein gutes Glas wegzuwerfen. Messen Sie einfach die Glasöffnung, damit Sie die richtige Passform erhalten.
Reinigung und Vermeidung von Dichtungsproblemen
Waschen Sie Gläser in warmem Seifenwasser und trocknen Sie sie gründlich, bevor Sie sie wieder befüllen. Jegliches Restwasser unter dem Deckel kann Mehl ruinieren oder Reis verklumpen.
Mehlstaub und Öl von Nüssen sammeln sich an den Glasrändern und beeinträchtigen die Dichtung. Wischen Sie den Rand mit einem feuchten Tuch ab, bevor Sie ihn schließen, besonders nach klebrigen Zutaten. Kaffeöle sind hartnäckig, daher benötigen Sie manchmal eine Bürste, um sie abzuschrubben.
Wechseln Sie nicht von einem Temperaturextrem zum anderen. Das Eingießen von kochendem Wasser in ein kaltes Glas (oder umgekehrt) kann das Glas zum Springen bringen. Lassen Sie die Gläser zuerst auf Raumtemperatur erwärmen oder abkühlen.
Wenn Sie hartnäckigen Schmutz haben, füllen Sie das Glas mit warmem Wasser und einem Löffel Backpulver und lassen Sie es über Nacht stehen. Das wirkt normalerweise besser als Schrubben und zerkratzt das Glas nicht. Spülmaschinen sind für Gläser in Ordnung, aber Handwäsche hilft Ihnen, Absplitterungen oder Risse zu erkennen, bevor sie schlimmer werden.
Fehlerbehebung bei häufigen Problemen mit der Aufbewahrung in Glasgefäßen
Auch die besten Gläser können Probleme haben. Deckel verlieren ihre Dichtung, Mehl verklumpt, oder irgendwie schmeckt Ihr Kaffee nach Knoblauchpulver. Wir haben alles gesehen, und die meisten Lösungen sind ziemlich einfach.
Verklumpen, Altwerden und Gerüche vermeiden
Mehl verklumpt, wenn Feuchtigkeit durch eine verschlissene Dichtung oder einen Deckel, der nicht dicht schließt, eindringt. Überprüfen Sie immer, ob Ihre Deckel fest zuschnappen oder zuschrauben, bevor Sie Trockenwaren lagern. Wenn der Deckel Widerstand leistet oder Sie eine Lücke sehen, muss die Dichtung wahrscheinlich ersetzt werden.
Reis und Nudeln bleiben länger frisch, wenn Sie nicht zu viel leeren Raum im Glas lassen. Überfüllen führt zu Verschütten, aber wenn Sie mehr als 2 bis 3 cm Freiraum lassen, dringt Luft ein und die Dinge werden alt. Bei Müsli und Kaffee beeinträchtigt Lichteinwirkung die Frische schneller, als Sie vielleicht denken.
Gerüche bleiben bestehen, wenn das Glas sauber bleibt, aber Deckel (und insbesondere Dichtungen) Gerüche von Gewürzen, Knoblauch oder Kaffee aufnehmen. Wir waschen Dichtungen in heißem Wasser mit Backpulver, nachdem wir etwas stark Riechendes gelagert haben. Wenn der Geruch nach zwei Versuchen nicht verschwindet, ersetzen Sie einfach die Dichtung.
Kaffeebohnen verlieren schnell ihr Aroma, wenn die Dichtung nicht perfekt ist. Wir schließen das Glas und drücken sanft auf den Deckel. Wenn er sich bewegt oder klickt, ist die Dichtung nicht richtig.
Auf Splitter, Verformungen oder Rückstände prüfen
Splitter am Glasrand verhindern das Abdichten der Deckel, selbst wenn die Dichtung in Ordnung aussieht. Wir fahren vor dem Nachfüllen mit dem Finger über den Rand. Bei rauen Stellen oder Rissen wird das Glas für die nicht-lebensmitteltaugliche Lagerung verwendet.
Verzogene Deckel sind kniffliger. Legen Sie den Deckel auf eine ebene Fläche und drücken Sie die Mitte. Wenn er wackelt oder sich biegt, dichtet er nicht ab. Dies geschieht normalerweise, wenn Sie den Deckel zu fest angezogen oder fallen gelassen haben.
Reste von Öl, Stärke oder anderen Rückständen sammeln sich an und erzeugen winzige Lücken zwischen der Dichtung und dem Glas. Selbst ein dünner Film von Reis kann die Dichtung brechen. Waschen Sie die Gläser gut und trocknen Sie sie vor dem Nachfüllen.
Wann Dichtungen oder Deckel ersetzt werden sollten
Gummidichtungen halten bei regelmäßigem Gebrauch in der Regel 18 bis 24 Monate. Wir tauschen sie aus, wenn sie steif werden, reißen oder ihre Elastizität verlieren. Eine verschlissene Dichtung lässt Luft und Feuchtigkeit eindringen, auch wenn der Deckel fest sitzt.
Metalldeckel mit integrierten Dichtungen müssen ersetzt werden, wenn Sie Rost entdecken oder sich das Dichtungsmaterial ablöst. Wir überprüfen diese alle sechs Monate, besonders bei Gläsern mit feuchtem Inhalt wie braunem Zucker.
Wenn Sie ein Glas ungewöhnlich fest zudrehen müssen, könnten die Gewinde am Deckel oder am Glas verschleißen. Nach drei bis vier Jahren täglichen Gebrauchs ist es wahrscheinlich Zeit für neue Deckel oder sogar neue Gläser.
Häufig gestellte Fragen
Wählen Sie die Glasgröße basierend auf dem Verpackungsgewicht, der Form der Zutat, den Regalabmessungen und der Häufigkeit der Verwendung des Lebensmittels. Lassen Sie genügend Platz zum einfachen Schöpfen, ohne übermäßigen leeren Raum zu schaffen.
Welche Glasgröße sollte ich für eine Standardpackung Universalmehl wählen, ohne es zu überfüllen?
Ein 4,4 bis 5 Liter großes Glas fasst eine Standardpackung Mehl von 2,2 kg und lässt Platz zum sauberen Schöpfen. Wählen Sie ein Design mit breiter Öffnung für leichteres Abmessen und Nachfüllen.
Wie ermittle ich die richtige Glaskapazität für Reis, damit eine ganze Packung hineinpasst und er trotzdem leicht zu schöpfen ist?
Eine 1 kg-Packung Reis benötigt ein 2- bis 3-Liter-Glas, während eine 2,2 kg-Packung etwa 4 bis 5 Liter benötigt. Lassen Sie etwas Freiraum und wählen Sie eine breite Öffnung für einfaches Schöpfen.
Welche Glasgrößen eignen sich am besten für verschiedene Pastaformen wie Spaghetti, Penne und Makkaroni?
Verwenden Sie für Spaghetti ein hohes 1,5- bis 2-Liter-Glas. Penne, Makkaroni und andere kurze Formen passen in der Regel am besten in breite 2- bis 4-Liter-Gläser.
Welche Glasgrößen halten Müsli frisch und passen gleichzeitig in einen typischen Küchenschrank oder eine Speisekammer?
Ein 3- bis 4-Liter-luftdichtes Glas passt zu den meisten Standard-Müslipackungen. Verwenden Sie ein 5- bis 6-Liter-Glas für loses Müsli und messen Sie vor dem Kauf die Höhe Ihres Regals.
Wie viel Freiraum sollte ich in einem Glas für ganze Kaffeebohnen lassen, um Geschmack und Aroma zu bewahren?
Lassen Sie etwa 2 bis 3 cm Freiraum. Ein 500 ml bis 1 Liter luftdichtes Glas funktioniert gut für eine 250 bis 350 g Packung ganze Kaffeebohnen.
Sollte ich ein großes Glas oder mehrere kleinere Gläser für Grundnahrungsmittel verwenden, wenn ich leichter nachfüllen und mehr Komfort im Alltag möchte?
Verwenden Sie ein großes Glas für die Ersatzlagerung und ein kleineres Glas für den täglichen Gebrauch. Dies erleichtert das Schöpfen und reduziert, wie oft der volle Vorrat Luft und Feuchtigkeit ausgesetzt ist.
Teilen:
Woran man erkennt, dass ein Vakuumierbeutel seine Versiegelung verloren hat und was als Nächstes zu tun ist
Mehl und Zucker in großen Glasgefäßen feuchtigkeits- und klumpenfrei lagern