

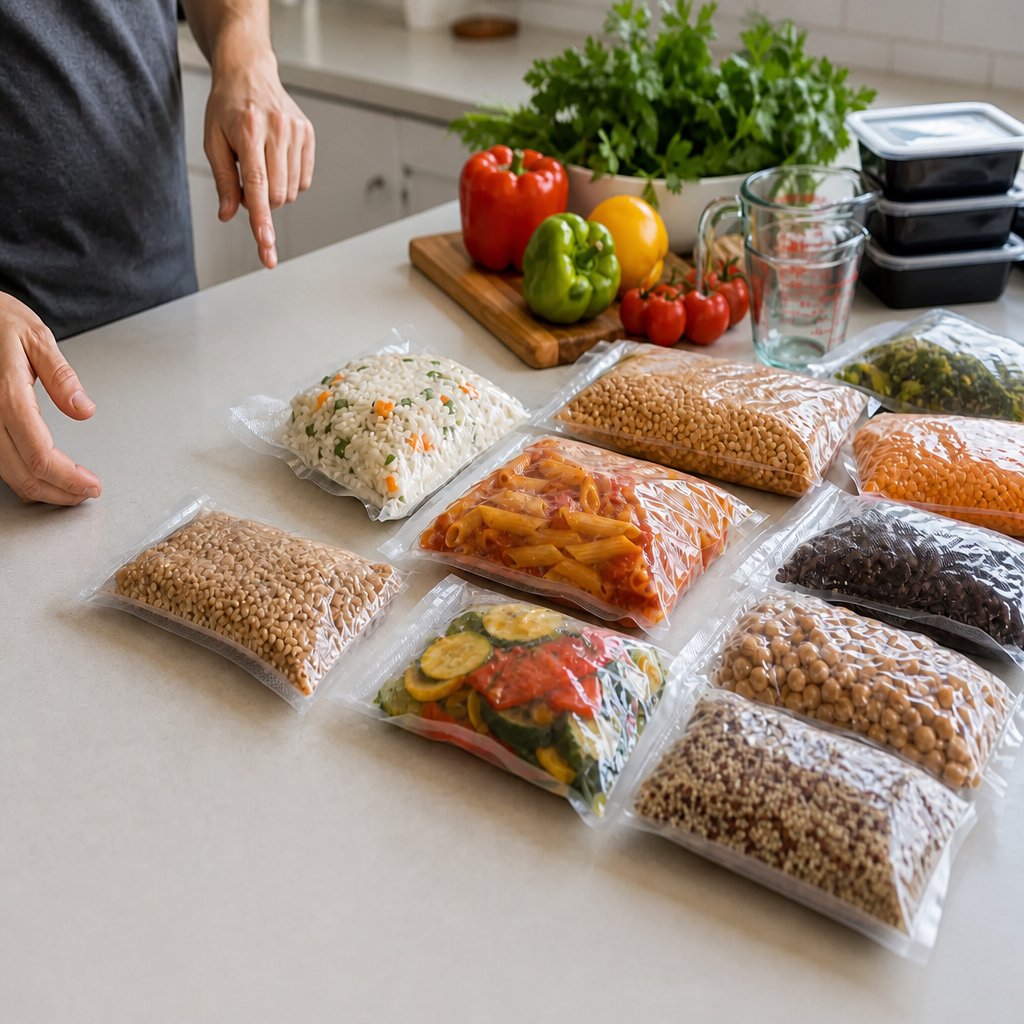
Entdecken Sie unsere neueste Kollektion von kompakten Vakuumiergeräten für Lebensmittel!
Die Essenszubereitung kann schnell scheitern, wenn Reis austrocknet, Nudeln klebrig werden und sperrige Behälter den Kühlschrank überfüllen. Das Vakuumieren bietet eine praktische Möglichkeit, den Kontakt mit Luft zu reduzieren, die Lebensmittelqualität zu schützen und gekochte Getreideprodukte in leicht zu organisierenden und wieder aufwärmbaren Portionen zu lagern.
Indem Sie Reis, Nudeln, Quinoa, Couscous und andere Getreideprodukte vor dem Vakuumieren abkühlen lassen, können Sie flache, platzsparende Packungen für den Kühlschrank oder Gefrierschrank erstellen. Saubere Beutelränder, passende Portionen und die richtigen Lagertemperaturen sind entscheidend für eine zuverlässige Versiegelung und bessere Ergebnisse.
Dieser Leitfaden erklärt, wie Sie die richtige Ausrüstung auswählen, gekochte Getreideprodukte Schritt für Schritt vakuumieren, häufige Fehler vermeiden, Portionen sicher lagern und sie ohne Beeinträchtigung der Textur wieder aufwärmen.
Wichtige Erkenntnisse
- Vakuumieren von gekochten Getreideprodukten hält diese bis zu sieben Tage im Kühlschrank und mehrere Monate im Gefrierschrank frisch und reduziert Lebensmittelverschwendung
- Lassen Sie Lebensmittel vor dem Vakuumieren vollständig abkühlen und legen Sie die Beutel so schnell wie möglich in den Kühlschrank oder Gefrierschrank, um Bakterien zu stoppen und die Sicherheit zu gewährleisten
- Portionieren Sie Getreideprodukte in flache Einzelportionsbeutel für schnelles Wiedererwärmen und eine effizientere Essenszubereitung
Warum Vakuumieren die Essenszubereitung revolutioniert
Das Vakuumieren verändert die Art und Weise, wie wir gekochte Getreideprodukte lagern, indem es die Luft entzieht, die Lebensmittel schneller verderben lässt, und die Qualität bewahrt, für die wir beim Kochen gearbeitet haben. Diese Methode löst die größten Probleme bei der Essenszubereitung: Lebensmittel frisch zu halten, Geschmack und Textur zu bewahren und die Verschwendung von Lebensmitteln zu reduzieren, die verderben, bevor wir sie essen können.
Verlängern der Haltbarkeit von gekochten Getreideprodukten
Wenn wir gekochten Reis, Nudeln oder Quinoa vakuumieren, entziehen wir fast den gesamten Sauerstoff, den Bakterien zum Vermehren benötigen. Das verlangsamt den Verderb und verlängert die Lagerzeit erheblich im Vergleich zu herkömmlichen Behältern.
Im Kühlschrank bleiben vakuumierte gekochte Getreideprodukte 1 bis 2 Wochen gut, verglichen mit nur 3 bis 4 Tagen in normalen Behältern. Das ist ein ziemlich großer Vorteil, wenn Sie für die ganze Woche vorbereiten.
Die Lagerung im Gefrierschrank wird noch besser. Vakuumierte Mahlzeiten behalten ihre Qualität 6 bis 12 Monate, während Getreide in normaler Verpackung nur 1 bis 2 Monate hält, bevor Gefrierbrand die Textur ruiniert.
| Lagerort | Vakuumverpackt | Herkömmliche Verpackung |
|---|---|---|
| Kühlschrank | 1-2 Wochen | 3-4 Tage |
| Gefrierschrank | 6-12 Monate | 1-2 Monate |
Wir portionieren Getreideprodukte gerne vor dem Vakuumieren in Einzelportions- oder Familiengrößenbeutel. Auf diese Weise können Sie genau das entnehmen, was Sie brauchen, ohne dass Luft und Feuchtigkeit die gesamte Charge beeinflussen.
Geschmack und Textur frisch halten
Luftkontakt zersetzt die Fette und Stärken in gekochten Getreideprodukten, was zu fadem Geschmack und matschiger Textur führt. Das Vakuumieren schafft eine luftdichte Barriere, die den Geschmack so bewahrt, wie er sein soll.
Reis bleibt locker, anstatt trocken oder klebrig zu werden. Nudeln bekommen nicht dieses seltsame gummiartige Gefühl, das man manchmal bekommt, wenn sie zu lange mit zu viel Luft liegen. Sogar Couscous, der ziemlich empfindlich ist, bleibt leicht und lose.
Vakuumierte Beutel verhindern auch, dass Ihre Getreideprodukte seltsame Gerüche von anderen Lebensmitteln in Ihrem Kühlschrank oder Gefrierschrank annehmen. Ihr Reis schmeckt nicht nach dem Knoblauchhähnchen von gestern Abend oder dem Fisch von morgen.
Wenn wir vakuumierte Getreideprodukte wieder aufwärmen, schmecken sie fast so gut wie frisch gekocht. Die Feuchtigkeit bleibt erhalten, da während der Lagerung kaum Verdunstung stattfindet. So schmeckt Ihre Sonntagsvorbereitung auch am Samstag noch großartig.
Lebensmittelverschwendung minimieren und Geld sparen
Verdorbene Lebensmittel wegzuwerfen ist wie Geld in den Müll zu werfen, und gekochte Getreideprodukte sind oft das Erste, was verdirbt, wenn wir zu viel vorbereiten. Das Vakuumieren hilft uns, das, was wir zubereiten, auch tatsächlich zu essen, anstatt zuzusehen, wie es verdirbt.
Durch die längere Haltbarkeit müssen Sie nicht die gleichen Mahlzeiten innerhalb weniger Tage schnell verzehren. Bereiten Sie seltener größere Mengen zu, in dem Wissen, dass sie wochenlang, nicht nur tagelang, sicher und lecker bleiben.
Das Einfrieren von portionierten Mahlzeiten bedeutet, dass wir Grundnahrungsmittel in großen Mengen kochen können, wenn wir Zeit haben, und sie dann für geschäftige Wochentage aufbewahren können. Das ist ein Lebensretter, wenn man nach einem langen Tag versucht ist, Essen zum Mitnehmen zu bestellen.
Vakuumierte Mahlzeiten schützen auch Ihre Investition in gute Zutaten. Wenn Sie für Bio-Reis oder ausgefallene Nudeln viel ausgegeben haben, möchten Sie eine Lagerung, die ihren Preis wert ist. Die Anschaffungskosten für ein Vakuumiergerät machen sich bezahlt, da Sie weniger Lebensmittel verschwenden und weniger Last-Minute-Einkäufe tätigen müssen.
Die richtige Ausrüstung für den Heimgebrauch auswählen
Die Wahl Ihres Vakuumiergeräts prägt wirklich, wie einfach die Essenszubereitung jede Woche ist. Wir haben gelernt, dass es viel einfacher ist, stärkehaltige Lebensmittel zu vakuumieren, wenn man den Unterschied zwischen Kammer- und externen Modellen kennt, die richtigen Beutel auswählt und sich auf einige wichtige Funktionen konzentriert.
Kammer- vs. externe Vakuumiergeräte
Externe Vakuumiergeräte sind die, die die meisten Leute zu Hause benutzen. Sie saugen Luft durch das offene Ende des Beutels ab und versiegeln ihn dann mit Hitze. Diese funktionieren für die meisten Getreideprodukte und Nudeln, besonders wenn Sie die Pulstaste verwenden, um den Unterdruck zu steuern.
Kammervakuumiergeräte funktionieren anders. Man legt den ganzen Beutel in eine Kammer, die Maschine entzieht allem darin die Luft und versiegelt dann den Beutel. Diese Methode eignet sich besser für feuchte Lebensmittel oder Nudeln mit Sauce, da das Vakuum keine Flüssigkeit aus dem Beutel saugt.
Für die wöchentliche Essenszubereitung mit gekochtem Reis und Getreide reichen externe Vakuumiergeräte normalerweise aus. Sie sind billiger, leichter und passen besser in einen Küchenschrank. Kammermodelle machen Sinn, wenn Sie große Mengen saucenhaltiger Mahlzeiten vakuumieren oder empfindliche Getreideprodukte haben, die leicht zerdrückt werden können.
Die meisten externen Vakuumiergeräte kosten zwischen 80 und 200 US-Dollar. Kammermodelle beginnen bei 300 US-Dollar und können deutlich teurer werden, wenn Sie Ausrüstung auf Restaurantniveau wünschen.
Vakuumbeutel: Einweg oder wiederverwendbar
Die meisten Maschinen werden mit Einweg-Vakuumbeuteln geliefert. Wir kaufen sie in Rollen oder vorgeschnittenen Größen, und sie eignen sich gut zum Einfrieren. Sie sind praktisch für die Essenszubereitung, da man die benötigte Größe zuschneiden kann.
Wiederverwendbare Vakuumbeutel sind umweltfreundlicher. Wir haben welche mit Reißverschluss ausprobiert, die mit Handvakuumierern funktionieren. Sie sparen langfristig Geld, müssen aber gewaschen und getrocknet werden.
Zum Einfrieren von gekochten Getreideprodukten und Nudeln verwenden wir Einwegbeutel. Sie halten Feuchtigkeit besser ab und bewahren eine starke Versiegelung über Monate hinweg. Wiederverwendbare Beutel sind für trockene Getreideprodukte oder die kurzfristige Kühlschranklagerung in Ordnung.
Die Beutelstärke ist wichtiger, als man vielleicht denkt. Standardbeutel sind 3 bis 4 Mil dick, was für die meisten Essenszubereitungen ausreicht. Dickere 5-Mil-Beutel können scharfe Nudeln oder gefrorene Klumpen ohne Reißen aushalten.
Wesentliche Merkmale für Getreide und Nudeln
Beim Vakuumieren von gekochten Stärken ist eine Pulsfunktion unerlässlich. Sie ermöglicht es uns, das Vakuum zu steuern und anzuhalten, bevor empfindlicher Reis oder Quinoa zu einem Ziegelstein zerquetscht wird. Übermäßiges Vakuumieren entzieht Feuchtigkeit und ruiniert die Textur.
Feuchte-Lebensmittel-Einstellungen passen die Versiegelungszeit und -temperatur an, um Dampf und Flüssigkeit in der Nähe der Beutelöffnung zu bewältigen. Gekochte Nudeln und Reis können feucht sein, und normale Einstellungen versiegeln manchmal nicht richtig, wenn es nass wird.
Integrierte Beutelschneider und Aufbewahrung sparen Zeit, wenn Sie viele Mahlzeiten zubereiten. Sie können schnell mehrere Portionen messen, schneiden und versiegeln.
Ein Zubehöranschluss ermöglicht das Vakuumieren von trockenen Getreideprodukten in Gläsern, wodurch Vorräte ewig frisch bleiben.
Doppelte Schweißbalken sind auch gut. Sie erzeugen zwei Versiegelungen für zusätzlichen Auslaufschutz, was hilfreich ist, wenn Sie Beutel in einem vollgepackten Gefrierschrank stapeln.
Schritt-für-Schritt-Anleitung: Getreide und Nudeln vakuumieren
Das Vakuumieren von Getreide und Nudeln ist nicht schwierig, aber Sie müssen sie richtig abkühlen, intelligent portionieren und die Beutel so handhaben, dass Feuchtigkeitsprobleme vermieden werden. Diese Schritte helfen Ihrer Essenszubereitung, tatsächlich zu halten.
Abkühlen und Portionieren Ihrer Mahlzeiten
Gekochte Getreideprodukte und Nudeln vor dem Vakuumieren auf Raumtemperatur abkühlen lassen. Heiße Speisen erzeugen Kondenswasser im Beutel, was die Versiegelung beeinträchtigt und einen gemütlichen Ort für Bakterien schafft.
Wir verteilen Reis, Quinoa oder Nudeln gerne dünn auf einem Backblech. So kühlen sie in etwa 30 bis 45 Minuten bei Raumtemperatur ab. Wenn Sie es eilig haben, stellen Sie das Blech für 15 bis 20 Minuten in den Kühlschrank.
Nudeln und klebrige Getreideprodukte mit etwas Öl, etwa einem Teelöffel pro Tasse, vermischen, damit sie nicht verklumpen. So bleiben sie unter Vakuumdruck getrennt, anstatt zu einem dichten Block zu werden.
Portionenkontrolle ist der Schlüssel. Wir teilen Mahlzeiten in Einzelportions- oder Mahlzeitengrößenbeutel auf, je nachdem, wie wir sie tatsächlich essen werden. Normalerweise sind das 1 bis 2 Tassen pro Beutel für eine Person oder bis zu 4 Tassen für eine Familie.
Beschriften Sie Ihre Portionen vor dem Vakuumieren, besonders wenn Sie verschiedene Arten von Getreide oder Nudeln zubereiten.
Verpacken und Überfüllen vermeiden
Legen Sie abgekühlte Portionen in Vakuumbeutel und lassen Sie oben 3 bis 4 Zoll Platz. Sie benötigen diesen Platz, damit das Gerät den Beutel verschließen kann, ohne Lebensmittel in den Vakuumbereich zu saugen.
Wenn Sie Beutel überfüllen, zieht das Vakuum Lebensmittel nach oben, und Feuchtigkeit kann sich in Richtung der Versiegelung schleichen. Das schwächt die Versiegelung, und Ihre Lebensmittel halten nicht lange.
Was am besten funktioniert:
- Beutel etwa halb bis zu zwei Drittel füllen
- Lebensmittel flach und ausgebreitet halten, nicht in einem großen Klumpen
- Die Innenseite der Beutelöffnung mit einem Papiertuch abwischen, um Feuchtigkeit oder Öl zu entfernen
- Die Beutelöffnung beim Befüllen nach außen falten, um den Versiegelungsbereich sauber zu halten
Für feuchtere Lebensmittel wie Nudeln mit Sauce die Portionen ein oder zwei Stunden vor dem Vakuumieren einfrieren. Dadurch wird verhindert, dass Flüssigkeiten in die Maschine gesaugt werden.
Erfolgreich versiegeln und beschriften
Legen Sie das offene Ende des Beutels in die Vakuumkammer, wie es die Anweisungen Ihres Geräts zeigen. Normalerweise muss der Beutel flach über den Versiegelungsstreifen liegen.
Starten Sie das Vakuum und beobachten Sie, wie der Beutel sich um Ihre Lebensmittel strafft. Wenn Sie sehen, dass Flüssigkeit in Richtung der Versiegelung gelangt, drücken Sie die Stopp-Taste und verwenden Sie die reine Versiegelungsfunktion. Das rettet Ihre Mahlzeit und Ihr Gerät.
Wir beschriften Beutel immer mit:
- Was drin ist (Art des Getreides oder der Nudeln, eventuelle Sauce oder Gewürze)
- Versiegelungsdatum
- Portionsgröße oder Portionen
- Bei Bedarf Aufwärmanweisungen
Verwenden Sie einen Permanentmarker auf dem Beutel oder kleben Sie ein Gefrieretikett vor dem Versiegeln auf. Sonst raten Sie Wochen später, wenn alles gleich aussieht.
Lagern Sie versiegelte Beutel flach im Kühlschrank für bis zu zwei Wochen oder im Gefrierschrank für sechs Monate. Stapeln Sie sie wie Akten in einem Behälter oder einer Schublade, damit Sie die Etiketten sehen und schnell das Gewünschte entnehmen können.
Bewährte Praktiken für sichere Lagerung und Lebensmittelqualität
Das Vakuumieren von gekochtem Reis, Nudeln und Getreide hält sie frisch, aber Sie müssen sie richtig kühlen und lagern, um Bakterien zu vermeiden und die Textur gut zu erhalten. Temperaturkontrolle und Wiedererwärmung machen den Unterschied zwischen einer funktionierenden Essensvorbereitung und Lebensmitteln, die Sie enttäuschen.
Vermeidung von Bakterien und Verderb
Niemals warme Getreideprodukte oder Nudeln vakuumieren. Lassen Sie sie vollständig abkühlen, bevor Sie sie vakuumieren, da eingeschlossene Wärme Kondenswasser bildet, was perfekt für Bakterien wie Bacillus cereus ist.
Verteilen Sie gekochte Getreideprodukte dünn auf einem Backblech, um sie schneller abzukühlen. Dadurch erreichen sie in etwa 30 bis 45 Minuten Raumtemperatur. Manchmal stellen wir das Blech in den Kühlschrank, um den Vorgang zu beschleunigen.
Zum Einfrieren immer vakuumiert verpackte Mahlzeiten mit Inhalt und Datum beschriften. Reis und Nudeln sehen nach dem Vakuumieren fast identisch aus, und wir haben sie definitiv schon einmal verwechselt. Verwenden Sie einen Permanentmarker auf dem Beutel oder kleben Sie ein Gefrieretikett vor dem Vakuumieren auf.
Überprüfen Sie die Beutel vor der Lagerung. Eine gute Versiegelung bedeutet keine Lufteinschlüsse, und der Beutel fühlt sich fest am Lebensmittel an. Wenn es lose Stellen gibt, ist noch Luft im Inneren, und Sie werden ziemlich schnell Gefrierbrand bekommen.
Richtiges Kühlen und Einfrieren
Wir kühlen gekochte Stärken immer mindestens 30 Minuten lang im Kühlschrank, nachdem sie auf Raumtemperatur abgekühlt sind. Dieser zusätzliche Schritt vor dem Vakuumieren hilft, die Feuchtigkeit zu reduzieren und verhindert, dass Kondenswasser die Versiegelung beeinträchtigt.
Zum Einfrieren legen Sie vakuumierte Mahlzeiten die ersten paar Stunden flach hin. Dieser Trick sorgt für gleichmäßige Portionen, die schnell gefrieren und ordentlich gestapelt werden können. Sobald sie fest sind, können Sie sie vertikal aufreihen oder stapeln, je nachdem, wie es am besten in Ihren Gefrierschrank passt.
Gefrierlagerzeiten für vakuumierte Getreideprodukte:
| Lebensmittelart | Gefrierlagerdauer |
|---|---|
| Weißer Reis | 6 bis 8 Monate |
| Brauner Reis | 4 bis 6 Monate |
| Nudeln | 8 bis 12 Monate |
| Quinoa | 8 bis 10 Monate |
| Couscous | 6 bis 8 Monate |
Versuchen Sie, vakuumierte Mahlzeiten von der Gefrierschranktür fernzuhalten, da dieser Bereich die größten Temperaturschwankungen aufweist. Der hintere Teil des Gefrierschranks bleibt am kältesten und stabilsten.
Aufwärmtipps für leckere Ergebnisse
Wir wärmen vakuumierte Mahlzeiten normalerweise direkt aus dem Gefrierschrank auf. Einfach den Beutel aufschneiden und das Essen in einem abgedeckten Gefäß mit einem Spritzer Wasser in der Mikrowelle erhitzen. Ein Esslöffel reicht aus. Das hilft, die Feuchtigkeit zurückzubringen und verhindert das Austrocknen. Die meisten Portionen sind in 2 bis 4 Minuten bei hoher Hitze fertig.
Auf dem Herd geben Sie den gefrorenen Reis oder die Nudeln direkt in eine Pfanne mit etwas Wasser oder Brühe. Abdecken und bei mittlerer bis niedriger Hitze erwärmen, dabei gelegentlich umrühren. Das dauert etwas länger, normalerweise 5 bis 8 Minuten, aber so haben Sie mehr Kontrolle über die Textur.
Wenn Sie Zeit haben, funktioniert das Auftauen über Nacht im Kühlschrank gut. Es ist eine schonendere Methode und bewahrt die Textur der Getreideprodukte besser als das Erhitzen in der Mikrowelle, besonders bei empfindlichen Sorten wie Quinoa oder Jasminreis.
Wärmen Sie die gleiche Portion nicht zweimal auf. Wir portionieren vakuumierte Mahlzeiten immer für den einmaligen Gebrauch, um das wiederholte Erhitzen und Abkühlen von Lebensmitteln zu vermeiden, was die Textur ruiniert und unsicher ist.
Intelligente Essensstrategien für vielbeschäftigte Wochen
Das Vakuumieren von gekochtem Reis, Nudeln und Getreide zahlt sich wirklich aus, wenn Sie einen soliden Essensplan haben. Gutes Portionieren, intelligente Gefrierschrankorganisation und ein einfaches Rotationssystem können die Zubereitung von Mahlzeiten weniger wie eine lästige Pflicht und mehr wie einen Life-Hack erscheinen lassen.
Großküche und Portionskontrolle
Wir kochen Getreide gerne ein- bis zweimal pro Woche in großen Mengen und vakuumieren es dann in mahlzeitgerechten Portionen. Für die meisten Erwachsenen ist eine Portion 1 bis 1,5 Tassen gekochter Reis oder Nudeln. Das sofortige Vakuumieren der Portionen nach dem Abkühlen bedeutet, dass Sie nicht jeden Tag darüber nachdenken müssen, was Sie essen sollen.
Für Familien verwenden wir einzelne Portionen anstelle großer Beutel. Auf diese Weise tauen Sie nur das auf, was Sie benötigen, und verschwenden weniger. Kochen Sie für zwei? Vakuumieren Sie doppelte Portionen zusammen. Wenn Sie für eine Person vorbereiten, sind Einzelportionen, die in weniger als zwei Minuten aufgewärmt sind, perfekt.
Praktischer Ansatz zur Portionierung:
- Frühstücksgetreide: 0,75 bis 1 Tasse (Haferflocken, Quinoa)
- Mittagessen: 1 Tasse (Getreide-Bowls, Beilagen)
- Abendessen: 1 bis 1,5 Tassen (Hauptgerichte, Wok-Gerichte)
Beschriften Sie jeden vakuumierten Beutel mit der Getreidesorte, der Portion und dem Datum. Das klingt einfach, erspart Ihnen aber das Raten an geschäftigen Morgenstunden.
Platzsparend und Organisation im Gefrierschrank
Vakuumierte Mahlzeiten nehmen viel weniger Platz ein als Behälter. Wir frieren Beutel zuerst flach auf einem Backblech ein und stellen sie dann wie Aktenordner auf. So ist es einfach, zu sehen, was Sie haben, und das zu nehmen, was Sie wollen.
Richten Sie eine Gefrierschublade oder einen Bereich nur für vakuumierte Getreideprodukte ein. Halten Sie ähnliche Artikel zusammen. Legen Sie Reis an eine Stelle, Nudeln an eine andere und spezielle Getreideprodukte wie Farro oder Quinoa an eine dritte. Gefrierkörbe oder Trennwände können helfen, wenn Sie den Platz haben.
Unser Gefrierlayout-System:
| Zone | Inhalt | Typische Menge |
|---|---|---|
| Vorne links | Weißer Reis, brauner Reis | 8-10 Portionen |
| Vorne rechts | Nudeln, Teigwaren | 6-8 Portionen |
| Hinterer Bereich | Quinoa, Farro, Spezialgetreide | 4-6 Portionen |
Drehen Sie Ihren Bestand jede Woche, indem Sie ältere Portionen nach vorne verschieben. Vakuumierte Getreideprodukte können sechs bis zwölf Monate halten, aber ehrlich gesagt, finden wir, dass die Textur am besten ist, wenn Sie sie innerhalb von drei oder vier Monaten verwenden.
Mix-and-Match-Mahlzeitenideen
Die Vorbereitung von Mahlzeiten mit vakuumversiegelten Lebensmitteln zahlt sich wirklich aus, wenn Sie flexibel bleiben, anstatt komplette Mahlzeiten vorzubereiten. Wir versiegeln einfaches Getreide getrennt von Proteinen oder Gemüse und kombinieren es je nachdem, wonach uns an diesem Tag ist. Eine Portion Reis kann die ganze Woche über in allen möglichen Gerichten verwendet werden.
Halten Sie drei oder vier Arten von gekochten Getreideprodukten bereit. Brauner Reis passt gut zu asiatisch inspirierten Gerichten, Quinoa ist großartig für Bowls und Salate, Nudeln sind immer praktisch für italienische Abende, und weißer Reis deckt alles andere ab. Abwechslung hält die Essenszubereitung interessant.
Schnelle Kombinationen mit vakuumiertem Getreide:
- Montag: Brauner Reis + gebratenes Gemüse + Teriyaki-Hähnchen
- Mittwoch: Quinoa + geröstete Kichererbsen + Tahini-Dressing
- Freitag: Nudeln + Marinara + italienische Wurst
Fügen Sie frische Kräuter, Dressings oder Toppings nach dem Wiedererwärmen hinzu, um die Dinge interessant zu halten. Die Getreideprodukte sind Ihre Basis, während die Toppings für Abwechslung sorgen und Ihnen zusätzliches Kochen ersparen.
Fehlerbehebung und häufige Fehler vermeiden
Die meisten Probleme beim Vakuumieren von gekochtem Reis, Nudeln und Getreide sind auf Feuchtigkeit, schlechte Versiegelungen oder überfüllte Beutel zurückzuführen. Wenn Sie wissen, worauf Sie achten müssen, lassen sich diese leicht vermeiden.
Wir verteilen gekochte Körner immer auf einem Backblech und lassen sie mindestens eine halbe Stunde abkühlen, bevor wir sie portionieren. Klebrige Körner wie Risotto brauchen ein wenig zusätzliche Hilfe. Tupfen Sie sie vor dem Verschließen mit einem Papiertuch trocken.
Wenn sich beim Vakuumieren Flüssigkeit im Beutel sammelt, unterbrechen Sie den Vorgang und nehmen Sie das Gargut heraus. Trocknen Sie die Öffnung des Beutels und versuchen Sie es erneut. Bei wirklich feuchten Speisen legen Sie ein Papiertuch oben in den Beutel, über das Gargut, aber unter die Versiegelungslinie. Es saugt überschüssige Feuchtigkeit auf, ohne die Versiegelung zu beeinträchtigen.
Behebung unvollständiger Versiegelungen
Speisereste, Öl oder Feuchtigkeit können eine gute Versiegelung ruinieren. Wir überprüfen den Versiegelungsbereich immer vor dem Start. Selbst ein einziges Reiskorn kann eine Lücke hinterlassen.
Wenn die Versiegelung zerknittert oder unvollständig aussieht, lassen Sie sie einfach im Versiegelungsmodus erneut durch das Vakuumiergerät laufen. Die meisten Geräte haben diese Option. Wenn Beutel einfach nicht versiegeln, handelt es sich meist um Schmutz oder einen verschlissenen Heizstreifen.
Wischen Sie den inneren Rand des Beutels vor dem Verschließen mit einem sauberen, trockenen Tuch ab. Bei öligen Lebensmitteln wie Nudeln mit Butter lassen Sie oben etwa 3 Zoll (ca. 7,5 cm) Leerraum, um Öl von der Versiegelung fernzuhalten.
Überfüllung und Zerdrücken vermeiden
Zu voll gestopfte Beutel verursachen zwei Probleme: die Versiegelung hält nicht, und Ihre Körner werden zerdrückt. Wir füllen die Beutel nur etwa zu zwei Dritteln, um oben Platz für eine gute Versiegelung zu lassen.
Wenn Sie den Beutel flach hinlegen, sollte die Lebensmittelschicht etwa 1 bis 1,5 Zoll (ca. 2,5 bis 3,8 cm) dick sein. Dünner ist besser für gleichmäßiges Einfrieren und Wiedererwärmen. Für empfindliche Körner wie Quinoa oder Couscous verwenden Sie die Einstellung für schonende oder feuchte Lebensmittel, falls Ihr Vakuumiergerät eine solche hat.
Bei Nudelformen wie Penne oder Rotini frieren wir die Portionen eine Stunde lang auf einem Tablett ein, bevor wir sie vakuumieren. Das macht sie fester, sodass sie beim Absaugen der Luft nicht zerdrückt oder verklumpen. Es ist ein zusätzlicher Schritt, aber die Textur ist nach dem Wiedererwärmen viel besser.
Häufig gestellte Fragen
Diese kurzen Antworten behandeln das Abkühlen, Portionieren, Lagern und Wiedererwärmen von gekochten Körnern nach dem Vakuumieren.
Wie lange sollten gekochter Reis, Nudeln oder Getreide vor dem Vakuumieren zur sicheren Lagerung abkühlen?
Gekochtes Getreide vor dem Vakuumieren auf Raumtemperatur abkühlen lassen, in der Regel 30 bis 60 Minuten lang. Dünn ausbreiten, um schneller abzukühlen, und dann sofort kühlen oder einfrieren.
Wie portioniert man gekochten Reis und Nudeln am besten für das Vakuumieren, damit sie gleichmäßig wieder aufwärmen?
Verwenden Sie flache Einzelportionen von etwa 150 bis 300 Gramm pro Beutel. Halten Sie jede Schicht etwa 2 bis 3 Zentimeter dick und beschriften Sie den Beutel mit dem Inhalt und dem Datum.
Kann man warme oder heiße gekochte Getreide vakuumieren, oder birgt dies das Risiko eines Beutelversagens und einer schlechten Versiegelung?
Nein. Warme Speisen erzeugen Dampf und Feuchtigkeit, die die Versiegelung schwächen oder in die Maschine gelangen können. Lassen Sie das Getreide vollständig abkühlen, bevor Sie es vakuumieren.
Wie verhindert man, dass vakuumverpackter gekochter Reis oder Nudeln im Gefrierschrank zerdrückt werden oder matschig werden?
Gekühlte Portionen 1 bis 2 Stunden auf einem Tablett einfrieren, bevor sie versiegelt werden. Verwenden Sie eine sanfte Einstellung oder Pulsfunktion, um empfindliche Körner nicht zu zerdrücken.
Welche Lagerzeiten sind für vakuumverpacktes gekochtes Getreide im Kühlschrank im Vergleich zum Gefrierschrank am besten?
Verwenden Sie vakuumverpacktes gekochtes Getreide innerhalb von 5 bis 7 Tagen im Kühlschrank. Für die beste Gefrierqualität verwenden Sie es innerhalb von 4 bis 6 Monaten.
Wie wärmt man vakuumverpackten Reis, Nudeln und Getreide am sichersten wieder auf, einschließlich Sous-Vide- und Mikrowellenoptionen?
Für die Mikrowelle geben Sie das Getreide in eine mikrowellengeeignete Schüssel, fügen Sie etwas Wasser hinzu, decken Sie es locker ab und erhitzen Sie es in kurzen Intervallen. Für Sous-Vide verwenden Sie einen hitzebeständigen Beutel und erwärmen ihn bei 60°C bis 65°C für 15 bis 20 Minuten. Erhitzen Sie die Speisen auf mindestens 74°C.
Teilen:
Kann eine Snackbox-Tragetasche Familienausflüge leichter packen und aufräumen?
Sollten Sie Lebensmittel vor dem Vakuumieren abkühlen? So vermeiden Sie Kondensation und schwache Verschweißungen