

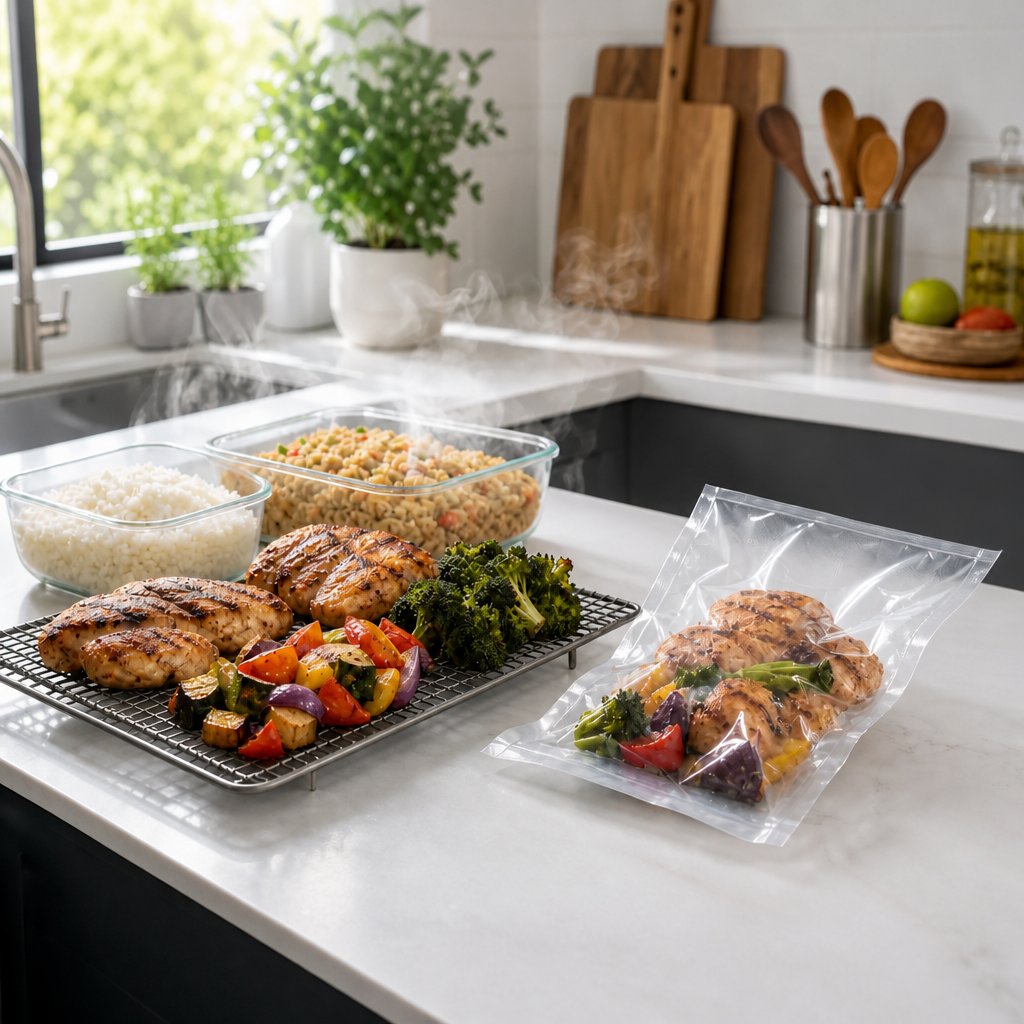
Schauen Sie sich unsere neueste Kollektion von kompakten Vakuumiergeräten für Lebensmittel an!
Warmes Essen kann eine starke Vakuumversiegelung in eine feuchte, unzuverlässige Verpackung verwandeln. Nach dem Versiegeln freigesetzter Dampf wird zu Kondenswasser, was die Versiegelung beeinträchtigen und die Lebensmittelqualität mindern kann. Für eine sicherere Lagerung und eine sauberere Versiegelung kühlen Sie gekochte Speisen vor dem Verpacken in einem Vakuumbeutel richtig ab.
Vakuumversiegelung kann dazu beitragen, dass Mahlzeiten, Reste und vorbereitete Zutaten länger frisch bleiben, ersetzt aber nicht die sichere Kühlung und Lagerung. Lebensmittel, die warm oder heiß versiegelt werden, können in einem unsicheren Temperaturbereich bleiben und übermäßige Feuchtigkeit im Beutel erzeugen.
Dieser Leitfaden erklärt, wie lange Lebensmittel gekühlt werden sollten, wie Kondensation vermieden werden kann, welche Versiegelungsmethoden für feuchte Lebensmittel am besten geeignet sind und wie vakuumversiegelte Mahlzeiten sicher im Kühlschrank oder Gefrierschrank gelagert werden können.
Wichtige Erkenntnisse
- Lassen Sie gekochte Speisen auf Raumtemperatur abkühlen, bevor Sie sie vakuumversiegeln, um Feuchtigkeit und Bakterien zu vermeiden.
- Verwenden Sie stabile, mehrschichtige Vakuumierbeutel und lassen Sie oben etwas Platz, damit Sie eine gute Versiegelung erhalten.
- Beschriften und datieren Sie Ihre Pakete immer, verstauen Sie sie im kältesten Teil Ihres Kühlschranks oder Gefrierschranks und stellen Sie ältere Artikel nach vorne.
Warum Kühlung vor dem Vakuumieren wichtig ist
Das Versiegeln von heißen oder warmen Lebensmitteln führt so gut wie sicher zu Feuchtigkeit im Beutel, einer schwachen Versiegelung und dem Risiko von Bakterien. Die Temperatur Ihrer Lebensmittel vor dem Versiegeln beeinflusst direkt, wie gut die Versiegelung hält und wie lange Ihre Mahlzeiten frisch bleiben.
Wie heiße oder warme Lebensmittel Ihre Versiegelung beeinträchtigen können
Heißes Essen gibt Dampf und Feuchtigkeit ab, was die Verbindung der Vakuumierbeutel an der Naht zerstören kann. Wenn Sie warme Lebensmittel in einen Beutel geben, erzeugt die Hitze Kondensation und verhindert, dass der Kunststoff richtig verschmilzt. Das Vakuumiergerät kann seine Aufgabe nicht erfüllen, wenn die Oberfläche nicht trocken ist.
Manchmal sieht eine Versiegelung zunächst gut aus, versagt aber oft innerhalb von ein oder zwei Tagen. Wir haben viele Beutel gesehen, die luftdicht schienen, aber langsam Luft verloren, weil die Versiegelung durch Hitze beeinträchtigt wurde. Lebensmittel mit Raumtemperatur geben Ihrem Vakuumiergerät die trockene Oberfläche, die es benötigt.
Heißes Essen kann sogar den Versiegelungsstreifen Ihres Geräts verformen oder beschädigen. Die meisten Vakuumiergeräte sind einfach nicht dafür ausgelegt, die zusätzliche Hitze und Feuchtigkeit von frisch gekochten Speisen zu verarbeiten.
Die Wissenschaft der Kondensation in vakuumversiegelten Beuteln
Wenn warme Speisen auf kühlen Kunststoff treffen, verwandelt sich Wasserdampf in winzige Tröpfchen im Beutel. Das ist einfache Physik und genau das, was wir vermeiden wollen. Diese Feuchtigkeit bietet Bakterien einen Nährboden, selbst im Vakuum.
Bakterien lieben den Temperaturbereich zwischen 4 °C und 60 °C. Wenn Sie warme Speisen versiegeln, verweilen sie zu lange in dieser Gefahrenzone, während sie im Beutel abkühlen. Deshalb verwenden professionelle Küchen Eisbäder, um Lebensmittel schnell zu kühlen.
Kondensation beeinträchtigt auch die natürlichen Barrieren in Lebensmitteln, wodurch sie noch schneller verderben oder Gefrierbrand bekommen. Kühl und trocken ist der Schlüssel, bevor Sie versiegeln.
Schwache Versiegelungen und ihre Auswirkungen auf die Lebensmittelsicherheit
Wenn die Versiegelung versagt, dringt Sauerstoff wieder ein, und das ist ein Problem. Sauerstoff lässt Bakterien sich vermehren und verursacht Oxidation, wodurch Lebensmittel an Qualität verlieren. Sie könnten denken, Ihr Essen sei sicher konserviert, aber tatsächlich könnte es verderben.
Schwache Versiegelungen begünstigen auch Gefrierbrand. Luft dringt ein, Eiskristalle bilden sich, und Sie enden mit trockenen, gräulichen Flecken. Das Essen wird zäh und verliert an Geschmack.
Teilweise Versiegelungen sind besonders riskant, da sie ein falsches Gefühl von Sicherheit vermitteln. Sie denken, Ihr Essen hält wochenlang, aber eine schlechte Versiegelung bedeutet, dass es möglicherweise nicht länger hält als bei normaler Lagerung. Überprüfen Sie immer, ob Ihre Beutel nach dem Versiegeln noch vakuumdicht aussehen.
Bewährte Verfahren zum sicheren Kühlen von Lebensmitteln
Das richtige Abkühlen Ihrer Lebensmittel vor dem Vakuumieren sorgt dafür, dass sowohl Ihre Lebensmittel als auch Ihre Gesundheit in gutem Zustand bleiben. Der Trick besteht darin, die Lebensmittel schnell aus der Gefahrenzone zu bringen und Kondensation zu vermeiden.
Sichere Kühlzeiten und -methoden
Lebensmittelsicherheitsrichtlinien besagen, dass gekochte Lebensmittel innerhalb von zwei Stunden von 60 °C auf 20 °C und dann innerhalb weiterer vier Stunden von 20 °C auf 4 °C abgekühlt werden sollten. So verhindern Sie, dass sich Bakterien festsetzen können.
Einige Methoden zur schnellen Kühlung von Lebensmitteln:
- Flache Behälter: Teilen Sie große Mengen in Portionen von maximal 5 cm Tiefe auf, um die Kühlung zu beschleunigen.
- Eisbäder: Stellen Sie versiegelte Behälter in eine größere Schüssel mit Eiswasser und rühren Sie gelegentlich um.
- Abkühlen bei Raumtemperatur: Lassen Sie Lebensmittel 30 bis 60 Minuten lang unabgedeckt auf der Arbeitsplatte stehen, jedoch niemals länger als insgesamt zwei Stunden.
- Abstände im Kühlschrank: Ordnen Sie Behälter mit Abstand zueinander an, damit die Luft zirkulieren kann.
Wir haben festgestellt, dass das Ausbreiten von heißen Speisen auf einem Backblech hervorragend für Gemüse oder Hackfleisch funktioniert. Eine größere Oberfläche bedeutet eine schnellere Abkühlung.
Versuchen Sie nicht, Lebensmittel in verschlossenen Behältern oder abgedeckten Töpfen abzukühlen, da die eingeschlossene Hitze den Vorgang nur verlangsamt und Kondensation erzeugt.
Die „Gefahrenzone“ für die Lebensmittelsicherheit vermeiden
Die „Gefahrenzone“ liegt zwischen 4°C und 60°C, und hier vermehren sich Bakterien wie verrückt. Jede Minute, die Ihr Essen in diesem Bereich verweilt, steigt das Kontaminationsrisiko.
Essen zu lange bei Raumtemperatur stehen zu lassen, ist im Grunde eine Einladung für Bakterien wie Salmonellen und E. coli. Deshalb gibt es die Zwei-Stunden-Regel. Betrachten Sie sie als Maximum, nicht als Ziel.
Fehler, die zu vermeiden sind:
- Große, heiße Töpfe direkt in den Kühlschrank stellen (erwärmt alles darin)
- Warme Behälter übereinander stapeln
- Essen über Nacht stehen lassen
- Annehmen, dass erneutes Erhitzen alles in Ordnung bringt (einige Toxine bleiben auch nach dem Erhitzen bestehen)
Starten Sie Ihren Kühl-Timer, sobald das Essen vom Herd kommt. Wenn Sie dazu neigen, es zu vergessen, stellen Sie einen tatsächlichen Timer ein, damit Sie den Überblick nicht verlieren.
Wann ist das Essen kühl genug zum Vakuumieren?
Streben Sie vor dem Vakuumieren Raumtemperatur (ca. 20-25°C) an. Zu diesem Zeitpunkt hat sich die Feuchtigkeit größtenteils abgesetzt, und Sie werden nicht viel Kondensation im Beutel haben.
Fassen Sie die Außenseite Ihres Behälters an. Wenn er sich nur leicht warm anfühlt, ist es wahrscheinlich in Ordnung. Wenn Sie sicher sein wollen, nehmen Sie ein sofort ablesbares Thermometer und prüfen Sie, ob es unter 25°C liegt.
Tupfen Sie alles mit Papiertüchern trocken, bevor Sie Lebensmittel in die Beutel geben. Selbst gekühlte Lebensmittel können etwas feucht sein, und trockener ist besser für eine starke Versiegelung. Wir lassen gerne zusätzlich 8-10 cm Beutelraum zwischen den Lebensmitteln und der Versiegelungslinie für feuchte Lebensmittel.
Wenn Sie Suppen, Eintöpfe oder Saucen versiegeln, frieren Sie diese zuerst vollständig ein oder verwenden Sie einen Flüssigkeitsblocker, falls Sie einen haben.
Auswahl des richtigen Vakuumiergeräts und der Beutel
Ihr Vakuumiergerät und die von Ihnen gewählten Beutel machen einen riesigen Unterschied, ob Ihr Essen frisch bleibt oder zu einem matschigen Durcheinander wird.
Kammer- versus externe Vakuumiergeräte
Externe Vakuumiergeräte saugen Luft durch die Beutelöffnung ab und versiegeln dann den Rand. Sie sind erschwinglich und kompakt, was für die meisten Hobbyköche großartig ist. Der Nachteil? Sie kommen mit Feuchtigkeit nicht gut zurecht, da jede Flüssigkeit, die zur Versiegelung gelangt, diese beeinträchtigen kann.
Kammer-Vakuumiergeräte legen den gesamten Beutel in eine Kammer, entfernen die Luft sowohl aus der Kammer als auch aus dem Beutel und versiegeln dann. Diese Anordnung hält Flüssigkeiten von der Versiegelung fern, sodass Sie feuchte oder sogar heiße Lebensmittel ohne viele Probleme verarbeiten können.
Der Haken ist, dass Kammergeräte groß und teuer sind. Aber wenn Sie viele Suppen, Eintöpfe oder Lebensmittel versiegeln, die nicht immer vollständig gekühlt werden, sind sie eine Lebensretter.
Für die meisten Leute, die gekühlte Lebensmittel gelegentlich versiegeln, funktioniert ein externes Modell gut. Wenn Sie in großen Mengen kochen oder Dinge versiegeln möchten, die noch etwas warm sind, lohnt es sich, Kammergeräte in Betracht zu ziehen.
Auswahl geeigneter Vakuumbeutel für heiße, feuchte oder empfindliche Lebensmittel
Externe Vakuumiergeräte benötigen strukturierte Beutel mit geprägten Kanälen, da diese beim Versiegeln Luft entweichen lassen. Glatte Beutel funktionieren mit diesen Geräten einfach nicht.
Kammer-Vakuumiergeräte können entweder strukturierte oder glatte Beutel verwenden. Achten Sie nur darauf, dass alle Ihre Beutel eine Sauerstoffbarriereschicht haben, um die Versiegelung nach dem Verpacken dicht zu halten.
Für feuchte oder warme Lebensmittel sind dickere Beutel am besten geeignet. Sie sind weniger anfällig für Löcher und halten Temperaturschwankungen besser stand. Verwenden Sie Standardbeutel für Trockenwaren und vollständig gekühlte Produkte.
Verzichten Sie auf normale Plastik- oder generische Lebensmittelaufbewahrungsbeutel. Sie verfügen nicht über die Sauerstoffbarriere oder die Konstruktion, die für eine echte Vakuumversiegelung erforderlich ist, sodass Ihre Lebensmittel genauso schnell verderben wie bei der Verwendung eines normalen Beutels.
Versiegelungstechniken für verschiedene Arten von gekochten Speisen
Nicht alle Lebensmittel sind beim Vakuumieren gleich. Feuchte Gerichte erfordern besondere Sorgfalt, um Flüssigkeit von der Versiegelung fernzuhalten, und die Portionierung erleichtert die Lagerung und das Wiedererwärmen. Die Art und Weise, wie Sie die Luft entfernen und die Beutel füllen, beeinflusst wirklich, wie lange Ihre Lebensmittel haltbar sind.
Umgang mit feuchten Lebensmitteln, Saucen und Eintöpfen
Suppen, Eintöpfe und Soßengerichte sind bekannt für Probleme bei der Versiegelung. Flüssigkeit kann zur Versiegelung hochgezogen werden, was zu einem schwachen Verschluss führt.
Die beste Lösung ist, das Essen zuerst teilweise festzufrieren. Verteilen Sie gekühlten Eintopf oder Sauce in einer flachen Schale, frieren Sie es zwei bis drei Stunden lang ein und füllen Sie es dann in einen Beutel und versiegeln Sie es. Dies verhindert, dass sich die Flüssigkeit während des Versiegelns bewegt.
Wenn Sie es eilig haben, lassen Sie einen zusätzlichen Freiraum von mindestens vier Zoll zwischen dem Essen und der Beutelöffnung. Sie können auch den Vakuumzyklus beobachten und kurz vor dem Hochkriechen der Flüssigkeit pausieren, dann sofort versiegeln.
Für Soßen oder Marinaden probieren Sie die „Pulse“-Funktion aus, falls Ihr Gerät eine hat. Damit können Sie steuern, wie viel Luft Sie absaugen, damit Sie keine Flüssigkeit in die Versiegelung saugen.
Verpacken von Portionen für die Essenszubereitung
Die richtige Portionierung vor dem Versiegeln spart Ihnen später Zeit und Mühe. Versiegeln Sie einzelne Portionen für einfache Mittagessen oder Portionen für zwei Personen. Auch Familienportionen sollten bequem in den Beutel passen und oben noch Platz lassen.
Drücken Sie die Beutel vorsichtig flach, bevor Sie sie versiegeln, damit sich das Essen gleichmäßig ausbreitet. Dies hilft, es schneller einzufrieren und wieder aufzuwärmen. Stapeln Sie Ihre Beutel im Gefrierschrank wie Akten, nicht in einem großen Haufen.
Beschriften Sie jeden Beutel mit dem Inhalt und dem Datum. Sobald Sie Lebensmittel für ein paar Wochen im Gefrierschrank haben, ist es leicht zu vergessen, was was ist.
Tipps zur Luftentfernung und festeren Versiegelungen
Das vollständige Entfernen der Luft ist der Schlüssel zu einer soliden und dauerhaften Versiegelung. Trocknen Sie die Beutelöffnung vor dem Versiegeln vollständig ab, denn schon ein wenig Feuchtigkeit oder Fett kann die Versiegelung ruinieren.
Glätten Sie alle Falten oben, bevor Sie den Beutel in das Gerät legen. Falten hinterlassen kleine Kanäle, durch die Luft wieder eindringen kann.
Nicht überfüllen. Halten Sie die Beutel halb voll oder weniger, damit das Gerät richtig arbeiten und eine flache, gleichmäßige Versiegelung erzeugen kann. Lebensmittel, die flach im Beutel liegen, lassen sich besser versiegeln und leichter lagern.
Wenn Sie Lebensmittel mit scharfen Kanten versiegeln, wie Knochen oder Nudeln, legen Sie ein Papiertuch zwischen das Lebensmittel und den Versiegelungsbereich. Das hilft, Löcher zu vermeiden.
Gefrierlagerung und langfristige Lebensmittelkonservierung
Vakuumversiegelte Lebensmittel halten im Gefrierschrank problemlos dreimal länger als in normalen Behältern oder Beuteln. Das richtige Stapeln und Lagern Ihrer Verpackungen hilft Ihnen, den Gefrierplatz optimal zu nutzen und alles in gutem Zustand zu halten.
Einfrieren nach dem Vakuumieren für maximale Frische
Kühlen Sie die Lebensmittel auf Raumtemperatur oder darunter ab, vakuumieren Sie sie und legen Sie sie sofort in den Gefrierschrank. Dies verhindert Kondensation und sorgt für die stärkste Versiegelung.
Vakuumversiegeltes Fleisch kann bis zu drei Jahre im Gefrierschrank halten, im Vergleich zu nur sechs Monaten in normalen Beuteln. Gemüse bleibt zwei bis drei Jahre gut, und Backwaren bekommen nicht annähernd so schnell Gefrierbrand.
Das Geheimnis der Langzeitlagerung ist die Entfernung von Sauerstoff. Das Vakuumieren verlangsamt die Oxidation und verhindert Gefrierbrand. Keine Eiskristalle mehr, die sich auf Ihren Lebensmitteln bilden.
Beschriften Sie Ihre Pakete immer mit dem Inhalt und dem Datum. Wir schreiben das normalerweise einfach mit einem Permanentmarker direkt auf die Beutel. Das ist ein Lebensretter, wenn Sie im Gefrierschrank nach dem Hühnchen suchen, das Sie vor Monaten eingepackt haben.
Effizientes Stapeln und Lagern von vakuumversiegelten Beuteln
Flache Packungen lassen sich einfach besser stapeln als sperrige Behälter. Ehrlich gesagt, ist das einer der Hauptgründe, warum ich das Vakuumieren zur Gefrierlagerung liebe. Wir ordnen unsere vakuumversiegelten Beutel normalerweise aufrecht in Behältern oder Körben an, so ähnlich wie ein Ablagesystem, damit wir sie leicht durchblättern können.
Ich friere die Beutel gerne zuerst flach auf einem Backblech ein und verschiebe sie dann in Behälter, sobald sie fest sind. Das ergibt ordentliche, gleichmäßige Packungen, die sich gut stapeln lassen und Ihren vertikalen Raum optimal nutzen. Quadratische und rechteckige Formen eignen sich meiner Erfahrung nach besser zum Stapeln als unregelmäßig geformte.
Versuchen Sie, ähnliche Artikel in ihren eigenen Zonen zu gruppieren. Wir bewahren alle Proteine in einem Bereich auf, Gemüse in einem anderen und zubereitete Mahlzeiten in einem dritten. Diese Anordnung spart Zeit und hilft, Situationen zu vermeiden, in denen die Gefriertür viel zu lange offen bleibt, während Sie herumgraben.
Stapeln Sie die Beutel nicht zu hoch. Wenn Sie sie zu hoch stapeln, werden die unteren zerdrückt oder gehen verloren. Wir halten uns an Stapel von etwa 15-20 cm Höhe, wodurch alles sichtbar und leicht zu greifen bleibt.
Anzeichen von Verderb und wann vakuumversiegelte Lebensmittel entsorgt werden sollten
Selbst wenn Sie Beutel perfekt verschließen, können Lebensmittel immer noch verderben, wenn sie nicht frisch waren oder wenn die Lagerbedingungen ungünstig waren. Zu wissen, worauf man achten muss, hilft, Ihren Haushalt sicher zu halten und bessere Entscheidungen darüber zu treffen, was noch gut ist.
Sichtbare und unsichtbare Anzeichen für Verderb
Das erste, was wir den Leuten empfehlen zu überprüfen, ist die Versiegelung. Wenn ein vakuumversiegelter Beutel aufgebläht aussieht oder sich locker anfühlt, ist Luft eingedrungen, und Sie sollten dieses Lebensmittel so behandeln, als wäre es nie versiegelt worden. Öffnen Sie es sofort und nehmen Sie einen Geruchstest vor. Ungewöhnliche Gerüche sind in der Regel das zuverlässigste Warnzeichen.
Achten Sie auf sichtbaren Schimmel, entweder im Beutel oder entlang der Versiegelung. Jeder Schimmel bedeutet, dass Sie das Lebensmittel wegwerfen müssen, selbst wenn er nur an einer Stelle ist. Die Textur ist auch ein wichtiger Hinweis. Wenn Fleisch, Geflügel oder Fisch schleimig anfühlt, ist das ein Zeichen für Bakterien. Achten Sie auf seltsame Farbveränderungen wie graue oder braune Flecken auf rotem Fleisch, besonders wenn es seltsam riecht.
Bei vakuumversiegeltem Gemüse sind Matschigkeit oder dunkle Flecken schlechte Nachrichten. Der Geruchstest ist entscheidend, wenn Sie eine Verpackung öffnen. Saure, ranzige oder ammoniakähnliche Gerüche bedeuten, dass das Essen nicht sicher ist. Vertrauen Sie Ihren Sinnen, und wenn sich etwas falsch anfühlt, werfen Sie es einfach weg.
Sicherheitshinweise zum Wiedererhitzen und Auftauen
Wir tauen vakuumversiegelte Lebensmittel immer im Kühlschrank auf, niemals auf der Arbeitsplatte. Das Auftauen bei Raumtemperatur schafft die perfekte Umgebung für die Vermehrung gefährlicher Bakterien wie Clostridium botulinum, selbst in einem versiegelten Beutel.
Wenn Sie vakuumversiegelte Lebensmittel wiedererhitzen, nehmen Sie sie zuerst aus dem Beutel, es sei denn, der Beutel ist als kochfest gekennzeichnet. Die meisten Vakuumbeutel sind einfach nicht für direkte Hitze ausgelegt. Bei gefrorenen Lebensmitteln überprüfen Sie die Versiegelung vor dem Auftauen. Wenn das Vakuum verschwunden ist, ist das Lebensmittel immer noch genießbar, aber Sie sollten es bald verwenden, da Gefrierbrand und Qualitätsverlust schneller auftreten, sobald Luft eindringt.
Kochen Sie alle vakuumversiegelten rohen Proteine auf eine sichere Kerntemperatur. Vakuumversiegelung verlängert die Haltbarkeit, tötet aber keine Krankheitserreger ab. Das erledigt das richtige Kochen.
Häufig gestellte Fragen
Diese prägnanten Antworten behandeln sicheres Kühlen, Kondensation, Versiegelung und Gefrierlagerung.
Wie lange sollte gekochtes Essen vor dem Vakuumieren für den Kühlschrank oder Gefrierschrank abkühlen?
Kühlen Sie Lebensmittel umgehend ab und versiegeln Sie sie erst, wenn sie nicht mehr warm sind. Kleine Portionen können in 30 bis 60 Minuten abkühlen, während größere Gerichte länger brauchen. Lassen Sie gekochte Speisen nicht länger als zwei Stunden bei Raumtemperatur stehen.
Was ist der sicherste Weg, Suppen, Eintöpfe oder Saucen vor dem Versiegeln zu kühlen, ohne das Bakterienwachstum zu riskieren?
Teilen Sie Flüssigkeiten in flache Behälter oder verwenden Sie ein Eisbad und stellen Sie sie dann umgehend in den Kühlschrank. Sobald sie vollständig gekühlt sind, frieren Sie Suppen, Eintöpfe oder Saucen ein, bis sie fest sind, bevor Sie sie vakuumversiegeln.
Warum bildet sich Kondenswasser in einem Vakuumbeutel und wie kann ich es verhindern?
Warme Speisen geben Dampf ab, der sich im Beutel in Tröpfchen verwandelt. Lassen Sie die Speisen vollständig abkühlen, tupfen Sie feuchte Oberflächen trocken und frieren Sie stark feuchtigkeitshaltige Lebensmittel vor dem Versiegeln vor.
Kann ich Lebensmittel vakuumieren, während sie noch warm sind, wenn ich ein Kammer-Vakuumiergerät verwende?
Ein Kammer-Vakuumiergerät kommt besser mit Feuchtigkeit zurecht, aber Lebensmittel sollten dennoch vor dem Versiegeln gekühlt werden. Vakuumieren Sie niemals heiße Flüssigkeiten. Kühlen oder frieren Sie sie zuerst ein.
Was sind die Ursachen für schwache oder fehlerhafte Versiegelungen beim Verpacken feuchter Lebensmittel, und wie behebe ich das?
Feuchtigkeit, Fett, Lebensmittelreste oder Falten können das Versiegeln des Beutels verhindern. Reinigen und trocknen Sie die Öffnung, lassen Sie genügend Kopffreiheit, glätten Sie den Beutel und versiegeln Sie erneut.
Sollte ich vakuumversiegelte Mahlzeiten vor dem Einfrieren kühlen, um Eiskristalle und Gefrierbrand zu reduzieren?
Ja. Das Kühlen von Mahlzeiten vor dem Einfrieren reduziert Kondensation, begrenzt Temperaturschwankungen im Gefrierschrank und hilft den Lebensmitteln, gleichmäßiger zu gefrieren.
Teilen:
So vakuumieren Sie gekochten Reis, Nudeln und Getreide für die wöchentliche Essensvorbereitung
Wie man gefrorenes Fleisch vakuumiert: Sollte man vor dem Einfrieren vakuumieren oder danach?