

Check out our latest collection of compact vacuum sealer for food!
The right vacuum sealer bag size can turn messy meal prep into an easier, cleaner system. When the bag is too large, you waste material. When it is too small, lunches get squeezed, seals fail, and leftovers lose freshness faster than they should.
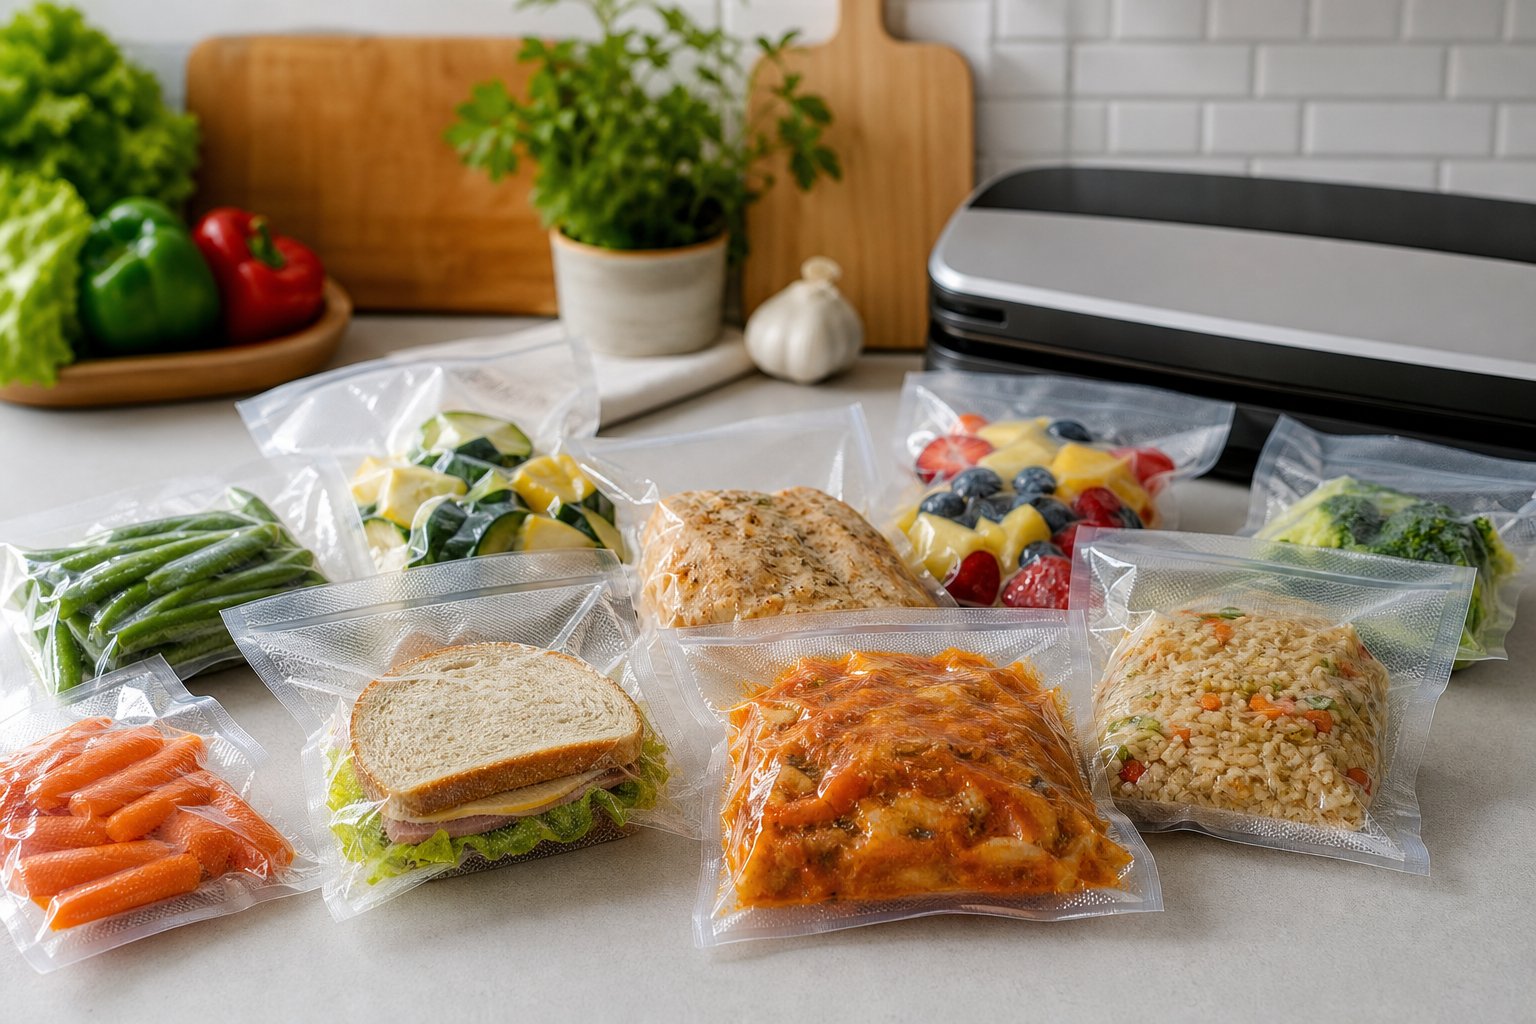
For most everyday food storage, 6x10 inch bags work well for snacks, 8x12 inch bags fit lunches and single servings, and 11x16 inch bags are better for family-size leftovers or larger meal prep portions.
This guide shows you how to match vacuum sealer bag sizes to school lunches, snacks, cooked proteins, soups, sauces, and leftovers so your food stays fresh, organized, and easy to store.
Key Takeaways
- Match bag size to your food, not the other way around, to avoid waste and get a proper seal
- Check material thickness and barrier strength for how long and what you’re storing
- Smaller bags work best for single servings, larger ones for family meals and bulk prep
Understanding Vacuum Sealing for Everyday Meals
Vacuum sealing pulls the air out of specially designed bags and seals them shut around your food. This simple move can really extend how long lunches, snacks, and leftovers last, keeping them from drying out or picking up weird fridge smells.
What Is Vacuum Sealing and Why Use It for Lunches and Snacks
Vacuum sealing removes oxygen from the bag and seals it tight, locking your food away from the outside world. For everyday meals, this means Monday’s meal prep still tastes good on Friday, and that block of cheese you bought in bulk won’t turn into a science experiment by midweek.
Since oxygen is out of the picture, bacteria and mold slow way down. Your pre-portioned lunches keep their flavor and texture, and snacks like nuts or dried fruit don’t go soft or stale.
People use vacuum sealing for portion control and grab-and-go meals all the time. It’s easy to pack trail mix, sliced veggies, sandwich fixings, or leftovers for the week. Stacks of vacuum-sealed bags make your fridge or freezer look organized, and you’re way less likely to forget about food hiding in the back.
Marinating goes faster too. When you vacuum seal meat or veggies with a marinade, the flavors soak in much quicker, sometimes in minutes instead of hours.
How Vacuum Seal Bags Help Prevent Freezer Burn and Spoilage
Freezer burn happens when food loses moisture, leaving those dry, tough spots nobody wants to eat. Vacuum-sealed bags stop this by keeping moisture locked inside.
When you use regular storage, air pockets stick around your food, and that air brings moisture that turns into ice crystals in the freezer. These crystals wreck the texture and taste. Vacuum bags get rid of those air pockets, so your frozen leftovers or bulk buys last a whole lot longer than they would in a zip-top bag.
Shelf life comparisons:
- Leftover cooked chicken: 3-4 days standard, 10-14 days vacuum sealed
- Frozen soup: 2-3 months, 12+ months vacuum sealed
- Sliced lunch meat: 3-5 days, 14-21 days vacuum sealed
Airtight bags also keep strong smells from escaping or mixing. So your garlicky pasta won’t turn your strawberries into something weird, and leftovers don’t perfume your whole fridge.
Types of Vacuum Bags and Materials for Food Storage
Vacuum seal bags come in a few different formats and materials, and what you pick changes how well they seal, how tough they are, and how fresh your food stays.
Overview of Vacuum Sealer Bags, Pouches, and Rolls
You’ll find vacuum sealer bags as pre-cut pouches or long rolls you cut yourself. Pre-cut pouches, like an 8x12 or 11x16 inch bag, are ready to go, just fill and seal. Super convenient if you want consistency and speed.
Rolls give you the freedom to make custom sizes. Need to seal half a sandwich or a giant casserole? Just cut what you need. This way, you don’t waste material. Most rolls are 8 to 11 inches wide and can be as long as 50 feet.
The material matters too. Good vacuum bags have several layers, usually polyethylene, nylon, sometimes polyester, to block oxygen and moisture. These layers make a difference, especially for freezer storage. Go for at least 3-4 mil thickness for fridge items, and 4-5 mil for freezer or reheating.
Always check that your bags are BPA-free and food-safe. Look for FDA approval if you’re putting food directly in them.
Embossed Versus Smooth Bags: What Works for Your Machine
Embossed vacuum bags have a textured side with tiny channels. These let air move out during sealing. Most countertop vacuum sealers need embossed bags, without those channels, they just can’t pull the air out right.
Smooth bags have no texture. They only work with chamber vacuum sealers, which suck the air out of the whole chamber, not just the bag. If you use a smooth bag in a regular (external) sealer, you’ll probably end up with a poor seal and wasted food.
The texture doesn’t change how long your food lasts or how it tastes, it’s just about how the machine works.
Choosing Between Standard, Gusseted, and Zipper Pouches
Standard flat vacuum pouches work for almost everything, lunches, snacks, leftovers. They’re cheap and stack easily in the freezer. We use them for sandwiches, cookies, chopped veggies, and pasta.
Gusseted bags have expandable sides, so they stand up and hold bulkier stuff. Great for soups, stews, or thick sandwiches that might otherwise get squished. They’re a bit pricier but can save you a mess, especially with liquids.
Zipper pouches are a hybrid: vacuum seal them once, then use the zipper for easy open-and-close. Handy for snacks you’ll dip into all week, like nuts or crackers. Just don’t expect to vacuum seal them again and again, the zipper’s mainly for short-term use after the first seal.
Most lunches and leftovers do fine in standard bags. Save the gusseted and zipper types for special cases.
How to Select the Perfect Bag Size for Lunches, Snacks, and Leftovers
Picking the right bag size for what you’re actually packing keeps your food fresher, saves money, and doesn’t waste freezer space. Let’s break down common bag sizes, what thickness means, and how to match portion size with real-life storage.
Assessing Common Bag Sizes and Their Ideal Uses
Small bags (6" x 10" or 8" x 12") are perfect for one sandwich, a handful of veggies, or a few cookies. These fit neatly in lunch boxes and help with portion control.
Medium bags (8" x 12" to 11" x 16") are our usual pick for most lunches and leftovers. They hold a main course, a piece of chicken with sides, or a few slices of lunch meat without too much extra plastic.
Large bags (11" x 16" and up) work for big portions, family casseroles, a week’s worth of sandwiches, or meal prep containers. They’re also wide enough for laying out whole sandwiches or bigger items.
Quick Size Guide:
- 6" x 10": Snacks, nuts, trail mix, cookies
- 8" x 12": Lunches, sandwich halves, small leftovers
- 11" x 16": Full meals, big protein portions, multiple servings
- Rolls: Custom sizes for awkward shapes or special portions
Using Bag Dimensions and Mils to Match Your Needs
Bag size is measured by width and length inside the bag. We usually add 3-4 inches to the food’s size so there’s room to seal and pull a good vacuum.
Mil is bag thickness. Standard 3-mil bags work for fridge snacks and short-term storage. For freezer use or anything with sharp edges, go for 4-mil or thicker, they’re less likely to get punctured.
Don’t forget to measure food height too. A thick sandwich needs more space than you’d think. It helps to actually measure your go-to foods before buying a big box of bags.
If you’re using a suction-style countertop sealer, you need textured bags. Chamber sealers work with smooth bags. Make sure your bags fit your machine.
Balancing Portion Size, Storage Space, and Food Type
Single servings don’t need as much bag space as you might expect. One cup of soup or stew fits into an 8" x 10" bag and stacks flat in the freezer.
Wet foods, like sauces or marinated meats, need extra headspace (4-5 inches) so the liquid doesn’t get sucked into the seal. Dense foods like cheese or steaks can go in snugger bags. Softer stuff, like muffins or bread, needs more room so it doesn’t get squished.
Honestly, most homes get by with just two standard sizes (say, 8" x 12" and 11" x 16") and maybe a roll for those random-shaped things. Pick your main size based on what you pack most, lunches, snacks, or meal preps.
Bag Size Breakdown: Recommendations for Real-Life Meals
Having the right vacuum bag size for each meal really does make meal prep smoother and wastes less space. We stick with quart bags for daily portions and gallon sizes for batch cooking, covers nearly everything.
Best Sizes for Single-Serve Snacks
For snacks like pretzels, crackers, trail mix, or sliced veggies, 6-inch by 10-inch vacuum pouches or quart bags are spot on. They keep you from sealing a few baby carrots in a bag that could fit a whole loaf of bread.
A single cheese stick, a sandwich’s worth of deli meat, or a serving of nuts fits perfectly in a quart-sized bag. People often use big bags for small snacks and end up tossing a lot of plastic.
Pre-portioning snacks makes packing lunches way easier. Just grab a sealed bag of berries or apple slices, no measuring in the morning. Quart size keeps snacks compact and safe from getting crushed.
Cookies, brownies, and granola bars seal up great in these smaller bags, too. Just leave about two inches of space at the top so the seal isn’t ruined by crumbs or moisture.
Portioning Lunches and Leftovers with Quart Bags
Quart-size bags (about 8" x 12") work for almost every lunch and leftover we pack. A chicken breast, pork chop, or salmon fillet fits with a little room for marinade.
These bags are ideal for:
- Two or three servings of pasta or rice
- Single portions of soup or stew (after cooling)
- Sliced turkey or cheese for sandwiches
- A couple of leftover pizza slices
- Grilled veggies
Sealing leftovers right after cooking helps you avoid the dreaded “mystery container” in the freezer. Labelled quart bags make it easy to know exactly what’s inside next week.
The quart size also keeps freezer burn at bay better than regular containers. Pulling out the air keeps flavors fresh and textures right for up to three months, easily.
Bulk-Freezing Family Meals and Larger Portions
Gallon-size vacuum sealer bags (usually 11 inches by 16 inches) and other large storage bags are a must when prepping meals for a family or freezing in bulk. I rely on these for things like whole roasts, multiple chicken breasts, or a big pan of lasagna that’ll feed four to six people.
Here’s what you can fit in those big vacuum bags:
- Three to five pounds of ground meat
- Whole chickens or big beef cuts
- Four to six servings of casseroles
- Bulk veggies from the garden or a market haul
- Several sandwich fixings in one go
If you cook up a big batch of chili, soup, or curry, gallon bags let you freeze four to six servings at once. That means you can pull out dinner on a busy weeknight and have it ready in no time.
For bread loaves, muffins, or burger buns, these bigger pouches keep everything together without flattening them. I always let baked goods cool completely before freezing, otherwise, you’ll get moisture trapped inside the bag, never good.
Tips for Maximising Freshness and Efficiency
Choosing the right bag size is only part of the equation. How you seal, store, and organize those bags really decides if your food stays fresh or ends up freezer-burned and forgotten in the back somewhere.
Avoid Overfilling and Ensure Proper Seals
People often overfill bags or shove food too close to the sealing edge. When food crowds the top, moisture and oils mess with the heat seal, and air sneaks back in through weak spots.
I always leave at least 5 to 8 centimeters of space between the food and the seal area. That way, the vacuum sealer has enough room to create a solid, clean bond. For wet foods like marinated chicken or soup, I’ll freeze them flat for an hour first or use the liquid setting if my sealer has one.
Wipe away any moisture around the seal zone before starting. Even a little bit of liquid can ruin the seal. If you’re sealing something with sharp edges, like crackers or bone-in cuts, wrap them in parchment paper first. That way, you won’t end up with a punctured bag and lost vacuum.
Labelling and Dating for Easy Organisation
Everyone’s faced the freezer guessing game, staring at mystery bags and wondering what’s inside. Labelling your vacuum-sealed bags before they go in the freezer saves time and cuts down on waste.
I use a permanent marker to write straight on the bag before sealing, or I’ll stick on a freezer-safe label. I include what’s inside, the portion size, and the date I sealed it. If I’m meal prepping in bulk, sometimes I’ll jot down a cook-by date or quick reheating notes too.
Lay bags flat in the freezer until they’re frozen solid, then stand them up vertically like files in a drawer. You end up saving space, and it’s way easier to see what you’ve got at a glance. I like to group similar things together, lunches in one spot, snacks in another, proteins for dinner somewhere else.
Matching Bag Type and Size to Your Sealer Machine
Not every vacuum sealer bag fits every machine. Most home models need embossed or textured bags so air can escape. Smooth bags might look nice, but most standard suction sealers can’t pull a vacuum with them.
Check your machine’s specs before buying bags in bulk. Some brands only work with their own bags, while others accept most universal options. If you use a roll, cut lengths that leave you enough sealing space without wasting extra plastic.
For lunch portions, I find pre-cut bags around 15 to 20 centimeters work great for sandwiches and single servings. Snack-sized bags, about 10 to 15 centimeters, are perfect for nuts, granola, or small leftovers. With custom-cut rolls, you can make bags exactly the size you need for weirdly shaped items or big prep days.
Features That Matter: Barrier Properties, Thickness, and Beyond
The right vacuum sealer bag does more than just hold your lunch together. Good bags keep out oxygen, moisture, and freezer burn thanks to their multi-layer construction. Thickness matters, too, it decides how well the bag handles sharp edges or temperature swings.
Understanding Barrier Properties and Food Safety
Barrier properties decide how well your vacuum seal bags keep oxygen, moisture, and contaminants away from your food. In my experience, multi-layer bags (usually made of polyethylene, nylon, and sometimes polyester) give the best protection for everyday storage.
These layers form a defense team. The outer layer resists punctures when you toss bags into your lunch box or stack them in the freezer. Inner layers block oxygen, which is what causes food to spoil or get freezer burn.
Look for these features:
- BPA-free, food-safe materials certified for direct food contact
- At least 3-layer construction for standard storage
- Textured or embossed surfaces to help air escape
Barrier quality really affects how long your prepped lunches stay fresh. A sandwich in a good multi-layer bag keeps its texture and flavor for days longer than one in a basic single-layer pouch.
Why Thickness (Mil Rating) Impacts Storage Longevity
Bag thickness, measured in mils, tells you how tough your bags are in real life. I recommend different ratings depending on what you’re storing and how long you’ll keep it frozen.
3-mil bags are fine for refrigerated items you’ll eat within a few days, like tomorrow’s sandwich or some cut veggies. They’re the lightest and cheapest, but they tear easily with sharp or frozen foods.
4-mil bags hit the sweet spot for most lunch prep and leftovers. They handle freezer storage and don’t puncture easily from chicken bones or crusty bread. This thickness also works for basic sous vide if you’re meal prepping proteins.
5-mil and thicker bags are for sharp items, long-term freezing, or higher-temperature cooking. They cost more, but they save you from the annoyance of finding a punctured bag that’s let air in.
Customizing with Rolls and Specialty Bags
Pre-sized bags are convenient for routine portions, but rolls are lifesavers when standard bag sizes just don’t fit. I use rolls all the time for weird-shaped leftovers or when I want to avoid wasting plastic.
With a roll, you cut exactly the length you need. That extra couple inches might not seem like much, but try squeezing 15 vacuum-sealed bags into a packed freezer, every bit counts.
Specialty options to try:
- Wider rolls for casseroles or whole meals
- Pre-cut assortment packs with several bag sizes
- Reusable zipper bags for stuff you’ll grab often, like trail mix or crackers
The trick is matching your bag to how you actually pack lunches and store leftovers, instead of just buying whatever’s cheapest per unit.
Frequently Asked Questions
Choosing the right vacuum sealer bag size is easier when you match the bag to the portion, food type, and storage method.
What bag size works best for single-serve lunches like sandwiches, wraps, and cut fruit?
Use 6" × 10" bags for snacks, cut fruit, and small sandwiches. Use 8" × 12" bags for wraps, full sandwiches, salads, or lunches with extra toppings.
How do I choose a bag size that seals properly without wasting extra plastic?
Choose a bag slightly wider than the food and leave 2 to 3 inches of empty space at the top. This gives the sealer enough room to create a strong seal.
When should I use quart-size versus gallon-size bags for leftovers and meal prep portions?
Use quart-size bags for single meals, side dishes, and individual proteins. Use gallon-size bags for family portions, casseroles, soups, roasts, or larger batch prep.
What bag dimensions fit common snack portions like trail mix, jerky, and cheese slices without crushing them?
Use 6" × 10" bags for trail mix, nuts, and jerky servings. Use 8" × 12" bags for cheese slices or snacks that need to lie flat.
How much extra length should I leave above the food for a reliable seal and easy opening later?
Leave at least 2 inches above the food. For moist foods or bags you plan to reseal, leave 3 to 4 inches.
Which bag sizes stack and store best in the freezer for soups, sauces, and cooked proteins?
Use 8" × 12" bags for most soups, sauces, and cooked proteins. Fill them partway, freeze them flat, then stack them vertically to save freezer space.
Partager:
How to Use a Cordless Vacuum Sealer for Snacks, Leftovers, and Small Daily Portions
How to Use Square Glass Jars for Pantry Visibility and Faster Cooking