

Check out our latest glass jars collection!
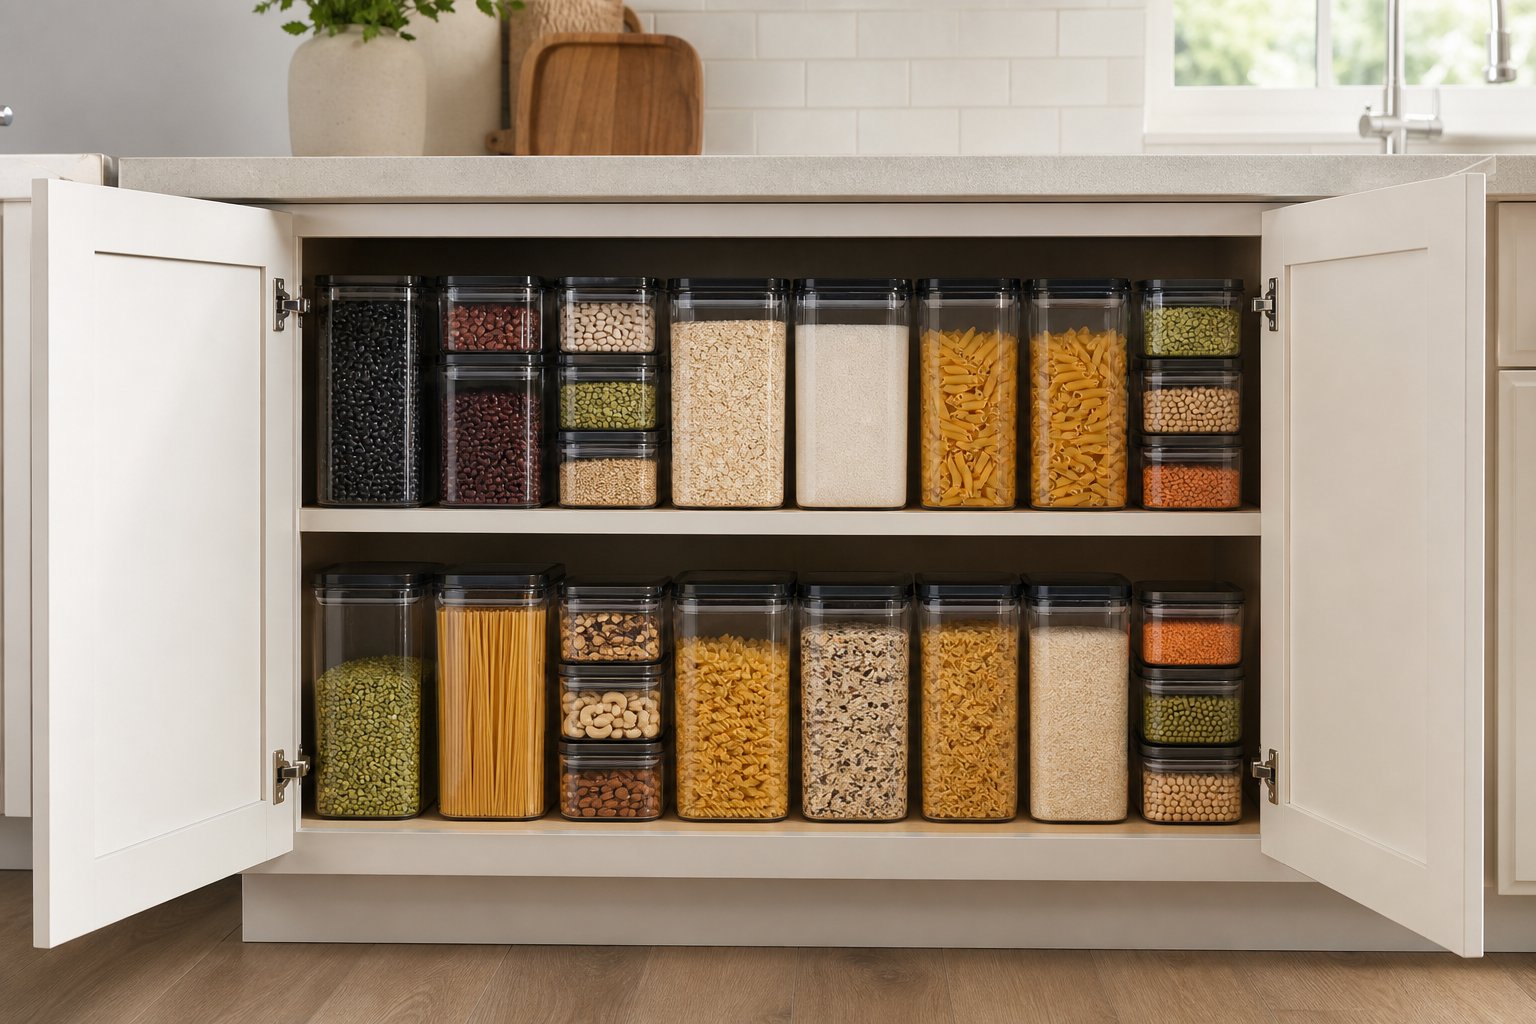
Low pantry cabinets can quickly turn into cluttered spaces where ingredients disappear, containers topple, and valuable shelf room goes unused. Square glass jars offer a simple way to bring order to these awkward cabinets while keeping everyday staples easy to see and reach.
Their flat sides fit neatly together, their clear glass makes contents visible, and their stackable shape helps you use limited vertical space more efficiently. They can also help protect dry ingredients from moisture, pests, and messy packaging.
With accurate measurements, practical jar sizes, clear labels, and safe stacking, even a small low cabinet can become easier to use. This guide explains how to plan, arrange, label, and maintain square glass jars for a more organized pantry.
Key Takeaways
- Square glass jars let you use all your low cabinet space by stacking and lining up side by side
- Using jars of the same size creates stable, tidy rows where you can see everything without constant reshuffling
- Measuring your space, planning zones, and labeling jars keeps your pantry working smoothly over time
Assessing Your Pantry Space for Stack-Friendly Storage
Low pantry cabinets definitely aren’t like walk-in pantries or tall shelves. Before you buy a bunch of square glass jars, it’s worth taking a good look at your actual space and figuring out what’s making it so hard to keep organized.
Identifying Low Cabinet Challenges
Low cabinets make you work with tight vertical space. Most base cabinets are around 34 to 36 inches tall, but inside, you only get about 30 inches after you factor in the countertop and bottom.
The main problem? Vertical space just gets wasted. Round jars roll, tip, and leave weird gaps, while square containers fit neatly. Stuff gets shoved to the back and forgotten, sometimes until it’s expired.
Deep shelves are another headache. Standard cabinets go 24 inches deep, so food disappears behind other food. You end up buying things you already have because you can’t see them.
Not everyone can add pull-out drawers, especially if you rent or want a cheap pantry refresh. That’s where square glass jars come in, making the most of every bit of space and keeping everything visible from the front.
Planning a Pantry Makeover
First, empty your cabinets completely. Toss anything expired. Group what’s left into categories: baking stuff, grains, pasta, snacks, breakfast foods.
Figure out how much you keep of each thing. If you always have 3 kilos of flour, don’t buy tiny jars that won’t fit it all. On the flip side, don’t waste money on jars so big they’re half-empty.
Think about how often you use things. Everyday items should go at eye level or wherever’s easiest to grab. Less-used stuff can go higher or lower.
Sketch out a rough plan for where everything should live. Trust us, this helps you avoid buying jars that don’t fit or leave awkward gaps.
Measuring for Square Glass Jars
Measure the inside width, depth, and height of each shelf. Watch for hinges or handles that stick out and eat up space.
Key measurements:
- Shelf width (side to side)
- Shelf depth (front to back)
- Height between shelves
- Space from shelf edge to closed cabinet door
Figure out how many jars will fit across and back. Square jars usually come in 10 cm, 12 cm, or 15 cm sizes. If your shelf is 90 cm wide, you can fit nine 10 cm jars with no wasted space.
Double-check your measurements before you order. We’ve had jars arrive just 2 cm too tall, and they wouldn’t stack right. Leave at least 1 cm above the top so you can lift jars out easily.
Choosing and Using Square Glass Jars Effectively
Square glass jars really do make a difference. They stack neatly, you can see what’s inside, and you use every bit of shelf space. Picking the right sizes and grouping things well turns even the tiniest cabinet into a useful storage spot.
Benefits of Square Glass Jars
Square glass jars let you squeeze every centimeter out of your shelves. Their flat sides sit flush together, so you don’t lose space like you do with round containers. When you don’t have much vertical clearance, this matters a lot.
Clear glass means you always know what you have and how much is left. No more buying another bag of rice just because you couldn’t see the half-full one hiding in the back. Plus, you spot what needs restocking at a glance.
Stacking is key in low cabinets where you can’t just add more shelves. Square jars stack into solid towers that won’t fall over when you grab the one on the bottom. We’ve found that stacking three or four jars high works for most cabinets without making them hard to reach.
Glass doesn’t absorb smells or get stained like plastic. You can store pasta one week and spices the next without any weird leftovers.
Comparing Glass, Canisters, and Clear Containers
Glass jars give you the best visibility and last for years. You can toss them in the dishwasher, microwave them, and they won’t warp with hot food. The extra weight keeps stacks stable, though it does make the top jars a bit heavier to pull down.
Canisters often have big openings and come in ceramic, metal, or acrylic. They look nice on counters, but in tight cabinets, they take up more space than you need. A lot of them don’t stack well, either.
Clear plastic containers are light and won’t break if dropped, which makes them great for kids’ snacks or upper shelves. But they scratch, cloud up, and sometimes hold on to strong smells. They’re cheaper, but in our experience, you end up replacing them every couple years.
For low cabinets, square glass jars just win out. Use plastic for snacks or places where weight is a problem.
Selecting Sizes for Various Ingredients
We like to keep three main sizes around:
Small jars (250-500ml) are great for spices, baking powder, yeast, bouillon cubes, and other things you don’t use much. Keep these in the front for easy grabbing.
Medium jars (750ml-1.5L) work well for flour, sugar, rice, pasta, oats, and coffee. They’re big enough for weekly use but not so heavy you can’t lift them. For reference, a 1L jar holds about 800g of flour or 900g of sugar.
Large jars (2-3L) are for bulk items such as cereal, beans, popcorn, and pet food. In low cabinets, stash these in the back since you won’t need them all the time.
Always measure your cabinet height before buying. Most low cabinets fit jars up to 18-20cm tall. Stack the small jars on the big ones to make use of vertical space, but don’t go so high you can’t get them out.
Smart Stacking and Arranging in Low Cabinets
Low cabinets need a different strategy than eye-level shelves. Limited visibility, bending down, and the risk of knocking things over make stacking tricky.
Maximising Shelf Height and Depth
We always measure shelves before buying jars. Most lower cabinets are 30-36 cm deep, so you can fit two rows of square jars without wasting the back half.
Adjustable shelves usually sit 25-30 cm apart. You can stack two layers of 10 cm jars or three layers of smaller 7 cm ones. Square jars really do make a difference here because round ones leave too many gaps.
We put taller stacks in the back and shorter ones up front. This way, you can see labels without pulling everything out.
For deep shelves, keep frequently used items such as flour, sugar, and oats right in front. Backup or seasonal ingredients go behind.
Safe and Accessible Stacking Techniques
We never go higher than three jars stacked in a lower cabinet. Bending down and reaching makes it easy to bump things, and heavy jars can crack if you’re not careful.
Square jars lock together pretty well, but we still leave a bit of space above the top so we can lift them out easily.
Heavy jars such as rice, beans, and pasta stay on the bottom. Lighter stuff like dried fruit and nuts goes in the middle, and the lightest (herbs, spices) on top.
Weight distribution tips:
- Bottom: 1 to 2 kilograms per jar
- Middle: 500 grams to 1 kilogram
- Top: Under 500 grams
After every use, we turn jars so the labels face forward. It only takes a second and saves you from hunting for the right jar every time.
Integrating Plastic Bins for Grouped Items
Plastic bins are lifesavers for corralling small jars that would otherwise scatter everywhere. One bin can hold four to six small square jars of spices or tea, and you just pull out the whole bin when you need it.
Clear bins are best because you can see what’s inside without opening them. Pick bins a little shorter than your shelves so you can stack jars inside without bumping the shelf above.
Some groupings we like:
- Baking supplies (vanilla, baking powder, fancy sugars)
- International ingredients (curry powders, garam masala, specialty salts)
- Breakfast stuff (chia, hemp hearts, protein powder)
- Snack bits (dried fruit, nuts, chocolate chips)
We label bins on the front and the top. The front label helps when you’re standing, while the top label is easy to see when you’re looking down into a low cabinet.
Bins also catch spills or sticky messes from things like honey, so your shelves stay cleaner and you don’t have to scrub as often.
Labelling and Maintaining Pantry Organization
Labels are what make an organized pantry stay organized. Without them, you end up guessing what’s in each jar, and no one else in the house knows where anything goes.
Choosing Pantry Labels That Work
Pick labels based on how much you plan to change what’s in your jars. If you always keep the same things (like flour or rice), go for permanent labels. Vinyl or label-maker tape looks nice and lasts.
If you swap contents often, removable labels are better. Painter’s tape and a marker work in a pinch, or try adhesive chalkboard labels you can wipe clean and reuse.
Make sure labels are big enough to read from across the kitchen, especially on low shelves where you’re looking down at an angle. Black on white or white on black is easiest to see.
Durability counts. Paper labels peel in humidity or get wrecked by spills. Waterproof vinyl or laminated labels last way longer, especially if you handle the jars a lot.
Labelling Everything for Easy Access
Label every jar, even if you think it’s obvious. Almond flour and all-purpose flour look exactly the same through glass, and guessing slows you down. We’ve found that labeling also keeps you from buying duplicates because you’ll know what you have at a glance.
Stick labels in the same spot on every jar. For regular shelves, front-facing works best. For low cabinets, label the lids too so you can see what’s inside when you’re looking down.
Add dates for items that go stale, including nuts, whole grain flours, and opened spices. A quick “opened” date helps you use up older things first.
Things we always label:
- Baking stuff (flours, sugars, baking powder)
- Grains and legumes (all the rices, lentils, beans)
- Snacks and cereals
- Pasta shapes
- Nuts and seeds
Using Chalkboard Labels and DIY Options
Chalkboard labels really give you the most flexibility for a pantry that changes with the seasons. Just wipe them down with a damp cloth and jot something new whenever you swap out ingredients. If you buy in bulk and refill the same jars with different things throughout the year, these labels make life easier.
I honestly prefer liquid chalk markers over regular chalk because they’re sharper, easier to read, and don’t smudge unless you actually wipe them with water. The writing stays put until you want it gone.
If you’re into DIY, grab some contact paper or vinyl, cut it into rectangles, and write right on them with a permanent marker. Washi tape looks cute for temporary labels, but it doesn’t really hold up if things get damp or you handle the jars a lot. Masking tape is cheap and peels off cleanly, though it’s not winning any beauty contests next to proper pantry labels.
When you order custom labels, add measurement markers on containers you use for baking. It’s surprisingly helpful to know your sugar jar holds exactly 2 kg when you’re making a grocery list.
Incorporating Extra Storage Solutions
Square glass jars work best when you add smart accessories that fill in awkward gaps and keep tiny items from turning into clutter. Lazy Susans tackle those tricky corners, canisters wrangle loose packages, and bins create zones that make open pantries actually work.
Adding Lazy Susans for Small Items
Lazy Susans have solved one of my biggest pantry frustrations: stuff shoved to the back and forgotten. With a turntable, you just spin it and grab oils, vinegars, condiments, or whatever else you need without moving everything.
Pop a lazy Susan in those hard-to-reach corners. The rotating base brings everything front and center with a quick spin. Pick one with raised edges so bottles don’t slide off as you turn it.
I usually use lazy Susans for things that don’t fit in square jars, such as soy sauce, hot sauces, and cooking wines. They all line up perfectly on these platforms. If you group similar items, you can grab a whole category in one go.
Measure your shelves before buying. Most lazy Susans come in 25, 30, or 35 cm diameters. If you go too big, it’ll hit the cabinet walls and won’t spin properly.
Making the Most of Canisters and Bins
Canisters help you create zones for stuff that comes in weird packaging. I like to corral snack bags, tea packets, and spice pouches that would just make a mess next to neat rows of jars.
Clear bins are great for high shelves where you need to see what’s inside at a glance. Stick a label such as “baking supplies” or “breakfast” on the front, and you’ll always know what’s where.
Wire baskets let onions and potatoes breathe, since they shouldn’t go in glass. The open design also makes it obvious when you’re running low. I usually keep baskets on lower shelves, where their casual look fits in.
Stackable canisters really help you use vertical space. Go for square or rectangular ones that match your glass jars. The matching shapes give your pantry a tidy, coordinated vibe.
Storage Tips for Open Pantry Setups
Open pantries really demand containers that look good together, since everything’s on display. I line up square glass jars on the most visible shelves and stash less attractive packaging in bins tucked away in corners or up top.
Try narrow shelves for single-row displays. A 15 cm deep shelf stops items from hiding behind each other and keeps your jars looking intentional, not cluttered. This size is perfect for spice jars and small canisters.
Risers help you make tiered displays on deeper shelves. You can see the labels on jars in the back row without moving everything up front. Acrylic or bamboo risers blend in with glass and add some handy height.
Keep your most-used items right at eye level. Stash backup or seasonal stuff higher up. You’ll avoid visual clutter and won’t have to rearrange jars you grab all the time.
Group things by use, not just by strict category. I keep baking ingredients together, even if that means mixing jars and canisters. When you’re actually cooking, this just feels more natural than a rigid “all jars here” system.
Frequently Asked Questions
These quick answers cover measuring, jar sizes, labeling, and safe stacking in low pantry cabinets.
What's the easiest way to measure a low pantry cabinet so jars stack neatly without wasting vertical space?
Measure the interior height, width, and depth, including any hinges or cabinet frames. Leave 2 to 5 cm of clearance above each stack so jars are easy to lift out.
How do you decide which pantry staples should go into square glass jars versus staying in original packaging?
Transfer frequently used dry goods such as flour, sugar, rice, pasta, oats, and lentils. Items in sturdy resealable packaging can stay in their original containers.
What jar sizes work best for stacking in short cabinets while still being easy to grab and refill?
Jars between 500 ml and 1 litre work well for most staples. Use smaller jars for spices and seeds, and keep heavier 1.5 to 2 litre jars on the bottom.
How can you label stacked jars so everything stays readable even when the front row shifts around?
Place labels on both the front and lid of each jar. Keep every label in the same position so ingredients remain easy to identify from above or straight ahead.
What's the best way to keep square glass jars from sliding or tipping when you pull one out from the bottom stack?
Use a non-slip shelf liner, place heavier jars on the bottom, and remove upper jars before taking out a lower one. Avoid stacking more than two or three jars high.
How do you handle heavy items like flour, rice, and sugar in stackable glass jars without making the cabinet a workout?
Store large, heavy jars on the lowest shelf and slide them forward instead of lifting them. Smaller 500 ml to 1 litre jars are easier to handle and refill.
Partager:
Are Wooden-Lid Glass Jars Airtight Enough for Everyday Dry Goods?
How Does a Stone Drying Mat Work, and What Can You Safely Dry on It?