

Check out our latest collection of compact vacuum sealer for food!
Freezer burn can turn carefully stored food into dry, icy, flavorless leftovers before you ever get to use it. It happens when moisture escapes and air reaches the surface, leaving meat, vegetables, bread, and prepared meals with dull color, tough texture, and frost-covered spots.
The fix is simple: seal food tightly, portion it before freezing, and label everything clearly so it gets used at the right time. These small habits help protect freshness, reduce waste, and make your freezer easier to manage.
In this guide, you’ll learn how to prevent freezer burn with better packaging, smarter freezer organization, clear labels, and practical storage tips for everyday foods.
Key Takeaways
- Wrap tightly, vacuum seal, or use the water displacement trick to keep air away and lock in moisture
- Freeze food in meal-sized portions and label with contents and dates so you actually use things on time
- Keep your freezer at 0°F (-18°C) or colder, and organize it so stuff doesn't get lost or exposed to temp swings
Understanding Freezer Burn: Causes and Effects
Freezer burn happens when frozen food loses moisture and air sneaks in, leaving dry, discolored patches that mess up taste and texture. Basically, ice turns straight to vapor (sublimation), and the air causes oxidation.
What Freezer Burn Looks Like
You open the freezer and, ugh, something looks like it’s been in a snowstorm. Freezer-burned food is pretty easy to spot once you know what to look for.
Meat and poultry get weird grey-brown or white patches where the surface dried out. Fish shows chalky or faded spots. Veggies lose their color and might look shriveled or frosty.
Ice cream? That one's obvious. Ice crystals form on top, and the surface gets grainy. Bread and baked stuff turn dry and hard in spots, sometimes even crunchy.
The texture gets leathery or tough, and it stands out from the rest. When you see those spots, you know moisture escaped, and the taste just won't be the same.
Why Moisture Loss Matters
Moisture keeps frozen food tasting like it should when you thaw it. When it leaves, the quality drops, sometimes a lot.
Losing water changes the way food feels. Meat turns dense and dry. Veggies get mushy after cooking. Even a little moisture loss can make a dish less appealing.
When food dries out, flavors get weird, off-notes stand out, and you lose the natural taste. Fat in meat oxidizes faster without moisture, so you might notice a stale or even rancid flavor.
Foods loaded with water, like berries or leafy greens, are especially at risk. They can turn limp and gross before you even see any freezer burn.
The Role of Air Exposure and Sublimation
Air is the main enemy here. Sublimation explains why even the coldest freezer can't totally stop freezer burn.
Sublimation is when ice skips the melting part and turns straight into vapor. In your freezer, this happens right at the food’s surface. Freezers are dry, so moisture wants to leave your food and join the air.
Every time you open the door, warm air rushes in, and that speeds up sublimation. The vapor refreezes as frost on the walls or the food itself.
Oxygen in the air also reacts with fats and proteins, making food taste stale and cardboard-y. If you don't seal things well, both sublimation and oxidation will wreck your food way faster.
Common Signs: Texture, Colour, and Ice Crystals
Spotting freezer burn helps you decide if something’s still worth eating or if you should just toss it.
Texture is usually the first giveaway. Meat feels tough or leathery. Foods that used to be tender get stringy or fibrous. Fruits and veggies turn mushy or spongy after thawing.
Color changes depend on what you're freezing:
- Red meat goes brown or grey
- Chicken gets white or grey spots
- Fish looks dull and faded
- Veggies lose their color and look washed out
- Bread shows dark, dried-out spots
Ice crystals show up in a few ways. Big crystals inside a bag mean moisture left the food and refroze. Thick frost on the surface means moisture keeps escaping. Ice cream gets grainy from small crystals.
If you only see a little freezer burn, you can usually trim it off. If it’s everywhere, the food’s probably still safe but won’t taste great.
Managing Freezer Temperature and Fluctuations
Keeping your freezer cold and steady is one of the best ways to stop freezer burn before it starts. When temperatures bounce around or get too warm, food dries out and those dreaded patches show up.
Ideal Freezer Temperature Settings
Set your freezer to 0°F (-18°C) or even a bit colder. That keeps food frozen solid and slows down the whole sublimation thing.
Most freezers come from the factory set a little warmer. Even if it seems “too cold,” don’t turn it up. Anything above 0°F lets ice crystals get bigger and moisture escape faster.
Digital displays are handy but not always spot-on. The sensor might be in a different spot than your food. I always stick a separate appliance thermometer right where I keep most stuff.
If your ice cream is rock-hard at 0°F, that’s actually good. Soft ice cream means the freezer’s too warm, and that leads straight to freezer burn.
Impact of Temperature Swings
Big temperature swings do more harm than a steady, slightly warm temp. When things warm up, ice on your food melts. When it gets cold again, that moisture refreezes in new spots, pulling water from inside the food.
This happens every time you leave the freezer open too long. Frost-free freezers do it automatically during defrost cycles. They warm up to melt ice, then cool back down.
I’ve noticed the worst freezer burn on stuff stored in the door or near vents. The door gets hit with warm air every time you open it. Vents blast cold air, then let it warm up when the compressor shuts off.
If you lose power, keep the freezer closed. A full freezer keeps food frozen for about 48 hours, half-full for 24.
Using Freezer Thermometers
A good freezer thermometer takes the guesswork out. I like dial thermometers or digital ones with a probe inside and a display outside.
Stick it in the middle, away from walls and vents. Check once a week so you catch any problems before your food suffers. Some thermometers track high and low temps over time, which is handy.
If you see temps above 0°F, adjust your freezer and wait a day before checking again. It takes time for things to settle.
How to Minimize Temperature Fluctuations
A full freezer keeps temps more stable because frozen food acts like insulation. If you don’t have enough food, fill empty spots with water jugs or ice packs.
Open the door as little as possible. I know it’s tempting to stand there staring at your options, but every second lets in warm, humid air. That air condenses and freezes on your food, leading to freezer burn.
Check the door gasket for cracks or crumbs. If you close the door on a piece of paper and it slides out too easily, the gasket probably needs replacing.
Don’t put your freezer next to ovens, dishwashers, or in direct sun. Extra heat makes the compressor work harder and creates bigger temp swings.
If you have a manual-defrost freezer, defrost it regularly. Ice buildup makes things less efficient and causes temperature changes. Frost-free models do it automatically, but those quick defrost cycles still cause little swings.
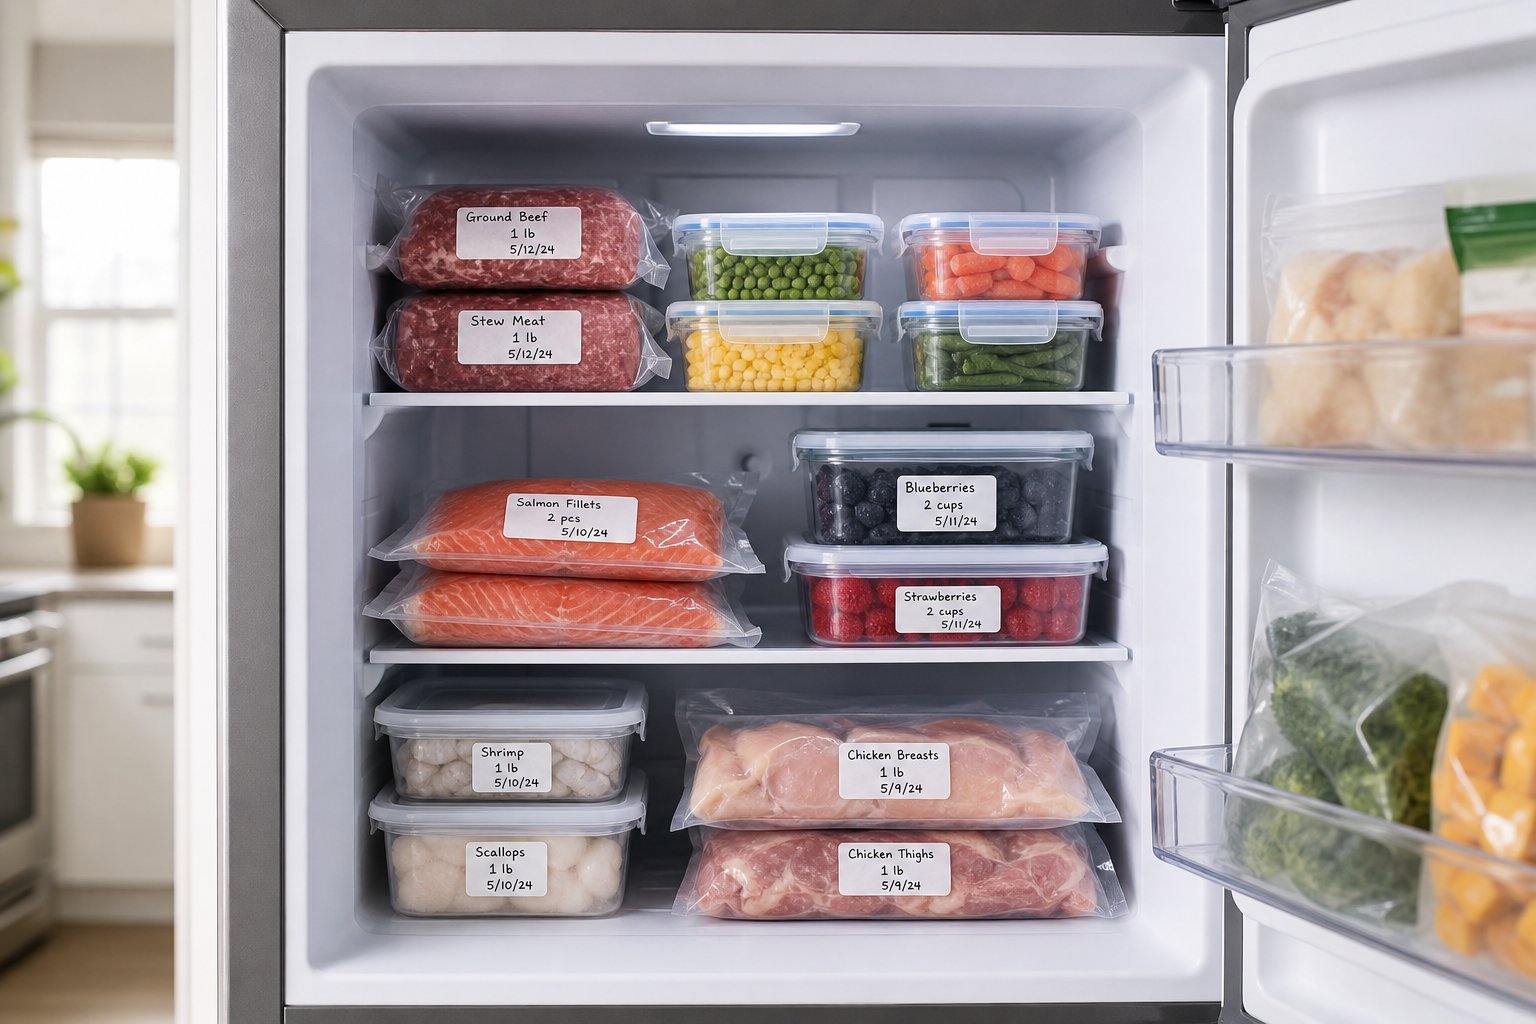
Smart Portioning and Labelling Strategies
Portioning your food right and labeling it clearly helps keep freezer burn at bay. These habits make your freezer less chaotic and your food way better when you finally eat it.
Why Portion Size Matters
Big blocks of food freeze unevenly and give air more places to sneak in. If you freeze a whole gallon of soup or an entire lasagna, the edges get freezer burn while the middle stays, well, frozen solid.
Split meals into single or family-sized portions before freezing. If you’ve got four cups of chili, divide it into four one-cup bags. This makes freezing and thawing faster, and less air touches the food.
Portion control also makes meal prep easier. You only thaw what you’ll eat, so you waste less and don’t have to deal with partially thawed, then refrozen, food. I always go by serving size, not just what fits in the container.
Freeze portions flat in bags. Squeeze out the air, seal, and lay them flat on a baking sheet. Once they’re solid, stand them up like files. You’ll save space and freeze things more evenly.
Labelling for Rotation and Storage Window
Most frozen food is best within 2-6 months, but if you don’t label, you’ll never remember when you put it in there. I write three things on every bag or container: what it is, when I froze it, and how much is inside.
Use a permanent marker or freezer-safe label because sticky notes or regular tape just won’t last. Write on bags before you fill them, since writing on frozen plastic is nearly impossible.
Storage times vary. Cooked meats are good for 2-3 months, blanched veggies for 8-12 months, soups and stews about 3-4 months. If you want to be extra organized, add a “use by” date.
Add reheating notes if it helps, such as “Microwave 3 min” or “Thaw overnight.” For freezer meals with multiple parts, I jot down which bits need separate reheating.
First-In, First-Out Practices
First-in, first-out (FIFO) keeps older food from getting buried and forgotten, which is when freezer burn really takes over.
I put the oldest stuff in front and new stuff in the back. When I add new food, I push the old forward. That way, I always see what needs using up first.
Group similar items together. All soups in one spot, all proteins in another, veggies together, and so on. It makes it easier to find what you want and keeps things from getting lost.
Check your freezer once a month and move anything nearing its limit to the front. If you see early signs of freezer burn, use those up soon, such as in soups or casseroles where texture isn’t as important.
Sealing and Packaging Techniques for Maximum Freshness
Sealing food properly keeps air and moisture out because those are the two big reasons freezer burn happens. The right packaging and sealing method can keep food tasting fresh for months, with the texture and flavor you want.
Vacuum Sealing Versus Freezer Bags
Vacuum sealing pulls almost all the air out from around your food, giving you the best defense against freezer burn. In our experience, vacuum-sealed foods last three to five times longer than those in regular freezer bags. Eliminating oxygen stops both moisture loss and oxidation.
If you freeze food often, a good vacuum sealer quickly pays for itself. These machines use heat to create a strong seal, which works better than zip closures. Plus, the bags are usually thicker than typical freezer bags.
Freezer bags can still do a decent job, as long as you use them right. Grab bags that are clearly marked for freezer use since they’re thicker and block moisture better than normal bags. Try to squeeze out as much air as you can before sealing. We like bags that are at least 2.7 mil thick for solid protection.
Think about how often you freeze food and how long you’ll keep it. If you buy in bulk or plan to store things for more than three months, vacuum sealing is the way to go.
Reducing Air with the Water Displacement Method
You can get almost vacuum-sealed results with just a bowl of water, with no fancy tools required. Fill your sink or a big bowl with cold water. Put your food in a freezer bag and leave the top open. Slowly lower the bag into the water, keeping the opening above the surface.
As you submerge the bag, water pressure pushes the air out through the opening. When the bag is almost fully underwater, quickly seal it before water sneaks in. This pressure hugs the bag tightly around your food, leaving hardly any air inside.
This trick works especially well for liquids, ground meat, and weirdly shaped foods. We use it all the time for soups, sauces, and marinated meats. Just make sure you seal the bag at least two centimeters above the water to keep things clean.
Dry the sealed bag before tossing it in the freezer. Check for any big air pockets. If you see any, try again for a better fit.
Double Wrapping and Using Freezer Paper
If you’re storing food for longer than three months, double wrapping gives it extra protection. We start by wrapping items in plastic wrap or putting them in a freezer bag, then add a second layer of heavy-duty aluminum foil or freezer paper. This double barrier keeps air and temperature swings at bay.
Always put the plastic-coated side of freezer paper against the food. You can write directly on the paper side. Add the contents and date so you know what’s inside. Wrap the food tightly, pushing out air as you go, and seal it with freezer tape. Regular tape just doesn’t stick in the cold.
Heavy-duty aluminum foil shapes nicely around awkward foods and blocks light, which helps keep quality up. We usually reach for it when freezing whole chickens or bone-in cuts.
Try to keep air between layers to a minimum. Press each layer snugly against the food or the inner wrap before adding the next.
Choosing the Right Container Materials
Rigid containers protect delicate foods that might get squished in bags. Glass containers with airtight lids are great for soups, stews, and casseroles. Leave two or three centimeters of headspace so liquids have room to expand as they freeze. Straight-sided containers make it way easier to pop out frozen blocks than ones with curved sides.
Plastic containers made for the freezer won’t crack in the cold. Make sure the lids fit tightly. Look for rubber gaskets or snap closures. Skip flimsy takeout containers; they let air in and might break.
| Material | Best For | Key Benefit |
|---|---|---|
| Glass | Liquids, prepared meals | No flavour transfer, microwave-safe |
| Heavy-duty plastic | Fruits, vegetables, baked goods | Lightweight, stackable |
| Aluminium foil | Irregular shapes, large cuts | Mouldable, blocks light |
| Freezer paper | Individual portions, flat items | Writable surface, moisture barrier |
If you notice scratches or worn-out seals on your containers, swap them out. Lids that don’t snap tight or gaskets that feel brittle just won’t cut it.
Organising Your Freezer for Long-Term Success
An organized freezer keeps temperatures steady, limits warm air exposure, and helps you keep track of what needs using before freezer burn strikes. All these little systems protect your stash of freezer meals and meal prep ingredients.
Zone Mapping for Temperature Consistency
Not every spot in your freezer is equally cold, and knowing these zones helps you avoid freezer burn on sensitive foods. The very back stays coldest and most stable, so stash proteins and pre-portioned meals there if you want them to last. The door gets hit with temperature swings, so keep quick-use items or foods less likely to get freezer burn, like bread or nuts, in that spot.
In upright freezers, cold air sinks. So, bottom shelves are usually colder than the top ones. Put your most valuable proteins and well-sealed meal prep containers down low, where temps stay steady. Middle shelves work for fruits and veggies, while the top shelf is fine for foods you’ll eat soon.
Chest freezers keep the bottom coldest, but it’s harder to reach. Stack your food so you can grab what you need fast by using bins or baskets for stuff you use a lot. This way, you don’t have to dig with the lid open, and everything inside stays safe from temperature swings.
Strategic Loading and Reducing Door Openings
Every time you open the freezer, warm, humid air rushes in and messes with the cold, dry environment you need to stop freezer burn. We group similar foods in clear bins or zones so you can grab what you want in seconds. When you’re prepping a bunch of freezer meals, line them up by type or use-by date to avoid digging through everything later.
Leave a little space between packages at first so air can circulate and freeze things faster. Once everything’s solid, pack them closer together. A full freezer holds its temperature better than a half-empty one because all those frozen items act like insulation. If you’ve got empty space, fill it with ice packs or frozen water bottles.
Try to keep a mental list or jot down what’s in each zone before opening the door. That way, you’re not standing there with the door open, letting all the cold out.
Inventory Management Systems
A simple inventory list helps you avoid forgetting about foods until they’re freezer burned. We like to keep a whiteboard on the freezer or a note on our phones with three columns: item name, date frozen, and quantity. When you add something new, log it right away.
Check your list every week and use up anything getting close to its freezer limit. Fresh poultry lasts up to nine months, beef and pork can go four to twelve months, and most cooked freezer meals are good for two to six months. Mark what needs using soon, and plan your meal prep so you rotate older stuff first.
| Food Type | Maximum Freezer Time |
|---|---|
| Fresh poultry | 9 months |
| Beef, pork (raw) | 4-12 months |
| Cooked freezer meals | 2-6 months |
| Lean fish | 6-8 months |
Label every container with what’s inside and the date. Use freezer-safe markers or labels that stay put in the cold. Portion sizes on meal prep containers help too. You’ll know exactly what you’re thawing. This makes life easier and keeps you from refreezing things, which leads to more air exposure and freezer burn.
Special Considerations: Ice Cream, Stews, and Sauces
Ice cream gets icy when exposed to air during defrost cycles, and stews and sauces need special handling to keep their texture and flavor after freezing.
Preventing Freezer Burn on Ice Cream
Freezer burn on ice cream, especially those annoying ice crystals, can ruin the creamy texture. It happens when air inside the container condenses during the freezer’s defrost cycle, and moisture refreezes right on the surface.
The best fix? Lay a piece of wax paper or parchment directly on top of the ice cream before putting the lid on. Press it gently against the surface to block air from reaching your dessert.
If the original ice cream carton doesn’t seal well, move the ice cream into an airtight container. Those cardboard cartons let too much air in after you open them.
Tips for ice cream storage:
- Replace the wax or parchment each time you scoop
- Store ice cream at 0°F for the right consistency
- Keep it in the back of the freezer, where temps stay steady
- Fill containers as full as you can to cut down on air space
Best Practices for Freezing Stews and Sauces
Cool your stew down to 40°F before you freeze it. This helps it freeze faster and keeps the texture better by forming smaller ice crystals.
Portioning matters a lot for stews and sauces. Freeze them in single-meal or family-sized portions, depending on what you need. Smaller portions freeze and thaw faster and more evenly.
Use freezer-safe plastic containers or glass jars made for freezing. Leave about an inch of headspace at the top because liquids expand when they freeze, and without space, containers might crack or pop open. Freezer bags work too, and you can squeeze out extra air before sealing.
Label each container with the contents and date. Once frozen, stews and sauces all look the same, and most stay at their best for three to four months.
Frequently Asked Questions
Here are quick answers to common questions about freezer storage, sealing, portioning, and labeling.
Which freezer-safe containers and bags actually seal well enough to keep food from drying out?
Use heavy-duty freezer bags, airtight freezer-safe containers, or vacuum-seal bags. Vacuum sealing is best for meat, fish, and foods stored longer than three months.
How do I remove as much air as possible without a vacuum sealer for everyday freezer storage?
Use the water displacement method. Place food in a freezer bag, leave a small opening, lower it into water to push the air out, then seal it fully.
What is the best way to portion meals and ingredients so they freeze faster and don't get icy edges?
Freeze food in smaller, flatter portions. This helps food freeze quickly, stack neatly, and thaw only what you need.
How should I label frozen food so I can track what it is and when it went in, even if it gets frosty?
Write the food name, portion size, and freeze date directly on the bag with a permanent marker. For containers, use freezer tape on the lid or side.
Do different foods need different wrapping methods, like meat versus baked goods versus sauces?
Yes. Meat does best with double wrapping or vacuum sealing. Baked goods need a tight wrap plus a freezer bag. Sauces need airtight containers with headspace.
How long can common freezer staples stay in the freezer before texture and flavour start to drop off?
Ground meat and poultry are best within three to four months. Whole cuts can last six to twelve months. Soups, stews, and baked goods are usually best within two to three months.
Partager:
How to Build a Family Freezer Rotation System With Vacuum-Sealed Portions
How to Use a Golf Chipping Net for Short Daily Practice Sessions