

Check out our latest golf collection!
A better short game does not need a full practice range.
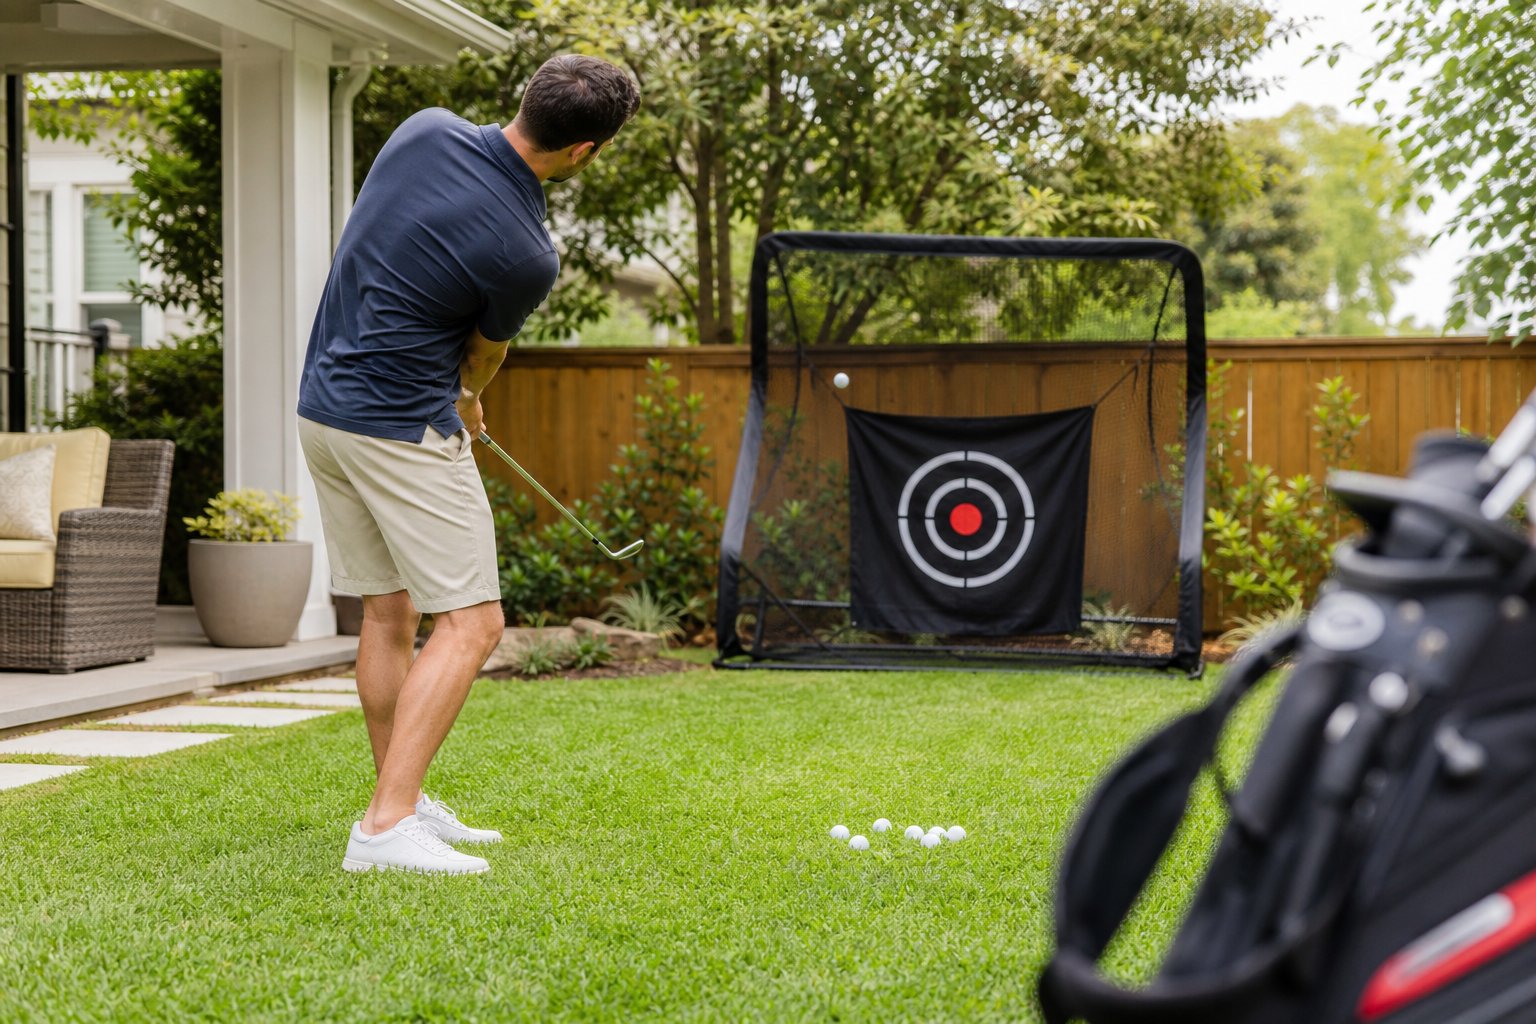
A golf chipping net helps you turn a backyard, garage, basement, or small indoor corner into a simple daily training area. With a net, a few balls, and a focused 10 to 15 minute routine, you can work on clean contact, landing spots, and distance control without overcomplicating practice.
The goal is not to hit as many balls as possible. The goal is to practice with purpose. This guide shows you how to set up your chipping station, choose smart drills, practice different shots, and build a short routine that improves your feel around the green.
Key Takeaways
- Set your chipping net at measured distances and practice from realistic surfaces to build solid contact and distance control
- Use drills like the ladder drill and club selection exercises to groove repeatable mechanics and get a better feel around the greens
- Focus on body rotation and a consistent setup instead of just flicking your wrists. Keep the motion simple and reliable
Choosing the Best Chipping Net for Your Space
The right net can transform a forgotten corner of your garage or a patch of lawn into a spot you actually use. Net size, target design, and how easy it is to move all play a role in whether you’ll practice daily or just let the net collect dust.
Types of Chipping Nets and Target Zones
Golf chipping nets come in a few main styles, each with its own vibe. Many pop-up nets usually run 12 to 25 inches and fold flat in seconds, which makes them useful for tight spaces or quick practice.
Bigger hitting nets, ranging from 5x4 feet to 10x7 feet, let you take full swings too. If you’ve got a dedicated spot and want one net for everything, these are a solid choice.
Nets with multiple pockets or target zones give you the best feedback. Look for three to five separate targets at different heights. Some multi-pocket nets use vertical pockets so you can practice low runners, mid pitches, and high flops. Side pockets catch those off-center shots and keep balls from scattering everywhere.
If your net only has a single bullseye, you’ll probably get bored fast. Multiple zones let you mimic real course situations where you’ve got to land the ball at specific spots.
Portability and Storage Solutions
Honestly, how easy it is to move and store the net decides how much you’ll use it. Pop-up nets fold into 12-inch circles that fit in a closet or even your trunk. Once you get the hang of the frame, you can set them up in under two minutes.
Bigger nets take five to ten minutes to assemble. They pack down like a camping tent, so you’ll need more storage space, but you can still move them if you have to. If you’re planning to leave the net up for a while, these are great.
Don’t overlook the storage bag. A quality bag with reinforced stitching and the right size makes a difference. If the bag’s too small, you’ll end up cramming the net in and eventually bending the frame.
Think about weight, too. If you plan to move the net a lot, lighter is better. Most pop-up nets weigh two to four pounds. The bigger ones can get up to 15 pounds, especially if you use stakes and accessories.
Essential Accessories: Hitting Mat and Alignment Sticks
A good hitting mat keeps your lawn from turning into a mud pit and gives you consistent feedback. Dual-surface mats that let you practice both fairway and rough lies are ideal. The turf should be dense enough to stick a tee in, but not so tough it hurts your wrists.
Size matters here. A 16x24 inch mat gives you space to adjust your stance. The smaller 12x12 inch mats are fine if you’re not moving around much, but they limit your options.
Alignment sticks are underrated. Lay one down parallel to your target line, another perpendicular for ball position. They help you keep your stance square, especially after a few dozen reps.
Rubber tees and foam balls are handy, too. Foam balls let you chip indoors without worrying about breaking stuff. Real range balls give you better distance feedback outside, but you’ll want more space behind your net.
Setting Up Your At-Home Chipping Station
A good chipping station comes down to three things: picking a safe spot, anchoring your net properly, and marking out distances so you actually work on distance control. Nail these basics and suddenly you’re not just smacking balls. You’re practicing with purpose.
Selecting a Safe and Practical Location
Your first move sets the tone for the rest of your practice. Find a spot with enough room for your backswing and follow-through, plus at least 10 to 15 yards between you and the net. Indoors, make sure you’ve got at least 8 feet of ceiling clearance. No one wants to explain a broken light fixture.
Always check what’s behind your net. Even good chips can sail over or miss wide sometimes. Keep windows, cars, and anything breakable far away. If you’re using the garage, put the net against a solid wall for extra safety.
Best spots:
- Backyards with level ground
- Garages with concrete floors
- Basements with enough ceiling height
- Covered patios or carports
The surface you hit from makes a difference. Real grass feels most like the course, but a quality mat protects your lawn and works fine on hard surfaces. Just remember, mats can cover up fat shots more than turf, so pay extra attention to clean contact.
Proper Placement and Net Stability
Anchor your net well so it doesn’t tip or slide after a few hits. Most nets come with ground stakes for outdoors or weighted bases for hard surfaces. Even foam balls can shift a net if you hit the same spot over and over.
For grass, push the stakes in at an angle away from the net. On concrete or indoors, use rubber feet or toss a sandbag on the base. Some folks even stick a heavy storage bin behind the net for stability and as a ball collector.
Make sure the net sits perpendicular to your hitting line, not leaning back. If it leans, your eyes will trick you into scooping the ball instead of hitting down on it.
Before you settle in, smack a few chips to test stability. The net should absorb impact without wobbling around. If it moves, add more weight or adjust your anchors.
Creating Effective Target Distances
Distance control is what separates decent chippers from the ones you envy. Mark out exact distances from your hitting spot to the net. 5, 10, and 15 yards work for most home setups.
Use cones, alignment sticks, or even chalk lines to mark these spots. Knowing exactly how far you need to carry each shot turns vague practice into something measurable. You’ll start matching swing lengths to real distances, not just “somewhere near the net.”
Marking ideas:
- Bright cones
- Garden stakes with ribbons
- Chalk or tape for hard surfaces
- Plant markers on grass
If your net has multiple pockets, assign each a distance. Maybe the center is your 10-yard chip, lower pockets for bump-and-runs. Mixing it up keeps things interesting and helps you build a variety of shots.
Start each session at the closest marker (usually 5 yards) and work your way out. It’s a confidence builder and helps you find your rhythm before tackling longer chips.
Fundamental Chipping Technique for Consistent Results
A repeatable chipping motion comes down to three things: how you grip the club, how you set up, and how you move through the ball. Get these right, and your chipping net sessions will actually make you better out on the course.
Grip, Stance, and Setup Basics
Start with a grip that’s a bit firmer than your putting grip, but don’t strangle the club. Your hands should move together, not fight each other.
Keep your stance narrow, hip-width or even a little less. This limits lower body movement, which is exactly what you want for chipping. Open your stance by pulling your lead foot back a touch.
Put about 60-70% of your weight on your front foot and keep it there. This helps you hit down on the ball. Lots of folks shift weight back and end up thinning or chunking chips. Your net will let you know right away if you’re doing that.
Mastering Ball Position and Hand Alignment
For most chips, put the ball back in your stance, near the inside of your trail foot. Combined with your forward weight, this makes sure you catch the ball first.
Your hands should be ahead of the ball at address. You want some forward shaft lean. Imagine a line from your lead shoulder through your hands and toward the clubhead. This takes a bit of loft off and helps you make crisp contact.
Alignment checkpoints:
- Ball off your trail foot’s instep
- Hands 5-8 cm ahead of the ball
- Shaft leaning toward the target
- Shoulders slightly open
Lock in these positions and you’ll avoid most of the usual contact issues before you even swing.
Basic Short Game Motions
The chipping motion is really just a longer putting stroke, not a mini full swing. Keep your arms, hands, and club in a triangle with your chest. Let your torso rotation drive the motion, not your wrists.
Start by turning your chest away from the target. The triangle formed by your arms and shoulders moves as one. Keep your wrists quiet. The length of your turn controls the distance, which is exactly what you’re working on with your net.
Swing through by rotating your chest back toward the target. Your arms follow, and the club releases naturally. Don’t try to help it with your hands. Your lead wrist should stay flat or even a little bowed, never cupped.
Work on this motion slowly at first. Make 10 swings without a ball, just feeling the turn. Then add balls and watch how much more consistent your contact gets.
Smart Practice Routines and Accuracy Drills
A chipping net really shines when you pair it with simple drills that build distance control and accuracy. Mixing up beginner ladder drills with accuracy games keeps things fresh and actually helps you get better.
Beginner Distance and Ladder Drills
Ladder drills teach you how different swing lengths change the carry and rollout, no need to switch clubs. Set your net at a fixed distance and mark out three spots at 5, 10, and 15 feet in front. Hit three chips to each marker, aiming to land the ball in each zone.
Use one club for this drill. A gap wedge or pitching wedge is fine. The goal isn’t to overhaul your swing, just to feel the difference a shorter or longer backswing makes. Jot down how many balls land in each target out of 10.
Simple progression:
- Week 1: Stick with one distance
- Week 2: Alternate between two
- Week 3: Go through all three in sequence
You’ll start to build real distance control around the green when you can predict how far the ball will go with different swings.
Target Zone and Accuracy Challenges
Accuracy drills force you to aim for something specific, not just bash balls into the net. Divide your net into zones using tape or hang towels at different heights for high flop shots or low runners.
Set up three challenge levels:
Easy: Land 7 out of 10 chips anywhere in the net from 10 yards
Medium: Hit the middle third of the net 6 out of 10 times
Hard: Land inside a marked circle (use a hula hoop or tape) 5 out of 10 attempts
Switch clubs and see how loft changes your accuracy. Most folks find a pitching wedge gives a tighter pattern than a lob wedge. Track your scores each week to see progress.
Add some pressure. Maybe time yourself or make yourself hit two perfect shots in a row before moving to the next level. It’s a fun way to mimic the nerves you feel on the course.
Intermediate and Advanced Practice Games
Once you've nailed the basics, competitive games really spice up your chipping sessions and push your skills in new ways. One of our favorites is "21 Points," where you score by landing shots in different target zones (inner circle = 3 points, middle ring = 2 points, outer net = 1 point).
Here are a few variation games we like:
| Game | Rules | Skill Focus |
|---|---|---|
| Around the World | Move to 5 different positions, must land 2/3 at each spot | Adaptability |
| Beat Your Best | Record your best 10-shot accuracy score, try to beat it | Consistency |
| Club Roulette | Randomly select clubs, hit 3 with each | Versatility |
Advanced players can add some stakes. If you miss the target zone, you have to make that shot twice before moving on. It's a little frustrating sometimes, but that challenge really builds mental toughness for those nerve-wracking up-and-downs on the course.
Honestly, we've seen more progress from 15 minutes of structured games than from 45 minutes of just whacking balls. The trick is to make every shot count and let your chipping practice net give you instant feedback.
Adapting Shot Variety and Trajectory Control
When you start messing around with ball flight, your chipping net turns into a pretty versatile training tool. Practicing different trajectories and landing spots with a bunch of clubs helps you get ready for whatever lies around the green.
Practicing Flop Shots and Low Chips
Pulling off a flop shot means opening your clubface at address and using more wrist hinge than you would for a standard chip. Try starting with a lob or sand wedge, and move the ball a bit forward in your stance. The tough part? You have to trust yourself and accelerate through the shot instead of slowing down because you're worried about blading it.
Your net gives you quick feedback on how high you launch it. If you hit a proper flop, it'll fly high and land soft, usually in the top part of the net. Start close, maybe five yards, until you feel good about it, then back up as you get more confident.
For low chips, do the opposite. Grab a 9-iron or 8-iron, keep your hands in front of the ball, and make a shorter, firmer stroke. The ball should come out low and zip into the bottom section of your net. This shot's huge when you need to run the ball out or when the wind's howling.
Club Selection for Different Targets
Every club in your bag creates a slightly different flight with the same swing. Try putting your chipping net about 10 yards away and cycle through your wedges and short irons without changing your motion.
A sand wedge flies high and stops quickly. The pitching wedge gives you a mid-trajectory with a bit more roll. Go down to a 9-iron for a lower shot, or even an 8-iron or 7-iron for a classic bump-and-run.
Jot down what happens. After five shots with each club, note which ones consistently hit your target. This builds a mental library you'll use when you need to pull off a specific shot on the course.
Using Landing Zones for Real-World Scenarios
If your net has multiple targets or rings, treat each one like a landing zone on a real green. The front basket? That's a tight pin, so you need a high, soft shot. The back target? Imagine a deep pin where you can be more aggressive.
Mix it up by pretending the green is firm and fast one session. Aim for the lowest target with less loft. Next time, picture a soft green and fly the ball higher with a wedge.
This kind of mental practice bridges the gap between hitting into a net and playing real golf. You're not just hitting balls; you're rehearsing the exact shots and decisions you'll face on the course.
Maximizing Practice Session Value at Home
Home chipping practice gets a lot more productive when you track your progress, fix mistakes early, and keep things interesting. Focusing on these areas actually moves the needle on your short game.
Tracking Progress and Building Confidence
Keep a simple log to see how you're improving. Write down the date, how many balls you hit, your distance, and how many shots landed in the target. A notebook or your phone's notes app works fine.
Say you hit 20 balls at 10 yards and get 8 in the net on Monday, then 12 by Friday. That's real progress you can see. These little wins actually build your confidence because you know your practice is paying off.
Set weekly goals that are specific, not vague. Instead of "get better at chipping," try "land 15 out of 20 balls in the target from 8 yards with my pitching wedge." You'll know exactly when you hit that goal.
Another tip: record short video clips of your setup and swing every few weeks. You'll spot changes in your posture or ball position that affect your contact. Watching yourself really helps you connect feel with reality.
Common Mistakes and How to Avoid Them
The most common mistake? Just hammering balls into the net without a specific target or plan. If you fire off 50 balls without thinking, you won't learn much about distance control. Always pick a target ring or basket and commit to a yardage.
A lot of golfers stick to comfortable shots. If you always chip with your sand wedge from perfect lies, you won't get better where it counts. Mix in different clubs and challenge yourself with tougher lies, thicker grass, hardpan, whatever you can find.
Rushing kills your practice. Five minutes of focused chipping beats 20 minutes of mindless swinging. Pause between shots, reset your setup, and picture the shot before you hit.
Don’t forget your setup. At home, it's easy to get sloppy with ball position and weight. Check your fundamentals every few shots: weight forward, ball back, hands ahead.
Involving Family or Friends for Extra Motivation
Practice is way more fun with someone else. Ask a family member to call out random targets or distances while you chip. It adds unpredictability, which is way more realistic than hitting the same shot over and over.
Make it a competition. Each of you gets 10 balls, and you score points based on which ring you hit. The pressure makes you focus, and honestly, it's just more fun.
If your partner or kids don't golf, they can still help by tracking your makes and misses. Just having someone watch usually makes you focus more and take the session seriously.
Set up a regular time with a golf buddy. If you know someone’s coming over for chipping drills on Tuesday night, you’re way more likely to stick with it. Plus, you can swap tips and see if a tweak helps the other person right away.
Frequently Asked Questions
Here are quick answers to common questions about using a golf chipping net for short, effective practice sessions at home.
How much space do I realistically need to set up a chipping net in my backyard, garage, or basement?
For most short chipping drills, 10 to 15 feet between you and the net is enough. Aim for 8 to 10 feet of width so you have room for slight misses.
Indoors, check that your ceiling is high enough for your swing. Around 8 feet usually works for basic chips, but always keep windows, walls, pets, and people safely out of the way.
What's a simple 10-minute chipping routine I can repeat daily without overthinking it?
Hit 10 chips with a pitching wedge, then 5 chips with a sand wedge, all from the same distance. Focus on clean contact and a steady landing spot.
Finish with 5 random shots using different targets or swing lengths. This gives you 20 focused reps without making practice feel complicated.
How far should I stand from the net to practise different carry distances and trajectories?
Start around 10 yards if you have the space. Move closer for softer touch shots, or step back for longer pitch practice.
You can also stay at one distance and change clubs. A sand wedge will fly higher, while a 9-iron or 8-iron will usually come out lower with more roll.
Which clubs make the most sense for short daily sessions: pitching wedge, gap wedge, sand wedge, or something else?
A pitching wedge and sand wedge are enough for most daily practice. The pitching wedge helps with lower chips and rollout, while the sand wedge is useful for higher, softer shots.
If you have a gap wedge, add it when you want more variety. Keep each session focused on two or three clubs so you build confidence faster.
How can I make practice more game-like using targets, scoring, or randomised shots instead of just hitting the same chip?
Give each target pocket or ring a point value, then try to reach a set score. For example, center target equals 3 points, outer target equals 1 point, and a miss equals 0.
You can also write club names or distances on paper and choose one before each shot. This makes practice feel closer to real course decisions.
What's the best way to protect walls, windows, and floors when practising chips indoors with limited space?
Place the net away from windows and fragile items. Add blankets, foam padding, or a soft barrier behind and beside the net for extra protection.
Use a hitting mat to protect floors and avoid swinging when pets or kids are nearby. Foam balls are also a safer option for tight indoor spaces.
Partager:
How to Prevent Freezer Burn With Proper Sealing, Labeling, and Portion Size
Chipping Net vs Putting Mat: Which Helps Beginners Improve Faster?