

Check out our latest compact vacuum sealer for food collection!
Leftovers don’t have to be a letdown. We’ve all microwaved last night’s dinner and ended up with something dry, soggy, or just not right. But honestly, with a few tweaks to how you store things, leftovers can come pretty close to the original magic.
If you want restaurant-quality leftovers, focus on cooling them fast, packing them right, and reheating them the way that suits each dish. Sure, most people know to toss leftovers in the fridge within two hours, but there’s a lot more to it. The right container can make or break your meal. Preventing sogginess, keeping things moist, and making sure food stays safe, all of it matters if you want that “day one” taste.
Let’s dig into the science of cooling, the best containers, and how to bring leftovers back to life. Whether you’re saving stir-fry or a holiday feast, these real-world strategies will help you actually look forward to leftovers.
Key Takeaways
- Chill and refrigerate leftovers within two hours, in airtight containers
- Always reheat leftovers to 165°F, and use the right method for each dish
- Most leftovers last 3–4 days in the fridge, or up to six months in the freezer
Understanding Leftovers and Why Storage Matters
Good storage can turn what might be a risky afterthought into a meal that’s almost as tasty as when you first made it. The line between delicious leftovers and spoiled food? It’s all about how you handle them, knowing what counts as a leftover, where things can go wrong, and sticking to a few basic safety habits.
What Qualifies as a Leftover
Anything cooked that you didn’t eat right away counts as a leftover. That’s your restaurant takeout, the half-pan of lasagna from Sunday, even a lone slice of pizza.
As soon as food drops below 140°F, the countdown starts. The “danger zone” is between 40°F and 140°F, where bacteria thrive. So, leftover safety really begins at the table, not just when you stash things away.
Restaurant leftovers need the same care as home-cooked ones. The source doesn’t matter—how you handle them does.
Risks of Poor Storage Practices
Leaving food out for more than two hours? That’s prime time for bacteria. If it’s hot in your kitchen—over 90°F—you only get an hour before things get dicey.
Leftovers pick up bacteria from the air and other foods, especially if you don’t use airtight containers. That’s how you end up with dry, funky-smelling food that’s not safe to eat.
You can’t trust your eyes or nose to tell if leftovers are safe. Harmful bacteria don’t always make food look or smell off.
Cross-contamination is sneaky. Using the same utensils or containers for raw and cooked foods without washing up spreads bacteria.
Basics of Food Safety for Leftovers
Get leftovers into the fridge within two hours—faster if it’s hot out. Breaking up big batches into shallow containers helps them cool fast.
Keep your fridge at or below 40°F. Most leftovers are good for 3–4 days if you store them right.
When it’s time to reheat, make sure everything hits 165°F. A food thermometer is your friend here. Soups and gravies? Bring them to a rolling boil.
Always use clean, airtight containers or wrap food tight. That keeps bacteria out and stops leftovers from drying out.
Rapid Cooling and Timing: Winning the Race Against the Danger Zone
Getting hot food chilled fast isn’t just a nice idea—it’s what keeps leftovers safe. The time between cooking and refrigeration is when bacteria go wild, so you’ve got to move quickly and use the right tricks.
Why Temperature Control is Critical
Bacteria love the “danger zone” (40°F–140°F). If food sits out at room temp, it’s basically a petri dish for germs that can make you sick.
You’ve got two hours to get food into the fridge before things get sketchy. If your kitchen is sweltering (over 90°F), you only get an hour.
Don’t worry about letting food cool to room temp before refrigerating. Modern fridges can handle it, and cooling food fast matters way more than worrying about your appliance.
Fast Cooling Techniques for Different Foods
Big batches cool slowly, so split them up. A huge pot of soup? Divide it into shallow containers—no more than 2–3 inches deep. More surface area means faster cooling.
For a roast or turkey, slice it up before storing. Leaving it whole means the center stays warm way too long.
Need to speed things up? Use an ice bath. Put your hot food in a container, then set that in a bigger bowl of ice and water. Stir it every so often. You don’t need a fancy blast chiller—just a little patience.
Recognizing the Danger Zone and Acting Fast
Keep an eye on the clock when food comes off the stove. Set a timer if you’re busy or distracted.
Critical timing benchmarks:
- 0–2 hours: Still safe to refrigerate
- 2–4 hours: Risky—use your best judgment
- Over 4 hours: Toss it
Some foods need extra attention—rice, pasta, creamy sauces, cooked veggies, anything with meat or seafood. These are bacteria magnets.
Never taste food to check if it’s safe. If you’re not sure how long it’s been out, just pitch it.
How to Store Leftovers Like a Pro
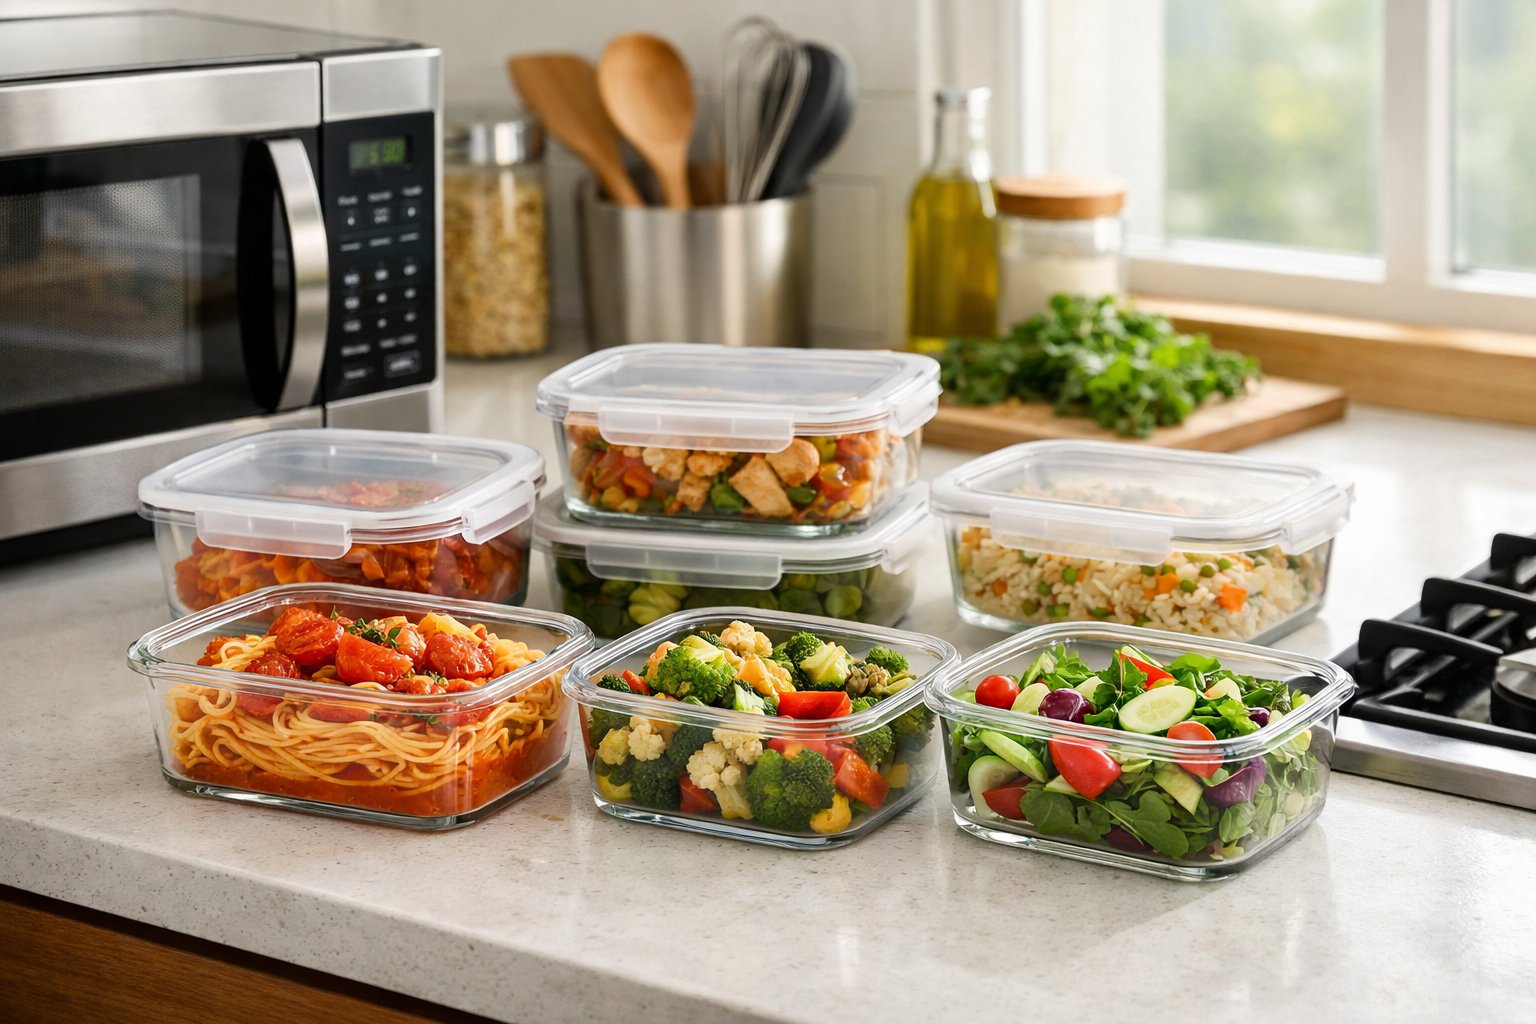
The difference between sad, soggy leftovers and food that actually tastes good the next day comes down to three things: real airtight containers, shallow layers that cool fast, and clear labels to keep you organized.
Using Airtight Containers for Maximum Freshness
Not all containers are worth your trust. Airtight ones are key—they keep moisture in and air (plus bacteria) out.
Glass containers with locking lids are my go-to. They don’t stain or smell, and you can see what’s inside. BPA-free plastic can work, too, but check that the seals are tight and the lids actually snap shut.
Want to test it? Seal the container, flip it upside down. If anything leaks, it’s not airtight. Keep a few sizes around—don’t cram food in or leave too much empty space.
What to look for:
- Lids with four-point locks or silicone gaskets
- Clear sides (so you don’t forget what’s in there)
- Stackable shapes to save space
- Microwave-safe materials
The Power of Shallow Containers and Perfect Portioning
Shallow containers are a game-changer. Spread food no more than two inches deep so it cools fast—from 140°F to 40°F in under two hours.
Tall, deep containers keep the center hot too long. I’ve lost good soup to this mistake before.
Portioning matters, too. Divide meals into single servings or family-size batches before storing. That way, you only reheat what you’ll eat, and it heats evenly—no more ice-cold centers.
Soups and stews? Fill containers only three-quarters full so there’s room for expansion if you freeze them. For solid foods, press them into a flat layer.
Wrapping and Labeling: Locking in Flavor and Safety
Even airtight containers benefit from an extra layer. Wrap individual pieces of meat, cheese, or baked goods in plastic wrap or foil before putting them in the container. This helps lock in moisture and keeps freezer burn away if you’re storing things longer.
Labeling is non-negotiable. Stick a piece of tape or a label on every container. Write what’s inside and the date. Permanent marker works, or use an erasable one if you reuse containers.
Why bother? Because the 3–4 day rule is real. Labels help you keep track of what needs to go first. For the freezer, add a “use by” date—usually about three months out.
Quick labeling guide:
| Storage Location | Use Within | Label Info Needed |
|---|---|---|
| Refrigerator | 3–4 days | Food name, storage date |
| Freezer | 2–3 months | Food name, storage date, use-by date |
Refrigerating and Freezing Leftovers by the Book
Most leftovers are good for 3–4 days in the fridge, and 3–4 months in the freezer before they start to lose quality. The trick is to chill food fast, keep your fridge at 40°F or lower, and use airtight containers that actually do their job.
How Long Leftovers Actually Last
Get leftovers in the fridge within two hours of cooking (or one hour if it’s hot out). Once chilled, most cooked foods are safe for 3–4 days at 40°F or below.
Frozen leftovers are safe indefinitely at 0°F, but after 3–4 months, you’ll notice they get dry and lose flavor.
The clock starts when you cook the food, not when you put it in the fridge. If you thaw something in the fridge, you get another 3–4 days before you need to use it up.
Refrigeration Rules You Should Never Ignore
Your fridge needs to stay at 40°F or below. An appliance thermometer helps, since those built-in displays aren’t always spot-on.
Divide big batches into shallow containers before refrigerating. A huge pot of stew takes forever to cool down in one big bowl—bacteria love that.
Hot food can go straight into the fridge. Don’t let it hang out on the counter. For really big batches, an ice bath helps speed things up.
Cut meat into smaller pieces before chilling. Slice up that roast or turkey breast. It cools faster and is easier to reheat later.
Freezer-Safe Containers and Avoiding Freezer Burn
Freezer-safe containers need real airtight seals to keep freezer burn away. Look for ones labeled “freezer-safe”—regular containers can crack when it gets cold.
Leave about half an inch of headspace in containers with liquids (they expand when frozen). For solid foods, pack them tight to push out extra air.
Heavy-duty foil, freezer paper, and quality freezer bags are your friends. Double-wrap if you’re planning to store things for a while.
Glass works, too, as long as it’s tempered for freezing. Just don’t shock it with sudden temperature changes or you’ll end up with a mess.
How to Thaw and Reheat Leftovers for Flawless Results
Thawing leftovers safely keeps bacteria in check, and the right reheating method brings back the flavor and texture you want. A food thermometer takes the guesswork out—make sure your food hits 165°F all the way through.
Safe Ways to Thaw Frozen Leftovers
Honestly, the refrigerator is still the safest route for thawing frozen leftovers. We just move containers from the freezer to the fridge the night before—figure on 8-12 hours for a slow, steady thaw. This keeps everything below 40°F, which is where you want it.
If we're in a hurry, cold water thawing can save the day. We seal leftovers in a waterproof bag, dunk them in cold water, and swap out the water every 30 minutes or so. Most things are good to go in 1-2 hours with this trick.
The microwave is the speed demon here, but you’ve got to reheat right after defrosting. We use the defrost setting, pausing every few minutes to break up icy patches. Never leave thawed food sitting on the counter—bacteria love that 40°F to 140°F window.
Countertop thawing? We skip it. The outside gets too warm before the inside’s even close to thawed. Not worth the risk.
Reheating Methods That Retain Taste and Texture
The oven’s a classic for a reason. We preheat to 325-350°F, cover dishes with foil to keep things moist, and give casseroles or baked pasta about 20-30 minutes. Proteins like chicken or steak do better at a lower temp—around 250°F—so they don’t dry out.
Stovetop reheating lets us tweak the texture as we go. For saucy dishes, we add a splash of water or broth and heat over medium-low, stirring often. Rice and grains perk up nicely with just a tablespoon of liquid per cup.
Air fryers are kind of a game-changer for anything that should stay crispy. Fried foods, roasted veggies, pizza—they all get their crunch back at 350°F for 3-5 minutes. Air circulation really makes a difference.
Best Methods by Food Type:
- Crispy items: Air fryer or oven
- Saucy dishes: Stovetop with a bit of liquid
- Casseroles: Covered in oven
- Meats: Low oven temp or gentle stovetop
Using a Food Thermometer for Peace of Mind
A food thermometer is your friend for reheating leftovers safely. We stick the probe into the thickest part, steering clear of bones or the container bottom. Everything needs to hit 165°F to knock out lingering bacteria.
For big casseroles or mixed dishes, we check a few spots since heat can be uneven. It’s a quick process—instant-read digital thermometers give us a reading in a couple of seconds. We clean the probe with hot, soapy water between uses to keep things safe.
When reheating on the stovetop, we always stir well before checking the temp. That way, the heat’s distributed and we get a true read on the whole dish.
Preventing Spoilage, Mold, and Unwanted Odors
Catching early signs of spoilage and using smart storage keeps leftovers safe and your fridge smelling decent. It’s not just about quality—it’s about health, too.
Spotting the Signs: When to Toss It
Trust your senses. If you see mold, weird color changes, or a slimy layer, it’s time to let go. Any fuzzy spots, no matter the color, mean mold—just toss it.
Smell can tell you a lot. Sour, off, or just “wrong” odors mean bacteria are probably having a party. Don’t taste-test questionable food.
Texture’s another clue. Slimy chicken, veggies that have gone from soft to mushy, or rice that’s clumped and sticky in a weird way? Probably not safe.
When to discard immediately:
- Visible mold or odd discoloration
- Sour, rancid, or just plain weird smells
- Slimy or super-sticky surfaces
- Food stored longer than 3-4 days (for most things)
- Anything left out at room temp over 2 hours
Smart Habits for a Fresh Fridge
We cool food quickly before sealing it up. Hot food creates condensation, and that just speeds up spoilage. Let things cool for 15-20 minutes, but get them into the fridge within 2 hours.
Airtight containers are non-negotiable. They keep bacteria out, moisture in, and stop your pasta from smelling like last night’s fish. Glass is usually better than plastic for fighting odors and keeping temps steady.
We keep the fridge at 40°F or below—no exceptions. Leftovers go on upper or middle shelves where temps are most stable. Raw meats? They stay on the bottom shelf in case of leaks.
Label everything with the date. Just grab some masking tape and a marker. It saves you from playing “what is this and when did I make it?”
Frequently Asked Questions
Good storage starts with airtight containers and quick cooling. Reheating works best when you match the method to how the food was originally cooked. It really comes down to controlling temperature and moisture—otherwise, leftovers just aren’t the same.
What's the best way to store leftovers to maintain that just-cooked flavor when reheating?
Get leftovers into airtight containers and into the fridge within two hours. Glass is ideal—it doesn’t pick up odors, and you can use it in the oven or microwave.
Divide big portions into shallow containers (no more than two inches deep). This helps food chill out fast and evenly, which keeps bacteria at bay and flavor intact.
Let food stop steaming for about 15-20 minutes before sealing and chilling. Don’t wait too long, though—modern fridges can handle a bit of warmth, but the danger zone is real.
How can I avoid the common pitfalls that cause reheated leftovers to dry out?
Moisture is everything. A splash of water, broth, or stock brings dried-out food back to life and creates steam for gentler heating.
In the microwave, we cover dishes with a damp paper towel. It keeps things from getting rubbery or dried out.
Cover your food during reheating whenever you can—a lid or foil traps steam, so the surface doesn’t dry out while the inside gets hot.
Are there any golden rules for how long I can leave my gourmet creations in the fridge before they lose their panache?
Most cooked dishes are good for 3-4 days in the fridge at 40°F or below. Seafood’s a bit more delicate—eat it within 1-2 days.
We always label with the date. Honestly, nobody’s memory is perfect, and mystery containers just waste space and food.
For longer storage, freeze leftovers within that 3-4 day window. Meat and poultry last 2-6 months frozen, while soups and casseroles hold up for 2-3 months.
What clever tips can I follow to ensure my leftovers taste as fabulous reheated as they did on the first serve?
Match the reheating method to how the food was originally cooked. Crispy or roasted foods go in the oven or air fryer, not the microwave.
For pizza, we use a dry skillet on medium heat and cover it until the cheese melts. The crust stays crisp, and the toppings heat through without sogginess.
Let proteins like steak or roasted chicken sit out for 20-30 minutes before reheating. This keeps the outside from overcooking while the inside warms up.
Could you spill the tea on the perfect reheating techniques to keep my meal-prep game strong and flavors on point?
The oven’s best for getting crispy textures back. We set it to 350°F-400°F and use a wire rack so air can circulate and keep things from getting soggy.
The stovetop is our go-to for soups, stews, and saucy pasta. Heat slowly over medium-low, stir now and then, and add a bit of liquid if things have thickened up in the fridge.
Microwaves shine with high-moisture foods like rice, steamed veggies, and casseroles. Add a tablespoon of water per cup of rice, cover with a damp paper towel, and let the steam do its thing.
Always reheat to 165°F. It’s the magic number for food safety and flavor revival—no one wants cold spots or bland leftovers.
Is there a secret to refrigerating and reheating leftovers in a way that even food critics would applaud?
We only reheat what we actually plan to eat. Letting food pass through the temperature danger zone more than once after cooking just invites trouble, so we don’t keep warming up the whole batch over and over.
Honestly, the air fryer’s a game-changer for bringing fried foods and pizza back to life. It’s fast like a microwave, but it crisps things up like an oven, usually takes just 3 or 4 minutes at 350°F. Kind of magic, really.
Texture matters, too. For stuff like fried chicken, we’ll leave it uncovered in the fridge for about an hour first. That way, extra moisture has a chance to escape before we seal it up.
Share:
Why Sealing Method Matters for Maintaining Food Texture
Why Some Storage Containers Fail Even When They Look Airtight